在 TensorFlow 之中进行数据增强
在我们之前的学习之中,我们所使用的数据都是进行一些 “简单的处理”,比如正则化、归一化、分批次等基本操作;这些操作都有一些特点,那就是在固定的数据集上进行处理,也就是说这些处理并不会改变数据的数量(甚至可能会减少数据的数量,比如数据筛选)。
那么这节课我们便来学习一下如何在 TensorFlow 之中数据增强,它可以增加数据量,从而可以使用更多样的数据来训练模型。
1. 什么是数据增强
关于数据增强,我们可以在 TensorFlow API 之中看到相关的定义:
A technique to increase the diversity of your training set by applying random (but realistic) transformations.
翻译一下就是:
数据增强是一种通过应用随机(但现实)的变换来增加训练集的多样性的技术。
简单来说,通过数据增强,我们可以将一些已经存在的数据进行相应的变换(可以选择将这些变换之后的数据增加到新的原来的数据集之中,也可以直接在原来的数据集上进行变换),从而实现数据种类多样性的增加。
数据增强常见于图像领域,因此这节课我们会以图像处理为例来解释如何在 TensorFlow 之中进行数据增强。
对于图片数据,常见的数据增强方式包括:
- 随机水平翻转:
- 随机的裁剪;
- 随机调整明亮程度;
- 其他方式等。
2. 如何在 TensorFlow 之中进行图像数据增强
在 TensorFlow 之中进行图像数据增强的方式主要有两种:
- 使用 tf.keras 的预处理层进行图像数据增强;
- 使用 tf.image 进行数据增强。
这两种各有不同的特点,但是因为我们要采用 tf.keras 进行模型的构建,因此我们重点学习如何使用 tf.keras 的预处理层进行图像数据增强。
1. 如何使用 tf.keras 的预处理层进行图像数据增强
使用 tf.keras 的预处理层进行图像数据增强要使用的最主要的 API 包括在一下包之中:
tf.keras.layers.experimental.preprocessing
在这个包之中,我们最常用的数据增强 API 包括:
- tf.keras.layers.experimental.preprocessing.RandomFlip(mode): 将输入的图片进行随机翻转,一般我们会取 mode=“horizontal” ,因为这代表水平旋转;而 mode=“vertical” 则代表随机进行上下翻转;
- tf.keras.layers.experimental.preprocessing.RandomRotation§: 按照旋转角度(单位为弧度) p 将输入的图片进行随机的旋转;
- tf.keras.layers.experimental.preprocessing.RandomContrast§:按照 P 的概率将输入的图片进行随机的图像色相翻转;
- tf.keras.layers.experimental.preprocessing.CenterCrop(height, width):使用 height * width 的大小的裁剪框,在数据的中心进行裁剪。
以上介绍的是我们在数据增强处理之中使用的最多的增强方式,在接下来的学习之中,我们会以该方式为例进行程序的演示。
在使用的过程之中,我们只需要将这些数据增强的网络层添加到网络的最底层即可。
2. 使用 tf.image 进行数据增强
使用 tf.image 是 TensorFlow 最原生的一种增强方式,使用这种方式可以实现更多、更加个性化的数据增强。
其中包含的数据增强方式主要包括:
- tf.image.flip_left_right (img):将图片进行水平翻转;
- tf.image.rgb_to_grayscale (img):将 RGB 图像转化为灰度图像;
- tf.image.adjust_saturation (image, f):将 image 图像按照 f 参数进行饱和度的调节;
- tf.image.adjust_brightness (image, f):将 image 图像按照 f 参数进行亮度的调节;
- tf.image.central_crop (image, central_fraction):按照 p 的比例进行图片的中心裁剪,比如如果 p 是 0.5 ,那么裁剪后的长、宽就是原来图像的一半;
- tf.image.rot90 (image):将 image 图像逆时针旋转 90 度。
可以看到,很多的 tf.image 数据增强方式并不提供随机化选项,因此我们需要手动进行随机化。
也正是因为上述特性,tf.image 数据增强主要用在一些自定义的模型之中,从而可以实现数据增强的自定义化。
3. 使用 tf.keras 的预处理层进行数据增强的实例
在这里,我们仍然采用我们熟悉的猫狗分类的例子来进行程序的演示,我们的代码和之前的代码相同,只是我们新增加了两个数据增强的处理层:
    tf.keras.layers.experimental.preprocessing.RandomFlip("horizontal_and_vertical",
                input_shape=(Height, Width ,3)),
    tf.keras.layers.experimental.preprocessing.RandomRotation(0.2),
其中第一个层表示进行随机的水平和垂直翻转,而第二个层表示按照 0.2 的弧度值进行随机旋转。
整体的网络程序为:
import tensorflow as tf
import os
import matplotlib.pyplot as plt

dataset_url = 'https://storage.googleapis.com/mledu-datasets/cats_and_dogs_filtered.zip'
path_download = os.path.dirname(tf.keras.utils.get_file('cats_and_dogs.zip', origin=dataset_url, extract=True))
train_dataset_dir = path_download + '/cats_and_dogs_filtered/train'
valid_dataset_dir = path_download + '/cats_and_dogs_filtered/validation'

BATCH_SIZE = 64
TRAIN_NUM = 2000
VALID_NUM = 1000
EPOCHS = 15
Height = 128
Width = 128

train_image_generator = tf.keras.preprocessing.image.ImageDataGenerator(rescale=1./255)
valid_image_generator = tf.keras.preprocessing.image.ImageDataGenerator(rescale=1./255)

train_data_generator = train_image_generator.flow_from_directory(batch_size=BATCH_SIZE,
                              directory=train_dataset_dir,
                              shuffle=True,
                              target_size=(Height, Width),
                              class_mode='binary')
valid_data_generator = valid_image_generator.flow_from_directory(batch_size=BATCH_SIZE,
                              directory=valid_dataset_dir,
                              shuffle=True,
                              target_size=(Height, Width),
                              class_mode='binary')

model = tf.keras.models.Sequential([
    tf.keras.layers.experimental.preprocessing.RandomFlip("horizontal_and_vertical",
                input_shape=(Height, Width ,3)),
    tf.keras.layers.experimental.preprocessing.RandomRotation(0.2),
    tf.keras.layers.Conv2D(16, 3, activation='relu'),
    tf.keras.layers.MaxPooling2D(),
    tf.keras.layers.Conv2D(32, 3, activation='relu'),
    tf.keras.layers.MaxPooling2D(),
    tf.keras.layers.Conv2D(64, 3, activation='relu'),
    tf.keras.layers.MaxPooling2D(),
    tf.keras.layers.Flatten(),
    tf.keras.layers.Dense(512, activation='relu'),
    tf.keras.layers.Dense(1)
])

model.compile(optimizer='adam',
       loss=tf.keras.losses.BinaryCrossentropy(from_logits=True),
       metrics=['accuracy'])
model.summary()

history = model.fit_generator(
    train_data_generator,
    steps_per_epoch=TRAIN_NUM // BATCH_SIZE,
    epochs=EPOCHS,
    validation_data=valid_data_generator,
    validation_steps=VALID_NUM // BATCH_SIZE)

acc = history.history['accuracy']
loss=history.history['loss']

val_acc = history.history['val_accuracy']
val_loss=history.history['val_loss']

epochs_ran = range(EPOCHS)

plt.plot(epochs_ran, acc, label='Train Acc')
plt.plot(epochs_ran, val_acc, label='Valid Acc')
plt.show()

plt.plot(epochs_ran, loss, label='Train Loss')
plt.plot(epochs_ran, val_loss, label='Valid Loss')
plt.show()
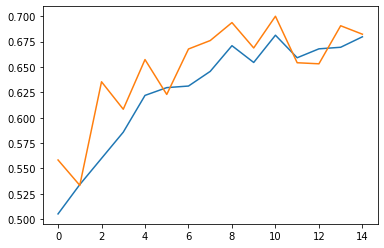
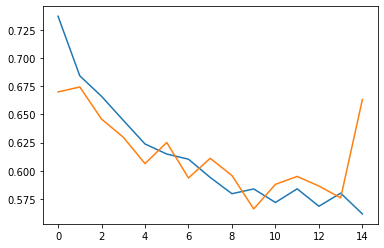
在训练结束后,我们可以得到如下结果,而这个结果与我们之前的结果有了一个良好的提升,最高达到了 79% 的准确率,因此我们认为我们的数据增强起到了一定的作用。
Found 2000 images belonging to 2 classes.
Found 1000 images belonging to 2 classes.
Model: "sequential_2"
_________________________________________________________________
Layer (type)                 Output Shape              Param #
=================================================================
random_flip_1 (RandomFlip)   (None, 128, 128, 3)       0
_________________________________________________________________
random_rotation_1 (RandomRot (None, 128, 128, 3)       0
_________________________________________________________________
conv2d_6 (Conv2D)            (None, 126, 126, 16)      448
_________________________________________________________________
max_pooling2d_6 (MaxPooling2 (None, 63, 63, 16)        0
_________________________________________________________________
conv2d_7 (Conv2D)            (None, 61, 61, 32)        4640
_________________________________________________________________
max_pooling2d_7 (MaxPooling2 (None, 30, 30, 32)        0
_________________________________________________________________
conv2d_8 (Conv2D)            (None, 28, 28, 64)        18496
_________________________________________________________________
max_pooling2d_8 (MaxPooling2 (None, 14, 14, 64)        0
_________________________________________________________________
flatten_2 (Flatten)          (None, 12544)             0
_________________________________________________________________
dense_4 (Dense)              (None, 512)               6423040
_________________________________________________________________
dense_5 (Dense)              (None, 1)                 513
=================================================================
Total params: 6,447,137
Trainable params: 6,447,137
Non-trainable params: 0
_________________________________________________________________
Epoch 1/15
31/31 [==============================] - 40s 1s/step - loss: 0.7372 - accuracy: 0.5052 - val_loss: 0.6700 - val_accuracy: 0.5583
......
Epoch 11/15
31/31 [==============================] - 41s 1s/step - loss: 0.5219 - accuracy: 0.8213 - val_loss: 0.5480 - val_accuracy: 0.7900
......
同时我们的程序还会输出以下两个图片:
准确率变化曲线:

损失变化曲线:

4. 小结
通过这节课的学习,我们了解到了什么是数据增强,同时也明白了如何在 TensorFlow 之中进行数据增强(两种不同的实现方式)。最后我们会很据以前的程序进行改进,得到了一个完整的程序示例。
