相对布局 RelativeLayout
在上一节中我们讲到了 LinearLayout,这也是大家学到的第一个布局方式。它支持将多个 View 通过线性的方式(水平或垂直)组合起来,其中最实用的就是 weight 属性,用好 weight 可以让你的线性布局更灵活美观。
然而,在上一节的例子中我们发现,如果需要在多个方向上进行布局,就要嵌套多个 LinearLayout,可以想象如果我们的 UI 足够复杂,那么从工作量和性能上都将是一场噩梦。所以这里要引出另一种布局方式——RelativeLayout(相对布局),很多时候需要嵌套多个 LinearLayout 才能实现的布局,使用 RelativeLayout 一层就能够完成。真的有这么神奇?学完你就知道。
1. RelativeLayout 的特性
顾名思义,相对布局就是让内部的 View 根据其他 View 或者 Parent 的位置来确定自己的摆放位置和尺寸。
比如你买了套沙发,你告诉师傅把沙发放到客厅内,面对电视机并且和茶几平行,靠墙摆放。其中沙发就是我们的目标 View,客厅就是 Parent,电视机和茶几就是其他的 View。这样一来,就能够准确的确定出你希望摆放的位置。
RelativeLayout 的原理就是这样,我们可以指定某个 View 相对于它的兄弟 View 而言的摆放位置(比如在 TextView 的左边 10 dp或者在上面 25 dp),另外也可以指定它在父布局(RelativeLayout)中的摆放位置。RelativeLayout 应该说是在 Android GUI 设计中最常用的布局方式,接下来我们来学习一下 RelativeLayout 的具体用法。
2. RelativeLayout 的对齐方式
由于在 LinearLayout 中已经对很多通用属性做过介绍,如果不清楚可以查看 7.2 小节的内容,这里就不在赘述 Layout 的设置项,而着重讲解 RelativeLayout 中比较特殊的设置属性。
注:为了方便学习演示,本节中的示例都默认将 RelativeLayout 的长宽设置成 match_parent,即整个屏幕的显示区域都是 RelativeLayout。
2.1 居中布局
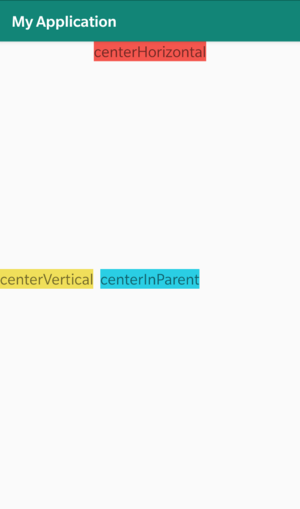
当你希望 View 能够在父布局中居中摆放时,你可以有以下3种属性选择:
-
android:layout_centerHorizontal=“true”:
这个属性会让你的View在父布局中水平居中,如上图中红色 View 所示,由于 RelativeLayout 占满全屏,所以它最终会在屏幕的水平方向上居中显示。 -
android:layout_centerVertical=“true”:
这个属性会让你的View在父布局中垂直居中,如上图中黄色 View 所示,它最终会在屏幕的垂直方向上居中显示。 -
android:layout_centerInParent="true"
看到这里,聪明的你应该能猜到,接下来就是在两个方向上居中显示。没错,这个属性能够让你在父布局中整体居中显示,如上图的蓝色 View 所示,它最终将摆放在屏幕的正中央。
参考代码如下:
<?xml version="1.0" encoding="utf-8"?>
<RelativeLayout xmlns:android="http://schemas.android.com/apk/res/android"
    xmlns:tools="http://schemas.android.com/tools"
    android:layout_width="match_parent"
    android:layout_height="match_parent"
    tools:context=".MainActivity">

    <TextView
        android:layout_width="wrap_content"
        android:layout_height="wrap_content"
        android:layout_centerHorizontal="true"
        android:background="#F75549"
        android:text="centerHorizontal"
        android:textSize="20sp" />

    <TextView
        android:layout_width="wrap_content"
        android:layout_height="wrap_content"
        android:layout_centerVertical="true"
        android:background="#F1E14D"
        android:text="centerVertical"
        android:textSize="20sp" />

    <TextView
        android:layout_width="wrap_content"
        android:layout_height="wrap_content"
        android:layout_centerInParent="true"
        android:background="#14CEE6"
        android:text="centerInParent"
        android:textSize="20sp" />
</RelativeLayout>
2.2 与父布局对齐
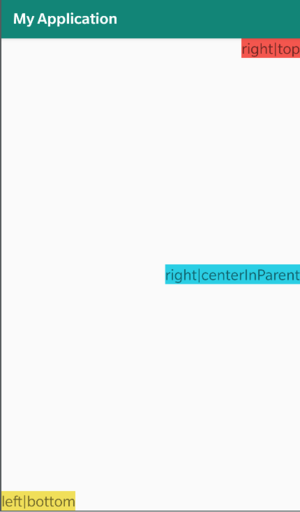
接下来的几个属性能够将 View 固定在相对于父布局任意一条边固定距离的位置。
-
android:layout_alignParentTop=“true”:
使用layout_alignParentTop属性可以让你的View与父布局的顶端对齐,同时由于RelativeLayout的长宽是match_parent,所以最终的效果就是显示在屏幕的最上方。 -
android:layout_alignParentBottom=“true”:
使用layout_alignParentBottom属性可以让你的View与父布局的底部对齐,最终的效果就是显示在屏幕的最下方。 -
android:layout_alignParentLeft=“true”:
使用layout_alignParentBottom属性可以让你的View与父布局的左侧对齐,最终的效果就是显示在屏幕的最左侧。 -
android:layout_alignParentRight=“true”:
使用layout_alignParentRight属性可以让你的View与父布局的右侧对齐,最终的效果就是显示在屏幕的最右侧。
注:以上几个对齐属性都可以多个搭配使用,比如我们上图中的几个View,分别是右上对齐、左下对齐和右中对齐
参考代码如下:
<?xml version="1.0" encoding="utf-8"?>
<RelativeLayout xmlns:android="http://schemas.android.com/apk/res/android"
    xmlns:tools="http://schemas.android.com/tools"
    android:layout_width="match_parent"
    android:layout_height="match_parent"
    tools:context=".MainActivity">

    <TextView
        android:layout_width="wrap_content"
        android:layout_height="wrap_content"
        android:layout_alignParentTop="true"
        android:layout_alignParentRight="true"
        android:background="#F75549"
        android:text="right|top"
        android:textSize="20sp" />

    <TextView
        android:layout_width="wrap_content"
        android:layout_height="wrap_content"
        android:layout_alignParentLeft="true"
        android:layout_alignParentBottom="true"
        android:layout_centerVertical="true"
        android:background="#F1E14D"
        android:text="left|bottom"
        android:textSize="20sp" />

    <TextView
        android:layout_width="wrap_content"
        android:layout_height="wrap_content"
        android:layout_alignParentRight="true"
        android:layout_centerInParent="true"
        android:layout_centerVertical="true"
        android:background="#14CEE6"
        android:text="right|centerInParent"
        android:textSize="20sp" />
</RelativeLayout>
2.3 将 View 添加到一个兄弟布局的相对位置
以上是设置 View 与父布局的相对位置,当 RelativeLayout 中有了 View 之后,我们同样可以设置 View 与其他兄弟 View 的位置关系。
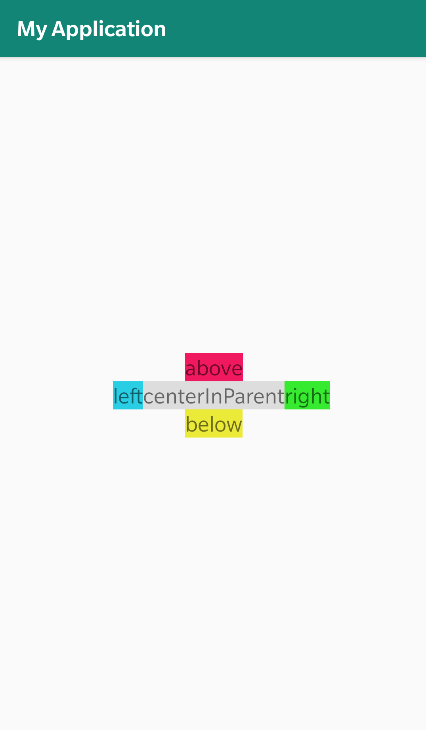
- android:layout_above="@id/center":
这个属性设置当前 View 摆放在 id 为 center 的 View 的上方。 - android:layout_below="@id/center":
设置当前View摆放在 id 为 center 的 View 的下方。 - android:layout_toLeftOf="@id/center":
设置当前 View 摆放在 id 为 center 的 View 的左边。 - android:layout_toRightOf="@id/center":
设置当前 View 摆放在 id 为 center 的 View 的右边。
注:可以看到这个属性是需要指定一个 id 的,所以我们需要给被依赖的兄弟 View 赋予一个 id。但是要注意的是与赋予 id 时用“+id”不同,在指定兄弟 View 的时候,不需要写“+id”,即直接写 id 即可。
参考代码如下:
<?xml version="1.0" encoding="utf-8"?>
<RelativeLayout xmlns:android="http://schemas.android.com/apk/res/android"
    xmlns:tools="http://schemas.android.com/tools"
    android:layout_width="match_parent"
    android:layout_height="match_parent"
    tools:context=".MainActivity">

    <TextView
        android:id="@+id/center"
        android:layout_width="wrap_content"
        android:layout_height="wrap_content"
        android:layout_centerInParent="true"
        android:background="#FFdddddd"
        android:text="centerInParent"
        android:textSize="20sp" />

    <TextView
        android:layout_width="wrap_content"
        android:layout_height="wrap_content"
        android:layout_above="@id/center"
        android:layout_centerInParent="true"
        android:background="#F30C5D"
        android:text="above"
        android:textSize="20sp" />

    <TextView
        android:layout_width="wrap_content"
        android:layout_height="wrap_content"
        android:layout_below="@id/center"
        android:layout_centerInParent="true"
        android:background="#ECEC18"
        android:text="below"
        android:textSize="20sp" />

    <TextView
        android:layout_width="wrap_content"
        android:layout_height="wrap_content"
        android:layout_centerInParent="true"
        android:layout_toLeftOf="@id/center"
        android:background="#14CEE6"
        android:text="left"
        android:textSize="20sp" />

    <TextView
        android:layout_width="wrap_content"
        android:layout_height="wrap_content"
        android:layout_centerInParent="true"
        android:layout_toRightOf="@id/center"
        android:background="#25EC0F"
        android:text="right"
        android:textSize="20sp" />
</RelativeLayout>
2.4 让 View 与兄弟 View 对齐
类似与父布局的对齐方式,你可以使用以下几个属性将 View 与一个已有的兄弟 View 对齐。
- android:layout_alignTop="@id/center":
设置 View 与 id 为 center 的 View 顶端对齐。 - android:layout_alignBottom="@id/center"
设置 View 与 id 为 center 的 View 底部对齐。 - android:layout_alignLeft="@id/center"
设置 View 与 id 为 center 的 View 左侧对齐。 - android:layout_alignRight="@id/center"
设置 View 与 id 为 center 的 View 右侧对齐。 - android:layout_alignBaseLine="@id/center"
设置 View 与 id 为 center 的 View 的基准线对齐。
3. RelativeLayout 的相对距离
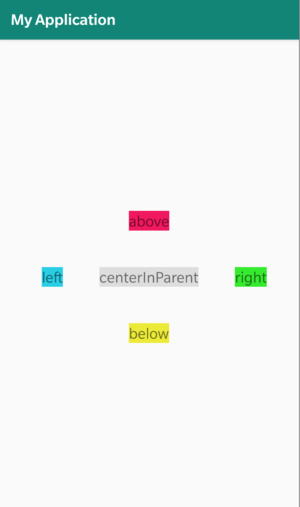
在上面的例子中,可以发现我们可以通过属性设置 View 与 View 之间、View 与父布局之间的相对位置,但是发现 View 都是贴在一起或者贴着边的,并不美观。其实 RelativeLayout 除了可以设置相对位置及对齐方式以外,还可以在此基础之上设置两个 View、View 与父布局之间的间距,设置间距和 LinearLayout 布局的一样:
- layout_margin: 设置元素与周围其他元素的间距,类似的还可以设置单边的间距:
- layout_marginRight
- layout_marginTop
- layout_marginLeft
- layout_marginBottom
注:margin 是可以为负数的,感兴趣的同学可以可以自行测试查看效果
我们在 2.3 小节示例中添加以上四种上下左右间距之后,效果如图:
4. 小结
本节介绍了更为灵活的布局方式——RelativeLayout,它的核心是可以任何设置 View 与父布局、View 与 View 之间的对齐方式及相对位置,并在其基础之上设置与目标的相对距离,在大多数的实战场景中,我们会将 LinearLayout 和 RelativeLayout 结合使用,往往会产生意想不到的效果。