状态栏通知:Notification
Notification 是一种可以在 App 之外给用户弹出消息通知的控件,当我们告诉系统有一个消息需要通知用户的时候,系统首先会在通知栏展示一个 icon,然后通过下拉通知栏我们可以查看详细的通知内容。非常适合于在推送新闻、好友消息、广告等场景使用,目前几乎所有的 App 都有这种类型的通知,大家平时在使用 Android 系统的时候一定会经常遇到,今天我们就一起来学习这种通知方式的用法。
1. Notification 的特性
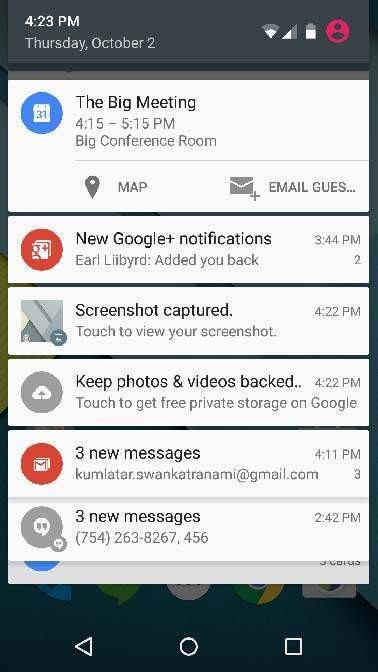
在上一节我们学习了 Toast,它提供了一种简单易用的展示提示信息的方法,但是它只能做短暂的提示,而相比之下,Notification 可以让消息长时间的停留在通知栏,适合于一些内容比较多并且需要长时间停留的消息通知。通常在顶部通知栏会有 icon 显示,有些手机甚至会配上 LED 灯的闪烁,如图:

如果想要看详细的通知内容,可以通过下拉的方式展开通知列表,然后点击我们想要看的通知栏目即可,如图:

2. Notification 的基本使用
我们可以直接创建 Notification,但是这样不利于我们设置自己的样式,好在 Android 系统为 Notification 提供了一个构建者,我们可以通过 Builder 来自定义各种属性,Builder 常用 API 如下:
- setAutoCancel(boolean autoCancel):
- 设置当用户点击通知之后,通知是否要自动消失。
- setContent(RemoteViews views) :
设置一个自定义的 View 来替换系统标准的 View,从而实现自定义通知样式。 - setContentInfo(CharSequence info):
设置通知的大文本内容(通常位于通知的右边)。 - setContentIntent(PendingIntent intent):
设置一个PendingIntent供Notification被点击的时候使用。 - setContentText(CharSequence text):
设置通知的内容文本。 - setContentTitle(CharSequence title):
设置通知的标题文本。 - setDefaults(int defaults):
设置Notification的默认选项。 - setSmallIcon(int icon):
设置通知的小 icon(通常位于右下角)。 - setLargeIcon(Bitmap bitmap):
设置通知的大 icon(通常位于左边)。 - setTicker(CharSequence ticker):
设置收到通知时在系统顶部显示的提示内容。 - setWhen(long when):
设置通知的时间,通知列表会按照这个值进行排序。 - setVibrate(long[] pattern):
设置收到通知时的振动频率。 - setLights(int argb, int onMs, int offMs):
设置 LED 灯样式(需要设备支持且设置 Flag 为Notification.FLAG_SHOW_LIGHTS),方法参数依次是:灯光颜色, 亮的时长,灭的时长。 - setSound(Uri uri):
设置接收到通知时的铃声。 - setOngoing(boolean ongoing):
设置当前是否正在进行一个通知。
3. Notification 使用示例
3.1 Notification 的创建与展示
Android 系统为我们提供了一套非常简单的方法去创建 Notification,只需要按照以下步骤即可轻松使用:
Step 1: 创建 Notification Builder
创建 Notification 之前我们要构建一个 Notification Builder,关于 Builder 我们在前文中提到过,通过它我们可以设置 Notification 各种各样的属性,比如大小图标、标题、内容、优先级等等,创建 Builder 的方式很简单,通过以下代码即可完成创建:
NotificationCompat.Builder mBuilder = new NotificationCompat.Builder(this)
Step 2: 设置 Notification 属性
一旦创建了 Builder,我们就可以通过它设置 Notification 的属性从而实现我们的需求了。从第 2 小节中我们了解到 Builder 的 API 非常之多,其实大多数 API 是很少用的,我们只需要了解就好,而以下 3 个是系统强制要求设置的:
- 设置小图标
mBuilder.setSmallIcon(R.drawable.notification_icon); - 设置通知标题
mBuilder.setContentTitle("Notification Alert, Click Me!"); - 设置通知内容
mBuilder.setContentText("Hi, This is Android Notification Detail!");
Step 3: 绑定事件
这一步是一个可选项,如果你有一些复杂的逻辑需要执行,那么可以给 Notification 绑定一个事件,让用户在点击通知栏的时候能够跳转到对应的 Activity 中完成相应的操作。
我们通过一个 PendingIntent 来完成绑定,PendingIntent 中包含一个可以启动 Activity 的 Intent。然后使用setContentIntent(PendingIntent intent)接口将 PendingIntent 和通知关联上,这样在通知列表中点击相应的通知就可以跳转到对应的 Activity 当中了,使用方法如下:
Intent intent = new Intent(context, Destination.class);
PendingIntent pendingIntent = PendingIntent.getActivity(context, 0, intent, 0);
Notification.Builder builder = new Notification.Builder(this);
mBuilder.setContentIntent(pendingIntent);
Step 4: 展示通知
最后,我们可以通过设置好的 Builder 构造出我们想要的 Notification,然后调用NotificationManager.notify()通知系统展示通知,示例代码如下:
NotificationManager notificationManager = (NotificationManager) getSystemService(Context.NOTIFICATION_SERVICE);
notificationManager.notify(notificationID, builder.build());
其中 notificationID 是当前通知的唯一 ID,后续可以它来更新Notification。
3.2 Notification 完整示例
如果你安装了慕课网 App,那么一定收到过一些精彩课程的推送信息,接下来我们就一起通过 Notification 完成一个新课程的更新通知。
3.2.1 编写布局
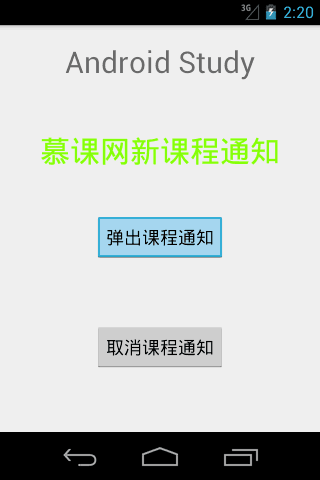
首先提供一个 Button 用于触发新课程的推送,然后一个 Button 用于取消这条推送,为了样式的美观,我们在加上一条App的标题和内容信息。整个的布局比较简单,主要由 4 个元素组成,代码如下:
<RelativeLayout xmlns:android="http://schemas.android.com/apk/res/android"
   xmlns:tools="http://schemas.android.com/tools"
   android:layout_width="match_parent"
   android:layout_height="match_parent"
   android:paddingBottom="@dimen/activity_vertical_margin"
   android:paddingLeft="@dimen/activity_horizontal_margin"
   android:paddingRight="@dimen/activity_horizontal_margin"
   android:paddingTop="@dimen/activity_vertical_margin"
   tools:context="MainActivity">

   <TextView
      android:id="@+id/tv_title"
      android:layout_width="wrap_content"
      android:layout_height="wrap_content"
      android:text="Android Study"
      android:layout_alignParentTop="true"
      android:layout_centerHorizontal="true"
      android:textSize="30dp" />

   <TextView
      android:id="@+id/tv_content"
      android:layout_width="wrap_content"
      android:layout_height="wrap_content"
      android:text="慕课网新课程通知"
      android:textColor="#ff87ff09"
      android:textSize="30dp"
      android:layout_below="@+id/tv_title"
      android:layout_centerHorizontal="true"
      android:layout_marginTop="48dp" />

   <Button
      android:layout_width="wrap_content"
      android:layout_height="wrap_content"
      android:text="取消课程通知"
      android:id="@+id/bt_cancel"
      android:layout_marginTop="62dp"
      android:layout_below="@+id/bt_show"
      android:layout_centerHorizontal="true" />
   <Button
      android:layout_width="wrap_content"
      android:layout_height="wrap_content"
      android:id="@+id/bt_show"
      android:text="弹出课程通知"
      android:layout_below="@+id/tv_content"
      android:layout_centerHorizontal="true"
      android:layout_marginTop="42dp" />
</RelativeLayout>
样式效果如下:

3.2.2 编写 MainActivity 逻辑
MainActivity 里面要做的事也比较简单,大体上只有两件事:
- 在点击“弹出课程通知”的时候创建 Builder 并通过设置相应的属性及提示信息,接着构造 Notification 并展示;
- 点击“取消课程通知”,则隐藏掉已经弹出的课程通知。
代码如下:
package com.emercy.myapplication;

import android.app.Activity;
import android.app.Notification;
import android.app.NotificationManager;
import android.app.PendingIntent;
import android.content.Context;
import android.content.Intent;
import android.os.Bundle;
import android.view.View;
import android.widget.Button;

public class MainActivity extends Activity {
   NotificationManager mManager;

   private static final int NOTIFICATION_ID = 0;

   @Override
   protected void onCreate(Bundle savedInstanceState) {
      super.onCreate(savedInstanceState);
      setContentView(R.layout.activity_main);

      ((Button)findViewById(R.id.bt_show)).setOnClickListener(new View.OnClickListener() {
         @Override
         public void onClick(View v) {
            addNotification();
         }
      });
      ((Button) findViewById(R.id.bt_cancel)).setOnClickListener(new View.OnClickListener() {
          @Override
          public void onClick(View v) {
        	  if (mManager != null) {
        		  mManager.cancel(NOTIFICATION_ID);
        	  }
          }
       });
   }

   private void addNotification() {
      Notification.Builder builder = new Notification.Builder(this)
         .setSmallIcon(R.drawable.icon)
         .setContentTitle("慕课网 Android 教程更新")
         .setContentText("状态栏通知:Notification");

      Intent notificationIntent = new Intent(this, NotificationActivity.class);
      PendingIntent contentIntent = PendingIntent.getActivity(this, 0, notificationIntent, PendingIntent.FLAG_UPDATE_CURRENT);
      builder.setContentIntent(contentIntent);

      mManager = (NotificationManager) getSystemService(Context.NOTIFICATION_SERVICE);
      mManager.notify(NOTIFICATION_ID, builder.build());
   }
}
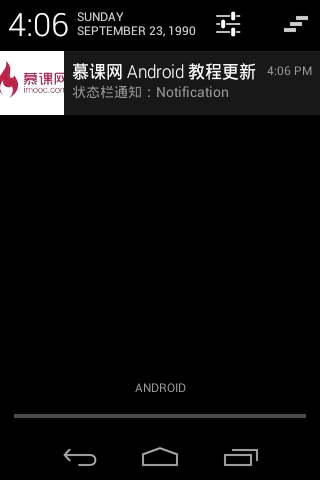
弹出的通知样式如下:

注意: 在代码中我们为 Notification 设置了 PendingIntent,而 PendingIntent 是通过一个 Intent 构造出来的,通过这个 Intent 我们可以将 Notification 和 NotificationActivity 绑定上,从而实现点击 Notification 跳转到相应 Activity 的功能,页面样式如下:
3.2.3 编写 NotificationActivity 及其布局页面
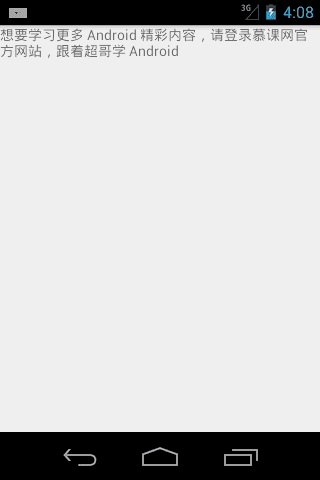
当用户在下拉通知菜单中点击我们弹出的 Notification 后,就可以进入推送的新课程页面了,这里就简单放一个TextView表示新课程的内容:
<?xml version="1.0" encoding="utf-8"?>
<LinearLayout xmlns:android="http://schemas.android.com/apk/res/android"
   android:layout_width="match_parent"
   android:layout_height="match_parent" >

   <TextView
      android:layout_width="match_parent"
      android:layout_height="400dp"
      android:text="想要学习更多 Android 精彩内容,请登录慕课网官方网站,跟着超哥学 Android" />
</LinearLayout>
然后创建一个空白的 NotificationActivity,设置布局为以上文件:
package com.emercy.myapplication;
import android.os.Bundle;
import android.app.Activity;

public class NotificationActivity extends Activity{
   @Override
   public void onCreate(Bundle savedInstanceState) {
      super.onCreate(savedInstanceState);
      setContentView(R.layout.notification);
   }
}
在通知列表中点击我们的 Notification 会跳转到课程的详情页,也就是 NotificationActivity,如下:

4. 小结
本节介绍了一个可以长时间停留,并且样式更丰富的通知消息,再点击的时候能够跳转到指定的 Activity 执行相应的业务逻辑。
为了更好的对 Notification 做定制化需求,系统为我们提供了一个 Builder 用于设置各种属性及样式,在创建之后通过NotificationManager来弹出通知,并且可以通过PendingIntent设置点击通知之后的跳转页面,只要按照正确的流程来使用,Notification 还是非常简单易用的。