在上一节中,我们讲到了所有的 Layout 都是从 ViewGroup 继承而来,它可以包含若干 View 并按照指定的规则将这个 View 摆放到屏幕上。那么接下来的章节我们就来学习一下 Android 的 UI 布局,Android 原生有六大布局,分别是: LinearLayout(线性布局)、RelativeLayout(相对布局)、TableLayout(表格布局)、FrameLayout(帧布局)、AbsoluteLayout(绝对布局)、GridLayout(网格布局),我们从最简单实用的一个布局开始:LinearLayout。
1. LinearLayout 的特性
LinearLayout 继承自 ViewGroup,可以将所包含的 View 按照线性方式一个一个的排列起来,即将 View 排列成一行(水平布局)或者排列成一列(垂直布局)。LinearLayout 有一个很关键的属性:android:orientation,可以用它来设置布局的方向,默认是横向。
2. 常用设置
在编写布局代码之前,我们先来了解一下 LinearLayout 常用的设置项。
2.1 基本属性:
- id: 布局唯一 id,用来在代码中通过 findViewById 查找该布局,获取布局对象
- layout_height: 设置布局高度,有三种可选值:
- 具体高度(dp、px)
- wrap_content: 布局高度由子 View 的高度而定
- match_parent: 布局高度占满父布局(等同于 fill_parent,后者已被废弃,后文将直接使用 match_parent 替代 fill_parent)
- layout_width: 设置布局宽度,同 layout_height
- layout_gravity: 设置布局在其父布局中的对齐方式,有以下几种常用值:
- top: 顶端对齐
- bottom: 底部对齐
- left: 居左对齐
- right: 居右对齐
- center: 居中对齐
可以组合使用,比如left|top表示左上对齐
- gravity: 设置布局内的各个 View / Viewgroup 的对齐方式,使用方法同 layout_gravity
- background: 设置布局的背景样式,可以用图片或者颜色作为背景
- layout_margin: 设置元素与周围其他元素的间距,类似的还可以设置单边的间距:
- layout_marginRight
- layout_marginTop
- layout_marginLeft
- layout_marginBottom
以上是大多数布局都会有的属性,在这一节讲的相对详细,后续出现可参考本节内容
2.2 特殊属性
- orientation: 线性布局的方向,前面提到过可以用它决定内部 View 的排列方向。
- layout_weight: 内部 View 的大小权重,这个是 LinearLayout 里很重要的一个设置,它将 LinearLayout 内部的 View 按照一定比例分配大小,具体使用后面会详细介绍
- divider: 设置布局之间的分割线,可以通过图片指定样式
- dividerPadding: 分割线之间的间距
- showDividers: 设置分割线的位置,有以下可选值:
- beginning: 在元素之前展示分割线
- end: 在元素之后展示分割线
- middle: 在每个元素之间展示分割线
- none: 不展示
3. 编写垂直样式布局
线性布局分为垂直和水平布局两种方式,在使用过程中除了方向不同,其余类似。本节仅演示垂直样式,水平样式相信你能够触类旁通。
顾名思义,垂直布局就是将内部 View 从上到下依次排成一列,为了便于理解,直接上代码,在我们新建的工程中,找到“res->layout->activity_main.xml”,编写代码如下:
<?xml version="1.0" encoding="utf-8"?>
<LinearLayout xmlns:android="http://schemas.android.com/apk/res/android"
    xmlns:tools="http://schemas.android.com/tools"
    android:layout_width="match_parent"
    android:layout_height="match_parent"
    android:orientation="vertical"
    tools:context=".MainActivity">

    <TextView
        android:layout_width="wrap_content"
        android:layout_height="wrap_content"
        android:textSize="30sp"
        android:text="Here"
        android:background="#E71B0C"/>

    <TextView
        android:layout_width="wrap_content"
        android:layout_height="wrap_content"
        android:textSize="30sp"
        android:text="Is"
        android:background="#E7430F"/>

    <TextView
        android:layout_width="wrap_content"
        android:layout_height="wrap_content"
        android:textSize="30sp"
        android:text="Imooc"
        android:background="#E6D11B"/>

    <TextView
        android:layout_width="wrap_content"
        android:layout_height="wrap_content"
        android:textSize="30sp"
        android:background="#88F10D"
        android:text="Android"/>

    <TextView
        android:layout_width="wrap_content"
        android:layout_height="wrap_content"
        android:textSize="30sp"
        android:background="#03A9F4"
        android:text="Study"/>

</LinearLayout>
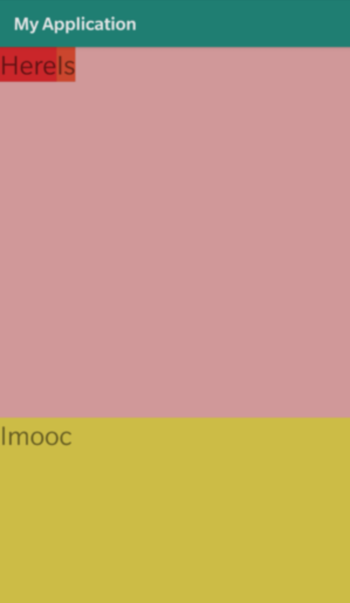
直接编译,效果如下:
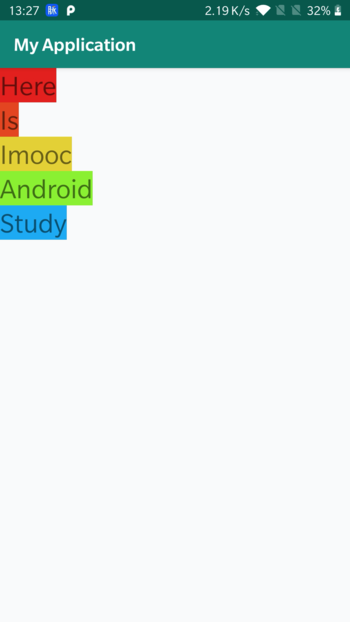
如图,在屏幕中有 5 个 TextView 按照垂直方向依次排成一列。注意,Layout 都是继承自 ViewGroup 的,在上一节我们说过 ViewGroup 也是 View,所以我们可以推理出 Layout 里面也是可以放 Layout 的。按照这个逻辑我们还可以在垂直布局中嵌套水平布局,比如我们希望把“Here Is”和“Android Study”这两个短语写到一排:
<?xml version="1.0" encoding="utf-8"?>
<LinearLayout xmlns:android="http://schemas.android.com/apk/res/android"
    xmlns:tools="http://schemas.android.com/tools"
    android:layout_width="match_parent"
    android:layout_height="match_parent"
    android:orientation="vertical"
    tools:context=".MainActivity">

    <LinearLayout
        android:layout_width="match_parent"
        android:layout_height="wrap_content"
        android:orientation="horizontal">

        <TextView
            android:layout_width="wrap_content"
            android:layout_height="wrap_content"
            android:background="#E71B0C"
            android:text="Here"
            android:textSize="30sp" />

        <TextView
            android:layout_width="wrap_content"
            android:layout_height="wrap_content"
            android:background="#E7430F"
            android:text="Is"
            android:textSize="30sp" />
    </LinearLayout>

    <TextView
        android:layout_width="wrap_content"
        android:layout_height="wrap_content"
        android:background="#E6D11B"
        android:text="Imooc"
        android:textSize="30sp" />

    <LinearLayout
        android:layout_width="match_parent"
        android:layout_height="wrap_content"
        android:orientation="horizontal">

        <TextView
            android:layout_width="wrap_content"
            android:layout_height="wrap_content"
            android:background="#88F10D"
            android:text="Android"
            android:textSize="30sp" />

        <TextView
            android:layout_width="wrap_content"
            android:layout_height="wrap_content"
            android:background="#03A9F4"
            android:text="Study"
            android:textSize="30sp" />
    </LinearLayout>

</LinearLayout>
直接运行:
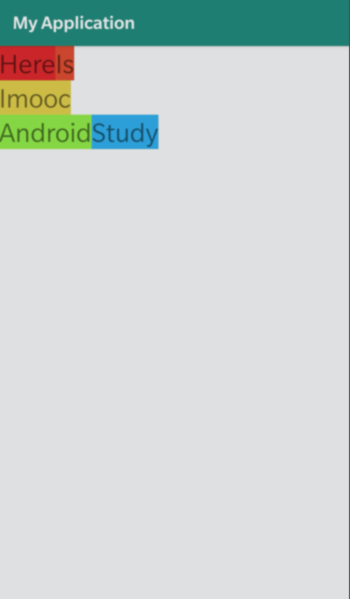
我们将“Here”和“Is”、“Android”和“Study”这四个 TextView 两两一组分别放到了一个水平样式的 LinearLayout 中,这样验证了,Layout 是可以嵌套使用的。
4. weight 的使用
以上是 LinearLayout 排列方式的使用,接下来讲到一个很关键的属性——weight,它可以使内部 View 按照一定的比例配置尺寸,有同学可能会有疑问,前面不是有layout_height及layout_width用来设置尺寸吗?那它和layout_weight有什么关系,会不会有什么冲突?带着这个疑问,一起学习 weight 的用法吧。
layout_weight是 LinearLayout 特有的一个属性,它很好的利用了线性布局的特点,让系统自适应的帮我们完成比例缩放。和你想的一样,它和layout_width及layout_height密不可分,他们的相互影响,最终的尺寸有很多种计算方法。这里提供一种我认为最简单的理解:
先按照 layout_height / layout_width 的设置分配所需大小,然后剩下的空间按照 weight 的比例分配,最终加起来的尺寸就是各个 View 的最终尺寸。
关于 layout_height / layout_width 可以大致分为 3 种情况:
- 高度 / 宽度设置为 0
- 高度 / 宽度为 wrap_content
- 高度 / 宽度为 match_parent
以下就针对这三种情况详细说明。
4.1 设置成 0 dp(重点)
这个是最直接,最常用的设置方式,也是我们需要掌握的重中之重。如果我们将高度设置成 0 dp,那么系统就会直接使用 weight 的比值作为尺寸比例分配给各个子 View。我们直接在上面的代码中进一步修改,不考虑内嵌的 LinearLayout,对 3 个子 View 添加 weight 属性,并加上背景色方便区分:
<?xml version="1.0" encoding="utf-8"?>
<LinearLayout xmlns:android="http://schemas.android.com/apk/res/android"
    xmlns:tools="http://schemas.android.com/tools"
    android:layout_width="match_parent"
    android:layout_height="match_parent"
    android:orientation="vertical"
    tools:context=".MainActivity">

    <LinearLayout
        android:layout_width="match_parent"
        android:layout_height="wrap_content"
        android:layout_weight="1"
        android:background="#EBA2A2"
        android:orientation="horizontal">

        <TextView
            android:layout_width="wrap_content"
            android:layout_height="wrap_content"
            android:background="#E71B0C"
            android:text="Here"
            android:textSize="30sp" />

        <TextView
            android:layout_width="wrap_content"
            android:layout_height="wrap_content"
            android:background="#E7430F"
            android:text="Is"
            android:textSize="30sp" />
    </LinearLayout>

    <TextView
        android:layout_width="match_parent"
        android:layout_height="wrap_content"
        android:layout_weight="2"
        android:background="#E6D11B"
        android:text="Imooc"
        android:textSize="30sp" />

    <LinearLayout
        android:layout_width="match_parent"
        android:layout_height="wrap_content"
        android:layout_weight="3"
        android:background="#AACCE7"
        android:orientation="horizontal">

        <TextView
            android:layout_width="wrap_content"
            android:layout_height="wrap_content"
            android:background="#88F10D"
            android:text="Android"
            android:textSize="30sp" />

        <TextView
            android:layout_width="wrap_content"
            android:layout_height="wrap_content"
            android:background="#03A9F4"
            android:text="Study"
            android:textSize="30sp" />
    </LinearLayout>

</LinearLayout>
效果如下:
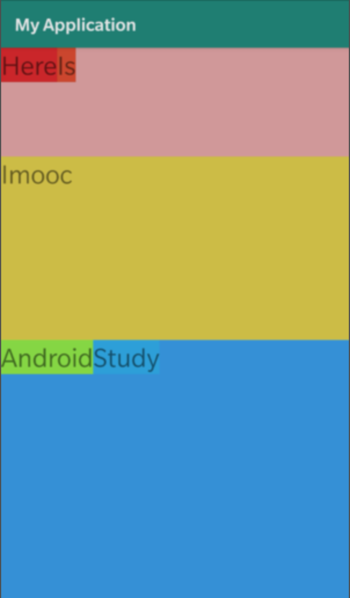
可以看到,3 个子 View 的高度正好是按照 1:2:3 排列。按照上面给出的计算方法,各个View的高度是 0,所以直接就是按照比例排列。
将高度/宽度写成 0 再使用 weight 属性是最直接最简单的方法,也是最常用最重要的方法,大家今后会经常用到,务必掌握!
4.2 设置成 wrap_content
我们将上面的代码中0dp直接修改成wrap_content再编译,会发现样式好像没有变,比例貌似也是 1:2:3。注意,很多地方会解释成wrap_content也是直接按照weight比例来分配,其实这是大错特错的。
我们在截屏上加上标志,仔细看看尺寸:
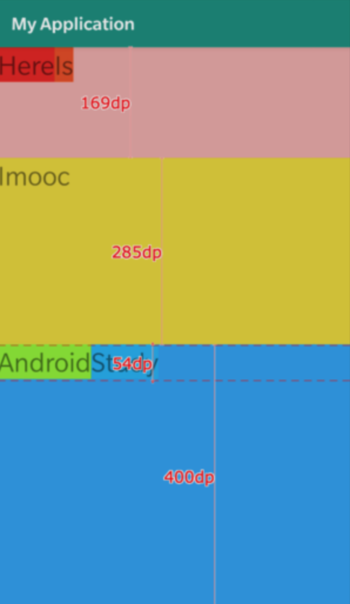
三个View的高度大约是 169、285、400,这个比例明显不符合 1:2:3 ,那这个比例是如何计算的呢?
我们再来回顾一下weight计算方式的定义,首先我们根据wrap_content计算高度,那么 3 个子 View 都是单行 size 相同的文字,所以本身高度一样,剩下部分按照 1:2:3 来分配。那么经过测量,单行高度是 54,我们将每个 View 的高度减去 54,得到剩余高度:
第一个View的剩余高度:169 - 54 = 115
第二个View的剩余高度:285 - 54 = 231
第三个View的剩余高度:400 - 54 = 346
这样一来,剩余的尺寸就刚好符合 1:2:3 了。
4.3 设置成 match_parent
match_parent的行为是最诡异的,但是如果理解了wrap_content,match_parent也就不难解释,先来看看效果,我们将代码中的wrap_content替换成match_parent再来看看效果:
我们会发现第三块直接消失了,这又是为什么呢?不要慌,我们还是套用一下定义。首先假定父布局高度是 X,那么 match_parent之后每个子View的高度都是 X,这样再按照比例分割剩下的 X - 3X。所以可以得到 3 个子 View 的高度分别是:
第一个View的高度:X + 1/6 * (X-3X) = (2/3)X
第二个View的高度:X + 2/6 * (X-3X) = (1/3)X
第三个View的高度:X + 3/6 * (X-3X) = 0
经过计算,非常合理!
5. 小结
这是大家学习的第一个 Layout,所以对属性的讲解会多也更详细,大家完全不必死记硬背,在今后熟悉了之后会发现其实大部分属性都大同小异。对于 LinearLayout 还有一些其他属性,比如前门提到过的 divider 等等,这个比较简单也比较容易理解,大家完全可以作为课后练习编写代码自行测试。
其实对于 LinearLayout 有很多的局限性,比如它只能按照一行或者一列排列,如果我希望从多个方向去实现布局, LinearLayout 就显得很蹩脚了,接下来一章我们会介绍一种非常灵活的布局,拭目以待。