Android Studio 检查改进代码
前一小节我们介绍了如何查找优质的 Android 代码示例,本小结我们学习如何通过 lint 来检查我们的代码,如何发现代码中存在的问题,保证应用能高效稳定的运行。
1. 什么是 lint
Android Studio 提供了一个名为 lint 的代码扫描工具,可帮助我们发现并更正代码结构质量的问题,而无需实际执行应用,也不必编写测试用例。系统会报告该工具检测到的每个问题并提供问题的描述消息和严重级别,以便我们可以快速确定需要优先进行的关键改进。此外,我们还可以降低问题的严重级别以忽略与项目无关的问题,或者提高严重级别以突出特定问题。
lint 工具可以检查 Android 项目源文件是否有潜在的错误,以及在正确性、安全性、性能、易用性、无障碍性和国际化方面是否需要优化改进。使用 Android Studio 时,无论何时构建应用,都会运行配置的 lint 和 IDE 检查。
下图显示了 lint 工具如何扫描处理文件:

-
应用源文件:源文件包含组成 Android 项目的文件,包括 Java、Kotlin 和 XML 文件、图标以及 ProGuard 配置文件;
-
lint.xml 文件:一个配置文件,可用于指定要排除的任何 lint 检查以及自定义问题严重级别;
-
lint 工具:一个静态代码扫描工具,我们可以从命令行或在 Android Studio 中对 Android 项目运行该工具;
-
lint 检查结果:我们可以在控制台或 Android Studio 的 Inspection Results 窗口中查看 lint 检查结果。
2. lint 的配置
默认情况下,当我们运行 lint 扫描时,lint 工具会检查它支持的所有问题。 我们也可以限制 lint 要检查的问题,并为这些问题分配严重级别。例如,我们可以禁止对与项目无关的特定问题进行 lint 检查,也可以将 lint 配置为以较低的严重级别报告非关键问题。
2.1 通过 lint 文件配置
我们可以在 lint.xml 文件中指定 lint 检查偏好设置。如果我们是手动创建此文件,请将其放置在 Android 项目的根目录下。
lint.xml 文件由封闭的 <lint> 父标记组成,此标记包含一个或多个 < issue > 子元素。lint 会为每个 < issue > 定义唯一的 id 属性值。
<?xml version="1.0" encoding="UTF-8"?>
<lint>
    <!-- list of issues to configure -->
</lint>
Tips:我们可以通过在 issue 标记中设置严重级别属性来更改某个问题的严重级别或对该问题停用 lint 检查。如需查看 lint 支持的问题及其对应的问题 ID 的完整列表,请运行 lint --list 命令。
以下是 lint.xml 文件示例:
<?xml version="1.0" encoding="UTF-8"?>
<lint>
    <!-- Disable the given check in this project -->
    <issue id="IconMissingDensityFolder" severity="ignore" />

    <!-- Ignore the ObsoleteLayoutParam issue in the specified files -->
    <issue id="ObsoleteLayoutParam">
        <ignore path="res/layout/activation.xml" />
        <ignore path="res/layout-xlarge/activation.xml" />
    </issue>

    <!-- Ignore the UselessLeaf issue in the specified file -->
    <issue id="UselessLeaf">
        <ignore path="res/layout/main.xml" />
    </issue>

    <!-- Change the severity of hardcoded strings to "error" -->
    <issue id="HardcodedText" severity="error" />
</lint>
2.2 通过 Gradle 配置
通过 Android Plugin for Gradle,我们可以使用模块级 build.gradle 文件中的 lintOptions {} 代码块配置某些 lint 选项,例如要运行或忽略哪些检查。以下代码段展示了可以配置的部分属性:
android {
  ...
  lintOptions {
    // Turns off checks for the issue IDs you specify.
    disable 'TypographyFractions','TypographyQuotes'
    // Turns on checks for the issue IDs you specify. These checks are in
    // addition to the default lint checks.
    enable 'RtlHardcoded','RtlCompat', 'RtlEnabled'
    // To enable checks for only a subset of issue IDs and ignore all others,
    // list the issue IDs with the 'check' property instead. This property overrides
    // any issue IDs you enable or disable using the properties above.
    check 'NewApi', 'InlinedApi'
    // If set to true, turns off analysis progress reporting by lint.
    quiet true
    // if set to true (default), stops the build if errors are found.
    abortOnError false
    // if true, only report errors.
    ignoreWarnings true
  }
}
...
2.3 在源文件中配置 Lint
配置 Java 的 lint 检查
要专门对 Android 项目中的某个类或方法停用 lint 检查,请向该代码添加 @SuppressLint 注释。
以下示例展示了如何对 onCreate 方法中的 NewApi 问题关闭 lint 检查。lint 工具会继续检查该类的其他方法中的 NewApi 问题。
@SuppressLint("NewApi")
@Override
public void onCreate(Bundle savedInstanceState) {
    super.onCreate(savedInstanceState);
    setContentView(R.layout.main);
以下示例展示了如何对 FeedProvider 类中的 ParserError 问题关闭 lint 检查:
@SuppressLint("ParserError")
public class FeedProvider extends ContentProvider {
要禁止 lint 检查文件中的所有问题,请使用 all 关键字,如下所示:
@SuppressLint("all")
配置 XML 的 lint 检查
我们通过 tools:ignore 属性对 XML 文件的特定部分停用 lint 检查。在 lint.xml 文件中添加以下命名空间值,以便 lint 工具能够识别该属性:
namespace xmlns:tools="http://schemas.android.com/tools"
以下示例展示了如何对 XML 布局文件的 < LinearLayout > 元素中的 UnusedResources 问题关闭 lint 检查。如果某个父元素声明了 ignore 属性,则该元素的子元素会继承此属性。在本例中,也会对 <TextView> 子元素停用 lint 检查。
<LinearLayout
    xmlns:android="http://schemas.android.com/apk/res/android"
    xmlns:tools="http://schemas.android.com/tools"
    tools:ignore="UnusedResources" >

    <TextView
        android:text="@string/auto_update_prompt" />
</LinearLayout>
要禁止检查多个问题,请使用以逗号分隔的字符串列出要禁止检查的问题。例如:
tools:ignore="NewApi,StringFormatInvalid"
要禁止 lint 检查 XML 元素中的所有问题,请使用 all 关键字,如下所示:
tools:ignore="all"
3. 如何运行 Lint
3.1 从命令行运行 lint
我们可以在项目的根目录下输入以下某个命令,使用 Gradle 封装容器 对项目调用 lint 任务:
- 在 Windows 上:
gradlew lint
- 在 Linux 或 Mac 上:
./gradlew lint
我们会看到类似于以下内容的输出:

lint 工具完成其检查后,会提供 XML 和 HTML 版 Lint 报告的路径。然后,我们可以转到 HTML 报告并在浏览器中将其打开,如下图所示:
3.2 从 Android Studio 运行 lint
在 Android Studio 中手动运行 lint 检查,请按如下步骤:
-
在 Android 视图中,打开我们的项目,然后选择要分析的项目、文件夹或文件;
-
从菜单栏中,依次选择 Analyze > Inspect Code;
-
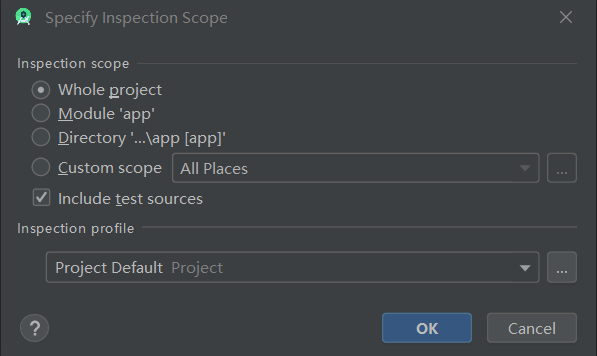
在 Specify Inspection Scope 对话框中,查看设置:
-
在 Inspection profile 下,保留默认配置文件 (Project Default);
-
点击 OK 以运行检查。

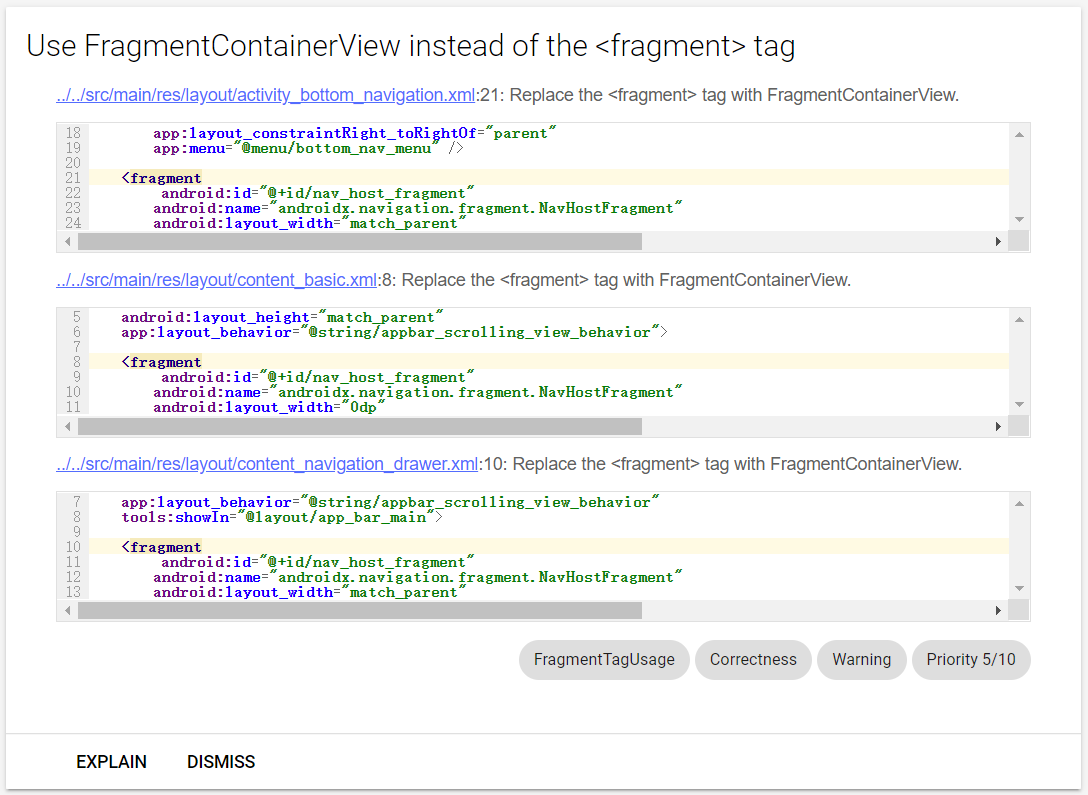
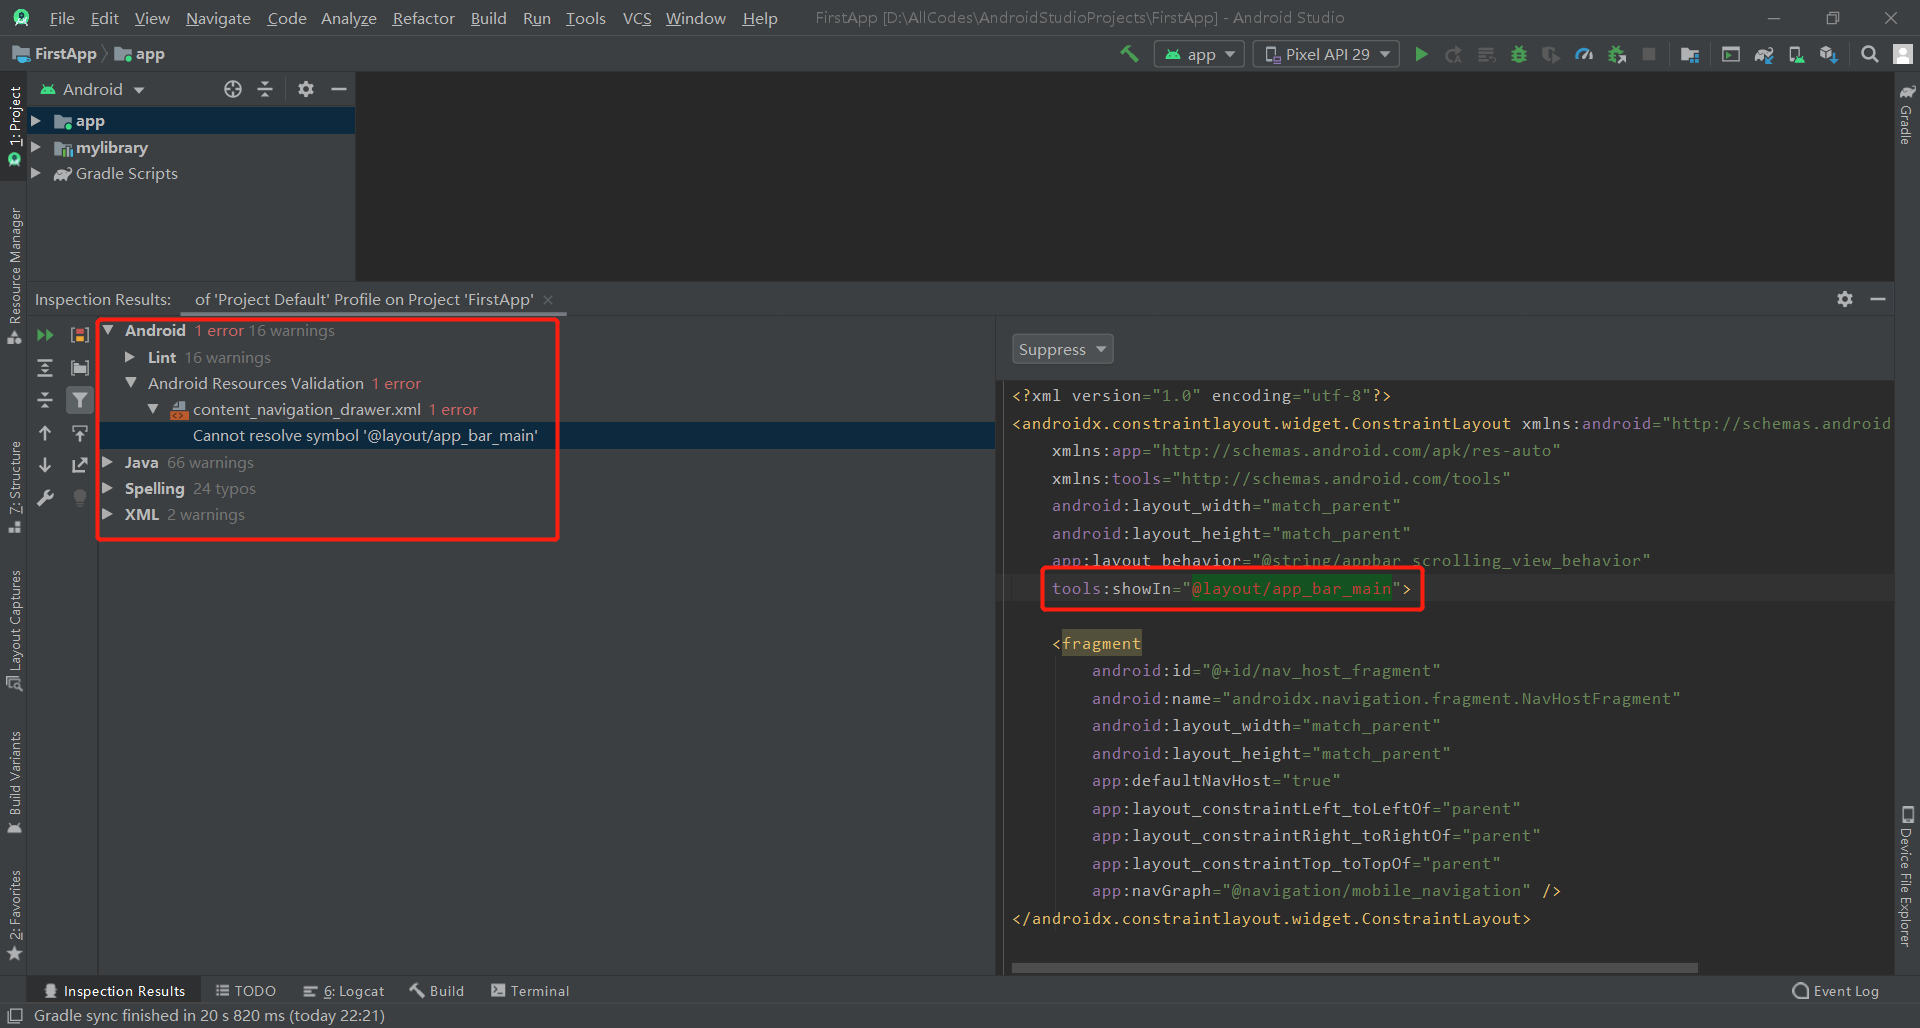
通过运行 Inspect Code 所生成的 lint 及其他 IDE 检查结果如下图:
-
在左侧窗格树状视图中,通过展开并选择错误类别、类型和问题来查看检查结果;
-
在右侧窗格显示选定错误类别、类型或问题的检查报告,并提供错误的名称和位置。在适用情况下,检查报告会显示问题概要等其他信息,以帮助我们更正问题;
-
在左侧窗格树状视图中,右键点击某个类别、类型或问题,以显示上下文菜单。根据上下文,我们可以执行以下全部或部分操作:跳到源代码、排除和包含选定项、抑制问题、修改设置、管理检查警报和重新运行检查。
4. 小结
本节课程我们主要学习了 Android Studio 如何通过 lint 来检查我们的代码。本节课程的重点如下:
- 了解如何配置 lint;
- 了解如何使用 lint 检查代码和更正问题。