
文章目录
AlertDialog使用
AlertDialog源码解析
总结
在Activity中展示AlertDialog
new AlertDialog.Builder(this) .setTitle("标题") .setMessage("内容") .setPositiveButton("确定", new DialogInterface.OnClickListener() { @Override public void onClick(DialogInterface dialog, int i) { dialog.dismiss(); } }) .setNegativeButton("取消", new DialogInterface.OnClickListener() { @Override public void onClick(DialogInterface dialog, int i) { dialog.dismiss(); } }) .create() .show(); 效果:

AlertDialog源码解析:
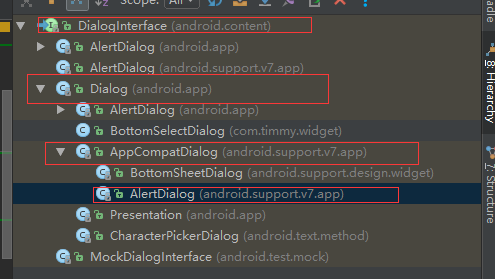
查看AlertDialog的继承(使用V7包中的)
查看AlertDialog的构造函数
1.发现AlertDialog的构造函数都是protected修饰的,所以可以知道在外部不能直接new出对象,需要使用静态内部类Builder,接下来会详细介绍
2.第一和第三个构造函数都会调用第二个构造函数,在第二个构造函数中主要处理了

protected AlertDialog(@NonNull Context context) {this(context, 0);}/*** Construct an AlertDialog that uses an explicit theme. The actual style* that an AlertDialog uses is a private implementation, however you can* here supply either the name of an attribute in the theme from which* to get the dialog's style (such as {@link R.attr#alertDialogTheme}.*/protected AlertDialog(@NonNull Context context, @StyleRes int themeResId) {super(context, resolveDialogTheme(context, themeResId));mAlert = new AlertController(getContext(), this, getWindow());}protected AlertDialog(@NonNull Context context, boolean cancelable,@Nullable OnCancelListener cancelListener) {this(context, 0);setCancelable(cancelable);setOnCancelListener(cancelListener);}
a.调用方法resolveDialogThrem(),确定Dialog主题,如果调用者没有设置自己的主题,就使用系统默认主题
b.实例化全局变量mAlert = new AlertController();该变量主要用来数据
static int resolveDialogTheme(@NonNull Context context, @StyleRes int resid) {if (resid >= 0x01000000) { // start of real resource IDs.return resid;} else {TypedValue outValue = new TypedValue();context.getTheme().resolveAttribute(R.attr.alertDialogTheme, outValue, true);return outValue.resourceId;}}
接着我们再看下AlertDialog的父类Dialog的构造函数做了那些操作
我们方法在Dialog也是做了初始化的操作,其中最重要的是处理化了Window对象
public Dialog(@NonNull Context context) {this(context, 0, true);}public Dialog(@NonNull Context context, @StyleRes int themeResId) {this(context, themeResId, true);}Dialog(@NonNull Context context, @StyleRes int themeResId, boolean createContextThemeWrapper) {if (createContextThemeWrapper) {if (themeResId == 0) {final TypedValue outValue = new TypedValue();context.getTheme().resolveAttribute(R.attr.dialogTheme, outValue, true);themeResId = outValue.resourceId;}mContext = new ContextThemeWrapper(context, themeResId);} else {mContext = context;}//通过上下文拿到窗体管理器WindowManagermWindowManager = (WindowManager) context.getSystemService(Context.WINDOW_SERVICE);//初始化Window,使用的是其子类PhoneWindowfinal Window w = new PhoneWindow(mContext);mWindow = w;w.setCallback(this);w.setOnWindowDismissedCallback(this);w.setWindowManager(mWindowManager, null, null);w.setGravity(Gravity.CENTER);//初始化HandlermListenersHandler = new ListenersHandler(this);}
Builder源码解析
Builder是AlertDialog中的一个静态内部类->查看构造函数
public static class Builder {private final AlertController.AlertParams P;private final int mTheme;public Builder(@NonNull Context context) {this(context, resolveDialogTheme(context, 0));}public Builder(@NonNull Context context, @StyleRes int themeResId) {P = new AlertController.AlertParams(new ContextThemeWrapper(context, resolveDialogTheme(context, themeResId)));mTheme = themeResId;}}
1.构造函数中主要初始化变量P = new AlertController.AlertParams(),该变量也是用来保存封装数据用的
接下来就是很多设置方法,并且这些设置的数据都是放在变量P中.
/*** 设置title,数据保存在P中的mTitle属性中*/public Builder setTitle(@StringRes int titleId) {P.mTitle = P.mContext.getText(titleId);return this;}public Builder setTitle(@Nullable CharSequence title) {P.mTitle = title;return this;}/*** 设置自己想要的title布局样式*/public Builder setCustomTitle(@Nullable View customTitleView) {P.mCustomTitleView = customTitleView;return this;}/*** 设置展示内容*/public Builder setMessage(@StringRes int messageId) {P.mMessage = P.mContext.getText(messageId);return this;}public Builder setMessage(@Nullable CharSequence message) {P.mMessage = message;return this;}/*** 设置title位置的icon*/public Builder setIcon(@DrawableRes int iconId) {P.mIconId = iconId;return this;}public Builder setIcon(@Nullable Drawable icon) {P.mIcon = icon;return this;}/*** 分别设置按钮文字和点击事件*/public Builder setPositiveButton(CharSequence text, final OnClickListener listener) {P.mPositiveButtonText = text;P.mPositiveButtonListener = listener;return this;}public Builder setNegativeButton(CharSequence text, final OnClickListener listener) {P.mNegativeButtonText = text;P.mNegativeButtonListener = listener;return this;}public Builder setNeutralButton(CharSequence text, final OnClickListener listener) {P.mNeutralButtonText = text;P.mNeutralButtonListener = listener;return this;}/*** 设置Dialog是否可以在外部点击消失,默认为true,在外部点击消失会回调接口OnCancelListener*/public Builder setCancelable(boolean cancelable) {P.mCancelable = cancelable;return this;}/*** 在外部点击消失会回调接口OnCancelListener*/public Builder setOnCancelListener(OnCancelListener onCancelListener) {P.mOnCancelListener = onCancelListener;return this;}/*** Dialog消失时调用dismiss()方法,进行回调*/public Builder setOnDismissListener(OnDismissListener onDismissListener) {P.mOnDismissListener = onDismissListener;return this;}/*** 按键点击事件监听,有返回boolean值,默认为false,表示dialog可以消失,如果返回true按返回键dialog不会消失,有特殊请求的可以在该回调方法中处理*/public Builder setOnKeyListener(OnKeyListener onKeyListener) {P.mOnKeyListener = onKeyListener;return this;}=============================================================================.setOnKeyListener(new DialogInterface.OnKeyListener() {@Overridepublic boolean onKey(DialogInterface dialog, int keyCode, KeyEvent event) {Logger.d("setOnKeyListener keyCode:"+keyCode);return false;}})=============================================================================
/*** 设置展示单选列表*/public Builder setItems(CharSequence[] items, final OnClickListener listener) {P.mItems = items;P.mOnClickListener = listener;return this;}/*** 也是单选,和上一种有区别*/public Builder setSingleChoiceItems(CharSequence[] items, int checkedItem, final OnClickListener listener) {P.mItems = items;P.mOnClickListener = listener;P.mCheckedItem = checkedItem;P.mIsSingleChoice = true;return this;}/*** 直接设置一个设配器,Dialog会展示一个listView*/public Builder setAdapter(final ListAdapter adapter, final OnClickListener listener) {P.mAdapter = adapter;P.mOnClickListener = listener;return this;}/*** 直接传入一个游标*/public Builder setCursor(final Cursor cursor, final OnClickListener listener,String labelColumn) {P.mCursor = cursor;P.mLabelColumn = labelColumn;P.mOnClickListener = listener;return this;}/*** 设置多选数据,和已选项*/public Builder setMultiChoiceItems(CharSequence[] items, boolean[] checkedItems,final OnMultiChoiceClickListener listener) {P.mItems = items;P.mOnCheckboxClickListener = listener;P.mCheckedItems = checkedItems;P.mIsMultiChoice = true;return this;}
上面的这些方法都是一些属性的设置,每个方法都有注释,方便查看,那将Dialog实例化,并展示出来是怎样的呢,我们接着往下看
/*** Dialog内容部分展示自己的布局界面*/public Builder setView(View view) {P.mView = view;P.mViewLayoutResId = 0;P.mViewSpacingSpecified = false;return this;}
实例化AlertDialog--create()方法
public AlertDialog create() {// 实例化final AlertDialog dialog = new AlertDialog(P.mContext, mTheme);//将Builder中变量P的数据,设置到AlertDialog的变量mAlertP.apply(dialog.mAlert);//还是设置dialog.setCancelable(P.mCancelable);if (P.mCancelable) {dialog.setCanceledOnTouchOutside(true);}dialog.setOnCancelListener(P.mOnCancelListener);dialog.setOnDismissListener(P.mOnDismissListener);if (P.mOnKeyListener != null) {dialog.setOnKeyListener(P.mOnKeyListener);}return dialog;}
我们看下P.apply()方法的实现:==>就是将P中保存的数据设置给AlertDialog的变量AlertController mAlert;
public void apply(AlertController dialog) {if (mCustomTitleView != null) {dialog.setCustomTitle(mCustomTitleView);} else {if (mTitle != null) {dialog.setTitle(mTitle);}if (mIcon != null) {dialog.setIcon(mIcon);}if (mIconId != 0) {dialog.setIcon(mIconId);}if (mIconAttrId != 0) {dialog.setIcon(dialog.getIconAttributeResId(mIconAttrId));}}if (mMessage != null) {dialog.setMessage(mMessage);}if (mPositiveButtonText != null) {dialog.setButton(DialogInterface.BUTTON_POSITIVE, mPositiveButtonText,mPositiveButtonListener, null);}if (mNegativeButtonText != null) {dialog.setButton(DialogInterface.BUTTON_NEGATIVE, mNegativeButtonText,mNegativeButtonListener, null);}if (mNeutralButtonText != null) {dialog.setButton(DialogInterface.BUTTON_NEUTRAL, mNeutralButtonText,mNeutralButtonListener, null);}//如果设置了mItems数据,表示是单选或者多选列表,则创建一个ListViewif ((mItems != null) || (mCursor != null) || (mAdapter != null)) {createListView(dialog);}//将mView设置给Dialogif (mView != null) {if (mViewSpacingSpecified) {dialog.setView(mView, mViewSpacingLeft, mViewSpacingTop, mViewSpacingRight,mViewSpacingBottom);} else {dialog.setView(mView);}} else if (mViewLayoutResId != 0) {dialog.setView(mViewLayoutResId);}/*dialog.setCancelable(mCancelable);dialog.setOnCancelListener(mOnCancelListener);if (mOnKeyListener != null) {dialog.setOnKeyListener(mOnKeyListener);}*/}

从上图中可以发现,AlertParams是AlertController的内部类,且他们都有相同的属性.这里使用的就是Builder设计模式的变种实现方式
再接着看AlertController的构造函数做了什么处理
public AlertController(Context context, AppCompatDialog di, Window window) {//赋值mContext = context;mDialog = di;mWindow = window;mHandler = new ButtonHandler(di);final TypedArray a = context.obtainStyledAttributes(null, R.styleable.AlertDialog,R.attr.alertDialogStyle, 0);//获取属性信息mAlertDialogLayout = a.getResourceId(R.styleable.AlertDialog_android_layout, 0);mButtonPanelSideLayout = a.getResourceId(R.styleable.AlertDialog_buttonPanelSideLayout, 0);mListLayout = a.getResourceId(R.styleable.AlertDialog_listLayout, 0);mMultiChoiceItemLayout = a.getResourceId(R.styleable.AlertDialog_multiChoiceItemLayout, 0);mSingleChoiceItemLayout = a.getResourceId(R.styleable.AlertDialog_singleChoiceItemLayout, 0);mListItemLayout = a.getResourceId(R.styleable.AlertDialog_listItemLayout, 0);mShowTitle = a.getBoolean(R.styleable.AlertDialog_showTitle, true);a.recycle();/*** 我们使用自定义的Title,所以Dialog不需要设置Window title*/di.supportRequestWindowFeature(Window.FEATURE_NO_TITLE);}
数据都准备好了,dialog也实例化了,最后来看Dialog是如何展示的,这里就是用到了Dialog.show()方法===>最最核心方法
public void show() {//Dialog正在展示的逻辑处理,直接returnif (mShowing) {if (mDecor != null) {if (mWindow.hasFeature(Window.FEATURE_ACTION_BAR)) {mWindow.invalidatePanelMenu(Window.FEATURE_ACTION_BAR);}mDecor.setVisibility(View.VISIBLE);}return;}mCanceled = false;//1.调用Dialog的onCreate()方法if (!mCreated) {dispatchOnCreate(null);} else {// Fill the DecorView in on any configuration changes that// may have occured while it was removed from the WindowManager.final Configuration config = mContext.getResources().getConfiguration();mWindow.getDecorView().dispatchConfigurationChanged(config);}//2.熟悉的onStart()方法onStart();//3.拿到Window的DecorView,该mWindow是在Dialog的构造函数中初始化得到mDecor = mWindow.getDecorView();if (mActionBar == null && mWindow.hasFeature(Window.FEATURE_ACTION_BAR)) {final ApplicationInfo info = mContext.getApplicationInfo();mWindow.setDefaultIcon(info.icon);mWindow.setDefaultLogo(info.logo);mActionBar = new WindowDecorActionBar(this);}//4.拿到窗体属性WindowManager.LayoutParams l = mWindow.getAttributes();if ((l.softInputMode& WindowManager.LayoutParams.SOFT_INPUT_IS_FORWARD_NAVIGATION) == 0) {WindowManager.LayoutParams nl = new WindowManager.LayoutParams();nl.copyFrom(l);nl.softInputMode |=WindowManager.LayoutParams.SOFT_INPUT_IS_FORWARD_NAVIGATION;l = nl;}//5.将mDecor添加到WindowManager中mWindowManager.addView(mDecor, l);mShowing = true;//6.发送消息,展示sendShowMessage();}
show()方法主要有6个核心方法:
通过dispatchOnCreate()方法来调用AlertDialog的onCreate()方法.(Dialog的onCreate()方法是一个空实现)
我们发现在AlertDialog的onCreate()方法中调用了mAlert的installContent()方法,根据方法名称,我们可以猜测这个方法的作用是内容视图的处理,我们往里面查看
@Overrideprotected void onCreate(Bundle savedInstanceState) {super.onCreate(savedInstanceState);mAlert.installContent();}
AlertController.installContent():
public void installContent() {final int contentView = selectContentView();mDialog.setContentView(contentView);setupView();}
在installContent()方法中又调用了三个方法,这三个方法是核心方法,
a.调用selectContentView()方法,获取Dialog的contentView,就是AlertDialogLayout的布局
private int selectContentView() {if (mButtonPanelSideLayout == 0) {return mAlertDialogLayout;}if (mButtonPanelLayoutHint == AlertDialog.LAYOUT_HINT_SIDE) {return mButtonPanelSideLayout;}return mAlertDialogLayout;}
b.dialog.setContentView();将上个方法获取的布局,设置给dialog,其实就是调用了Window的setContentView()方法,这一块和Activity的setContentView()方法的逻辑一样
public void setContentView(@LayoutRes int layoutResID) {mWindow.setContentView(layoutResID);}
c.最后调用了setupView()方法,就是布局控件的一些展示处理
首先我们看下AlertDialog的默认xml布局文件
<?xml version="1.0" encoding="utf-8"?><!--/* //device/apps/common/res/layout/alert_dialog.xml**** Copyright 2006, The Android Open Source Project**** Licensed under the Apache License, Version 2.0 (the "License");** you may not use this file except in compliance with the License.** You may obtain a copy of the License at**** http://www.apache.org/licenses/LICENSE-2.0**** Unless required by applicable law or agreed to in writing, software** distributed under the License is distributed on an "AS IS" BASIS,** WITHOUT WARRANTIES OR CONDITIONS OF ANY KIND, either express or implied.** See the License for the specific language governing permissions and** limitations under the License.*/--><LinearLayoutxmlns:android="http://schemas.android.com/apk/res/android"android:id="@+id/parentPanel" //xml文件的根viewandroid:layout_width="match_parent"android:layout_height="wrap_content"android:orientation="vertical"android:paddingTop="9dip"android:paddingBottom="3dip"android:paddingStart="3dip"android:paddingEnd="1dip">//Dialog的顶部控件包括(icon和title)<LinearLayout android:id="@+id/topPanel"android:layout_width="match_parent"android:layout_height="wrap_content"android:minHeight="54dip"android:orientation="vertical"><LinearLayout android:id="@+id/title_template"android:layout_width="match_parent"android:layout_height="wrap_content"android:orientation="horizontal"android:gravity="center_vertical"android:layout_marginTop="6dip"android:layout_marginBottom="9dip"android:layout_marginStart="10dip"android:layout_marginEnd="10dip"><ImageView android:id="@+id/icon"android:layout_width="wrap_content"android:layout_height="wrap_content"android:layout_gravity="top"android:paddingTop="6dip"android:paddingEnd="10dip"android:src="@drawable/ic_dialog_info" /><com.android.internal.widget.DialogTitleandroid:id="@+id/alertTitle"style="?android:attr/textAppearanceLarge"android:singleLine="true"android:ellipsize="end"android:layout_width="match_parent"android:layout_height="wrap_content"android:textAlignment="viewStart" /></LinearLayout>//分割线<ImageView android:id="@+id/titleDivider"android:layout_width="match_parent"android:layout_height="1dip"android:visibility="gone"android:scaleType="fitXY"android:gravity="fill_horizontal"android:src="@android:drawable/divider_horizontal_dark" /><!-- If the client uses a customTitle, it will be added here. --></LinearLayout>//默认的内容展示控件,内部使用ScrollView嵌套TextView进行文本展示<LinearLayout android:id="@+id/contentPanel"android:layout_width="match_parent"android:layout_height="wrap_content"android:layout_weight="1"android:orientation="vertical"><ScrollView android:id="@+id/scrollView"android:layout_width="match_parent"android:layout_height="wrap_content"android:paddingTop="2dip"android:paddingBottom="12dip"android:paddingStart="14dip"android:paddingEnd="10dip"android:overScrollMode="ifContentScrolls"><TextView android:id="@+id/message"style="?android:attr/textAppearanceMedium"android:layout_width="match_parent"android:layout_height="wrap_content"android:padding="5dip" /></ScrollView></LinearLayout>//自定义的布局添加到这个FrameLayout控件中<FrameLayout android:id="@+id/customPanel"android:layout_width="match_parent"android:layout_height="wrap_content"android:layout_weight="1"><FrameLayout android:id="@+android:id/custom"android:layout_width="match_parent"android:layout_height="wrap_content"android:paddingTop="5dip"android:paddingBottom="5dip" /></FrameLayout>//底部的按钮展示控件<LinearLayout android:id="@+id/buttonPanel"android:layout_width="match_parent"android:layout_height="wrap_content"android:minHeight="54dip"android:orientation="vertical" ><LinearLayoutstyle="?android:attr/buttonBarStyle"android:layout_width="match_parent"android:layout_height="wrap_content"android:orientation="horizontal"android:paddingTop="4dip"android:paddingStart="2dip"android:paddingEnd="2dip"android:measureWithLargestChild="true"><LinearLayout android:id="@+id/leftSpacer"android:layout_weight="0.25"android:layout_width="0dip"android:layout_height="wrap_content"android:orientation="horizontal"android:visibility="gone" /><Button android:id="@+id/button1"android:layout_width="0dip"android:layout_gravity="start"android:layout_weight="1"style="?android:attr/buttonBarButtonStyle"android:maxLines="2"android:layout_height="wrap_content" /><Button android:id="@+id/button3"android:layout_width="0dip"android:layout_gravity="center_horizontal"android:layout_weight="1"style="?android:attr/buttonBarButtonStyle"android:maxLines="2"android:layout_height="wrap_content" /><Button android:id="@+id/button2"android:layout_width="0dip"android:layout_gravity="end"android:layout_weight="1"style="?android:attr/buttonBarButtonStyle"android:maxLines="2"android:layout_height="wrap_content" /><LinearLayout android:id="@+id/rightSpacer"android:layout_width="0dip"android:layout_weight="0.25"android:layout_height="wrap_content"android:orientation="horizontal"android:visibility="gone" /></LinearLayout></LinearLayout></LinearLayout>
再看下setupView()的处理逻辑
private void setupView() {//拿到根viewfinal View parentPanel = mWindow.findViewById(R.id.parentPanel);//默认顶部控件final View defaultTopPanel = parentPanel.findViewById(R.id.topPanel);//默认内容控件final View defaultContentPanel = parentPanel.findViewById(R.id.contentPanel);//默认按钮控件final View defaultButtonPanel = parentPanel.findViewById(R.id.buttonPanel);// 如果有自己设置的布局控件,则调用setupCustomContent()final ViewGroup customPanel = (ViewGroup) parentPanel.findViewById(R.id.customPanel);setupCustomContent(customPanel);final View customTopPanel = customPanel.findViewById(R.id.topPanel);final View customContentPanel = customPanel.findViewById(R.id.contentPanel);final View customButtonPanel = customPanel.findViewById(R.id.buttonPanel);// Resolve the correct panels and remove the defaults, if needed.final ViewGroup topPanel = resolvePanel(customTopPanel, defaultTopPanel);final ViewGroup contentPanel = resolvePanel(customContentPanel, defaultContentPanel);final ViewGroup buttonPanel = resolvePanel(customButtonPanel, defaultButtonPanel);//内容区域控件数据设置-底部按钮区域-和顶部title区域数据填充setupContent(contentPanel);setupButtons(buttonPanel);setupTitle(topPanel);//展示标示final boolean hasCustomPanel = customPanel != null&& customPanel.getVisibility() != View.GONE;final boolean hasTopPanel = topPanel != null&& topPanel.getVisibility() != View.GONE;final boolean hasButtonPanel = buttonPanel != null&& buttonPanel.getVisibility() != View.GONE;// Only display the text spacer if we don't have buttons.if (!hasButtonPanel) {if (contentPanel != null) {final View spacer = contentPanel.findViewById(R.id.textSpacerNoButtons);if (spacer != null) {spacer.setVisibility(View.VISIBLE);}}}if (hasTopPanel) {// Only clip scrolling content to padding if we have a title.if (mScrollView != null) {mScrollView.setClipToPadding(true);}// Only show the divider if we have a title.View divider = null;if (mMessage != null || mListView != null || hasCustomPanel) {if (!hasCustomPanel) {divider = topPanel.findViewById(R.id.titleDividerNoCustom);}}if (divider != null) {divider.setVisibility(View.VISIBLE);}} else {if (contentPanel != null) {final View spacer = contentPanel.findViewById(R.id.textSpacerNoTitle);if (spacer != null) {spacer.setVisibility(View.VISIBLE);}}}if (mListView instanceof RecycleListView) {((RecycleListView) mListView).setHasDecor(hasTopPanel, hasButtonPanel);}// Update scroll indicators as needed.if (!hasCustomPanel) {final View content = mListView != null ? mListView : mScrollView;if (content != null) {final int indicators = (hasTopPanel ? ViewCompat.SCROLL_INDICATOR_TOP : 0)| (hasButtonPanel ? ViewCompat.SCROLL_INDICATOR_BOTTOM : 0);setScrollIndicators(contentPanel, content, indicators,ViewCompat.SCROLL_INDICATOR_TOP | ViewCompat.SCROLL_INDICATOR_BOTTOM);}}final ListView listView = mListView;if (listView != null && mAdapter != null) {listView.setAdapter(mAdapter);final int checkedItem = mCheckedItem;if (checkedItem > -1) {listView.setItemChecked(checkedItem, true);listView.setSelection(checkedItem);}}}
设置Dialog自定义布局的处理逻辑setupCustomContent()
private void setupCustomContent(ViewGroup customPanel) {final View customView;//拿到传入进来的自定义布局if (mView != null) {customView = mView;} else if (mViewLayoutResId != 0) {//传入的是布局id,使用LayoutInflater.inflate方法拿到填充布局final LayoutInflater inflater = LayoutInflater.from(mContext);customView = inflater.inflate(mViewLayoutResId, customPanel, false);} else {customView = null;}final boolean hasCustomView = customView != null;if (!hasCustomView || !canTextInput(customView)) {mWindow.setFlags(WindowManager.LayoutParams.FLAG_ALT_FOCUSABLE_IM,WindowManager.LayoutParams.FLAG_ALT_FOCUSABLE_IM);}if (hasCustomView) {//拿到custom控件,进行addView()添加final FrameLayout custom = (FrameLayout) mWindow.findViewById(R.id.custom);custom.addView(customView, new LayoutParams(MATCH_PARENT, MATCH_PARENT));if (mViewSpacingSpecified) {custom.setPadding(mViewSpacingLeft, mViewSpacingTop, mViewSpacingRight, mViewSpacingBottom);}if (mListView != null) {((LinearLayout.LayoutParams) customPanel.getLayoutParams()).weight = 0;}} else {//如果没有传入自定义的布局文件,则隐藏customPanel.setVisibility(View.GONE);}}
内容区域数据填充
private void setupContent(ViewGroup contentPanel) {//内容区域外层ScrollView处理mScrollView = (NestedScrollView) mWindow.findViewById(R.id.scrollView);mScrollView.setFocusable(false);mScrollView.setNestedScrollingEnabled(false);//文本内容控件TextViewmMessageView = (TextView) contentPanel.findViewById(android.R.id.message);if (mMessageView == null) {return;}//根据文本mMessage判断TextView是否显示if (mMessage != null) {mMessageView.setText(mMessage);} else {mMessageView.setVisibility(View.GONE);mScrollView.removeView(mMessageView);//文本内容是List,则remove调用TextView,添加ListView控件if (mListView != null) {final ViewGroup scrollParent = (ViewGroup) mScrollView.getParent();final int childIndex = scrollParent.indexOfChild(mScrollView);scrollParent.removeViewAt(childIndex);scrollParent.addView(mListView, childIndex,new LayoutParams(MATCH_PARENT, MATCH_PARENT));} else {contentPanel.setVisibility(View.GONE);}}}
底部按钮控件展示出来
private void setupButtons(ViewGroup buttonPanel) {int BIT_BUTTON_POSITIVE = 1;int BIT_BUTTON_NEGATIVE = 2;int BIT_BUTTON_NEUTRAL = 4;int whichButtons = 0;//拿到button1控件mButtonPositive = (Button) buttonPanel.findViewById(android.R.id.button1);mButtonPositive.setOnClickListener(mButtonHandler);//根据文本信息判断是否展示--其他按钮也是一样的处理逻辑if (TextUtils.isEmpty(mButtonPositiveText)) {mButtonPositive.setVisibility(View.GONE);} else {mButtonPositive.setText(mButtonPositiveText);mButtonPositive.setVisibility(View.VISIBLE);whichButtons = whichButtons | BIT_BUTTON_POSITIVE;}mButtonNegative = (Button) buttonPanel.findViewById(android.R.id.button2);mButtonNegative.setOnClickListener(mButtonHandler);if (TextUtils.isEmpty(mButtonNegativeText)) {mButtonNegative.setVisibility(View.GONE);} else {mButtonNegative.setText(mButtonNegativeText);mButtonNegative.setVisibility(View.VISIBLE);whichButtons = whichButtons | BIT_BUTTON_NEGATIVE;}mButtonNeutral = (Button) buttonPanel.findViewById(android.R.id.button3);mButtonNeutral.setOnClickListener(mButtonHandler);if (TextUtils.isEmpty(mButtonNeutralText)) {mButtonNeutral.setVisibility(View.GONE);} else {mButtonNeutral.setText(mButtonNeutralText);mButtonNeutral.setVisibility(View.VISIBLE);whichButtons = whichButtons | BIT_BUTTON_NEUTRAL;}//单个按钮的展示逻辑if (shouldCenterSingleButton(mContext)) {/** If we only have 1 button it should be centered on the layout and* expand to fill 50% of the available space.*/if (whichButtons == BIT_BUTTON_POSITIVE) {centerButton(mButtonPositive);} else if (whichButtons == BIT_BUTTON_NEGATIVE) {centerButton(mButtonNegative);} else if (whichButtons == BIT_BUTTON_NEUTRAL) {centerButton(mButtonNeutral);}}final boolean hasButtons = whichButtons != 0;if (!hasButtons) {buttonPanel.setVisibility(View.GONE);}}
顶部Tiltle控件处理逻辑
private void setupTitle(ViewGroup topPanel) {if (mCustomTitleView != null) {// 使用自定义的titleViewLayoutParams lp = new LayoutParams(LayoutParams.MATCH_PARENT, LayoutParams.WRAP_CONTENT);topPanel.addView(mCustomTitleView, 0, lp);// Hide the title templateView titleTemplate = mWindow.findViewById(R.id.title_template);titleTemplate.setVisibility(View.GONE);} else {mIconView = (ImageView) mWindow.findViewById(android.R.id.icon);final boolean hasTextTitle = !TextUtils.isEmpty(mTitle);//title控件展示逻辑if (hasTextTitle && mShowTitle) {// Display the title if a title is supplied, else hide it.mTitleView = (TextView) mWindow.findViewById(R.id.alertTitle);mTitleView.setText(mTitle);// Do this last so that if the user has supplied any icons we// use them instead of the default ones. If the user has// specified 0 then make it disappear.if (mIconId != 0) {mIconView.setImageResource(mIconId);} else if (mIcon != null) {mIconView.setImageDrawable(mIcon);} else {// Apply the padding from the icon to ensure the title is// aligned correctly.mTitleView.setPadding(mIconView.getPaddingLeft(),mIconView.getPaddingTop(),mIconView.getPaddingRight(),mIconView.getPaddingBottom());mIconView.setVisibility(View.GONE);}} else {// Hide the title templatefinal View titleTemplate = mWindow.findViewById(R.id.title_template);titleTemplate.setVisibility(View.GONE);mIconView.setVisibility(View.GONE);topPanel.setVisibility(View.GONE);}}}
处理AlertDialog的控件后,接着调用AlertDialog的onStart()方法
最后将Dialog的DecorView添加到WindowManager中,并且显示出来,到这里Dialog就出现在用户的视野中.
Handler接收消息
private static final class ListenersHandler extends Handler {private final WeakReference<DialogInterface> mDialog;public ListenersHandler(Dialog dialog) {//拿到Dialog的实例,软引用mDialog = new WeakReference<>(dialog);}@Overridepublic void handleMessage(Message msg) {switch (msg.what) {case DISMISS:((OnDismissListener) msg.obj).onDismiss(mDialog.get());break;case CANCEL:((OnCancelListener) msg.obj).onCancel(mDialog.get());break;case SHOW:((OnShowListener) msg.obj).onShow(mDialog.get());break;}}}
总结:经过前面在AlertDialog源码中的杀入杀出,我们了解了AlertDialog是如何实现的,他主要是使用内部类Builder进行数据设置,接着调用create()方法真正创建AlertDialog,并将之间设置的各种数据apply()到控制器AlertController类中,接着是进行展示,调用show()方法,这快的实现原理和Activity的展示逻辑一样,都使用借用WindowManager来进行处理.


