
识别手写数字,前提是识别图片已进行预处理,即28×28二值化灰度图
本人开发环境:
- Windows 10
- Python 3.6.6
- TensorFlow 1.9.0
- Android Studio 3.1
一 训练模型成pb文件
下载MNIST数据集,代码详细可看官方文档:http://www.tensorfly.cn/tfdoc/tutorials/mnist_pros.html
注意:要定义模型的输入层和输出层节点的名字(通过形参 ‘name’指定,后面加载模型都是通过该name来传递数据的)
import input_dataimport tensorflow as tffrom tensorflow.python.framework import graph_util#mnist下载地址mnist = input_data.read_data_sets('./mnist_data/', one_hot=True)

sess = tf.InteractiveSession()

x = tf.placeholder("float32", shape=[None, 784],name='x')
y_ = tf.placeholder("float32", shape=[None, 10],name='y_')def weight_variable(shape):
    initial = tf.truncated_normal(shape, stddev=0.1)    return tf.Variable(initial)def bias_variable(shape):
    initial = tf.constant(0.1, shape=shape)    return tf.Variable(initial)def conv2d(x, W):
    return tf.nn.conv2d(x, W, strides=[1,1,1,1], padding="SAME")def max_pool_2x2(x):
    return tf.nn.max_pool(x, ksize=[1,2,2,1],
                          strides=[1,2,2,1], padding="SAME")

W_conv1 = weight_variable([5,5,1,32])
b_conv1 = bias_variable([32])
x_image = tf.reshape(x, [-1,28,28,1])

h_conv1 = tf.nn.relu(conv2d(x_image, W_conv1) + b_conv1)
h_pool1 = max_pool_2x2(h_conv1)

W_conv2 = weight_variable([5,5,32,64])
b_conv2 = weight_variable([64])

h_conv2 = tf.nn.relu(conv2d(h_pool1, W_conv2) + b_conv2)
h_pool2 = max_pool_2x2(h_conv2)#第3层, 全连接层#这层是拥有1024个神经元的全连接层#W的第1维size为7*7*64,7*7是h_pool2输出的size,64是第2层输出神经元个数W_fc1 = weight_variable([7*7*64, 1024])
b_fc1 = bias_variable([1024])

h_pool2_flat = tf.reshape(h_pool2, [-1, 7*7*64])
h_fc1 = tf.nn.relu(tf.matmul(h_pool2_flat, W_fc1) + b_fc1)

keep_prob = tf.placeholder("float32",name='keep_prob')
h_fc1_drop = tf.nn.dropout(h_fc1, keep_prob)

W_fc2 = weight_variable([1024, 10])
b_fc2 = bias_variable([10])

y_conv = tf.nn.softmax(tf.matmul(h_fc1_drop, W_fc2) + b_fc2,name="y_conv")
y_conv2=tf.nn.softmax(tf.matmul(h_fc1, W_fc2) + b_fc2,name="y_conv2")
cross_entropy = -tf.reduce_sum(y_ * tf.log(y_conv))
train_step = tf.train.AdamOptimizer(1e-4).minimize(cross_entropy)
correct_predict = tf.equal(tf.argmax(y_conv, 1), tf.argmax(y_, 1))
accuracy = tf.reduce_mean(tf.cast(correct_predict, "float32"))

sess.run(tf.initialize_all_variables())#开始训练模型,循环20000次,每次随机从训练集中抓取50幅图像for i in range(20000):
  batch = mnist.train.next_batch(50)  if i%100 == 0:
    train_accuracy = accuracy.eval(feed_dict={
        x:batch[0], y_: batch[1], keep_prob: 1.0})    print ("step %d, training accuracy %g" % (i, train_accuracy))
  train_step.run(feed_dict={x: batch[0], y_: batch[1], keep_prob: 0.5})print ("test accuracy %g" % accuracy.eval(feed_dict={
x:mnist.test.images, y_:mnist.test.labels, keep_prob:1.0}))#保存为pb文件constant_graph = graph_util.convert_variables_to_constants(sess, sess.graph_def, ["y_conv2"])with tf.gfile.FastGFile('./Model_pb/grf.pb', mode='wb') as f:f.write(constant_graph.SerializeToString())
二 Android studio配置
1.在Android studio新建Android项目
注意:API最好大于18,因为Trace.beginSection(),Trace.endSection()调用的API最低为18。
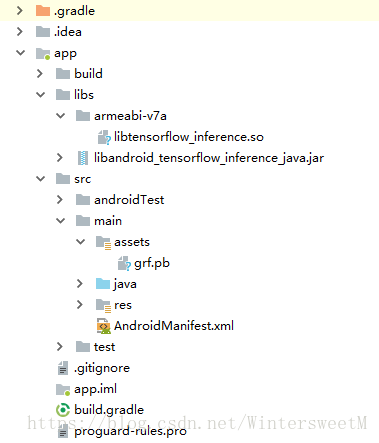
2.把训练好的pb文件放入Android项目app/src/main/assets下,若不存在assets目录,右键main->new->Directory,输入assets。
3.将TensoFlow的jar包和so库放在app/libs文件夹下
(1).可从这下载 https://github.com/PanJinquan/Mnist-tensorFlow-AndroidDemo/tree/master/app/libs libtensorflow_inference.so和libandroid_tensorflow_inference_java.jar ;也可自己用bazel编译出so和jar文件。
(2).在/app/libs下新建armeabi-v7a文件夹,并将libtensorflow_inference.so放进去。 (文件夹名称 与 ARM处理器名称 相同即可)
(3).将libandroid_tensorflow_inference_java.jar放在/app/libs下,并且右键“add as Libary”。
4.app\build.gradle配置
(1).在defaultConfig中添加
ndk {
         abiFilters "armeabi-v7a"}
(2).在android节点下添加soureSets,用于制定jniLibs的路径
sourceSets {
        main {
            jniLibs.srcDirs = ['libs']
        }
    }
(3).在dependencies中(若没有则)增加TensoFlow编译的jar文件libandroid_tensorflow_inference_java.jar
implementation files('libs/libandroid_tensorflow_inference_java.jar')1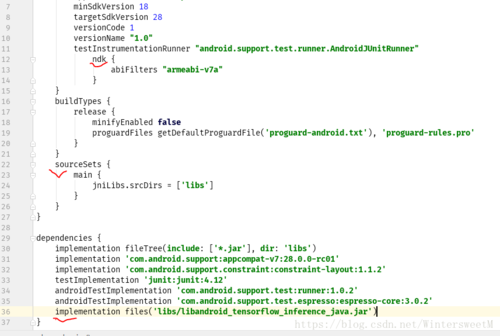
5.在gradle.properties中添加下面一行
android.useDeprecatedNdk=true1
三 模型调用
1. 新建类tsf.java,在这个类里面进行模型的调用,并且获取输出
package com.example.lenovo.android_tensorflow;import android.content.res.AssetManager;import android.graphics.Bitmap;import android.os.Trace;import android.util.Log;import org.tensorflow.contrib.android.TensorFlowInferenceInterface;public class tsf {

    static {        //加载库文件
        System.loadLibrary("tensorflow_inference");
    }    private static final String MODEL_FILE = "file:///android_asset/grf.pb";    //数据的维度
    private static final int HEIGHT = 28;    private static final int WIDTH = 28;    private static final int MAXL = 10;    //模型中输入变量的名称
    private static final String inputName = "x";    //用于存储的模型输入数据
    private float[] inputs = new float[HEIGHT * WIDTH];    //模型中输出变量的名称
    private static final String outputName = "y_conv2";    //用于存储模型的输出数据,0-9
    private float[] outputs = new float[MAXL];

    TensorFlowInferenceInterface inferenceInterface;
    tsf(AssetManager assetManager) {        //接口定义
        inferenceInterface = new TensorFlowInferenceInterface(assetManager,MODEL_FILE);
    }    //将int数组转化为float数组
    public float[] ints2float(int[] src,int w){        float res[]=new float[w];        for(int i=0;i<w;++i) {
            res[i]=src[i];
        }        return  res;
    }    //返回数组中最大值的索引
    public int argmax(float output[]){        int maxIndex=0;        for(int i=1;i<MAXL;++i){
            maxIndex=output[i]>output[maxIndex]? i: maxIndex;
        }        return maxIndex;
    }    //将图像像素数据转为一维数组
    public int[] getGrayPix_R(Bitmap bp){        int[]pxs=new int[784];        int acc=0;        for(int m=0;m<28;++m){            for(int n=0;n<28;++n){

                Log.d("12","gray_"+acc+":"+pxs[acc]+"_");
                ++acc;
            }
        }        return pxs;
    }    //获得预测结果
    public int  getAddResult(Bitmap bitmap) {        int pxs[]=getGrayPix_R(bitmap);

        Trace.beginSection("feed");
        inferenceInterface.feed(inputName,  ints2float(pxs,784),1, 784);
        Trace.endSection();        //获得模型输出结果
        Trace.beginSection("run");
        String[] outputNames = new String[] {outputName};
        inferenceInterface.run(outputNames);
        Trace.endSection();        //将输出结果存放到outputs中
        Trace.beginSection("fetch");
        inferenceInterface.fetch(outputName, outputs);
        Trace.endSection();        //类似于tf.argmax()的功能,寻找output中最大值的index
        return argmax(outputs);
    }


}
2.在MainActivity中使用tsf类
可在其它函数里调用tsf,获得识别结果
将已完成预处理的图片放进/app/src/main/res/drawable中
        tsf m=new tsf(getAssets());
        Bitmap bitmap= BitmapFactory.decodeResource(getResources(),R.drawable.pratice1_1);
        int result=m.getAddResult(bitmap);
        Log.i("MainActivity","*********** the digit is :    "+result);
原文出处:https://blog.csdn.net/WintersweetM/article/details/81806589