业余时间写了个轻量级的权限控制框架 light-security ,并发布到了 Maven 中央仓库。发布时的操作步骤还挺多,我这个记性是记不住的,所以记录一下,便于以后查阅,也希望对大家有帮助。
一、Sonartype相关准备工作
前往 https://issues.sonatype.org/ 注册账号,并记好账号和密码,后面有用。
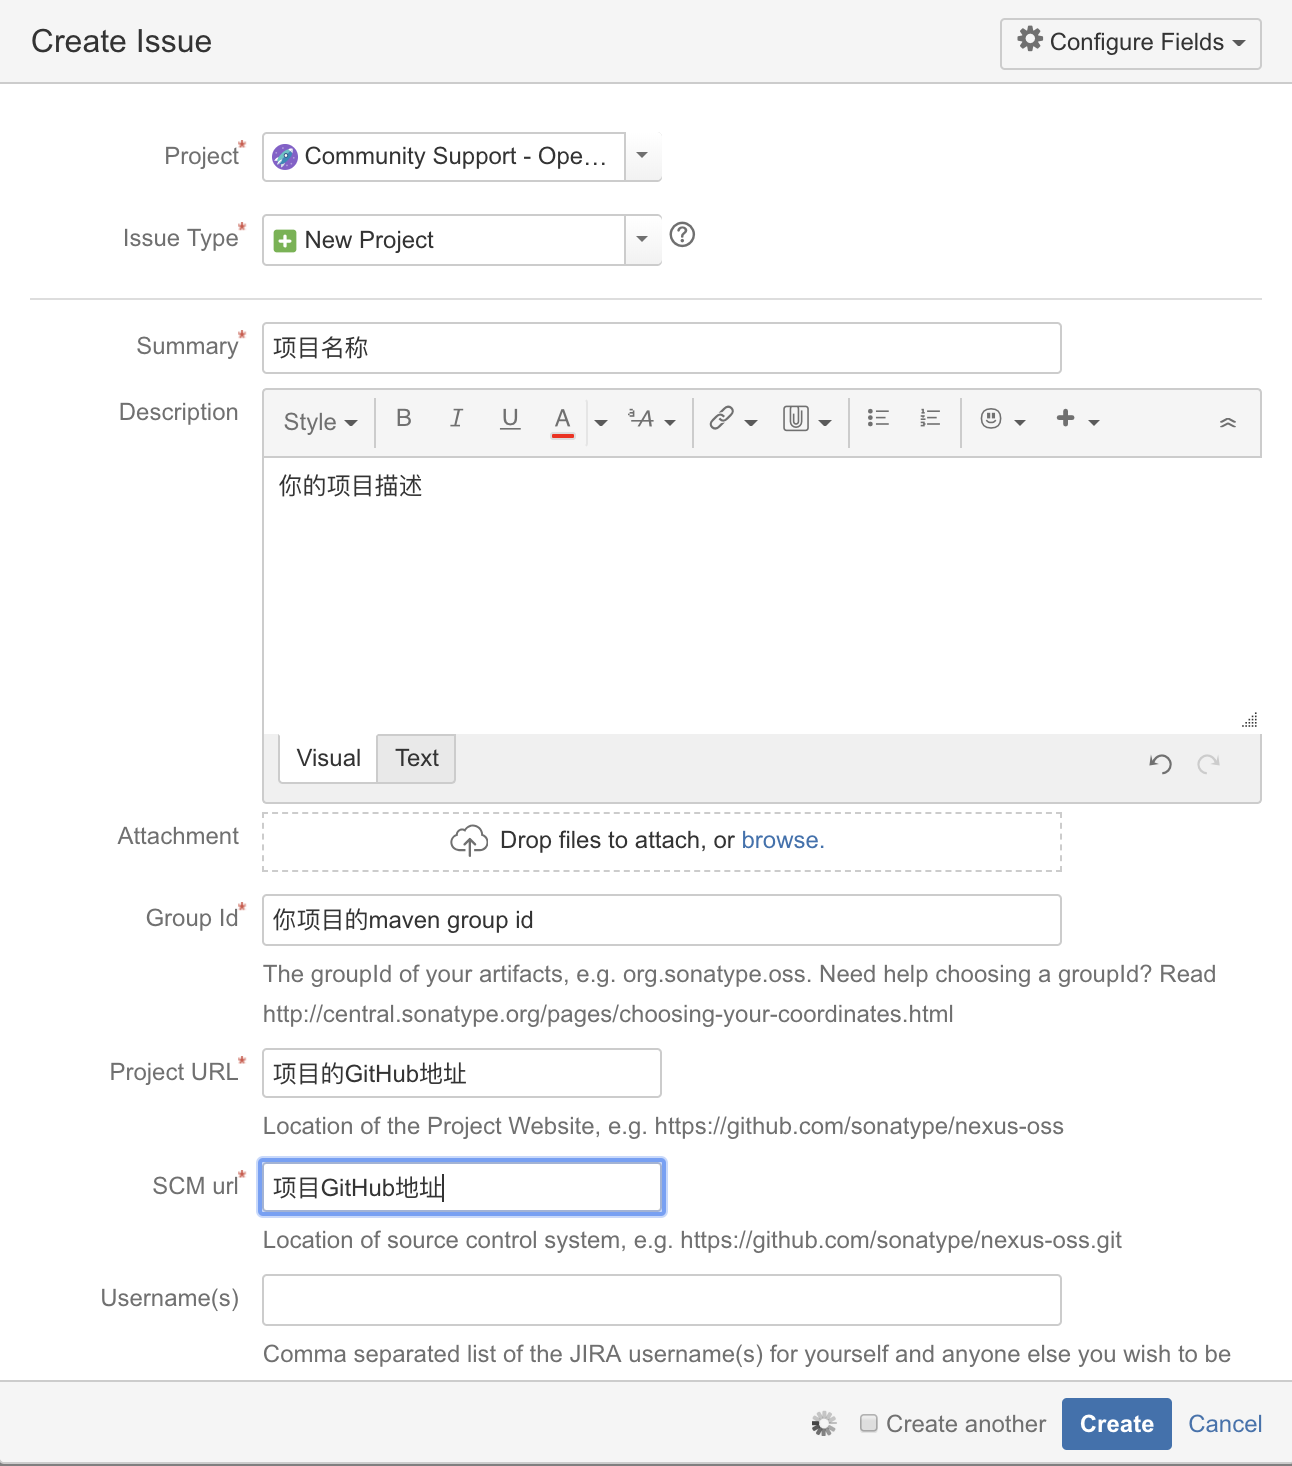
前往 https://issues.sonatype.org/secure/Dashboard.jspa ,点击导航栏上的
Create按钮,并按提示填写项目信息:
个人为项目
light-security-spring-boot-starter填写的信息如 https://issues.sonatype.org/browse/OSSRH-47914 所示,供大家参考。创建
Issue后,等待审核即可。一般会在一个工作日内审核完成。当Issue的Status变为RESOLVED或FIXED后,即可进行下一步操作。
二、GPG相关准备工作
2.1 安装GPG
Mac安装GPG:
1 | brew install gpg |
Ubuntu安装GPG:
1 | sudo apt-get install gnupg |
2.2 GPG常用命令
1 2 3 4 5 | gpg --version 检查安装成功没 gpg --gen-key 生成密钥对 gpg --list-keys 查看公钥 gpg --keyserver 服务器地址 --send-keys 公钥ID 将公钥发布到 PGP 密钥服务器 gpg --keyserver 服务器地址 --recv-keys 公钥ID 查询公钥是否发布成功 |
2.3 生成秘钥
1 2 | gpg --gen-key 按照提示输入姓名/邮箱,然后按O即可生成。 |
如果遇到问题,可详见”遇到的问题一节”。
2.4 查看本地秘钥
1 | gpg --list-keys |
结果类似如下:
1 2 3 4 5 6 7 | ~ gpg --list-keys /Users/itmuch.com/.gnupg/pubring.kbx ------------------------------------ pub rsa2048 2019-04-20 [SC] [有效至:2021-04-19] [xxxxxxxxx] uid [ 绝对 ] itmuch.com <eacdy0000@126.com> sub rsa2048 2019-04-20 [E] [有效至:2021-04-19] |
三、配置Maven
TIPS
可参考官方文档配置
https://central.sonatype.org/pages/apache-maven.html
1 修改项目的pom.xml,添加如下内容:
1 2 3 4 5 6 7 8 9 10 11 12 13 14 15 16 17 18 19 20 21 22 23 24 25 26 27 28 29 30 31 32 33 34 35 36 37 38 39 40 41 42 43 44 45 46 47 48 49 50 51 52 53 54 55 56 57 58 59 60 61 62 63 64 65 66 67 68 69 70 71 72 73 74 75 76 77 78 79 80 81 82 83 84 85 86 87 88 89 90 91 92 93 94 95 96 97 98 99 100 101 102 103 | <licenses> <license> <name>The Apache Software License, Version 2.0</name> <url>http://www.apache.org/licenses/LICENSE-2.0.txt</url> </license> </licenses> <developers> <developer> <name>itmuch</name> <email>eacdy0000@126.com</email> <url>https://github.com/eacdy</url> </developer> </developers> <scm> <url>https://github.com/eacdy/light-security</url> <connection>https://github.com/eacdy/light-security.git</connection> <developerConnection>https://github.com/eacdy</developerConnection> </scm> <distributionManagement> <snapshotRepository> <id>ossrh</id> <url>https://oss.sonatype.org/content/repositories/snapshots</url> </snapshotRepository> <repository> <id>ossrh</id> <url>https://oss.sonatype.org/service/local/staging/deploy/maven2/</url> </repository> </distributionManagement> <profiles> <profile> <id>release</id> <build> <plugins> <plugin> <groupId>org.sonatype.plugins</groupId> <artifactId>nexus-staging-maven-plugin</artifactId> <version>1.6.7</version> <extensions>true</extensions> <configuration> <serverId>ossrh</serverId> <nexusUrl>https://oss.sonatype.org/</nexusUrl> <autoReleaseAfterClose>true</autoReleaseAfterClose> </configuration> </plugin> <plugin> <groupId>org.apache.maven.plugins</groupId> <artifactId>maven-release-plugin</artifactId> <version>2.5</version> <configuration> <autoVersionSubmodules>true</autoVersionSubmodules> <useReleaseProfile>false</useReleaseProfile> <releaseProfiles>release</releaseProfiles> <goals>deploy</goals> </configuration> </plugin> <plugin> <groupId>org.apache.maven.plugins</groupId> <artifactId>maven-source-plugin</artifactId> <version>2.2.1</version> <executions> <execution> <id>attach-sources</id> <goals> <goal>jar-no-fork</goal> </goals> </execution> </executions> </plugin> <plugin> <groupId>org.apache.maven.plugins</groupId> <artifactId>maven-javadoc-plugin</artifactId> <version>2.9.1</version> <executions> <execution> <id>attach-javadocs</id> <goals> <goal>jar</goal> </goals> </execution> </executions> </plugin> <plugin> <groupId>org.apache.maven.plugins</groupId> <artifactId>maven-gpg-plugin</artifactId> <version>1.5</version> <executions> <execution> <id>sign-artifacts</id> <phase>verify</phase> <goals> <goal>sign</goal> </goals> </execution> </executions> </plugin> </plugins> </build> </profile> </profiles> |
可参考我的配置:https://github.com/eacdy/light-security/blob/master/light-security-spring-boot-starter/pom.xml
2 修改 $MAVEN_HOME/conf/settings.xml 文件(即你的Maven配置文件),添加如下内容:
1 2 3 4 5 6 7 8 | <server> <!-- 这里的ID要和distributionManagement.repository.id一致 --> <id>ossrh</id> <!-- https://issues.sonatype.org/的账号 --> <username>账号</username> <!-- https://issues.sonatype.org/的密码 --> <password>密码</password> </server> |
四、修改项目版本
用如下命令,修改项目的版本,例如1.0.1-RELEASE 。
1 | mvn versions:set -DnewVersion=1.0.1-RELEASE |
当然也可手动修改版本,不过当项目比较复杂,module比较多时,手动修改就会比较麻烦,而且容易出错。建议用命令修改。
五、发布
执行如下命令即可将依赖发布到中央仓库。
1 | mvn clean install deploy -P release |
不出意外,构建会报xxx服务器无法找到GPG的异常。原因是前文生成的秘钥尚未发布到key server。keyserver的地址会在异常中打印出来。我的项目报的是 http://keys.gnupg.net:11371/ 。于是执行
1 2 | gpg --keyserver http://keys.gnupg.net:11371/ --send-keys [xxxxxxxxx] 其中的[xxxxxxxxx],可用gpg --list-keys显示出来。 |
然后再次执行如下命令:
1 | mvn clean install deploy -P release |
此时即可发布成功。发布完使用如下命令重置为SNAPSHOT版本
1 | mvn versions:set -DnewVersion=1.0.2-SNAPHOST |
六、遇到的问题
6.1 执行 gpg --gen-key 报 Key generation failed: Timeout 的异常
解决方案:
1 2 | rm -rf ~/.gnupg gpg --gen-key |
6.2 执行mvn clean install deploy -P release 时,报gpg: signing failed: Inappropriate ioctl for device
原因是当前终端无法弹出密码输入页面。
解决方案:
1 2 | export GPG_TTY=$(tty) mvn clean install deploy -P release |
6.3 连不上 https://oss.sonatype.org
科学上网(在某些城市有被查水表、罚款的风险),自己找梯子吧;
飞到香港、澳门或者海外等能没有墙的地方,然后发布应用,发布完再回国(一种人傻钱多的方式);
移民(更彻底的解决方案,但如果想看抗日神剧或者听某些国内音乐,可能要用梯子翻回来)……
TIPS
如果你在发布时遇到其他问题,也可添加我的微信
jumping_me,我尽量帮助到你。
七、参考文档
官方文档
如何发布jar包到maven中央仓库
发布项目至maven中央仓库汇总(流程+问题)
向maven中央仓库提交jar
gpg: signing failed: Inappropriate ioctl for device
Git 生成GPG key 报错
Key generation failed: Timeout的解决方法
·································
欢迎关注课程:《面向未来微服务:Spring Cloud Alibaba从入门到进阶》(限时优惠)


 随时随地看视频


