一. View(视图) 动画
View 动画建议采用 XML 来定义。View 动画对应着 Animation 的四个子类。
TranslateAnimation :用来移动 View
ScaleAnimation:用来缩放 View
RotateAnimtion:用来旋转 View
fromDegree 表示旋转刚开始的角度
toDegree 表示旋转结束的角度
pivotX 表示旋转轴点(默认情况下是 View 的中心点)的 x 坐标
pivotY 表示旋转轴点的 y 坐标
AlphaAnimation:用来改变 View 的透明度
fromAlpha 表示透明度的起始值
toAlpha 表示透明度的结束值
这种动画效果的实现很简单,具体可以参见 《Android 群英传》 P269 页。
二. 自定义 View 动画
自定义 View 动画是一个既简单又复杂的事情。只需要继承 Animation 这个抽象类即可。然后重写它的 initialize 和 applyTransformation 方法。前一个方法中做一些初始化的工作,后一个方法中进行相应的矩阵变化即可。很多时候采用 Camera 来简化矩阵的变化过程。下面这个例子效果和代码就是利用自定义 View 动画实现的,可以学习一下:
而其实现的核心代码也不是很复杂,具体如下:
public class FlipCardAnimation extends Animation{    private final float mFromDegrees;    private final float mToDegrees;    private final float mCenterX;    private final float mCenterY;    private Camera mCamera;    //用于确定内容是否开始变化
    private boolean isContentChange = false;    private OnContentChangeListener listener;    public FlipCardAnimation(float fromDegrees, float toDegrees,                             float centerX, float centerY) {
        mFromDegrees = fromDegrees;
        mToDegrees = toDegrees;
        mCenterX = centerX;
        mCenterY = centerY;
    }    //用于确定内容是否开始变化  在动画开始之前调用
    public void setCanContentChange(){        this.isContentChange = false;
    }    @Override
    public void initialize(int width, int height, int parentWidth, int parentHeight) {        super.initialize(width, height, parentWidth, parentHeight);        // new Camera()
        mCamera = new Camera();
    }    @Override
    protected void applyTransformation(float interpolatedTime, Transformation t) {        final float fromDegrees = mFromDegrees;        float degrees = fromDegrees + ((mToDegrees - fromDegrees) * interpolatedTime);        final float centerX = mCenterX;        final float centerY = mCenterY;        final Camera camera = mCamera;        final Matrix matrix = t.getMatrix();
        camera.save();        if (degrees>90 || degrees<-90){            if (!isContentChange){                if(listener!=null){
                    listener.contentChange();
                }
                isContentChange = true;
            }            if (degrees>0) {
                degrees = 270 + degrees - 90;
            }else if (degrees<0){
                degrees = -270+(degrees+90);
            }
        }
        camera.rotateX(degrees);
        camera.getMatrix(matrix);
        camera.restore();
        matrix.preTranslate(-centerX, -centerY);
        matrix.postTranslate(centerX, centerY);
    }    public void setOnContentChangeListener(OnContentChangeListener listener) {        this.listener = listener;
    }    public interface OnContentChangeListener{        void contentChange();
    }
}
三. View 动画使用的特殊场景
3.1 LayoutAnimation
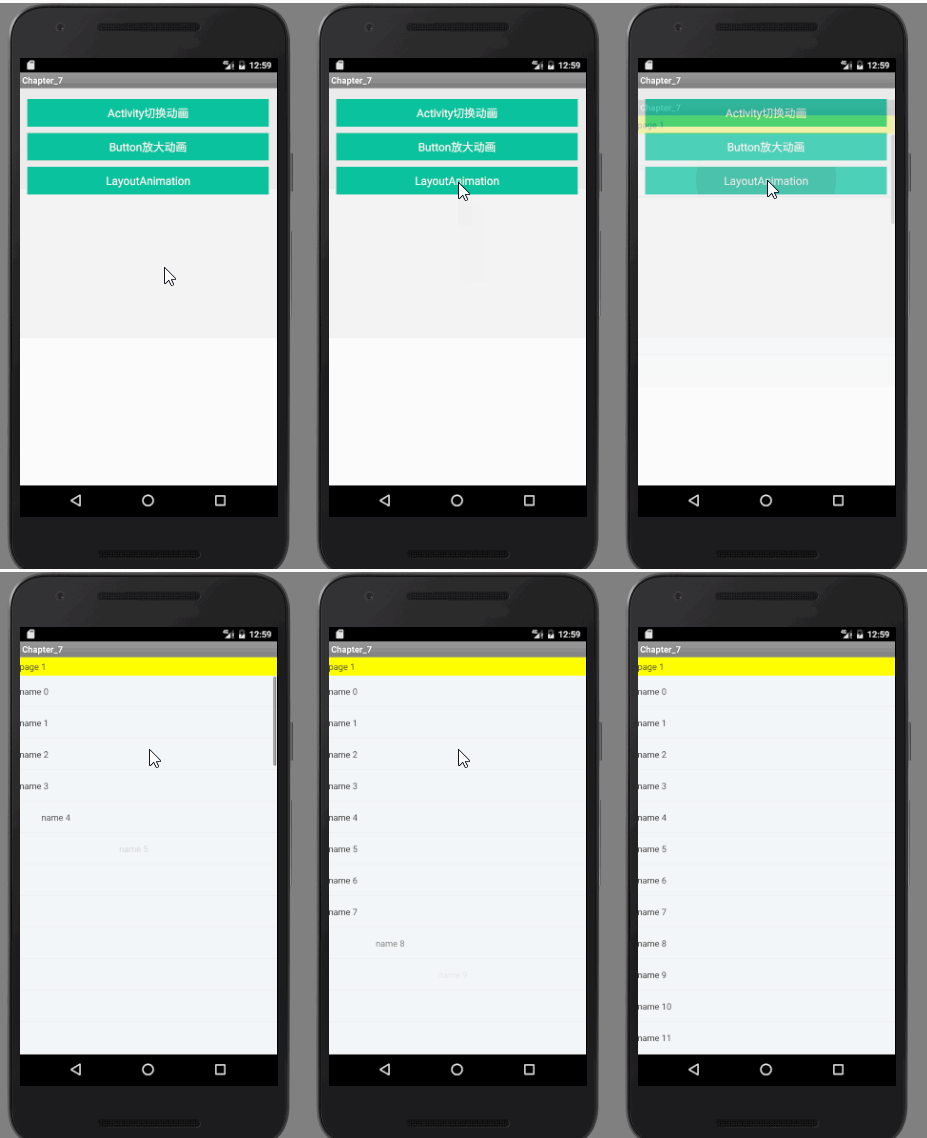
作用于 ViewGroup ,为其指定一个动画。这样当其子元素出场时都具备这个动画效果。常常用于 listView 中,我们经常看见其 item 出场时有一些动画效果。原因就是如此。
定义 layoutAnimation
为子元素指定出场动画(即 View 动画 透明度,旋转,缩放等等)
为 ViewGroup 指定 android:layoutAnimation 属性(ViewGroup 比如说可以是 LV 或者 RV 等等)
实现的一个效果类似于下面的 GIf :
Java 代码实现如下:
public class DemoActivity_2 extends Activity {    private static final String TAG = "DemoActivity_2";    private HorizontalScrollViewEx mListContainer;    @Override
    protected void onCreate(Bundle savedInstanceState) {        super.onCreate(savedInstanceState);
        setContentView(R.layout.demo_2);        Log.d(TAG, "onCreate");
        initView();
    }    private void initView() {        LayoutInflater inflater = getLayoutInflater();
        mListContainer = (HorizontalScrollViewEx) findViewById(R.id.container);        final int screenWidth = MyUtils.getScreenMetrics(this).widthPixels;        final int screenHeight = MyUtils.getScreenMetrics(this).heightPixels;        for (int i = 0; i < 1; i++) {            ViewGroup layout = (ViewGroup) inflater.inflate(                    R.layout.content_layout, mListContainer, false);
            layout.getLayoutParams().width = screenWidth;            TextView textView = (TextView) layout.findViewById(R.id.title);
            textView.setText("page " + (i + 1));
            layout.setBackgroundColor(Color.rgb(255 / (i + 1), 255 / (i + 1), 0));
            createList(layout);
            mListContainer.addView(layout);
        }
    }    private void createList(ViewGroup layout) {        // 设置进入的动画效果
        ListView listView = (ListView) layout.findViewById(R.id.list);        Animation animation = AnimationUtils.loadAnimation(this, R.anim.anim_item);        LayoutAnimationController controller = new LayoutAnimationController(animation);
        controller.setDelay(0.5f);
        controller.setOrder(LayoutAnimationController.ORDER_NORMAL);
        listView.setLayoutAnimation(controller);        ArrayList<String> datas = new ArrayList<String>();        for (int i = 0; i < 50; i++) {
            datas.add("name " + i);
        }        // Adapter 的设置
        ArrayAdapter<String> adapter = new ArrayAdapter<String>(this,                R.layout.content_list_item, R.id.name, datas);
        listView.setAdapter(adapter);
        listView.setOnItemClickListener(new OnItemClickListener() {            @Override
            public void onItemClick(AdapterView<?> parent, View view,                    int position, long id) {                Toast.makeText(DemoActivity_2.this, "click item",                        Toast.LENGTH_SHORT).show();

            }
        });
    }
}
而 anim_item 如下:
<?xml version="1.0" encoding="utf-8"?>
<set xmlns:android="http://schemas.android.com/apk/res/android"
    android:duration="300"
    android:interpolator="@android:anim/accelerate_interpolator"
    android:shareInterpolator="true" >
    <alpha
        android:fromAlpha="0.0"
        android:toAlpha="1.0" />
    <translate
        android:fromXDelta="500"
        android:toXDelta="0" />
</set>
当然上述 效果也可以在 xml 中指定 LayoutAnimation.
3.2 Activity 的切换效果
除了 Activity 默认的切换效果。我们可以自定义。主要用到 overridePendingTransition(int enterAnim,int exitAnim). 参数分别对应着 Activity 出场和退出的动画效果。
注意:动画效果需要在 startActivity( ) 和 finish() 之后调用,否则不起效果。
启动 Activity 时候指定进入的效果:
Intent intent = new Intent(this, TestActivity.class);
startActivity(intent);
overridePendingTransition(R.anim.enter_anim, R.anim.exit_anim);
退出时候,指定退出的效果:
   @Override
    public void finish() {        super.finish();
        overridePendingTransition(R.anim.enter_anim, R.anim.exit_anim);
    }
而 xml 动画跟上面的差不多即可。


 随时随地看视频


