
5分钟实现Android中更换头像功能
写在前面:
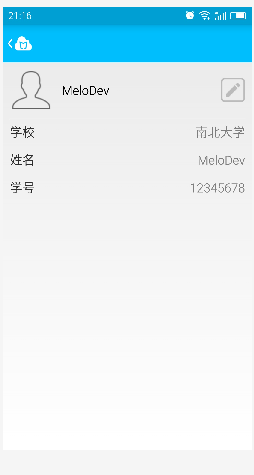
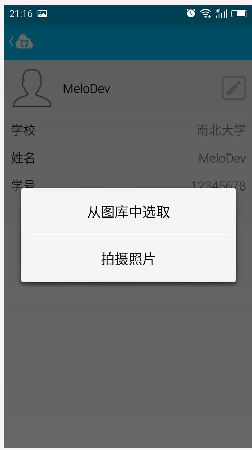
更换头像这个功能在用户界面几乎是100%出现的。通过拍摄照片或者调用图库中的图片,并且进行剪裁,来进行头像的设置。
功能相关截图如下:


下面我们直接看看完整代码吧:
1 2 3 4 5 6 7 8 9 10 11 12 13 14 15 16 17 18 19 20 21 22 23 24 25 26 27 28 29 30 31 32 33 34 35 36 37 38 39 40 41 42 43 44 45 46 47 48 49 50 51 52 53 54 55 56 57 58 59 60 61 62 63 64 65 66 67 68 69 70 71 72 73 74 75 76 77 78 79 80 81 82 83 84 85 86 87 88 89 90 91 92 93 94 95 96 97 98 99 100 101 102 103 104 105 106 107 108 109 110 111 112 113 114 115 116 117 118 119 120 121 122 123 124 125 126 127 128 129 130 131 132 133 134 135 136 137 138 139 140 141 142 143 144 145 146 147 148 149 150 151 152 | public class UserActivity extends BaseActivity implements OnClickListener {private ImageView iv_photo; private Bitmap head;// 头像Bitmap private static String path = "/sdcard/myHead/";// sd路径 @Override protected void onCreate(Bundle savedInstanceState) {super.onCreate(savedInstanceState); initView(); initListener(); } private void initView() {setContentView(R.layout.activity_user); iv_photo = (ImageView) findViewById(R.id.iv_photo); Bitmap bt = BitmapFactory.decodeFile(path + "head.jpg");// 从SD卡中找头像,转换成Bitmap if (bt != null) { @SuppressWarnings("deprecation")Drawable drawable = new BitmapDrawable(bt);// 转换成drawable iv_photo.setImageDrawable(drawable); } else {/** * 如果SD里面没有则需要从服务器取头像,取回来的头像再保存在SD中 * */ } } private void initListener() {iv_photo.setOnClickListener(this); } @Override public void onClick(View v) { switch (v.getId()) {case R.id.iv_photo:// 更换头像 showTypeDialog(); break; } } private void showTypeDialog() {AlertDialog.Builder builder = new AlertDialog.Builder(this); final AlertDialog dialog = builder.create(); View view = View.inflate(this, R.layout.dialog_select_photo, null); TextView tv_select_gallery = (TextView) view.findViewById(R.id.tv_select_gallery); TextView tv_select_camera = (TextView) view.findViewById(R.id.tv_select_camera); tv_select_gallery.setOnClickListener(new OnClickListener() {// 在相册中选取@Override public void onClick(View v) {Intent intent1 = new Intent(Intent.ACTION_PICK, null); intent1.setDataAndType(MediaStore.Images.Media.EXTERNAL_CONTENT_URI, "image/*"); startActivityForResult(intent1, 1); dialog.dismiss(); } }); tv_select_camera.setOnClickListener(new OnClickListener() {// 调用照相机@Override public void onClick(View v) {Intent intent2 = new Intent(MediaStore.ACTION_IMAGE_CAPTURE); intent2.putExtra(MediaStore.EXTRA_OUTPUT, Uri.fromFile(new File(Environment.getExternalStorageDirectory(), "head.jpg"))); startActivityForResult(intent2, 2);// 采用ForResult打开 dialog.dismiss(); } }); dialog.setView(view); dialog.show(); } @Override protected void onActivityResult(int requestCode, int resultCode, Intent data) { switch (requestCode) {case 1: if (resultCode == RESULT_OK) {cropPhoto(data.getData());// 裁剪图片 } break; case 2: if (resultCode == RESULT_OK) {File temp = new File(Environment.getExternalStorageDirectory() + "/head.jpg"); cropPhoto(Uri.fromFile(temp));// 裁剪图片 } break; case 3: if (data != null) {Bundle extras = data.getExtras(); head = extras.getParcelable("data"); if (head != null) {/** * 上传服务器代码 */ setPicToView(head);// 保存在SD卡中 iv_photo.setImageBitmap(head);// 用ImageView显示出来 } } break; default: break; } super.onActivityResult(requestCode, resultCode, data); } /** * 调用系统的裁剪功能 * * @param uri */ public void cropPhoto(Uri uri) { Intent intent = new Intent("com.android.camera.action.CROP");intent.setDataAndType(uri, "image/*"); intent.putExtra("crop", "true");// aspectX aspectY 是宽高的比例 intent.putExtra("aspectX", 1); intent.putExtra("aspectY", 1);// outputX outputY 是裁剪图片宽高 intent.putExtra("outputX", 150); intent.putExtra("outputY", 150); intent.putExtra("return-data", true);startActivityForResult(intent, 3); } private void setPicToView(Bitmap mBitmap) {String sdStatus = Environment.getExternalStorageState(); if (!sdStatus.equals(Environment.MEDIA_MOUNTED)) { // 检测sd是否可用return; } FileOutputStream b = null; File file = new File(path); file.mkdirs();// 创建文件夹 String fileName = path + "head.jpg";// 图片名字 try {b = new FileOutputStream(fileName); mBitmap.compress(Bitmap.CompressFormat.JPEG, 100, b);// 把数据写入文件 } catch (FileNotFoundException e) {e.printStackTrace(); } finally { try {// 关闭流 b.flush(); b.close(); } catch (IOException e) {e.printStackTrace(); } } } } |
再添加以下权限
1 2 3 4 | <uses-permission android:name="android.permission.CAMERA" /> <uses-permission android:name="android.permission.WRITE_EXTERNAL_STORAGE" /> <uses-permission android:name="android.permission.MOUNT_UNMOUNT_FILESYSTEMS" /> <uses-permission android:name="android.permission.INTERNET" /> |
Dialog的xml文件如下:
1 2 3 4 5 6 7 8 9 10 11 12 13 14 15 16 17 18 19 20 21 22 23 24 25 26 27 28 29 30 31 32 33 | <?xml version="1.0" encoding="utf-8"?> <LinearLayout xmlns:android="http://schemas.android.com/apk/res/android" android:layout_width="match_parent" android:layout_height="match_parent" android:orientation="vertical" > <TextView android:id="@+id/tv_select_gallery" android:layout_width="match_parent" android:layout_height="wrap_content" android:gravity="center_horizontal" android:padding="20dp" android:text="从图库中选取" android:textColor="#000" android:textSize="20sp" /> <View android:layout_width="match_parent" android:layout_height="1dp" android:layout_marginLeft="10dp" android:layout_marginRight="10dp" android:background="#000" /> <TextView android:id="@+id/tv_select_camera" android:layout_width="match_parent" android:layout_height="wrap_content" android:gravity="center_horizontal" android:padding="20dp" android:text="拍摄照片" android:textColor="#000" android:textSize="20sp" /> </LinearLayout> |
代码的注释还算全面,仔细阅读一定能看懂,大家可以试试这个demo~这样一个更换头像的功能就实现了。


