(一)背景知识
为什么需要屏幕适配
Android是一个开放的系统,全球各种用户、手机企业、OEM厂商都可以对Android系统进行定制,这就导致了Android系统的碎片化问题。其中对于开发者来讲工作中最常碰到的就是屏幕碎片化,那么如何解决屏幕碎片化问题,实现最优的屏幕适配,是每个Android开发者所要面临的问题,这里我整合CSDN博主赵凯强的关于Android屏幕适配的博文的知识,写成博客分享给大家。
Android中的显示单位
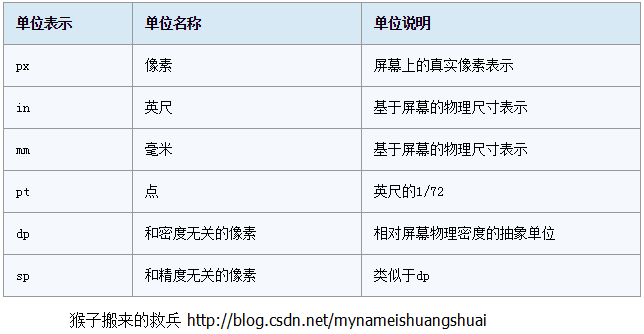
常见的定义
屏幕尺寸
屏幕尺寸指屏幕的对角线的长度,单位是英寸,1英寸=2.54厘米
比如常见的屏幕尺寸有2.4、2.8、3.5、3.7、4.2、5.0、5.5、6.0等
屏幕分辨率
屏幕分辨率是指在横纵向上的像素点数,单位是px,1px=1个像素点。一般以纵向像素*横向像素,如1960*1080。
屏幕像素密度
屏幕像素密度是指每英寸上的像素点数,单位是dpi,即“dot per inch”的缩写。屏幕像素密度与屏幕尺寸和屏幕分辨率有关,在单一变化条件下,屏幕尺寸越小、分辨率越高,像素密度越大,反之越小。
dp、dip、dpi、sp、px
px:我们应该是比较熟悉的,前面的分辨率就是用的像素为单位,大多数情况下,比如UI设计、Android原生API都会以px作为统一的计量单位,像是获取屏幕宽高等。
dip和dp:是一个意思,都是Density Independent Pixels的缩写,即密度无关像素,上面我们说过,dpi是屏幕像素密度,假如一英寸里面有160个像素,这个屏幕的像素密度就是160dpi,那么在这种情况下,dp和px如何换算呢?在Android中,规定以160dpi为基准,1dip=1px,如果密度是320dpi,则1dip=2px,以此类推。
sp:即scale-independent pixels,与dp类似,但是可以根据文字大小首选项进行放缩,是设置字体大小的御用单位。
dip与px之间的换算公式
a. 2N + 2N/2 = PX
b.(2N-1)+ 2N/2 = PX12
注:偶数值dip 的1.5倍等于相对应的px值,偶数值的间距与奇数元素设置居中对齐的时候会有1px的误差。
下面是一个常见的dp和px的转换工具类
public class DensityUtil {

    /**
     * 根据手机的分辨率从 dp 的单位 转成为 px(像素)
     */
    public static int dip2px(Context context, float dpValue) {
        final float scale = context.getResources().getDisplayMetrics().density;
        return (int) (dpValue * scale + 0.5f);
    }

    /**
     * 根据手机的分辨率从 px(像素) 的单位 转成为 dp
     */
    public static int px2dip(Context context, float pxValue) {
        final float scale = context.getResources().getDisplayMetrics().density;
        return (int) (pxValue / scale + 0.5f);
    }
}  123456789101112131415161718
mdpi、hdpi、xdpi、xxdpi、xxxdpi
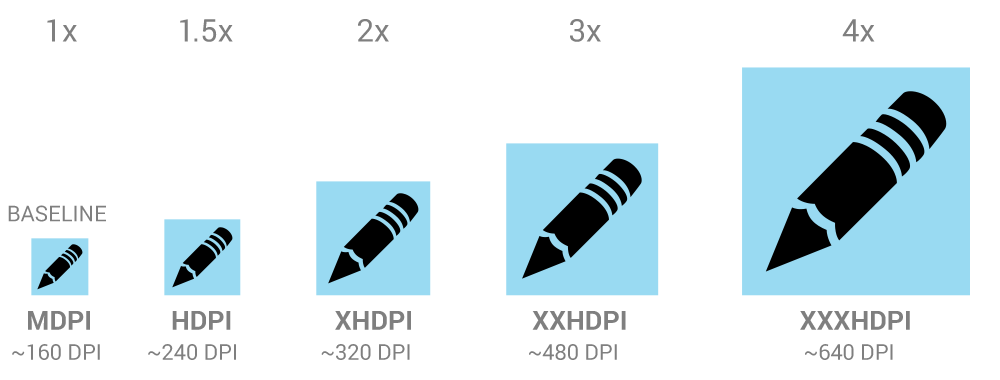
mdpi、hdpi、xdpi、xxdpi、xxxdpi用来修饰Android中的drawable文件夹及values文件夹,用来区分不同像素密度下的图片和dimen值。
根据谷歌官方文档,上述五个具体解释如下:
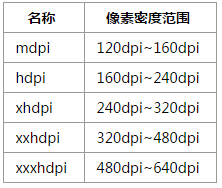
在开发的过程中,我们可以和美工配合,设计五种主流的像素密度图标,并图片放在合适的文件夹里面。
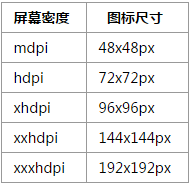
下图为图标的各个屏幕密度的对应尺寸
尺寸资源XML文件
通常我们在企业级项目中常常会使用尺寸资源文件,目的是为了做到一处更改全部更改。
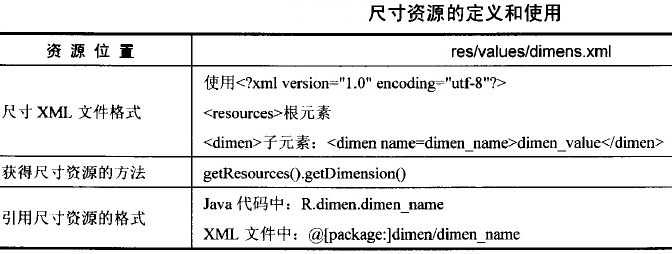
实例:
该示例在布局文件中添加一个TextView和一个Button,分别使用尺寸资源来定义它们的宽和高。
1.在工程的res\values\目录下添加一个dimens.xml尺寸资源文件,并且添加4个尺寸资源(如下面代码所示),可视化的添加方法跟添加字符串类似,不过其Value值要是“数字+单位”(我自己的体会)。当然你也可以直接输代码。
<?xml version="1.0" encoding="utf-8"?><resources>
    <dimen name="test_width">150px</dimen>
    <dimen name="test_height">100px</dimen>
    <dimen name="btn_width">30mm</dimen>
    <dimen name="btn_height">10mm</dimen></resources>1234567
2.在工程的res\layout\目录下添加一个test_dimens.xml布局资源文件,在布局文件中添加一个TextView和一个Button,TextView的宽高尺寸引用尺寸资源来设置,Button的宽和高在代码中设置:
<TextView
     android:text="@string/test_demen"
     android:id="@+id/myTextView01"
     android:layout_width="wrap_content"
     android:layout_height="wrap_content"
     android:textColor="@color/blue_text"
     android:width="@dimen/test_width"
     android:height="@dimen/test_height"
     android:background="@color/red_bg"
 />
    <Button
        android:id="@+id/button1"
        android:layout_width="wrap_content"
        android:layout_height="wrap_content"
        android:text="@string/test_demen1" />123456789101112131415
3.Button宽和高设置代码
  Button myButton = (Button)findViewById(R.id.button1);
        Resources r =  getResources();
        float btn_h = r.getDimension(R.dimen.btn_height);
        float btn_w = r.getDimension(R.dimen.btn_width);
        myButton.setHeight((int)btn_h);
        myButton.setWidth((int)btn_w);123456
可以看出,尺寸资源和字符串资源的使用很相似。
(二)屏幕适配方案
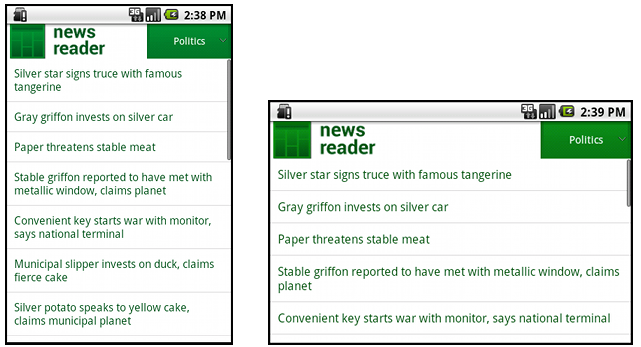
充分利用”wrap_content” 、”match_parent”以及“weight”
通常我们会在布局视图中使用”wrap_content”和”match_parent”来确定它的宽和高。如果你使用了”wrap_content”,相应视图的宽和高就会被设定成刚好能够包含视图中内容的最小值。而如果你使用了”match_parent”,就会让视图的宽和高延伸至充满整个父布局。
<LinearLayout xmlns:android="http://schemas.android.com/apk/res/android"
    android:orientation="vertical"
    android:layout_width="match_parent"
    android:layout_height="match_parent">
    <LinearLayout android:layout_width="match_parent"
                  android:id="@+id/linearLayout1"
                  android:gravity="center"
                  android:layout_height="50dp">
        <ImageView android:id="@+id/imageView1"
                   android:layout_height="wrap_content"
                   android:layout_width="wrap_content"
                   android:src="@drawable/logo"
                   android:paddingRight="30dp"
                   android:layout_gravity="left"
                   android:layout_weight="0" />
        <View android:layout_height="wrap_content"
              android:id="@+id/view1"
              android:layout_width="wrap_content"
              android:layout_weight="1" />
        <Button android:id="@+id/categorybutton"
                android:background="@drawable/button_bg"
                android:layout_height="match_parent"
                android:layout_weight="0"
                android:layout_width="120dp"
                style="@style/CategoryButtonStyle"/>
    </LinearLayout>

    <fragment android:id="@+id/headlines"
              android:layout_height="fill_parent"
              android:name="com.example.android.newsreader.HeadlinesFragment"
              android:layout_width="match_parent" />  </LinearLayout>  1234567891011121314151617181920212223242526272829303132
android:layout_weight属性
在布局中一旦View设置了weight属性,那么该 View的宽度等于原有宽度(android:layout_width)加上剩余空间的占比。1
假设设屏幕宽度为100,在两个view的宽度都为match_parent的情况下,原有宽度为100,两个的View的宽度都为100,那么剩余宽度为100-(100+100) = -100, 左边的View占比三分之一,所以总宽度是100+(-100)*1/3 = (2/3)100.事实上默认的View的weight这个值为0,一旦设置了这个值,那么所在view在绘制的时候onMeasure会执行两次。通常我们在使用weight属性时,将width设为0dip即可,效果跟设成wrap_content是一样的。
1.当两个组件同时设置android:layout_width=”match_parent”
<LinearLayout xmlns:android="http://schemas.android.com/apk/res/android"
    xmlns:tools="http://schemas.android.com/tools"
    android:layout_width="match_parent"
    android:layout_height="match_parent"
    android:layout_marginTop="20dp"
    android:orientation="horizontal">

    <Button        android:layout_width="match_parent"
        android:layout_height="50dp"
        android:layout_weight="1"
        android:text="@string/btn1"
        android:background="@android:color/holo_blue_bright"/>

        <Button        android:layout_width="match_parent"
        android:layout_height="50dp"
        android:layout_weight="2"
        android:text="@string/btn2"
        android:background="@android:color/holo_green_light"/></LinearLayout>12345678910111213141516171819202122
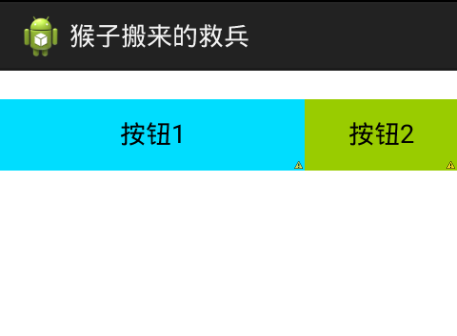
从上图我们可以看出按钮1的权重为1,但是却占据了2/3的宽度
2.当两个组件同时设置android:layout_width=”wrap_content”
<LinearLayout xmlns:android="http://schemas.android.com/apk/res/android"
    xmlns:tools="http://schemas.android.com/tools"
    android:layout_width="match_parent"
    android:layout_height="match_parent"
    android:layout_marginTop="20dp"
    android:orientation="horizontal">

    <Button        android:layout_width="wrap_content"
        android:layout_height="50dp"
        android:layout_weight="1"
        android:text="@string/btn1"
        android:background="@android:color/holo_blue_bright"/>

        <Button        android:layout_width="wrap_content"
        android:layout_height="50dp"
        android:layout_weight="2"
        android:text="@string/btn2"
        android:background="@android:color/holo_green_light"/></LinearLayout>12345678910111213141516171819202122
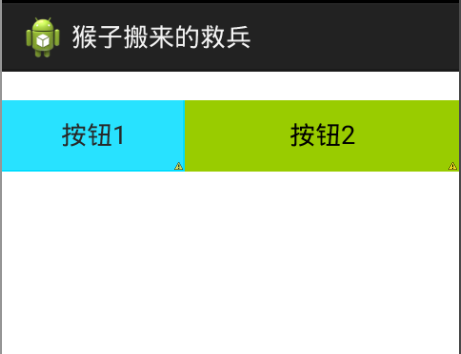
从上图我们可以看出按钮1的权重为1,占据了1/3的宽度
多使用相对布局RelativeLayout,少使用绝对布局
如果你需要让子视图能够有更多的排列方式,而不是简单地排成一行或一列,使用RelativeLayout将会是更好的解决方案。RelativeLayout允许布局的子控件之间使用相对定位的方式控制控件的位置,比如你可以让一个子视图居屏幕左侧对齐,让另一个子视图居屏幕右侧对齐。
<RelativeLayout
    android:layout_width="match_parent"
    android:layout_height="match_parent">
        ……
</RelativeLayout>  12345
使用尺寸Size限定符
我们的应用程序实现可自适应的布局外,还应该提供一些方案根据屏幕的配置来加载不同的布局,可以通过配置限定符(configuration qualifiers)来实现。配置限定符允许程序在运行时根据当前设备的配置自动加载合适的资源(比如为不同尺寸屏幕设计不同的布局)。
现在有很多的应用程序为了支持大屏设备,都会实现“two pane”模式(程序会在左侧的面板上展示一个包含子项的List,在右侧面板上展示内容)。平板和电视设备的屏幕都很大,足够同时显示两个面板,而手机屏幕一次只能显示一个面板,两个面板需要分开显示。所以,为了实现这种布局,你可能需要以下文件:
res/layout/main.xml,single-pane(默认)布局:
<LinearLayout xmlns:android="http://schemas.android.com/apk/res/android"
    android:orientation="vertical"
    android:layout_width="match_parent"
    android:layout_height="match_parent">
    <fragment android:id="@+id/headlines"
              android:layout_height="fill_parent"
              android:layout_width="match_parent" />  </LinearLayout>  12345678
res/layout-large/main.xml,two-pane布局:
<LinearLayout xmlns:android="http://schemas.android.com/apk/res/android"
    android:layout_width="fill_parent"
    android:layout_height="fill_parent"
    android:orientation="horizontal">
    <fragment android:id="@+id/headlines"
              android:layout_height="fill_parent"
              android:layout_width="400dp"
              android:layout_marginRight="10dp"/>
    <fragment android:id="@+id/article"
              android:layout_height="fill_parent"
              android:layout_width="fill_parent" />  </LinearLayout>  123456789101112
第二个布局的目录名中包含了large限定符,那些被定义为大屏的设备(比如7寸以上的平板)会自动加载此布局,而小屏设备会加载另一个默认的布局。
最小宽度Smallest-width限定符
Smallest-width限定符允许你设定一个具体的最小值(以dp为单位)来指定屏幕。例如,7寸的平板最小宽度是600dp,所以如果你想让你的UI在这种屏幕上显示two pane,在更小的屏幕上显示single pane,你可以使用sw600dp来表示你想在600dp以上宽度的屏幕上使用two pane模式。
res/layout/main.xml,single-pane(默认)布局:
<LinearLayout xmlns:android="http://schemas.android.com/apk/res/android"
    android:orientation="vertical"
    android:layout_width="match_parent"
    android:layout_height="match_parent">

    <fragment android:id="@+id/headlines"
              android:layout_height="fill_parent"
              android:layout_width="match_parent" />  </LinearLayout>  123456789
res/layout-sw600dp/main.xml,two-pane布局:
<LinearLayout xmlns:android="http://schemas.android.com/apk/res/android"
    android:layout_width="fill_parent"
    android:layout_height="fill_parent"
    android:orientation="horizontal">
    <fragment android:id="@+id/headlines"
              android:layout_height="fill_parent"
              android:layout_width="400dp"
              android:layout_marginRight="10dp"/>
    <fragment android:id="@+id/article"
              android:layout_height="fill_parent"
              android:layout_width="fill_parent" />  </LinearLayout>  123456789101112
这意味着,那些最小屏幕宽度大于600dp的设备会选择layout-sw600dp/main.xml(two-pane)布局,而更小屏幕的设备将会选择layout/main.xml(single-pane)布局。
使用布局别名
Smallest-width限定符仅在Android 3.2及之后的系统中有效。因而,你也需要同时使用Size限定符(small, normal, large和xlarge)来兼容更早的系统。例如,你想手机上显示single-pane界面,而在7寸平板和更大屏的设备上显示multi-pane界面,你需要提供以下文件:
res/layout/main.xml: single-pane布局res/layout-large: multi-pane布局res/layout-sw600dp: multi-pane布局123
最后的两个文件是完全相同的,为了要解决这种重复,你需要使用别名技巧。例如,你可以定义以下布局:
res/layout/main.xml, single-pane布局
res/layout/main_twopanes.xml, two-pane布局12
加入以下两个文件:
res/values-large/layout.xml:
<resources>
    <item name="main" type="layout">@layout/main_twopanes</item>  </resources>  123
res/values-sw600dp/layout.xml:
<resources>
    <item name="main" type="layout">@layout/main_twopanes</item>  </resources>  123
最后两个文件有着相同的内容,但是它们并没有真正去定义布局,它们仅仅只是给main定义了一个别名main_twopanes。这样两个layout.xml都只是引用了@layout/main_twopanes,就避免了重复定义布局文件的情况。
使用.9图
“点九”是andriod平台的应用软件开发里的一种特殊的图片形式,文件扩展名为:.9.png
智能手机中有自动横屏的功能,同一幅界面会在随着手机(或平板电脑)中的方向传感器的参数不同而改变显示的方向,在界面改变方向后,界面上的图形会因为长宽的变化而产生拉伸,造成图形的失真变形。
我们都知道android平台有多种不同的分辨率,很多控件的切图文件在被放大拉伸后,边角会模糊失真。OK,在android平台下使用点九PNG技术,可以将图片横向和纵向同时进行拉伸,以实现在多分辨率下的完美显示效果。
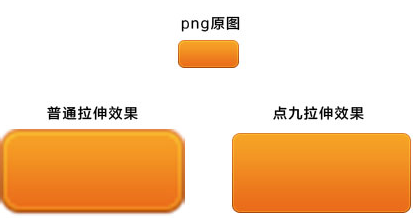
对比很明显,使用点九后,仍能保留图像的渐变质感,和圆角的精细度。
从中我们也可以理解为什么叫“点九PNG”,其实相当于把一张png图分成了9个部分(九宫格),分别为4个角,4条边,以及一个中间区域,4个角是不做拉升的,所以还能一直保持圆角的清晰状态,而2条水平边和垂直边分别只做水平和垂直拉伸,所以不会出现边会被拉粗的情况,只有中间用黑线指定的区域做拉伸。结果是图片不会走样。
实现百分比布局
在开发中,组件布局是大家每日开发必须要面对的工作,对于Android来说提供五种常用布局,分别是:
LinearLayout(线性布局)
TableLayout(表格布局)
RelativeLayout(相对布局)
AbsoluteLayout(绝对布局)
FrameLayout(框架布局)
但是,开发中如果可以按照百分比的方式进行界面布局,将会对我们的适配工作带来许多便利。前段时间,谷歌正式提供百分比布局支持库(android-support-percent-lib),对于我们开发者来讲只需要导入这个库就可以实现百分比布局。现在我们抛开谷歌库不谈,自己其实也可以实现百分比布局。具体实现大家可以参考我之前的博客Android自实现百分比布局
支持各种屏幕密度
使用非密度制约像素
由于各种屏幕的像素密度都有所不同,因此相同数量的像素在不同设备上的实际大小也有所差异,这样使用像素定义布局尺寸就会产生问题。因此,请务必使用 dp 或 sp 单位指定尺寸。dp 是一种非密度制约像素,其尺寸与 160 dpi 像素的实际尺寸相同。sp 也是一种基本单位,但它可根据用户的偏好文字大小进行调整(即尺度独立性像素),因此我们应将该测量单位用于定义文字大小。
例如,请使用 dp(而非 px)指定两个视图间的间距:
<Buttonandroid:layout_width="wrap_content"android:layout_height="wrap_content"android:text="@string/clickme"android:layout_marginTop="20dp" />12345
请务必使用 sp 指定文字大小:
<TextViewandroid:layout_width="match_parent"android:layout_height="wrap_content"android:textSize="20sp" />1234
另外,虽然说dp可以去除不同像素密度的问题,使得1dp在不同像素密度上面的显示效果相同,但是还是由于Android屏幕设备的多样性,如果使用dp来作为度量单位,并不是所有的屏幕的宽度都是相同的dp长度,比如说,Nexus S和Nexus One属于hdpi,屏幕宽度是320dp,而Nexus 5属于xxhdpi,屏幕宽度是360dp,Galaxy Nexus属于xhdpi,屏幕宽度是384dp,Nexus 6 属于xxxhdpi,屏幕宽度是410dp。所以说,光Google自己一家的产品就已经有这么多的标准,而且屏幕宽度和像素密度没有任何关联关系,即使我们使用dp,在320dp宽度的设备和410dp的设备上,还是会有90dp的差别。当然,我们尽量使用match_parent和wrap_content,尽可能少的用dp来指定控件的具体长宽,再结合上权重,大部分的情况我们都是可以做到适配的。
但是除了这个方法,我们还有没有其他的更彻底的解决方案呢?我们换另外一个思路来思考这个问题。因为分辨率不一样,所以不能用px;因为屏幕宽度不一样,所以要小心的用dp,那么我们可不可以用另外一种方法来统一单位,不管分辨率是多大,屏幕宽度用一个固定的值的单位来统计呢?答案是:当然可以。我们假设手机屏幕的宽度都是320某单位,那么我们将一个屏幕宽度的总像素数平均分成320份,每一份对应具体的像素就可以了。我们看下面的代码
import java.io.File;
import java.io.FileNotFoundException;
import java.io.FileOutputStream;
import java.io.PrintWriter;

publicclassMakeXml {

    privatefinalstatic String rootPath = "C:\\Users\\Administrator\\Desktop\\layoutroot\\values-{0}x{1}\\";

    privatefinalstaticfloat dw = 320f;
    privatefinalstaticfloat dh = 480f;

    privatefinalstatic String WTemplate = "<dimen name=\"x{0}\">{1}px</dimen>\n";
    privatefinalstatic String HTemplate = "<dimen name=\"y{0}\">{1}px</dimen>\n";

    publicstaticvoid main(String[] args) {
        makeString(320, 480);
        makeString(480,800);
        makeString(480, 854);
        makeString(540, 960);
        makeString(600, 1024);
        makeString(720, 1184);
        makeString(720, 1196);
        makeString(720, 1280);
        makeString(768, 1024);
        makeString(800, 1280);
        makeString(1080, 1812);
        makeString(1080, 1920);
        makeString(1440, 2560);
    }

    publicstaticvoid makeString(int w, int h) {

        StringBuffer sb = new StringBuffer();
        sb.append("<?xml version=\"1.0\" encoding=\"utf-8\"?>\n");
        sb.append("<resources>");
        float cellw = w / dw;        for (int i = 1; i < 320; i++) {
            sb.append(WTemplate.replace("{0}", i + "").replace("{1}",
                    change(cellw * i) + ""));
        }
        sb.append(WTemplate.replace("{0}", "320").replace("{1}", w + ""));
        sb.append("</resources>");

        StringBuffer sb2 = new StringBuffer();
        sb2.append("<?xml version=\"1.0\" encoding=\"utf-8\"?>\n");
        sb2.append("<resources>");
        float cellh = h / dh;        for (int i = 1; i < 480; i++) {
            sb2.append(HTemplate.replace("{0}", i + "").replace("{1}",
                    change(cellh * i) + ""));
        }
        sb2.append(HTemplate.replace("{0}", "480").replace("{1}", h + ""));
        sb2.append("</resources>");        String path = rootPath.replace("{0}", h + "").replace("{1}", w + "");
        File rootFile = new File(path);        if (!rootFile.exists()) {
            rootFile.mkdirs();
        }
        File layxFile = new File(path + "lay_x.xml");
        File layyFile = new File(path + "lay_y.xml");
        try {
            PrintWriter pw = new PrintWriter(new FileOutputStream(layxFile));
            pw.print(sb.toString());
            pw.close();
            pw = new PrintWriter(new FileOutputStream(layyFile));
            pw.print(sb2.toString());
            pw.close();
        } catch (FileNotFoundException e) {
            e.printStackTrace();
        }

    }

    publicstaticfloat change(float a) {        int temp = (int) (a * 100);
        return temp / 100f;
    }
}1234567891011121314151617181920212223242526272829303132333435363738394041424344454647484950515253545556575859606162636465666768697071727374757677787980
代码应该很好懂,我们将一个屏幕宽度分为320份,高度480份,然后按照实际像素对每一个单位进行复制,放在对应values-widthxheight文件夹下面的lax.xml和lay.xml里面,这样就可以统一所有你想要的分辨率的单位了,下面是生成的一个320*480分辨率的文件,因为宽高分割之后总分数和像素数相同,所以x1就是1px,以此类推
<?xml version="1.0" encoding="utf-8"?><resources><dimen name="x1">1.0px</dimen><dimen name="x2">2.0px</dimen><dimen name="x3">3.0px</dimen><dimen name="x4">4.0px</dimen><dimen name="x5">5.0px</dimen><dimen name="x6">6.0px</dimen><dimen name="x7">7.0px</dimen><dimen name="x8">8.0px</dimen><dimen name="x9">9.0px</dimen><dimen name="x10">10.0px</dimen>...省略好多行<dimen name="x300">300.0px</dimen><dimen name="x301">301.0px</dimen><dimen name="x302">302.0px</dimen><dimen name="x303">303.0px</dimen><dimen name="x304">304.0px</dimen><dimen name="x305">305.0px</dimen><dimen name="x306">306.0px</dimen><dimen name="x307">307.0px</dimen><dimen name="x308">308.0px</dimen><dimen name="x309">309.0px</dimen><dimen name="x310">310.0px</dimen><dimen name="x311">311.0px</dimen><dimen name="x312">312.0px</dimen><dimen name="x313">313.0px</dimen><dimen name="x314">314.0px</dimen><dimen name="x315">315.0px</dimen><dimen name="x316">316.0px</dimen><dimen name="x317">317.0px</dimen><dimen name="x318">318.0px</dimen><dimen name="x319">319.0px</dimen><dimen name="x320">320px</dimen></resources>12345678910111213141516171819202122232425262728293031323334
那么1080*1960分辨率下是什么样子呢?我们可以看下,由于1080和320是3.37倍的关系,所以x1=3.37px
<?xml version="1.0" encoding="utf-8"?><resources><dimen name="x1">3.37px</dimen><dimen name="x2">6.75px</dimen><dimen name="x3">10.12px</dimen><dimen name="x4">13.5px</dimen><dimen name="x5">16.87px</dimen><dimen name="x6">20.25px</dimen><dimen name="x7">23.62px</dimen><dimen name="x8">27.0px</dimen><dimen name="x9">30.37px</dimen><dimen name="x10">33.75px</dimen>...省略好多行<dimen name="x300">1012.5px</dimen><dimen name="x301">1015.87px</dimen><dimen name="x302">1019.25px</dimen><dimen name="x303">1022.62px</dimen><dimen name="x304">1026.0px</dimen><dimen name="x305">1029.37px</dimen><dimen name="x306">1032.75px</dimen><dimen name="x307">1036.12px</dimen><dimen name="x308">1039.5px</dimen><dimen name="x309">1042.87px</dimen><dimen name="x310">1046.25px</dimen><dimen name="x311">1049.62px</dimen><dimen name="x312">1053.0px</dimen><dimen name="x313">1056.37px</dimen><dimen name="x314">1059.75px</dimen><dimen name="x315">1063.12px</dimen><dimen name="x316">1066.5px</dimen><dimen name="x317">1069.87px</dimen><dimen name="x318">1073.25px</dimen><dimen name="x319">1076.62px</dimen><dimen name="x320">1080px</dimen></resources>12345678910111213141516171819202122232425262728293031323334
无论在什么分辨率下,x320都是代表屏幕宽度,y480都是代表屏幕高度。
那么,我们应该如何使用呢?首先,我们要把生成的所有values文件夹放到res目录下,当设计师把UI高清设计图给你之后,你就可以根据设计图上的尺寸,以某一个分辨率的机型为基础,找到对应像素数的单位,然后设置给控件即可。
下图还是两个Button,不同的是,我们把单位换成了我们在values文件夹下dimen的值,这样在你指定的分辨率下,不管宽度是320dp、360dp,还是410dp,就都可以完全适配了。
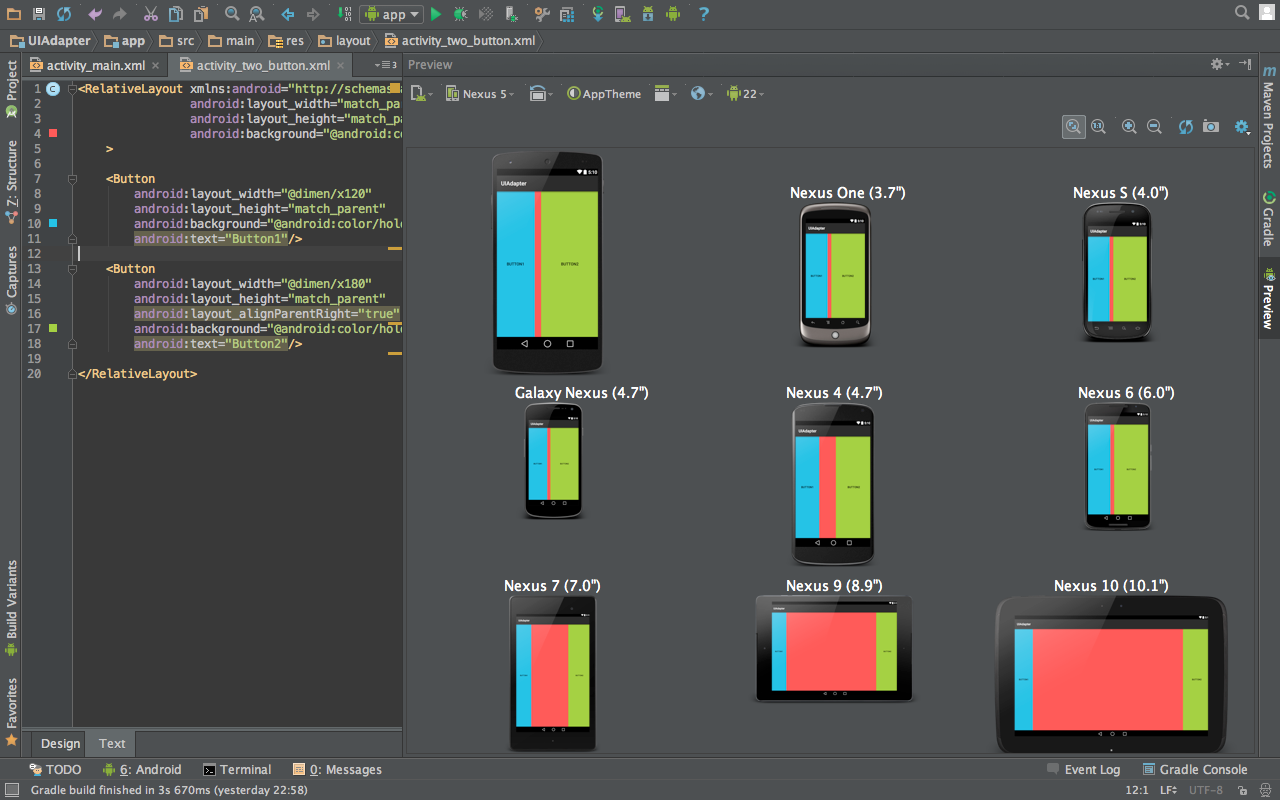
但是,还是有个问题,为什么下面的三个没有适配呢?
这是因为由于在生成的values文件夹里,没有对应的分辨率,其实一开始是报错的,因为默认的values没有对应dimen,所以我只能在默认values里面也创建对应文件,但是里面的数据却不好处理,因为不知道分辨率,我只好默认为x1=1dp保证尽量兼容。这也是这个解决方案的几个弊端,对于没有生成对应分辨率文件的手机,会使用默认values文件夹,如果默认文件夹没有,就会出现问题。
所以说,这个方案虽然是一劳永逸,但是由于实际上还是使用的px作为长度的度量单位,所以多少和google的要求有所背离,不好说以后会不会出现什么不可预测的问题。其次,如果要使用这个方案,你必须尽可能多的包含所有的分辨率,因为这个是使用这个方案的基础,如果有分辨率缺少,会造成显示效果很差,甚至出错的风险,而这又势必会增加软件包的大小和维护的难度,所以大家自己斟酌,择优使用。
提供备用位图
由于 Android 可在具有各种屏幕密度的设备上运行,因此我们提供的位图资源应始终可以满足各类普遍密度范围的要求:低密度、中等密度、高密度以及超高密度。这将有助于我们的图片在所有屏幕密度上都能得到出色的质量和效果。
要生成这些图片,我们应先提取矢量格式的原始资源,然后根据以下尺寸范围针对各密度生成相应的图片。
xhdpi:2.0
hdpi:1.5
mdpi:1.0
ldpi:0.75
也就是说,如果我们为 xhdpi 设备生成了 200x200 px尺寸的图片,就应该使用同一资源为 hdpi、mdpi 和 ldpi 设备分别生成 150x150、100x100 和 75x75 尺寸的图片。
然后,将生成的图片文件放在 res/ 下的相应子目录中(mdpi、hdpi、xhdpi、xxhdpi),系统就会根据运行您应用的设备的屏幕密度自动选择合适的图片。
这样一来,只要我们引用 @drawable/id,系统都能根据相应屏幕的 dpi 选取合适的位图。
但是还有个问题需要注意下,如果是.9图或者是不需要多个分辨率的图片,就放在drawable文件夹即可,对应分辨率的图片要正确的放在合适的文件夹,否则会造成图片拉伸等问题。
参考链接:http://blog.csdn.net/zhaokaiqiang1992/article/details/45419023

 随时随地看视频


