Directive
Vue 指令类型很多,限于篇幅,我们不会把所有指令的解析过程都介绍一遍,这里结合前面的例子只介绍 v-text 指令的解析过程,其他指令的解析过程也大同小异。
前面我们提到了 Vue 实例创建的生命周期,在给 data 添加 Observer 之后,有一个过程是调用 vm.compile 方法对模板进行编译。compile 方法的源码定义如下:
<!-源码目录:src/instance/internal/lifecycle.js-->
Vue.prototype._compile = function (el) {
    var options = this.$options
    // transclude and init element
    // transclude can potentially replace original
    // so we need to keep reference; this step also injects
    // the template and caches the original attributes
    // on the container node and replacer node.
    var original = el
    el = transclude(el, options)
    this._initElement(el)
    // handle v-pre on root node (#2026)
    if (el.nodeType === 1 && getAttr(el, 'v-pre') !== null) {
      return
    }
    // root is always compiled per-instance, because
    // container attrs and props can be different every time.
    var contextOptions = this._context && this._context.$options
    var rootLinker = compileRoot(el, options, contextOptions)
    // resolve slot distribution
    resolveSlots(this, options._content)
    // compile and link the rest
    var contentLinkFn
    var ctor = this.constructor
    // component compilation can be cached
    // as long as it's not using inline-template
    if (options._linkerCachable) {
      contentLinkFn = ctor.linker
      if (!contentLinkFn) {
        contentLinkFn = ctor.linker = compile(el, options)
      }
    }
    // link phase
    // make sure to link root with prop scope!
    var rootUnlinkFn = rootLinker(this, el, this._scope)
    var contentUnlinkFn = contentLinkFn
      ? contentLinkFn(this, el)
      : compile(el, options)(this, el)
    // register composite unlink function
    // to be called during instance destruction
    this._unlinkFn = function () {
      rootUnlinkFn()
      // passing destroying: true to avoid searching and
      // splicing the directives
      contentUnlinkFn(true)
    }
    // finally replace original
    if (options.replace) {
      replace(original, el)
    }
    this._isCompiled = true
    this._callHook('compiled')
  }
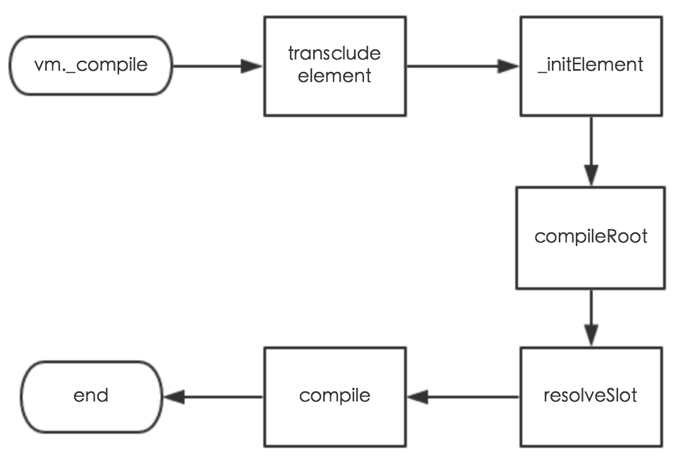
我们可以通过下图来看一下这个方法编译的主要流程:

这个过程通过 el = transclude(el, option) 方法把 template 编译成一段 document fragment,拿到 el 对象。而指令解析部分就是通过 compile(el, options) 方法实现的。接下来我们看一下 compile 方法的实现,它的源码定义如下:
<!-源码目录:src/compiler/compile.js-->
    export function compile (el, options, partial) {
  // link function for the node itself.
  var nodeLinkFn = partial || !options._asComponent
    ? compileNode(el, options)
    : null
  // link function for the childNodes
  var childLinkFn =
    !(nodeLinkFn && nodeLinkFn.terminal) &&
    !isScript(el) &&
    el.hasChildNodes()
      ? compileNodeList(el.childNodes, options)
      : null
  /**
   * A composite linker function to be called on a already
   * compiled piece of DOM, which instantiates all directive
   * instances.
   *
   * @param {Vue} vm
   * @param {Element|DocumentFragment} el
   * @param {Vue} [host] - host vm of transcluded content
   * @param {Object} [scope] - v-for scope
   * @param {Fragment} [frag] - link context fragment
   * @return {Function|undefined}
   */
  return function compositeLinkFn (vm, el, host, scope, frag) {
    // cache childNodes before linking parent, fix #657
    var childNodes = toArray(el.childNodes)
    // link
    var dirs = linkAndCapture(function compositeLinkCapturer () {
      if (nodeLinkFn) nodeLinkFn(vm, el, host, scope, frag)
      if (childLinkFn) childLinkFn(vm, childNodes, host, scope, frag)
    }, vm)
    return makeUnlinkFn(vm, dirs)
  }
}
compile 方法主要通过 compileNode(el, options) 方法完成节点的解析,如果节点拥有子节点,则调用 compileNodeList(el.childNodes, options) 方法完成子节点的解析。compileNodeList 方法其实就是遍历子节点,递归调用 compileNode 方法。因为 DOM 元素本身就是树结构,这种递归方法也就是常见的树的深度遍历方法,这样就可以完成整个 DOM 树节点的解析。接下来我们看一下 compileNode 方法的实现,它的源码定义如下:
<!-源码目录:src/compiler/compile.js-->
function compileNode (node, options) {
  var type = node.nodeType
  if (type === 1 && !isScript(node)) {
    return compileElement(node, options)
  } else if (type === 3 && node.data.trim()) {
    return compileTextNode(node, options)
  } else {
    return null
  }
}
compileNode 方法对节点的 nodeType 做判断,如果是一个非 script 普通的元素(div、p等);则调用 compileElement(node, options) 方法解析;如果是一个非空的文本节点,则调用 compileTextNode(node, options) 方法解析。我们在前面的例子中解析的是非空文本节点 count: {{times}},这实际上是 v-text 指令,它的解析是通过 compileTextNode 方法实现的。接下来我们看一下 compileTextNode 方法,它的源码定义如下:
<!-源码目录:src/compiler/compile.js-->
function compileTextNode (node, options) {
  // skip marked text nodes
  if (node._skip) {
    return removeText
  }
  var tokens = parseText(node.wholeText)
  if (!tokens) {
    return null
  }
  // mark adjacent text nodes as skipped,
  // because we are using node.wholeText to compile
  // all adjacent text nodes together. This fixes
  // issues in IE where sometimes it splits up a single
  // text node into multiple ones.
  var next = node.nextSibling
  while (next && next.nodeType === 3) {
    next._skip = true
    next = next.nextSibling
  }
  var frag = document.createDocumentFragment()
  var el, token
  for (var i = 0, l = tokens.length; i < l; i++) {
    token = tokens[i]
    el = token.tag
      ? processTextToken(token, options)
      : document.createTextNode(token.value)
    frag.appendChild(el)
  }
  return makeTextNodeLinkFn(tokens, frag, options)
}
compileTextNode 方法首先调用了 parseText 方法对 node.wholeText 做解析。主要通过正则表达式解析 count: {{times}} 部分,我们看一下解析结果,如下图所示:

解析后的 tokens 是一个数组,数组的每个元素则是一个 Object。如果是 count: 这样的普通文本,则返回的对象只有 value 字段;如果是 {{times}} 这样的插值,则返回的对象包含 html、onTime、tag、value 等字段。
接下来创建 document fragment,遍历 tokens 创建 DOM 节点插入到这个 fragment 中。在遍历过程中,如果 token 无 tag 字段,则调用 document.createTextNode(token.value) 方法创建 DOM 节点;否则调用processTextToken(token, options) 方法创建 DOM 节点和扩展 token 对象。我们看一下调用后的结果,如下图所示:

可以看到,token 字段多了一个 descriptor 属性。这个属性包含了几个字段,其中 def 表示指令相关操作的对象,expression 为解析后的表达式,filters 为过滤器,name 为指令的名称。
在compileTextNode 方法的最后,调用 makeTextNodeLinkFn(tokens, frag, options) 并返回该方法执行的结果。接下来我们看一下 makeTextNodeLinkFn 方法,它的源码定义如下:
<!-源码目录:src/compiler/compile.js-->
function makeTextNodeLinkFn (tokens, frag) {
  return function textNodeLinkFn (vm, el, host, scope) {
    var fragClone = frag.cloneNode(true)
    var childNodes = toArray(fragClone.childNodes)
    var token, value, node
    for (var i = 0, l = tokens.length; i < l; i++) {
      token = tokens[i]
      value = token.value
      if (token.tag) {
        node = childNodes[i]
        if (token.oneTime) {
          value = (scope || vm).$eval(value)
          if (token.html) {
            replace(node, parseTemplate(value, true))
          } else {
            node.data = _toString(value)
          }
        } else {
          vm._bindDir(token.descriptor, node, host, scope)
        }
      }
    }
    replace(el, fragClone)
  }
}
makeTextNodeLinkFn 这个方法什么也没做,它仅仅是返回了一个新的方法 textNodeLinkFn。往前回溯,这个方法最终作为 compileNode 的返回值,被添加到 compile 方法生成的 childLinkFn 中。
我们回到 compile 方法,在 compile 方法的最后有这样一段代码:
<!-源码目录:src/compiler/compile.js-->
return function compositeLinkFn (vm, el, host, scope, frag) {
    // cache childNodes before linking parent, fix #657
    var childNodes = toArray(el.childNodes)
    // link
    var dirs = linkAndCapture(function compositeLinkCapturer () {
      if (nodeLinkFn) nodeLinkFn(vm, el, host, scope, frag)
      if (childLinkFn) childLinkFn(vm, childNodes, host, scope, frag)
    }, vm)
    return makeUnlinkFn(vm, dirs)
  }
compile 方法返回了 compositeLinkFn,它在 Vue.prototype._compile 方法执行时,是通过 compile(el, options)(this, el) 调用的。compositeLinkFn 方法执行了 linkAndCapture 方法,它的功能是通过调用 compile 过程中生成的 link 方法创建指令对象,再对指令对象做一些绑定操作。linkAndCapture 方法的源码定义如下:
<!-源码目录:src/compiler/compile.js-->
function linkAndCapture (linker, vm) {
  /* istanbul ignore if */
  if (process.env.NODE_ENV === 'production') {
    // reset directives before every capture in production
    // mode, so that when unlinking we don't need to splice
    // them out (which turns out to be a perf hit).
    // they are kept in development mode because they are
    // useful for Vue's own tests.
    vm._directives = []
  }
  var originalDirCount = vm._directives.length
  linker()
  var dirs = vm._directives.slice(originalDirCount)
  dirs.sort(directiveComparator)
  for (var i = 0, l = dirs.length; i < l; i++) {
    dirs[i]._bind()
  }
  return dirs
}
linkAndCapture 方法首先调用了 linker 方法,它会遍历 compile 过程中生成的所有 linkFn 并调用,本例中会调用到之前定义的 textNodeLinkFn。这个方法会遍历 tokens,判断如果 token 的 tag 属性值为 true 且 oneTime 属性值为 false,则调用 vm.bindDir(token.descriptor, node, host, scope) 方法创建指令对象。 vm._bindDir 方法的源码定义如下:
<!-源码目录:src/instance/internal/lifecycle.js-->
Vue.prototype._bindDir = function (descriptor, node, host, scope, frag) {
    this._directives.push(
      new Directive(descriptor, this, node, host, scope, frag)
    )
  }
Vue.prototype._bindDir 方法就是根据 descriptor 实例化不同的 Directive 对象,并添加到 vm 实例 directives 数组中的。到这一步,Vue.js 从解析模板到生成 Directive 对象的步骤就完成了。接下来回到 linkAndCapture 方法,它对创建好的 directives 进行排序,然后遍历 directives 调用 dirs[i]._bind 方法对单个directive做一些绑定操作。dirs[i]._bind方法的源码定义如下:
<!-源码目录:src/directive.js-->
Directive.prototype._bind = function () {
  var name = this.name
  var descriptor = this.descriptor
  // remove attribute
  if (
    (name !== 'cloak' || this.vm._isCompiled) &&
    this.el && this.el.removeAttribute
  ) {
    var attr = descriptor.attr || ('v-' + name)
    this.el.removeAttribute(attr)
  }
  // copy def properties
  var def = descriptor.def
  if (typeof def === 'function') {
    this.update = def
  } else {
    extend(this, def)
  }
  // setup directive params
  this._setupParams()
  // initial bind
  if (this.bind) {
    this.bind()
  }
  this._bound = true
  if (this.literal) {
    this.update && this.update(descriptor.raw)
  } else if (
    (this.expression || this.modifiers) &&
    (this.update || this.twoWay) &&
    !this._checkStatement()
  ) {
    // wrapped updater for context
    var dir = this
    if (this.update) {
      this._update = function (val, oldVal) {
        if (!dir._locked) {
          dir.update(val, oldVal)
        }
      }
    } else {
      this._update = noop
    }
    var preProcess = this._preProcess
      ? bind(this._preProcess, this)
      : null
    var postProcess = this._postProcess
      ? bind(this._postProcess, this)
      : null
    var watcher = this._watcher = new Watcher(
      this.vm,
      this.expression,
      this._update, // callback
      {
        filters: this.filters,
        twoWay: this.twoWay,
        deep: this.deep,
        preProcess: preProcess,
        postProcess: postProcess,
        scope: this._scope
      }
    )
    // v-model with inital inline value need to sync back to
    // model instead of update to DOM on init. They would
    // set the afterBind hook to indicate that.
    if (this.afterBind) {
      this.afterBind()
    } else if (this.update) {
      this.update(watcher.value)
    }
  }
}
Directive.prototype._bind 方法的主要功能就是做一些指令的初始化操作,如混合 def 属性。def 是通过 this.descriptor.def 获得的,this.descriptor 是对指令进行相关描述的对象,而 this.descriptor.def 则是包含指令相关操作的对象。比如对于 v-text 指令,我们可以看一下它的相关操作,源码定义如下:
<!-源码目录:src/directives/public/text.js-->
export default {
  bind () {
    this.attr = this.el.nodeType === 3
      ? 'data'
      : 'textContent'
  },
  update (value) {
    this.el[this.attr] = _toString(value)
  }
}
v-text 的 def 包含了 bind 和 update 方法,Directive 在初始化时通过 extend(this, def) 方法可以对实例扩展这两个方法。Directive 在初始化时还定义了 this.update 方法,并创建了 Watcher,把 this.update 方法作为 Watcher 的回调函数。这里把 Directive 和 Watcher 做了关联,当 Watcher 观察到指令表达式值变化时,会调用 Directive 实例的 _update 方法,最终调用 v-text 的 update 方法更新 DOM 节点。
至此,vm 实例中编译模板、解析指令、绑定 Watcher 的过程就结束了。接下来我们看一下 Watcher 的实现,了解 Directive 和 Observer 之间是如何通过 Watcher 关联的。


 随时随地看视频


热门评论
-

xiaoxiao3349882017-06-08 0
查看全部评论可惜不是vue2.0的源码,因为渲染使用了virtual dom;改成了render函数;我就这里读不是太懂,所以不知道怎么将watcher 和 dep建立联系的。困惑了好多天,希望老师能写一篇这样的文章,感激不尽