文件说明
这个压缩包,是一个手写数字识别库,世界上最权威的,美国邮政系统开发的,手写内容是0-9的内容,手写内容采集于美国人口调查局的员工和高中生,我们先从MNIST的官网开始,下载这个四个文件,这四个文件的具体说明:
There are 4 files:
train-images-idx3-ubyte: training set images
train-labels-idx1-ubyte: training set labels
t10k-images-idx3-ubyte:  test set images
t10k-labels-idx1-ubyte:  test set labels

The training set contains 60000 examples, and the test set 10000 examples.
MINIST实验包含了四个文件,其中train-images-idx3-ubyte是60000个图片样本,是由,train-labels-idx1-ubyte是这60000个图片对应的数字标签,t10k-images-idx3-ubyte是用于测试的样本,t10k-labels-idx1-ubyte是测试样本对应的数字标签。
TRAINING SET LABEL FILE (train-labels-idx1-ubyte):
[offset] [type]          [value]          [description] 0000     32 bit integer  0x00000801(2049) magic number (MSB first)
0004     32 bit integer  60000            number of items 0008     unsigned byte   ??               label 0009     unsigned byte   ??               label ........
xxxx     unsigned byte   ??               labelThe labels values are 0 to 9.
从说明可以看到,该文件是二进制内容,其中0-4位(magic number), 它是一个文件协议的描述,这个值一定是2049,读取文件信息的时候可以对他进行验证,避免该文件是存在问题的,做实验当然也可以不用考虑;4-8位是描述了该文件一共有60000个样本数据;从9开始到最后,每一位代表该数据集合的数字信息。
TRAINING SET IMAGE FILE (train-images-idx3-ubyte):
[offset] [type]          [value]          [description]
0000     32 bit integer  0x00000803(2051) magic number
0004     32 bit integer  60000            number of images
0008     32 bit integer  28               number of rows
0012     32 bit integer  28               number of columns
0016     unsigned byte   ??               pixel
0017     unsigned byte   ??               pixel
........
xxxx     unsigned byte   ??               pixel
Pixels are organized row-wise. Pixel values are 0 to 255. 0 means background (white), 255 means foreground (black).
TEST SET LABEL FILE (t10k-labels-idx1-ubyte):
[offset] [type]          [value]          [description] 0000     32 bit integer  0x00000801(2049) magic number (MSB first)
0004     32 bit integer  10000            number of items 0008     unsigned byte   ??               label 0009     unsigned byte   ??               label ........
xxxx     unsigned byte   ??               labelThe labels values are 0 to 9.
TEST SET IMAGE FILE (t10k-images-idx3-ubyte):
[offset] [type]          [value]          [description]
0000     32 bit integer  0x00000803(2051) magic number
0004     32 bit integer  10000            number of images
0008     32 bit integer  28               number of rows
0012     32 bit integer  28               number of columns
0016     unsigned byte   ??               pixel
0017     unsigned byte   ??               pixel
........
xxxx     unsigned byte   ??               pixel
Pixels are organized row-wise. Pixel values are 0 to 255. 0 means background (white), 255 means foreground (black).
文件解析
既然我们已经知道了该文件的具体内容描述,那么我们就可以开始对文件进行解析,看看具体的内容。我们下载下来的文件是.gz后缀的,表明是一个压缩文件,我们设计代码的时候,需要考虑对文件进行解压。
#!/usr/bin/python# -*- coding: UTF-8 -*-import gzipimport sysimport struct

train_images = "MNIST_data/train-images-idx3-ubyte.gz"train_labels = "MNIST_data/train-labels-idx1-ubyte.gz"t10k_images = "MNIST_data/t10k-images-idx3-ubyte.gz"t10k_labels = "MNIST_data/t10k-labels-idx1-ubyte.gz"def read_labels(filename):
    labels = []    with gzip.open(filename) as bytestream:
        index = 0
        buf = bytestream.read()
        bytestream.close()        # 根据MINIST文件的描述,文件开始是用于校验的数字,`integer`格式,占用4个字节,位于0-4位置
        # 第二个描述文件的内容数量,`integer`格式,占用4个字节,位置4-8位置
        magic, numberOfLabels = struct.unpack_from('>II', buf, index)
        print(magic)
        print(numberOfLabels)        # index += struct.calcsize('>II') #这里的结果是 +=8,为了直观,就直接填写8
        # 因为magic, numberOfLabels 占据前面8个字节,所以把下标移动到第 8 位,开始读取数字标签的内容
        index = 8
        while index < numberOfLabels:            # 根据MINIST文件的描述,labels的数字是`unsigned byte`格式,占用一个字节,所以这里填写`B`
            num = int(struct.unpack_from('B', buf, index)[0])
            labels.append(num)            # index += struct.calcsize('B')
            # 移动到下一个光标
            index += 1
    return labelsdef read_images(filename, labels):
    # 把文件解压成字节流
    with gzip.open(filename) as bytestream:
        index = 0
        buf = bytestream.read()
        bytestream.close()        # 根据MINIST文件的描述,文件开始是用于校验的数字,`integer`格式,占用4个字节,位于0-4位置
        # 第二个描述文件的内容数量,`integer`格式,占用4个字节,位置4-8位置
        magic, numberOfImages, rows, columns = struct.unpack_from('>IIII', buf, index)
        print(magic)
        print(numberOfImages)
        print(rows)
        print(columns)        # index += struct.calcsize('>IIII') #这里的结果是 +=16,为了直观,就直接填写16
        # 因为magic, numberOfImages, rows, columns 占据前面16个字节,所以把下标移动到第 16 位,开始读取数字标签的内容
        index = 16

        for i in xrange(numberOfImages):        # for i in xrange(5):
            # 打印对应的数字标签
            print(labels[i])            for x in xrange(rows):                for y in xrange(columns):
                    num = int(struct.unpack_from('B', buf, index)[0])                    if num > 100:
                        sys.stdout.write(str(num)+" ")                    elif num > 50:
                        sys.stdout.write(str(num)+"  ")                    else:
                        sys.stdout.write(str('0   '))
                    index += 1
                sys.stdout.write(str('\n'))
                sys.stdout.write(str('\n'))
            sys.stdout.flush()    return# 解析labels的内容,train_labels包含了60000个数字标签,返回60000个数字标签的数组labels = read_labels(train_labels)
print(labels)
read_images(train_images, labels)如果我们通过print(labels)打印labels的内容,就会看到,这就是一个包含了60000个数字的数组,数组都是从0~9,这个数组和images的图片样本是一一对应的。

image.png
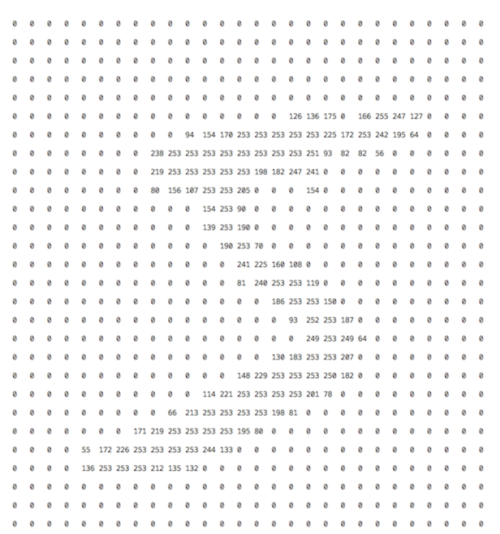
运行代码,我们截图第一张图片样本出来,第一张图片的文本是5,图片的每个像素点是无标记数字(0~254)

image.png
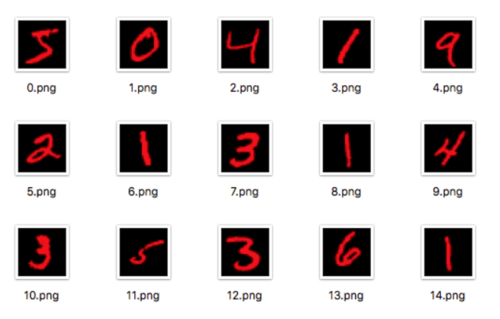
如果把像素写成图片,图片是这样的:

image.png
更多的图片,这里就不展开介绍怎么写成图片文件,提供代码自行研究:

image.png
from PIL import Imageimport structimport gzipdef read_image(filename):
    with gzip.open(filename) as bytestream:
        index = 0
        buf = bytestream.read()
        bytestream.close()
        magic, images, rows, columns = struct.unpack_from('>IIII', buf, index)
        index += struct.calcsize('>IIII')        for i in xrange(images):
            image = Image.new('RGB', (columns, rows))            for x in xrange(rows):                for y in xrange(columns):
                    image.putpixel((y, x), int(struct.unpack_from('>B', buf, index)[0]))
                    index += struct.calcsize('>B')            print 'save ' + str(i) + 'image'
            # 请手动创建test文件夹,图片文件要写入文件夹中
            image.save('test/' + str(i) + '.png')    returnread_image("MNIST_data/train-images-idx3-ubyte.gz")
回到Tensorflow
从上述,我们已经知道了这几个文件的具体内容,那么我们就回到Tensorflow,看看Tensorflow是如何训练模型的
用自己的方式实现
#!/usr/bin/python# -*- coding: UTF-8 -*-import gzipimport sysimport struct

train_images_file = "MNIST_data/train-images-idx3-ubyte.gz"train_labels_file = "MNIST_data/train-labels-idx1-ubyte.gz"t10k_images_file = "MNIST_data/t10k-images-idx3-ubyte.gz"t10k_labels_file = "MNIST_data/t10k-labels-idx1-ubyte.gz"def read_labels(filename):
    labels = []    with gzip.open(filename) as bytestream:
        index = 0
        buf = bytestream.read()
        bytestream.close()        # 根据MINIST文件的描述,文件开始是用于校验的数字,`integer`格式,占用4个字节,位于0-4位置
        # 第二个描述文件的内容数量,`integer`格式,占用4个字节,位置4-8位置
        magic, numberOfLabels = struct.unpack_from('>II', buf, index)
        print(magic)
        print(numberOfLabels)        # index += struct.calcsize('>II') #这里的结果是 +=8,为了直观,就直接填写8
        # 因为magic, numberOfLabels 占据前面8个字节,所以把下标移动到第 8 位,开始读取数字标签的内容
        index = 8
        while len(labels) < numberOfLabels:            # 根据MINIST文件的描述,labels的数字是`unsigned byte`格式,占用一个字节,所以这里填写`B`
            num = int(struct.unpack_from('B', buf, index)[0])
            tmp =[0,0,0,0,0,0,0,0,0,0]
            tmp[num] = 1
            labels.append(tmp)            # index += struct.calcsize('B')
            # 移动到下一个光标
            index += 1
    return labelsdef read_images(filename, labels):
    images = []    # 把文件解压成字节流
    with gzip.open(filename) as bytestream:
        index = 0
        buf = bytestream.read()
        bytestream.close()        # 根据MINIST文件的描述,文件开始是用于校验的数字,`integer`格式,占用4个字节,位于0-4位置
        # 第二个描述文件的内容数量,`integer`格式,占用4个字节,位置4-8位置
        magic, numberOfImages, rows, columns = struct.unpack_from('>IIII', buf, index)
        print(magic)
        print(numberOfImages)
        print(rows)
        print(columns)        # index += struct.calcsize('>IIII') #这里的结果是 +=16,为了直观,就直接填写16
        # 因为magic, numberOfImages, rows, columns 占据前面16个字节,所以把下标移动到第 16 位,开始读取数字标签的内容
        index = 16

        for i in xrange(numberOfImages):            # 打印对应的数字标签
            image = []            for x in xrange(rows):
                row = []                for y in xrange(columns):
                    num = int(struct.unpack_from('B', buf, index)[0])
                    image.append(float(num/255.0))
                    index += 1
            images.append(image)    return images# 解析labels的内容,train_labels包含了60000个数字标签,返回60000个数字标签的数组train_labels = read_labels(train_labels_file)# print(labels)train_images = read_images(train_images_file, train_labels)

test_labels = read_labels(t10k_labels_file)# print(labels)test_images = read_images(t10k_images_file, test_labels)import tensorflow as tf
x = tf.placeholder("float", [None,784.])
W = tf.Variable(tf.zeros([784.,10.]))
b = tf.Variable(tf.zeros([10.]))
y = tf.nn.softmax(tf.matmul(x,W) + b)
y_ = tf.placeholder("float")
cross_entropy = -tf.reduce_sum(y_*tf.log(y))
train_step = tf.train.GradientDescentOptimizer(0.01).minimize(cross_entropy)
init = tf.initialize_all_variables()
sess = tf.Session()
sess.run(init)for i in range(600):
    print(i)
    batch_xs = train_images[100*i:100*i+100]
    batch_ys = train_labels[100*i:100*i+100]
    sess.run(train_step, feed_dict={x: batch_xs, y_: batch_ys})
correct_prediction = tf.equal(tf.argmax(y,1), tf.argmax(y_,1))
accuracy = tf.reduce_mean(tf.cast(correct_prediction, "float"))print sess.run(accuracy, feed_dict={x: test_images, y_: test_labels})运行代码,稍等几分钟就可以看到结果,正确率为0.897
但是在太慢了,效率太低了,主要是组合图片数组的时候太慢了,花了大概三分钟,我们通过引入NumPy来提高处理效率,参考官方例子进行改造。
#!/usr/bin/python# -*- coding: UTF-8 -*-import gzipimport sysimport structimport numpy

train_images_file = "MNIST_data/train-images-idx3-ubyte.gz"train_labels_file = "MNIST_data/train-labels-idx1-ubyte.gz"t10k_images_file = "MNIST_data/t10k-images-idx3-ubyte.gz"t10k_labels_file = "MNIST_data/t10k-labels-idx1-ubyte.gz"def read32(bytestream):
    # 由于网络数据的编码是大端,所以需要加上>
    dt = numpy.dtype(numpy.int32).newbyteorder('>')
    data = bytestream.read(4)    return numpy.frombuffer(data, dt)[0]def read_labels(filename):
    with gzip.open(filename) as bytestream:
        magic = read32(bytestream)
        numberOfLabels = read32(bytestream)
        labels = numpy.frombuffer(bytestream.read(numberOfLabels), numpy.uint8)
        data = numpy.zeros((numberOfLabels, 10))        for i in xrange(len(labels)):
            data[i][labels[i]] = 1
        bytestream.close()    return datadef read_images(filename):
    # 把文件解压成字节流
    with gzip.open(filename) as bytestream:
        magic = read32(bytestream)
        numberOfImages = read32(bytestream)
        rows = read32(bytestream)
        columns = read32(bytestream)
        images = numpy.frombuffer(bytestream.read(numberOfImages * rows * columns), numpy.uint8)
        images.shape = (numberOfImages, rows * columns)
        images = images.astype(numpy.float32)
        images = numpy.multiply(images, 1.0 / 255.0)
        bytestream.close()    return images

train_labels = read_labels(train_labels_file)
train_images = read_images(train_images_file)
test_labels = read_labels(t10k_labels_file)
test_images = read_images(t10k_images_file)import tensorflow as tf
x = tf.placeholder("float", [None, 784.])
W = tf.Variable(tf.zeros([784., 10.]))
b = tf.Variable(tf.zeros([10.]))
y = tf.nn.softmax(tf.matmul(x, W) + b)
y_ = tf.placeholder("float")
cross_entropy = -tf.reduce_sum(y_ * tf.log(y))
train_step = tf.train.GradientDescentOptimizer(0.01).minimize(cross_entropy)
init = tf.initialize_all_variables()
sess = tf.Session()
sess.run(init)for i in range(600):
    batch_xs = train_images[100 * i:100 * i + 100]
    batch_ys = train_labels[100 * i:100 * i + 100]
    sess.run(train_step, feed_dict={x: batch_xs, y_: batch_ys})# 提高准确度,训练多一次for i in range(600):
    batch_xs = train_images[100 * i:100 * i + 100]
    batch_ys = train_labels[100 * i:100 * i + 100]
    sess.run(train_step, feed_dict={x: batch_xs, y_: batch_ys})

correct_prediction = tf.equal(tf.argmax(y, 1), tf.argmax(y_, 1))
accuracy = tf.reduce_mean(tf.cast(correct_prediction, "float"))print sess.run(accuracy, feed_dict={x: test_images, y_: test_labels})
通过测试,准确度大概是在
0.9041,耗时:2.4秒
作者:ImWiki
链接:https://www.jianshu.com/p/58a48727b0f9


 随时随地看视频


热门评论
-

weixin_慕婉清90180172019-09-30 0
-

慕盖茨25964322019-09-26 0
查看全部评论那个,index < numberOfLabels 是不是应该再加个8,前面magic和numberOfLabels的把最后的8个labels少掉了?初学者,,所以看的认真些~~
你好,我想问下如果把图片解码成相应的矩阵,再输入到卷积网络(卷积结构和参数都不变)进行训练,会得到相同效果的训练结果吗?