在使用vue不到一周,感觉现在还停留在初级阶段,虽然知道怎么和后端做数据交互,但是对于mounted这个挂载还不是很清楚的。放大之,对vue的生命周期不甚了解。只知道简单的使用,而不知道为什么,这对后面的踩坑是相当不利的。因为我们有时候会在几个钩子函数里做一些事情,什么时候做,在哪个函数里做,我们不清楚。
vue生命周期简介
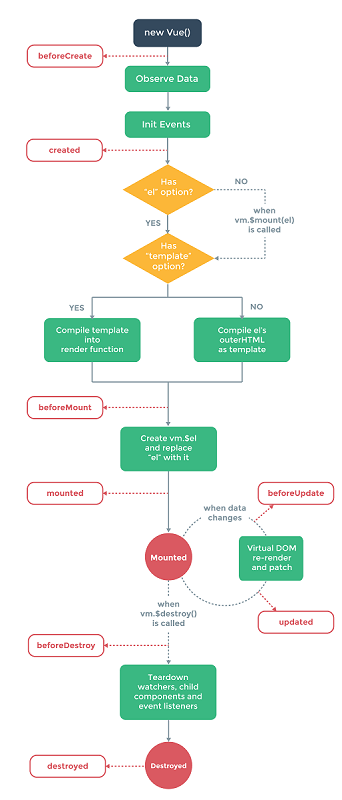
从图上我们可以看到vue在生命周期中有这些状态,beforeCreate,created,beforeMount,mounted,beforeUpdate,updated,beforeDestroy,destroyed。Vue在实例化的过程中,会调用这些生命周期的钩子,给我们提供了执行自定义逻辑的机会。那么,在这些vue钩子中,vue实例到底执行了那些操作,我们先看下面执行的例子
var app = new Vue({
el: '#app',
data: {
message : "jokerWu is boy"
},
beforeCreate: function () {
console.group('beforeCreate 创建前状态===============》');
console.log("%c%s", "color:red" , "el : " + this.$el); //undefined
console.log("%c%s", "color:red","data : " + this.$data); //undefined
console.log("%c%s", "color:red","message: " + this.message)
},
created: function () {
console.group('created 创建完毕状态===============》');
console.log("%c%s", "color:red","el : " + this.$el); //undefined
console.log("%c%s", "color:red","data : " + this.$data); //已被初始化
console.log("%c%s", "color:red","message: " + this.message); //已被初始化
},
beforeMount: function () {
console.group('beforeMount 挂载前状态===============》');
console.log("%c%s", "color:red","el : " + (this.$el)); //已被初始化
console.log(this.$el);
console.log("%c%s", "color:red","data : " + this.$data); //已被初始化
console.log("%c%s", "color:red","message: " + this.message); //已被初始化
},
mounted: function () {
console.group('mounted 挂载结束状态===============》');
console.log("%c%s", "color:red","el : " + this.$el); //已被初始化
console.log(this.$el);
console.log("%c%s", "color:red","data : " + this.$data); //已被初始化
console.log("%c%s", "color:red","message: " + this.message); //已被初始化
},
beforeUpdate: function () {
console.group('beforeUpdate 更新前状态===============》');
console.log("%c%s", "color:red","el : " + this.$el);
console.log(this.$el);
console.log("%c%s", "color:red","data : " + this.$data);
console.log("%c%s", "color:red","message: " + this.message);
},
updated: function () {
console.group('updated 更新完成状态===============》');
console.log("%c%s", "color:red","el : " + this.$el);
console.log(this.$el);
console.log("%c%s", "color:red","data : " + this.$data);
console.log("%c%s", "color:red","message: " + this.message);
},
beforeDestroy: function () {
console.group('beforeDestroy 销毁前状态===============》');
console.log("%c%s", "color:red","el : " + this.$el);
console.log(this.$el);
console.log("%c%s", "color:red","data : " + this.$data);
console.log("%c%s", "color:red","message: " + this.message);
},
destroyed: function () {
console.group('destroyed 销毁完成状态===============》');
console.log("%c%s", "color:red","el : " + this.$el);
console.log(this.$el);
console.log("%c%s", "color:red","data : " + this.$data);
console.log("%c%s", "color:red","message: " + this.message)
}
})
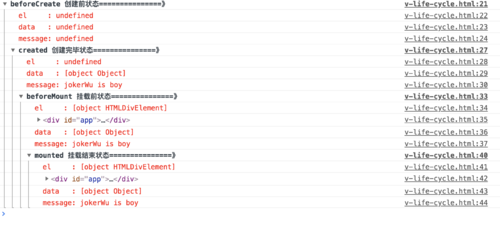
在chrome浏览器里打开,F12看console就能发现
beforecreated:el 和 data 并未初始化
created:完成了 data 数据的初始化,el没有
beforeMount:完成了 el 和 data 初始化
mounted :完成挂载
另外在标红处,我们能发现el还是 {{message}},这里就是应用的 Virtual DOM(虚拟Dom)技术,先把坑占住了。到后面mounted挂载的时候再把值渲染进去。
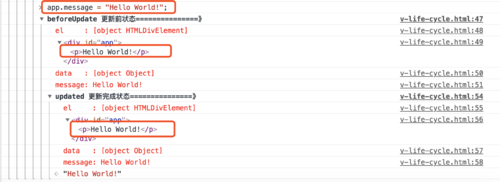
在console中输入app.message = "Hello World!"
当data发生改变时,会调用beforeUpdate和updated方法。
执行了destroy操作
输入app.$destroy();
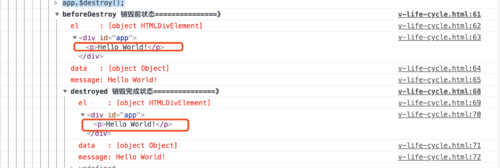
beforeDestroy,destroed :实例的销毁,vue实例还是存在的,只是解绑了事件的监听还有watcher对象数据与view的绑定,即数据驱动。
输入app.message = "this is life cycle";

总结:
beforeCreate :数据还没有监听,没有绑定到vue对象实例,同时也没有挂载对象
created :数据已经绑定到了对象实例,但是还没有挂载对象
beforeMount: 模板已经编译好了,根据数据和模板已经生成了对应的元素对象,将数据对象关联到了对象的 $el属性,$el属性是一个HTMLElement对象,也就是这个阶段,vue实例通过原生的createElement等方法来创建这个html片段,准备注入到我们vue实例指明的el属性所对应的挂载点
mounted:将$el的内容挂载到了el,相当于我们在jquery执行了$(el).html($el),生成页面上真正的dom,上面我们就会发现dom的元素和我们$el的元素是一致的。在此之后,我们能够用方法来获取到el元素下的dom对象,并进 行各种操作
tips:那vue在哪个生命周期请求数据呢
这个得看实际情况,一般在 created(或beforeRouter) 里面就可以,如果涉及到需要页面加载完成之后的话就用 mounted。
在created的时候,视图中的html并没有渲染出来,所以此时如果直接去操作html的dom节点,一定找不到相关的元素
而在mounted中,由于此时html已经渲染出来了,所以可以直接操作dom节点,(此时document.getelementById 即可生效了)。

 随时随地看视频


