1.前言
上篇主要讲了一下紧凑型切片的的解析逻辑,这一篇主要讲一下使用openlayers动态加载紧凑型切片的web地图服务。
2.代码实现
上篇已经可以通过切片的x、y、z得对应的切片图片,现在使用asp.net mvc方式提供读取服务,这里有一问题就是频繁打开切文件会存在资源未释放的占用的情况,导致请求失败,这里使用单例模式保证相同切片文件只打开一次,并且提供文件缓存与过期释放机制,加快服务的请求返回速率。
1.切片请求服务入口,提供基本的参数x、y、z以及紧凑切片文件路径,系统返回对应的切片数据。
// 切片请求控制器public ActionResult GetTile(int x, int y, int z)
{     try
     {
         ArcgisBundleHelper Helper = new ArcgisBundleHelper(@"G:\feiq\Recv Files\Map_test\map");         var data = Helper.GetTile(x, y, z);         return File(data, "image/jpeg");
     }     catch (Exception ex)
     {         throw;
     }
}
2.单例模式实现的切文件缓存类,实现切片文件的新增缓存、过期缓存清除,以及通过索引的方式访问切片文件。
/// <summary>/// 缓存切片单例类/// </summary>public class TileCache
{     /// <summary>
     /// 获取切片文件索引     /// </summary>
     /// <param name="id"></param>
     /// <returns></returns>
     public BundleCache this[bundlx id]
     {         get
         {                 lock (obj)
                 {                     return AddBundleCache(id);
                 }

        }
     }     private static volatile TileCache instance;     private static readonly object obj = new object();     private TileCache() { }     //线程安全单例
     public static TileCache Instance
     {         get
         {             if (null == instance)
             {                 lock (obj)
                 {                     if (null == instance)
                     {
                         instance = new TileCache();
                     }
                 }

            }             return instance;
         }
     }     /// <summary>
     /// 设置最多缓存文件数目     /// </summary>
     private static int cacheCount = 20;     /// <summary>
     /// 切片文件缓存集合类     /// </summary>
     private static List<BundleCache> bundleCacheList = new List<BundleCache>();     /// <summary>
     /// 通过id返回切片缓存     /// </summary>
     /// <param name="cache"></param>
     /// <returns></returns>
     private static BundleCache AddBundleCache(bundlx cache)
     {         string cacheid = cache.id;            if (bundleCacheList.Select(e => e.BundleId).ToList().Contains(cacheid))
             {                 //更新最后访问时间
                 BundleCache tem = bundleCacheList.Where(e => e.BundleId == cacheid).FirstOrDefault();
                 tem.LastTime = DateTime.Now;
                 changeCache();                 return bundleCacheList.Where(e => e.BundleId == cacheid).FirstOrDefault();
             }             else
             {                 //未添加的文件,写入缓存集合
                 BundleCache bc = new BundleCache();
                 bc.BundleId = cache.id;
                 bc.CTime = DateTime.Now;
                 bc.LastTime = DateTime.Now;                 using (FileStream file = new FileStream(cache.bundlxFileName, FileMode.Open))
                 {                     byte[] bufferfile = new byte[file.Length];
                     file.Read(bufferfile, 0, (int)file.Length);                     //写入数据
                     bc.BundlxData = bufferfile;
                 }                 using (FileStream file = new FileStream(cache.bundleFileName, FileMode.Open))
                 {                     byte[] bufferfile = new byte[file.Length];
                     file.Read(bufferfile, 0, (int)file.Length);                     //写入数据
                     bc.BundleData = bufferfile;
                 }
                 bundleCacheList.Add(bc);
                 changeCache();                 return bc;
         }
     }     /// <summary>
     /// 保证缓存文件数目一定     /// </summary>
     private static void changeCache()
     {         if (bundleCacheList.Count>cacheCount)
         {
             bundleCacheList= bundleCacheList.OrderByDescending(e => e.LastTime).ToList().Take(cacheCount).ToList();
         }
     }
}
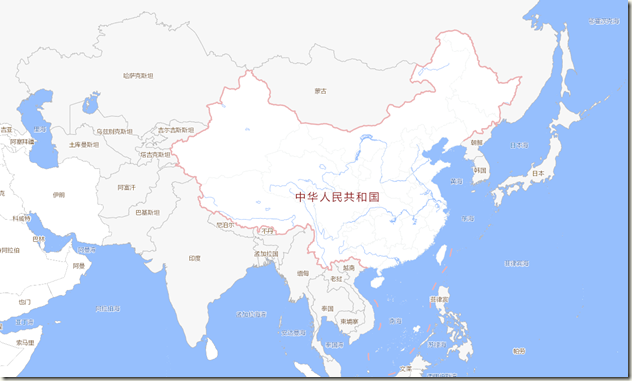
3.我们的服务地址为 "/Tile/GetTile?x={x}&y={y}&z={z}",使用openlayers动态加载紧凑型切片。加载的结果如图。
@{
     ViewBag.Title = "Index";
     Layout = null;
}<style>

    html, body, #map {
         height: 100%;
         width: 100%;
         margin: 0;
         padding: 0;
     }</style>
<div id="map">

</div>
<script src="~/Content/openlayer4.64/ol.js"></script>
<script type="text/javascript">     var mapurl = "/Tile/GetTile?x={x}&y={y}&z={z}";     var maplayer = new ol.layer.Tile({
         name: "testLayer",         // 瓦片图像数据源
         source: new ol.source.XYZ({
             crossOrigin: 'anonymous',
             url: mapurl
         }),
         opacity: 1
     });     var map = new ol.Map({
         target: 'map',
         layers: [
             maplayer
         ],
         view: new ol.View({
             center: ol.proj.fromLonLat([104.41, 33.82]),
             zoom: 4
         })
     });</script>
3.结束
上面方法使用动态解析紧凑型切片的方式,实现webgis的实时加载功能,由于是动态解析文件,返回的效率不高,下一篇我们开发一个程序,实现从紧凑型切片批量转为分散型切片的方法。
百度网盘链接:https://pan.baidu.com/s/1I-Bj3EQSN57pQHvKZ2hBUA 提取码:lliw
github项目地址:https://github.com/HuHongYong/TilerArcgisBundle
作者:ATtuing
出处:http://www.cnblogs.com/ATtuing
本文版权归作者和博客园共有,欢迎转载,但未经作者同意必须保留此段声明,且在文章页面明显位置给出原文链接。


 随时随地看视频


