AppCompatActivity 改变了我的 AlertDialog 设计
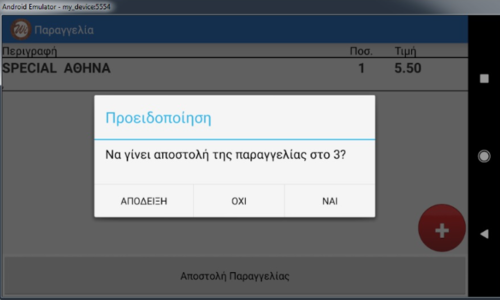
我已将我的活动更改为 appCompat 活动。我还将 AlertDialog 更改为 Android.Support.V7.App.AlertDialog。但我已经失去了以前的警报对话框设计。这就是它的样子。

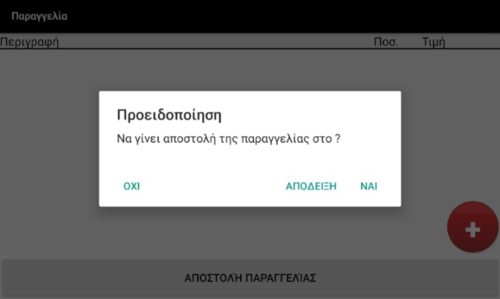
这就是现在的样子

我到现在为止的主题是
parent="@android:style/Theme.Holo.Light.DarkActionBar">
但我被迫更改它,因为 appCompat 不支持 Holo 主题。所以我把它改为
parent="Theme.AppCompat.Light.DarkActionBar">
如何使警报对话框看起来像上一个?
 鸿蒙传说
鸿蒙传说浏览 277回答 2
2回答
-

慕桂英3389331
尝试这个:AlertDialog 对话框= new AlertDialog.Builder(new ContextThemeWrapper(context, android.R.style.Theme_Holo_Dialog)); -

泛舟湖上清波郎朗
如果你想让按钮可以帮助用户更容易按下,你可以构建一个带有自定义按钮的对话框并设置按钮的样式(例如在drawable文件夹上设置按钮的样式)。你可以参考以下代码: AlertDialog.Builder dialog = new AlertDialog.Builder(this); AlertDialog alert = dialog.Create(); alert.SetTitle("Login Information"); //alert.SetMessage("Complex Alert"); //alert.SetIcon(Resource.Drawable.alert); LayoutInflater inflater = (LayoutInflater)this.GetSystemService(Context.LayoutInflaterService); View view = inflater.Inflate(Resource.Layout.input_layout, null); alert.SetView(view); EditText editText_name = view.FindViewById<EditText>(Resource.Id.et_name); EditText editText_pwd = view.FindViewById<EditText>(Resource.Id.et_pwd); Button button1 = view.FindViewById<Button>(Resource.Id.button1); Button button2 = view.FindViewById<Button>(Resource.Id.button2); button1.Click += delegate { Toast.MakeText(this,"press button1!",ToastLength.Short).Show(); }; button2.Click += delegate { Toast.MakeText(this, "press button2!", ToastLength.Short).Show(); }; //alert.SetButton("OK", (c, ev) => //{ // // Ok button click task // string name = editText_name.Text; // string password = editText_pwd.Text; // Toast.MakeText(this, "name = " + name + " password= " + password, ToastLength.Long).Show(); //}); //alert.SetButton2("CANCEL", (c, ev) => { }); alert.Show();这input_layout.xml<?xml version="1.0" encoding="utf-8"?><LinearLayout xmlns:android="http://schemas.android.com/apk/res/android"android:orientation="vertical" android:layout_width="match_parent"android:layout_height="match_parent"><EditText android:layout_width="match_parent" android:layout_height="wrap_content" android:id="@+id/et_name" android:hint="please input name"/><EditText android:layout_width="match_parent" android:layout_height="wrap_content" android:id="@+id/et_pwd" android:password="true" android:hint="please input password"/><LinearLayout android:padding="20dp" android:orientation="horizontal" android:layout_width="match_parent" android:layout_height="wrap_content" > <Button android:id="@+id/button1" android:text="button1" android:textColor="@android:color/white" android:layout_weight="1" android:layout_width="match_parent" android:layout_height="wrap_content" android:background="@drawable/defaultbutton" /> <Button android:id="@+id/button2" android:layout_marginLeft="20dp" android:text="button2" android:textColor="@android:color/white" android:layout_weight="1" android:layout_width="match_parent" android:layout_height="wrap_content" android:background="@drawable/defaultbutton" /></LinearLayout>在文件夹中定义一个xml(例如defaultbutton.xml)drawable<?xml version="1.0" encoding="utf-8" ?><shape xmlns:android="http://schemas.android.com/apk/res/android"android:shape="rectangle"><solid android:color="#1E90FF" /><!--<stroke android:width="2dp" android:color="#ffffff" />--><corners android:bottomLeftRadius="20dp" android:bottomRightRadius="20dp" android:topLeftRadius="20dp" android:topRightRadius="20dp" /></shape>笔记:1.在文件夹中定义一个xml( defaultbutton.xml)drawable2.像这样使用:android:background="@drawable/defaultbutton"结果是:
 随时随地看视频慕课网APP
相关分类


 Java
Java