-

- weixin_慕哥6428742 2024-07-12
xlrd安装命令:cmd :pip install xlrd
导入 import xlrd
- 0赞 · 0采集
-

- weixin_慕哥6428742 2024-07-12
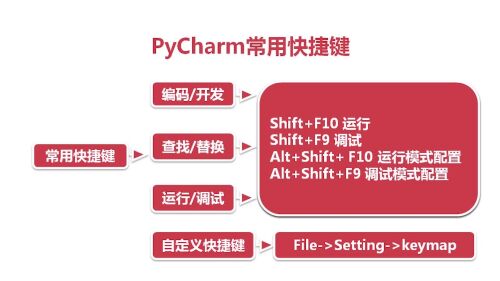
快捷键
- 0赞 · 0采集
-

- weixin_慕哥6428742 2024-07-12
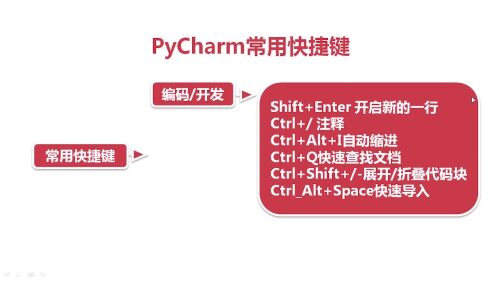
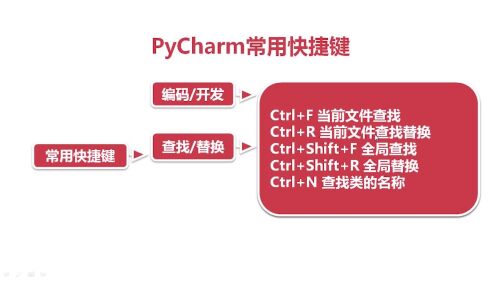
Pycharm快捷键:
- 0赞 · 0采集
-

- weixin_慕盖茨5075337 2024-05-10
写入格式化
定义一个变量
titlestyle = xlwt.XFStyle() 初始化样式
titlefont = xlwt.Font()
titlefont.name = "宋体"
titlefont.bold =true
titlefont.height = 11*20字号
titlefont.colour_index =0x08字体颜色
titlestyle.font = titlefont
对齐方式
cellalign = xlwt.Alignment()
cellalign.horz =0x02
cellalign.vert = 0x01
titlestyle.alignment = cellalign
边框
borders = xlwt.Borders()
borders.right = xlwt.borders.DASHED
borders.bottom =xlwt.Borders.DOTTED
titlestyle.borders = borders
背景颜色
datestyle = xlwt.XFStyle()
bgcolor = xlwt.Pattern()
bgcolor.pattern = xlwt.Pattern.SOLID_PATTERN\
bgcolor.pattern_fore_colour = 22背景颜色
datestyle.pattern = bgcolor
- 0赞 · 0采集
-

- weixin_慕盖茨5075337 2024-05-10
import xlwt
创建工作簿
wb = xlwt.workbook()
创建工作表
wb.add_sheet("CNY")
填充数据
ws.write_merge(0,1,0,5,"2019年货币兑换表")合并第1行第2行,第1列到第6列内容2019年货币兑换表
data =( ("02/01/2019",8.634,1,0.875,0.062,6.86),("02/01/2019",8.634,1,0.875,0.062,6.86))
for i,item in enumerate(data):
for j,val in enumerate(item):
ws.write(i+2,j,val)
创建第二个工作表
wsimage = wb.add_sheet("image")
写入图片
wsimage.insert_bitmap("2017.bmp",0,0)
wb.save("2019-CNY.xls")
- 0赞 · 0采集
-

- weixin_慕盖茨5075337 2024-05-10
操作单元格
sheet=data_sheet_by_index(0)
sheet.cell(1,2)第2行3列内容
sheet.cell_type(1,2)
或sheet.cell(1,2).ctpye
sheet.cell(1,2).value
或sheet.cell_vlaue(1,2)
- 0赞 · 0采集
-

- weixin_慕盖茨5075337 2024-05-10
excel列
sheet = data.sheet_by_index(0)
sheet.ncols
sheet.col(1)第二列的数据单元格对象组成的列表
sheet.col(1)[2].value
sheet.col_values(1) 所有单元格value组成的列表
sheet.col_types(1) 0空,1字符,2 数字
- 0赞 · 0采集
-

- weixin_慕盖茨5075337 2024-05-10
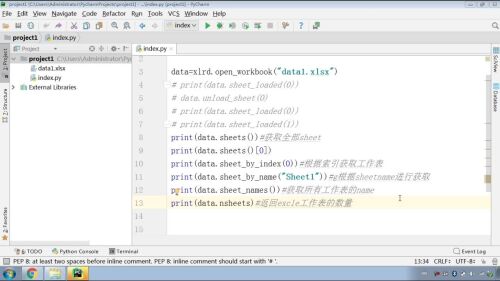
操作excel行
sheet = data.sheet_by_index(0) 获取第一个工作表
print(sheet.nrows) 获取sheetg表下的有效行数
sheet.row(0)获取第一行内容 单元格对象组列表
sheet.row_types(1) 获取单元格的数据类型
sheet.row(1)[2] .value第二行第三列的value
sheet.row_values(1)得到指定行单元格的value
sheet.row_len(1)得到单元格的长度
- 0赞 · 0采集
-

- weixin_慕盖茨5075337 2024-05-10
1
- 0赞 · 0采集
-

- 返璞归真ZQ 2024-02-25
只支持2003-2013的.xls格式,不支持.xlsx格式
- 0赞 · 0采集
-

- King丶 2023-08-09
pip install pymysql
- 0赞 · 0采集
-

- 慕斯卡4376320 2023-07-04

python装使用教程
- 0赞 · 0采集
-

- 北七零度 2022-11-23
 111
111- 0赞 · 0采集
-

- 慕姐7583652 2022-11-15
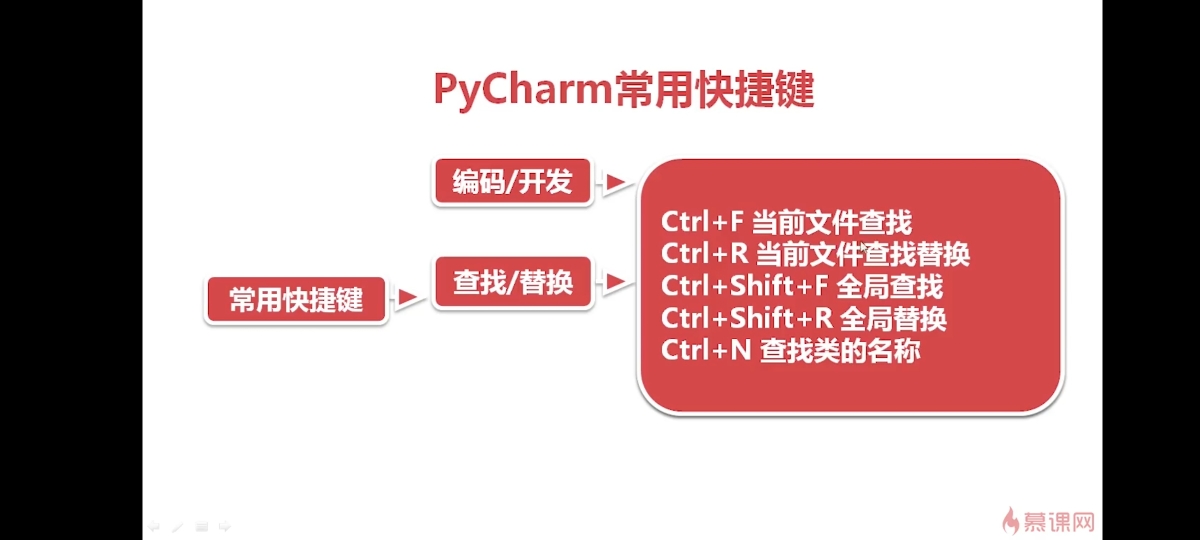
PyCharm常用快捷键
1、编码/开发
shift + enter 开启新的一行
ctrl + / 注释
ctrl + alt + i 自动缩进
ctrl + q 快速查找文档
ctrl + shift +/- 展开/折叠代码块
ctrl_alt + space 快速导入
2、查找/替换
ctrl + f 当前文件查找
ctrl + r 当前文件查找替换
ctrl + shift +f 全局查找
ctrl + shift +r 全局替换
ctrl + n 查找类的名称
3、运行/调试
shift + f10 运行
shift + f9 调试
alt + shift + f10 运行模式配置
alt + shift + f9 调试模式配置
4、自定义快捷键
file - > setting - > keymap
- 0赞 · 0采集
-

- 北七零度 2022-11-14
 111
111- 0赞 · 1采集
-

- 北七零度 2022-11-14
 111
111- 0赞 · 0采集
-

- 初_ 2022-04-19
- 快捷键~~~~~


- 0赞 · 0采集
-

- Ypf_ 2022-02-17
Py chrome常用快捷键大全


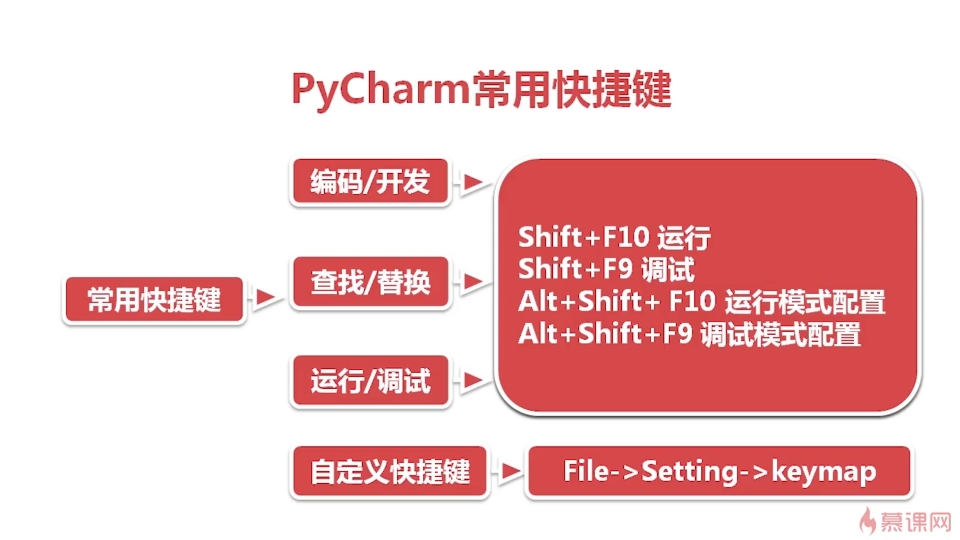
——————《Python办公自动化》- 1赞 · 0采集
-

- darcy_d 2022-01-18
# 添加表格
table = slide.shapes.add_table(2, 3, Inches(2), Inches(2), Inches(4), Inches(2)).table
# 填充内容
table.cell(0, 0).text = 'title1'
table.cell(0, 1).text = 'title2'
table.cell(0, 2).text = 'title3'
# 合并单元格
cell = table.cell(0, 0)
cell1 = table.cell(0, 2)
cell.merge(cell1)
# 取消合并单元格
if cell.is_merge_origin:
cell.split()
- 0赞 · 0采集
-

- darcy_d 2022-01-18
from pptx.util import Inches, Pt
from pptx.enum.shapes import MSO_SHAPE
from pptx.dml.color import RGBColor
# 添加自选图形
shape = slide.shapes.add_shape(MSO_SHAPE.RECTANGLE, Inches(2), Inches(2), Inches(5), Inches(3))
# 设置填充色、边框样式
fill = shape.fill
fill.solid()
fill.fore_color.rgb = RGBColor(255, 0, 0)
line = shape.line
line.color.rgb = RGBColor(55, 3, 5)
line.width = Pt(2)
- 0赞 · 0采集
-

- darcy_d 2022-01-17
import pptx
from pptx.util import Inches
# 得到演示文稿的对象
prs = pptx.Presentation()
# 打开ppt
# prs = pptx.Presentation('test.pptx')
# 指定模板,插入一张幻灯片
slide = prs.slides.add_slide(prs.slide_layouts[0])
prs.slides.add_slide(prs.slide_layouts[1])
prs.slides.add_slide(prs.slide_layouts[2])
# 删除幻灯片
del prs.slides._sldIdLst[1]
# 向幻灯片中插入文本框
text1 = slide.shapes.add_textbox(Inches(5), Inches(5), Inches(5), Inches(5))
text1.text = '我是文本框'
p1 = text1.text_frame.add_paragraph()
p1.text = '我是段落1'
p1.add_run().text = 'end'
# 向幻灯片中现有的元素写入文本
title_shape = slide.shapes.title
title_shape.text = '标题1'
slide.shapes.placeholders[1].text = '标题2'
# 保存ppt文档
prs.save('test.pptx')
- 0赞 · 0采集
-

- darcy_d 2022-01-14
pip install python-pptx
import pptx
- 0赞 · 0采集
-

- darcy_d 2022-01-11
pip install pywin32
from win32com.client import constants, gencache
import os
def createpdf(wordPath, pdfPath):
word = gencache.EnsureDispatch('Word.Application'
doc = word.Documents.Open(wordPath, ReadOnly=1)
# 转换方法
doc.ExportAsFixedFormat(pdfPath, constants.wdExportFormatPDF)
word.Quit()
# 单个文件转换
createpdf('info.docx', 'info.pdf')
# 多个文件转换
os.listdir('.') # 获取当前文件夹下的所有文件
wordfiles = [] # 存储当前文件夹下的所有word文件
for file in os.listdir('.'):
if file.endswith(('.doc', '.docx')):
wordfiles.append(file)
for file in wordfiles:
filepath = os.path.abspath(file) # 获取文件的绝对路径
index = filepath.rindex('.') # 获取最后一个点的索引
pdfpath = filepath[:index] + '.pdf' # 构造pdf绝对路径
createpdf(filepath, pdfpath)
- 0赞 · 0采集
-

- darcy_d 2022-01-10
from docx.enum.style import WD_STYLE_TYPE # 导入
style = document.styles.add_style('textstyle', WD_STYLE_TYPE.PARAGRAPH) # 创建段落样式
style.font.size = Pt(5) # 设置字体大小
p1 = document.add_paragraph('texttexttext', style='textstyle') # 为段落设置样式
官方文档:https://python-docx.readthedocs.io/en/latest/user/styles-using.html
样式对照表:http://www.thedoctools.com/index.php?show=mt_create_style_name_list

table = document.add_table(rows=1, cols=3, style='Medium List 1') # 为表格设置内置样式
document.styles['textstyle'].delete() # 删除样式
- 0赞 · 0采集
-

- darcy_d 2022-01-07
document.add_picture('logo.jpg') # 插入图片
document.add_picture('logo.jpg', Pt(20), Pt(30)) # 插入图片,设置宽高
table = document.add_table(rows=1, cols=2) # 插入表格
header_cells = table.rows[0].cells # 获取第一行的单元格
header_cells[0].text = 'title' # 向表格中写入内容
rows.cells = table.add_row().cells # 添加行
len(document.tables[0].rows) # 获取文档中第一个表格的总行数
document.tables[0].cell(0, 1).text # 获取文档中第一个表格的第一行第二列的内容
- 0赞 · 0采集
-

- darcy_d 2022-01-06
from docx import Document
from docx.shared import Pt, RGBColor
document = Document() # 创建文档对象
document = Document("info.docx") # 读取现有word,创建文档对象
document.add_heading('title') # 写入标题,默认标题1样式
document.add_heading('title', level=4) # 指定标题级别
p1 = document.add_paragraph('xxxxxxxxxxxxxxxxx') # 写入段落
p1.insert_paragraph_before('xxxxxxxxxx') # 在段落前插入段落
format = p1.paragraph_format # 获取段落的样式
format.left_indent = Pt(20) # 左侧缩进
format.right_indent = Pt(20) # 右侧缩进
format.first_line_indent = Pt(20) # 首行缩进
format.line_spacing = 1.5 # 1.5倍行间距
run = p1.add_run('xxxxxxxxxx') # 在段落后追加文字
run.font.size = Pt(12) # 设置字号
run.font.name = '微软雅黑' # 设置字体
run.font.color.rgb = RGBColor(235, 33, 24) # 设置文字颜色
run.bold = True # 设置加粗
run.font.underline = True # 添加下划线
run.font.italic = True # 设置斜体
document.save('test.docx') # 保存文档
- 1赞 · 0采集
-

- darcy_d 2022-01-06
python-docx
- 0赞 · 0采集
-

- darcy_d 2021-12-29
import xlsxwriter
wb = xlsxwriter.Workbook("data.xlsx") # 创建工作簿
sheet = wb.add_worksheet("newsheet") # 创建工作表
sheet.write(0, 0, "title") # 写入单元格数据
sheet.merge_range(1, 0, 2, 2, "data") # 合并单元格并写入数据
sheet.write_row(3, 0, ["col1", "col2", "col3" ]
sheet.write(7, 1, "=sum(B5:B7)" # 写入公式
sheet.write_url(9, 0, "http://www.baidu.com", string = "更多数据" # 写入超链接
sheet.insert_image(10, 0, "view.png") # 插入图片
wb.close() # 关闭文件
- 0赞 · 0采集
-

- darcy_d 2021-12-28
style = xlwt.XFStyle() # 初始化样式
font = xlwt.Font() # 初始化字体
font.name = "宋体" # 字体名称
font.bold = True # 加粗
font.height = 11 * 20 # 字号设置为11,20为衡量单位
font.colour_index = 0x08 # 字体颜色设置为黑色,也可等于索引1
style.font = font # 设置字体
align = xlwt.Alignment() # 初始化对齐方式
align.horz = 0x02 # 设置水平方向居中对齐
align.vert = 0x01 # 设置垂直方向居中对齐
style.alignment = align # 设置对齐方式
borders = xlwt.Borders() # 初始化边框
borders.right = xlwt.Borders.DASHED # 右边框设置为虚线
borders.bottom = xlwt.Borders.DOTTED # 下边框设置为点线
style.borders = borders # 设置边框样式
bgcolor = xlwt.Pattern() # 初始化颜色模式
bgcolor.pattern = xlwt.Pattern.SOLID_PATTERN # 颜色模式设置为背景颜色
bgcolor.pattern_fore_colour = 22 # 背景颜色设置为灰色
style.pattern = bgcolor # 设置背景颜色
ws.write(0, 0, value, style) # 设置单元格样式
- 0赞 · 1采集
-

- darcy_d 2021-12-27
import xlwt # 导入模块,只支持xls格式
wb = xlwt.Wortbook() # 创建工作簿
ws = wb.add_sheet("sheet1") # 创建sheet
ws.write_merge(0, 1, 0, 5, "title") # 合并单元格,并写入数据
ws.write(i + 2, j, value) # 向单元格写入数据
ws.insert_bimap("文件路径.bmp", 0, 1) # 插入图片
wb. save("保存文件路径.xls") # 保存工作簿
- 0赞 · 0采集


