1、webpack的安装:
初始化npm :npm init
安装webpack :npm install webpack --save-dev
2、webpack基本配置:
配置文件:
var path = require('path');

module.exports = {// commonJS的模块化输出
        entry : './src/script/main.js',// 打包的入口是从哪个文件开始
        output : {// 打包后文件的名称和位置
            path : path.resolve(__dirname, './dist/js'),
            filename : 'bundle.js'
        },
}
entry的使用:
使用一个字符串:entry : './src/script/main.js',
使用一个数组:entry : ['./src/script/main.js', './src/script/b.js'],
使用一个对象:
entry : {
    main:'./src/script/main.js',
    a:'./src/script/a.js'
},
注意:对于使用数组,如果指定多个chunk,则在打包的时候都能输出到一个文件中,例如:
entry   : {
    'index' : ['./src/page/index/index.js', './src/page/login/login.js],
},
output  : {
    path        : './dist',
    filename    : 'js/index.js',
},
对于使用对象,如果指定多个chunk,则在打包的时候后一个chunk会覆盖前一个chunk,只有一个chunk会输出到文件中,因此需要使用[name]占位符来指定输出文件,例如:
entry   : {
    'index' : ['./src/page/index/index.js'],
    'login' : ['./src/page/login/login.js'],
},
output  : {
    path        : './dist',
    filename    : 'js/index.js',
},
output的使用:
output : {// 打包后文件的名称和位置
    path : path.resolve(__dirname, './dist/'),
    filename : 'js/[name].js',
    publicPath : 'http://cdn.com',
}
在filename不建议使用绝对路径,路径会在path属性中指定
publicPath属性:当打包的时候,会将js的绝对路径替换成publicPath指定的路径
如果在entry中没有指定打包的名称,则会使用main作为默认的打包名称
3、webpack处理html:
安装:npm install html-webpack-plugin --save-dev
首先require一下:var HtmlWebpackPlugin = require('html-webpack-plugin');
plugin里面添加:
plugins : [
    new HtmlWebpackPlugin({
        template : 'index.html',
        filename : 'view/index.html',
        inject : 'head',
        title : 'webpack is good',
        minify : {
            removeComments : true,// 删除注释
            collapseWhitespace : true,// 删除空格
        },
        chunks : ['a'],
        hash : true,
    }),

    new htmlWebpackPlugin({// 一个模板生成多个页面,就可以继续创建该插件对象
        template : 'index.html',
        filename : 'view/a.html',
        inject : 'body',
        title : 'this is a.html',
        excludeChunks  : ['a'],
    }),
],
参数:
template:所引用的模板
filename:生成的html文件的名称与位置
inject:true|false|'body'|'head',注入所有的资源到特定的 template 或 templateContent 中,如果设置为 true 或者 body,所有的 javascript 资源将被放置到 body 元素的底部,'head' 将放置到 head 元素中。
title:生成html的title,使用方式:<title><%= htmlWebpackPlugin.options.title %></title>
minify:对当前生成的html文件进行压缩
chunks:对生成的html文件引用指定的chunk
excludeChunks : 排除指定的chunk,其他的都会被加载
hash:
案例:将两个js文件分别引入到head和body中:
设置参数:inject : false,
<head>
<script type="text/javascript" src="<%=         htmlWebpackPlugin.files.chunks.main.entry %>"></script>
</head>
<body>
<script type="text/javascript" src="<%= htmlWebpackPlugin.files.chunks.a.entry %>"></script>
</body>
   webpack将main.js内嵌入html页面中,而引入其他chunk时只引入页面对应的chunk(在a.html页面中将main.js嵌入head中,而将a.js引入body中,在b.html页面中将main.js前途head中,而将b.js引入body中):
模板文件index.html
<!DOCTYPE html>
<html>
<head>
    <title><%= htmlWebpackPlugin.options.title %></title>

    <script type="text/javascript">
        <%=
        compilation.assets[htmlWebpackPlugin.files.chunks.main.entry.substr(htmlWebpackPlugin.files.publicPath.length)].source()
        %>
    </script>
</head>
<body>
    <% for (var k in htmlWebpackPlugin.files.chunks) { %>
        <% if (k !== 'main') { %>
            <script type="text/javascript" src="<%= htmlWebpackPlugin.files.chunks[k].entry %>"></script>
        <% } %>
    <% } %>
</body>
</html>
配置文件webpack.config.js
var path = require('path');
var htmlWebpackPlugin = require('html-webpack-plugin');

module.exports = {// commonjs的模块化输出
    entry : {
        main:'./src/script/main.js',
        a : './src/script/a.js',
        b : './src/script/b.js',
        c : './src/script/c.js',
    },// 打包的入口是从哪个文件开始
    output : {// 打包后文件的名称和位置
        path : path.resolve(__dirname, './dist/'),
        filename : 'js/[name]-[hash].js',
        publicPath : 'http://cdn.com',
    },
    plugins : [
        new htmlWebpackPlugin({
            template : 'index.html',
            filename : 'view/a.html',
            inject : false,
            title : 'this is a.html',
            chunks : ['main', 'a'],
        }),
        new htmlWebpackPlugin({
            template : 'index.html',
            filename : 'view/b.html',
            inject : false,
            title : 'this is b.html',
            chunks : ['b'],
        }),
        new htmlWebpackPlugin({
            template : 'index.html',
            filename : 'view/c.html',
            inject : false,
            title : 'this is c.html',
            excludeChunks : ['c'],
        }),
    ]
}
案例:使用函数来生成多个页面的情况:
首先配置一个函数:
var getHtmlConfig = function(name) {
return {
    template : './src/view/'+ name +'.html',
    filename : 'view/'+ name +'.html',
    inject : 'body',
    hash : true,
    title : 'webpack is good',
    chunks : [name, 'common'],
};
}
然后在plugin中使用:
new HtmlWebpackPlugin(getHtmlConfig('index')),
new HtmlWebpackPlugin(getHtmlConfig('login')),
案例:在一个页面中引入通用模板的方法(即将head标签提取出来放入通用模板html-head.html文 件中,在其他html中引入通用模板):
首先在当前文件夹下创建一个layout的文件夹,用于存放通用模板
再在layer文件夹下创建一个layout.html的文件
将需要公共处理的模块复制到layout.html文件中,如下:
<head>
<title>hello webpack</title>
<script type="text/javascript" src="https://cdn.bootcss.com/jquery/1.12.0/jquery.min.js">
</script>
</head>
在当前文件夹下的index.html页面中使用表达式引入,如下:
<!DOCTYPE html>
<html>
<%= require('html-loader!./layout/layout.html') %>

<body>
</body>
</html>
安装loader:npm install html-loader --save-dev
执行webpack
4、webpack处理css:会将css代码嵌入到打包的js文件中
安装loader:npm install css-loader style-loader --save-dev
css-loader:使webpack可以处理.css文件
style-locder:将css-loader处理完的文件在html页面中显示自定义的样式
{style-locder!css-loader}:处理机制为至右向左处理,即执行css-loader处理css文件,再使用style-loader显示样式
使用方式:
entry : './src/app.js',
module : {
    loaders : [{
        test : /\.css$/,
        loader : 'style-loader!css-loader'
    }]
},
在app.js中引入:
require('./css/要引用的css文件名.css');
5、CommonsChunkPlugin插件:用于处理通用模块和公共模块
使用方式:
var webpack = require('webpack');
entry : {
    'index' : ['./src/page/index/index.js'],
    'login' : ['./src/page/login/login.js'],
    'common': ['./src/page/common/index.js'],
},
plugins : [
    new webpack.optimize.CommonsChunkPlugin({
        name : 'common',
        filename : 'js/base.js',
    })
]
会将index和login的chunk中的都引入的模块打包成通用模块,会将名称为common的chunk打包成公共模块。
如果创建了公共模块,则在html中需要引用base.js模块,否则会报错
6、extract-text-webpack-plugin插件:webpack单独打包css
安装:npm install extract-text-webpack-plugin@1.0.1 --save-dev
首先require一下
var ExtractTextPlugin = require("extract-text-webpack-plugin");
plugins里面添加
plugins:  [
        new ExtractTextPlugin("css/index.css"),
],
modules里面对css的处理修改为
module : {
loaders : [{
test: /\.css$/,
loader:  ExtractTextPlugin.extract("style-loader","css-loader")
}],
}
在引入文件里面添加需要的css
require('../css/index.css');
在页面中引用link
<link rel="stylesheet" type="text/css" href="../dist/css/index.css">
7、webpack处理图片和字体
安装:npm install url-loader --save-dev
在modules中添加loader:
loaders : [{
    test    : /\.css$/,
    loader  : ExtractTextPlugin.extract("style-loader","css-loader"),
},{
    test    : /\.(gif|png|jpg|woff|svg|eot|ttf)\??.*$/,
    loader  : 'url-loader?limit=100&name=resources/[name].[ext]',
},]
参数:
limit:如果图片文件的大小小于limit指定的值,则以base64的方式放在css文件 中,如果大于limit指定的值,则会以文件的形式保存图片
name:指定保存图片的名称和路径
在index.css中使用图片:
body {
    background: url('../../image/123.png');
}
8、webpack-dev-server
安装本地:npm install webpack-dev-server@1.16.5 --save-dev
安装全局:npm install webpack-dev-server -g(如果安装失败加上版本号)
由于webpack-dev-server只是开发时的一个工具,而对于线上没有作用,因此需要配置线上和开发两种情况的使用方式:
在开发环境中使用webpack-dev-server:
// 环境变量配置,dev(开发) / online(线上)
var WEBPACK_ENV = process.env.WEBPACK_ENV || 'dev';

// 入口,需要配置一个公共模块
entry : {
'index' : ['./src/page/index/index.js'],
'login' : ['./src/page/login/login.js'],
'common': ['./src/page/common/index.js'],// 在此公共模块中添加webpack-dev-server
},

// 如果为dev(开发环境),则使用webpack-dev-server
if ('dev' === WEBPACK_ENV) {// 在common模块中追加一段字符串
config.entry.common.push('webpack-dev-server/client?http://localhost:8088/');
}
在output中加入publicPath:
output : {
    path : './dist',
    filename : 'js/[name].js',
    publicPath : '/dist',
},
Windows的执行参数:
set WEBPACK_ENV=dev && webpack-dev-server --inline --port 8088
linux的执行参数:
WEBPACK_ENV=dev webpack-dev-server --inline --port 8088
简化执行参数,可以配置npm,在package.json中配置参数:
"scripts": {
// 执行webpack-dev-server(linux)
"dev" : "WEBPACK_ENV=dev webpack-dev-server --inline --port 8088",
// 打包命令(linux)
"dist" : "WEBPACK_ENV=online webpack -p",
// 执行webpack-dev-server(Windows)
"dev_win":"set WEBPACK_ENV=dev && webpack-dev-server --inline --port 8088",
// 打包命令(Windows)
"dist_win" : "set WEBPACK_ENV=online && webpack -p"// 这里不能再有逗号
},
执行:npm run dev_win(启用Windows下的webpack-dev-server服务)
热门评论
-
qq_Mr盘_02018-07-03 0
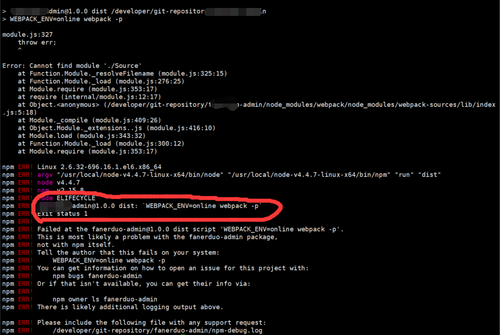
查看全部评论为什么我打包的会报错