前言 - LZ瞎比比
听说谷歌Baba更新了Material-UI?记忆不乏飘散到前几年。。。
我是一枚不折不扣的Android开发者,14年9月到现在,可谓现在才有了一点点资格入Android大门。还记得我曾羡慕IOS端的UI样式,那简易流畅的使用方式,让我一次次的默默的吐槽谷歌Baba,干哈呢?
直到,当谷歌Baba在14年推出Android 5.0,其中变包含Material Design,这个不得不让人大快人心的良心之作。奈何,LZ却是在17年的某天才有所了解,不得不佩服自己所谓的敏锐性以及对前沿技术的关注乏之又乏。
后期看着网上玲琅满目的各种对Material Design的解说,我也疑惑了,是简单的使用?还是整理一份自己的简单的专属Material Design的博文?最终,还是决定,自己亲自撸一波~
要问过程爽不爽,只有撸过才知道。来吧,伸出你的左右手,让我们一起撸一波谷歌Baba这次又为我们更新了哪儿些让人惊喜的玩意~

来来来,撸之前,先了解了解
简单来回顾下:
Material Design,是谷歌在14年的IO大会上提出的一种新的理念,也被称为新的设计语言(也被称为“原材料设计”),称它为设计语言不为过,但是实际上,这仅仅是谷歌提倡的一种新的设计风格、理念以及设计基本原则。
初衷,是一种新的设计语言。而推出之后,也没看到几家真正应用到,之前看到《薄荷》这款产品,用张哥的话说,充满了Material Design元素,良心产品,良心张哥,666~
有兴趣的小伙伴可以点击下方的链接地址查看,自行体验体验:
而今,查看官方,发现这次似乎又新增了666的东西,如下图所示:
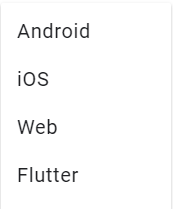
不仅仅是我大Android,另外新添加了IOS、Web以及Flutter三大巨头。当然咯,本文的侧重点在于Android模块,其他的部分大家感兴趣的话可在文末自行了解。
这里聊点题外话
这里不得不吐槽一下,现在的软件啊,越来越特么的不要脸了,举个例子,软件本身功能就是查看文件目录,你说你特么的要定位,获取联系人,获取IMEI、IMSI,MAC等权限干叼?
也是够够的了,真希望未来的谷歌Baba可以针对这种无良厂商做出一定限制,最基本的,做好自己本职工作,别管什么原因,少涉及非应用本身的内容。
祝愿~!!!加油,看好你哦~
脑图展示
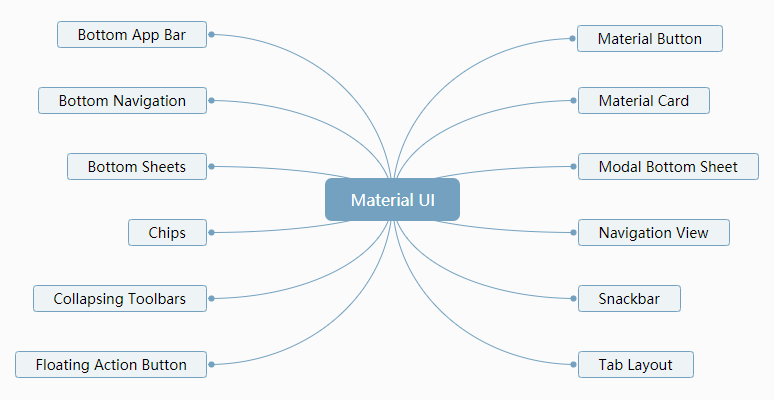
嘀嘀嘀,开车了
时间不早了,得赶紧开车咯,不然熬成小老头更找不到对象咯~
坐标:帝都,单身小姐姐看过来哦~ 贴心懂事会照顾人,一枚标准可爱会害羞猿猿~
PS:突然感到得到我鸡排大大部分真传~
一、初始化配置
首先,要保证当前Android Studio
Step 1: 打开工程目录下的build.gradle文件,并添加maven引用
allprojects {
    repositories {
        google()
        jcenter()        // 1.添加Google Maven地址
        maven {
            url "https://maven.google.com"
        }
    }
}
Step 2: 修改编译版本
// 2.修改编译版本为 android - PcompileSdkVersion 'android-P'
Step 3: 移除项目工程中依赖的v7包以及添加material依赖
dependencies {    // 3.移除项目工程中依赖的v7包
    implementation fileTree(dir: 'libs', include: ['*.jar'])
    testImplementation 'junit:junit:4.12'
    androidTestImplementation 'com.android.support.test:runner:1.0.2'
    implementation 'com.android.support.constraint:constraint-layout:1.1.0'
    androidTestImplementation 'com.android.support.test.espresso:espresso-core:3.0.2'
    // 4.添加material依赖
    implementation 'com.google.android.material:material:1.0.0-alpha1'}
当然,你可以使用com.android.support:design:28.0.0-alpha1,但是主要注意的是design包和material二者只能选一。
Step 4: 使用:androidx.appcompat.app.AppCompatActivity
注意:使用的是androidx。
import androidx.appcompat.app.AppCompatActivity;public class MainActivity extends AppCompatActivity {同步一下,运行一波,虽然毛也没。。。好歹不报错~
二、玩转Material - UI
1. Bottom App Bar
Material Design的一个重要特征是设计 BottomAppBar。可适应用户不断变化的需求和行为,So,BottomAppBar是一个从标准物质指导的演变。它更注重功能,增加参与度,并可视化地锚定UI。
先来一个什么鬼样式都没有的:
<?xml version="1.0" encoding="utf-8"?><androidx.coordinatorlayout.widget.CoordinatorLayout xmlns:android="http://schemas.android.com/apk/res/android"
    xmlns:app="http://schemas.android.com/apk/res-auto"
    xmlns:tools="http://schemas.android.com/tools"
    android:layout_width="match_parent"
    android:layout_height="match_parent"
    tools:context=".MainActivity">

    <com.google.android.material.bottomappbar.BottomAppBar
        android:id="@+id/bar"
        android:layout_width="match_parent"
        android:layout_height="wrap_content"
        android:layout_gravity="bottom"
        app:backgroundTint="@color/colorPrimaryDark" // 设置背景色        app:navigationIcon="@android:drawable/ic_menu_call" />

    <com.google.android.material.floatingactionbutton.FloatingActionButton
        android:id="@+id/fab"
        android:layout_width="wrap_content"
        android:layout_height="wrap_content"
        app:layout_anchor="@id/bar" /></androidx.coordinatorlayout.widget.CoordinatorLayout>
效果当然比较low咯!

下面引用一个官方内置样式:
style="@style/Widget.MaterialComponents.BottomAppBar":

当然下面还有一些其他的属性:
可以通过FabAlignmentMode,FabAttached,FabCradleMargin,FabCradleRoundedCornerRadius和FabCradleVerticalOffset来控制FAB的放置;
(FabAlignmentMode)可以设置为中心或结束。如果FabAttached设置为True,那么Fab将被布置为连接到BottomAppBar;
FabCradleMargin是设置FAB和BottomAppBar之间的间距,改变这个值会增加或减少FAB和BottomAppBar之间的间距;
FabCradleRoundedCornerRadius指定切口周围角的圆度;
FabCradleVerticalOffset指定FAB和BottomAppBar之间的垂直偏移量。如果fabCradleVerticalOffset为0,则FAB的中心将与BottomAppBar的顶部对齐。
当然,我们还可以通过fabAttached属性去设置FloatingActionButton以及BottomAppBar是否粘合,效果如下:
app:fabAttached="false":

app:fabAttached="true":

2. Bottom Navigation
BottomNavigationView创建底部导航栏,用户只需轻点一下即可轻松浏览和切换顶级内容视图。
当项目有3到5个顶层(底部)目的地导航到时,可以使用此模式。
使用也是很Easy,如下:
创建一个菜单资源 ,最多5个导航目标(BottomNavigationView不支持超过5个项目);
在内容下面放置BottomNavigationView;
将BottomNavigationView上的app:menu属性设置为菜单资源;
设置选择监听事件setOnNavigationItemSelectedListener(...)。
那下面按照步骤操作一次:
Step 1: 在布局中添加BottomNavigationView:
<com.google.android.material.bottomnavigation.BottomNavigationView
    android:layout_width="match_parent"
    android:layout_height="wrap_content"
    android:layout_gravity="bottom"
    android:background="@color/colorPrimaryDark"
    app:menu="@menu/bottom_navigation_menu" />
Step 2: 定义menu
<?xml version="1.0" encoding="utf-8"?><menu xmlns:android="http://schemas.android.com/apk/res/android">

    <item
        android:icon="@android:drawable/ic_menu_info_details"
        android:orderInCategory="100"
        android:title="你" />
    <item
        android:icon="@android:drawable/ic_menu_info_details"
        android:orderInCategory="100"
        android:title="我" />
    <item
        android:icon="@android:drawable/ic_menu_help"
        android:orderInCategory="100"
        android:title="他" /></menu>
Step 3: 运行一波,走起~

Step 4: 通过app:itemIconTint和app:itemTextColor设置响应用户点击状态。包括Icon以及字体颜色
1.定义bottom_navigation_colors
<?xml version="1.0" encoding="utf-8"?><selector xmlns:android="http://schemas.android.com/apk/res/android">
    <item android:color="@color/colorAccent" android:state_checked="true" />
    <item android:color="@android:color/white" android:state_checked="false" /></selector>
2.添加引用
app:itemIconTint="@drawable/bottom_navigation_colors"app:itemTextColor="@drawable/bottom_navigation_colors"
3.查看效果

下面简单依次列出使用系统内置样式效果:
style="@style/Widget.Design.BottomNavigationView"
> 默认的材质BottomNavigationView样式由更新的颜色,文字大小和行为组成。默认的BottomNavigationView具有白色背景以及带有颜色的图标和文本colorPrimary。
演示效果如下:

style="@style/Widget.MaterialComponents.BottomNavigationView.Colored":
此样式继承默认样式,但将颜色设置为不同的属性。 使用彩色样式获取带有colorPrimary背景的底部导航栏,并为图标和文本颜色添加白色阴影。
演示效果如下:

style="@style/Widget.Design.BottomNavigationView":
如果希望底部导航栏具有旧行为,可以在BottomNavigationView上设置此样式。 但是,还是建议尽可能使用更新后的Material style。
演示效果如下:

3. Bottom Sheets
BottomSheetBehavior应用于CoordinatorLayout的一个子类, 使其成为持久的底部工作表。
持久性底部页面是从屏幕底部出现的视图,在主要内容上升高。他们可以垂直拖动以暴露他们的内容列表。
注意:如果要使用模态(对话框)的底页,请使用 BottomSheetDialogFragment。
下面着撸起实现:
Step 1: 搞个布局玩玩
外层使用CoordinatorLayout包裹,底部导航栏采用BottomNavigationView,中间内容区域,很Easy咯~
<?xml version="1.0" encoding="utf-8"?><androidx.coordinatorlayout.widget.CoordinatorLayout xmlns:android="http://schemas.android.com/apk/res/android"
    xmlns:app="http://schemas.android.com/apk/res-auto"
    xmlns:tools="http://schemas.android.com/tools"
    android:id="@+id/cl_layout"
    android:layout_width="match_parent"
    android:layout_height="match_parent"
    android:orientation="vertical"
    tools:context=".MainActivity">

    <com.google.android.material.button.MaterialButton
        android:layout_width="match_parent"
        android:layout_height="wrap_content"
        android:gravity="center"
        android:onClick="showBehavior"
        android:text="测试" />

    <androidx.core.widget.NestedScrollView
        android:id="@+id/show_list"
        android:layout_width="match_parent"
        android:layout_height="wrap_content"
        app:behavior_hideable="true"
        app:behavior_peekHeight="300dp"
        app:behavior_skipCollapsed="true"
        app:layout_behavior="com.google.android.material.bottomsheet.BottomSheetBehavior">

        <LinearLayout
            android:layout_width="match_parent"
            android:layout_height="match_parent"
            android:orientation="vertical">

            <androidx.cardview.widget.CardView
                android:layout_width="match_parent"
                android:layout_height="300dp"
                app:cardBackgroundColor="@color/colorAccent" />

            <androidx.cardview.widget.CardView
                android:layout_width="match_parent"
                android:layout_height="300dp"
                app:cardBackgroundColor="@color/colorPrimaryDark" />

            <androidx.cardview.widget.CardView
                android:layout_width="match_parent"
                android:layout_height="300dp"
                app:cardBackgroundColor="@color/colorAccent" />

        </LinearLayout>
    </androidx.core.widget.NestedScrollView>

    <com.google.android.material.bottomnavigation.BottomNavigationView
        style="@style/Widget.Design.BottomNavigationView"
        android:layout_width="match_parent"
        android:layout_height="wrap_content"
        android:layout_gravity="bottom"
        android:background="@color/colorPrimaryDark"
        app:menu="@menu/bottom_navigation_menu" /></androidx.coordinatorlayout.widget.CoordinatorLayout>
Step 2: 实现效果,主要是BottomSheetBehavior使用
package com.hlq.materialstudy;import android.os.Bundle;import android.view.View;import com.google.android.material.bottomsheet.BottomSheetBehavior;import androidx.appcompat.app.AppCompatActivity;import androidx.coordinatorlayout.widget.CoordinatorLayout;public class MainActivity extends AppCompatActivity {    private CoordinatorLayout mCoordinatorLayout;
    BottomSheetBehavior behavior;    @Override
    protected void onCreate(Bundle savedInstanceState) {        super.onCreate(savedInstanceState);
        setContentView(R.layout.activity_main);
        mCoordinatorLayout = findViewById(R.id.cl_layout);
        View bottomSheetView = mCoordinatorLayout.findViewById(R.id.show_list);
        behavior = BottomSheetBehavior.from(bottomSheetView);
        behavior.setState(BottomSheetBehavior.STATE_HIDDEN);
        behavior.setBottomSheetCallback(new BottomSheetBehavior.BottomSheetCallback() {            @Override
            public void onStateChanged(View view, int i) {                // 这里是bottomSheet 状态的改变,根据slideOffset可以做一些动画
            }            @Override
            public void onSlide(View view, float v) {                // 这里是拖拽中的回调,根据slideOffset可以做一些动画
            }
        });
    }    public void showBehavior(View view) {
        behavior.setState(BottomSheetBehavior.STATE_COLLAPSED);
    }

}
Step 3: 效果如下
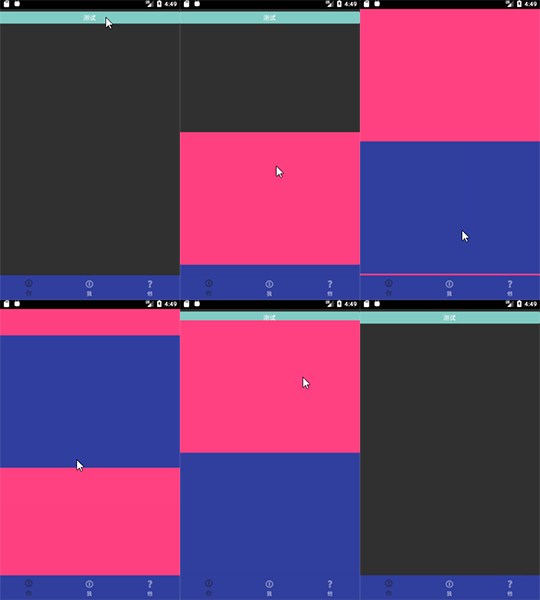
俩步走,666没毛病。
这里再次简单描述相关细节:
Bottom Sheets具有五种状态:
STATE_COLLAPSED: Bottom Sheets是可见的,但只显示可视(部分)高度。此状态通常是底部工作表的“静止位置”。可视高度由开发人员选择,应足以表明有额外的内容,允许用户触发某个动作或扩展Bottom Sheets;
STATE_EXPANDED: Bottom Sheets是可见的并且它的最大高度并且不是拖拽或沉降;
STATE_DRAGGING:用户主动向上或向下拖动Bottom Sheets;
STATE_SETTLING: 拖动/轻扫手势后,Bottom Sheets将调整到特定高度。这将是可视高度,展开高度或0,以防用户操作导致底部表单隐藏;
STATE_HIDDEN: Bottom Sheets隐藏。
如果已经在Activity使用CoordinatorLayout,添加底部表单很简单:
将任何视图添加为CoordinatorLayout的直接子视图。
通过添加以下xml属性来应用该行为 app:layout_behavior="com.google.android.material.bottomsheet.BottomSheetBehavior"
设置所需的行为标志
app:behavior_hideable:是否可以通过拖拽隐藏底部表单。
app:behavior_peekHeight:折叠状态的窥视高度。
app:behavior_skipCollapsed:如果底部表单可隐藏,并且设置为true,则表单不会处于折叠状态。
4. Chips
Chip代表一个小块中的复杂实体,如联系人。 它是一个圆形按钮,由一个标签,一个可选的芯片图标和一个可选的关闭图标组成。 如果Chip可检查,则可以点击或切换Chip。
Chip可以被放置在ChipGroup中,其可以被配置为将其Chip布置在单个水平线中或者重新排列在多个线上。如果一个ChipGroup包含可检查的Chip,那么它也可以控制其一组Chip是否单选。
也可以在需要Drawable的上下文中直接使用独立的ChipDrawable。
例如,启用自动完成的文本字段可以使用跨度将ChipDrawable替换为text,以将其表示为语义实体。
上面啰嗦半天,还是来点实际的干货,怎么玩?
扔个布局:
<com.google.android.material.chip.Chip
    android:layout_width="wrap_content"
    android:layout_height="wrap_content"
    app:chipText="渣渣贺" />
看个效果:

丢几个内置样式:
style="@style/Widget.MaterialComponents.Chip.Entry":
注意: Chip通常与独立的ChipDrawable一起使用。

style="@style/Widget.MaterialComponents.Chip.Filter":
注意:Filter Chip通常放置在一个ChipGroup。

style="@style/Widget.MaterialComponents.Chip.Choice":
注意:Filter Chip通常放置在一个ChipGroup。

style="@style/Widget.MaterialComponents.Chip.Action":

快到最后时,甩出来点其他属性:
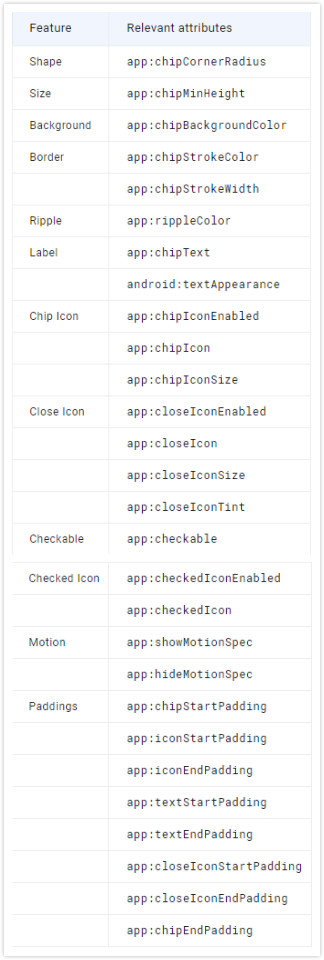
处理点击事件也是很easy,这里直接放上官方提供demo:
Call setOnClickListener(OnClickListener) to register a callback to be invoked when the chip is clicked.
Chip chip = (Chip) findViewById(R.id.chip);

chip.setOnClickListener(new OnClickListener() {    @Override
    public void onClick(View view) {        // Handle the click.
    }
});
Or, call setOnCheckedChangeListener(OnCheckedChangeListener) to register a callback to be invoked when the chip is toggled.
Chip chip = (Chip) findViewById(R.id.chip);

chip.setOnCheckedChangeListener(new setOnCheckedChangeListener() {    @Override
    public void onCheckedChanged(CompoundButton view, boolean isChecked) {        // Handle the toggle.
    }
});
Call setOnCloseIconClickListener(OnClickListener) to register a callback to be invoked when the chip’s close icon is clicked.
Chip chip = (Chip) findViewById(R.id.chip);

chip.setOnCloseIconClickListener(new OnClickListener() {    @Override
    public void onClick(View view) {        // Handle the click on the close icon.
    }
});
而下面说说关于ChipGroup的使用:
ChipGroup默认会在多条线路上重排Chip。
<com.google.android.material.chip.ChipGroup
    android:layout_width="match_parent"
    android:layout_height="wrap_content">

  <!-- Chips can be declared here, or added dynamically. --></com.google.android.material.chip.ChipGroup>
当然,也可以使用该app:singleLine属性将其限制在单个水平线上 。如果这样做,通常会使用HorizontalScrollView来包装 ChipGroup。
<HorizontalScrollView
    android:layout_width="match_parent"
    android:layout_height="wrap_content">
  <com.google.android.material.chip.ChipGroup
      android:layout_width="match_parent"
      android:layout_height="wrap_content"
      app:singleLine="true">

    <!-- Chips can be declared here, or added dynamically. -->

  </com.google.android.material.chip.ChipGroup></HorizontalScrollView>
当让,ChipGroup可以通过app:singleSelection设置单选,但是需要注意以下俩点:
为ChipGroup设置:app:singleSelection="true"
为Chip设置:style="@style/Widget.MaterialComponents.Chip.Choice"
而效果如下:

有的小伙伴说了,那么我怎么处理选中的Chip项呢?这里简单贴出官方提供的小例子:
ChipGroup chipGroup = (ChipGroup) findViewById(R.id.chip_group);

chipGroup.setOnCheckedChangeListener(new OnCheckedChangeListener() {    @Override
    public void onCheckedChanged(ChipGroup group, @IdRes int checkedId) {        // Handle the checked chip change.
    }
});
那么如何使用一个独立的ChipDrawable呢?
独立ChipDrawable可以用在需要一个的Drawable环境中。最明显的用例是联系人。大概如下图所示的样子:

使用ChipDrawable时,首先要在res目录下创建xml目录,并定义一个Chip文件,如下。
<chip xmlns:app="http://schemas.android.com/apk/res-auto"
    app:chipIcon="@mipmap/ic_launcher_round"
    app:chipText="渣渣贺" />
在Activity中引用资源,赋值:
// Inflate from resources.ChipDrawable chip = ChipDrawable.createFromResource(this, R.xml.standalone_chip);// Use it as a Drawable however you want.chip.setBounds(0, 0, chip.getIntrinsicWidth(), chip.getIntrinsicHeight());
ImageSpan span = new ImageSpan(chip);
EditText editText=findViewById(R.id.edit_text);
Editable text = editText.getText();
text.setSpan(span, 0, text.length(), Spanned.SPAN_EXCLUSIVE_EXCLUSIVE);
效果如下:

当然,Entry Chip是独立ChipDrawables 的默认Material风格,但我们可以使用style属性应用任何其他样式,并且,所有属性Chip都可以应用于ChipDrawable资源。
5. Collapsing Toolbars
首先附上一张官方效果图:
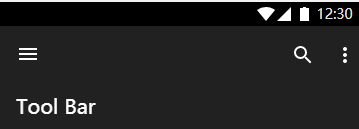
CollapsingToolbarLayout是ViewGroup为material准则中指定的折叠工具栏提供许多视觉特征和交互。CollapsingToolbarLayout 集成了 AppBarLayout, CoordinatorLayout, Toolbar,和滚动内容视图,如 RecyclerView。所以如果你有药创建的折叠式toolbar时,这个当然是不二其选。
而用法也是很easy:
要将Collapsing Toolbar添加到布局,并且将AppBarLayout内部放置到一个CollapsingToolbarLayout;
添加一个Toolbar和任何其他视图作为一个子项的CollapsingToolbarLayout。确保整个视图结构位于内部CoordinatorLayout以利用CollapsingToolbarLayout滚动和功能。
下面简单来撸一个效果:
放置布局:
<androidx.coordinatorlayout.widget.CoordinatorLayout xmlns:android="http://schemas.android.com/apk/res/android"
    xmlns:app="http://schemas.android.com/apk/res-auto"
    android:layout_width="match_parent"
    android:layout_height="match_parent">

    <com.google.android.material.appbar.AppBarLayout
        android:layout_width="match_parent"
        android:layout_height="300dp">

        <com.google.android.material.appbar.CollapsingToolbarLayout
            android:id="@+id/collapsingtoolbarlayout"
            android:layout_width="match_parent"
            android:layout_height="300dp"
            app:contentScrim="#ee22ff"
            app:expandedTitleMarginStart="10dp"
            app:layout_scrollFlags="scroll|exitUntilCollapsed">

            <ImageView
                android:layout_width="match_parent"
                android:layout_height="300dp"
                android:background="@drawable/test"
                app:layout_collapseMode="parallax"
                app:layout_collapseParallaxMultiplier="0.7" />

            <androidx.appcompat.widget.Toolbar
                android:layout_width="match_parent"
                android:layout_height="?attr/actionBarSize"
                app:layout_collapseMode="pin" />
        </com.google.android.material.appbar.CollapsingToolbarLayout>
    </com.google.android.material.appbar.AppBarLayout>

    <androidx.recyclerview.widget.RecyclerView
        android:id="@+id/showList"
        android:layout_width="match_parent"
        android:layout_height="match_parent"
        app:layout_behavior="@string/appbar_scrolling_view_behavior" /></androidx.coordinatorlayout.widget.CoordinatorLayout>
实例化:
mToolbarLayout = findViewById(R.id.collapsingtoolbarlayout);
mToolbarLayout.setTitle("渣渣贺");
RecyclerView showList = findViewById(R.id.showList);
showList.setLayoutManager(new LinearLayoutManager(this));
showList.setAdapter(new ShowAdapter(getListData()));
看个效果:
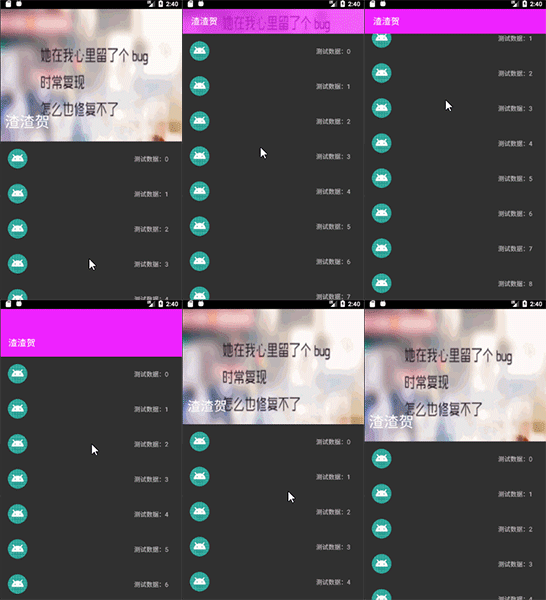
6. Floating Action Button
FloatingActionButton在应用程序中显示主要操作。这是一个圆形图标按钮,要高于其他页面内容。
而使用起来也是很简单Easy,具体详情可以查看之前LZ写过的有关Material Design文章,代码如下:
<?xml version="1.0" encoding="utf-8"?><androidx.coordinatorlayout.widget.CoordinatorLayout xmlns:android="http://schemas.android.com/apk/res/android"
    xmlns:app="http://schemas.android.com/apk/res-auto"
    xmlns:tools="http://schemas.android.com/tools"
    android:layout_width="match_parent"
    android:layout_height="match_parent"
    android:orientation="vertical"
    tools:context=".MainActivity">

    <com.google.android.material.floatingactionbutton.FloatingActionButton
        android:layout_width="wrap_content"
        android:layout_height="wrap_content"
        android:layout_gravity="bottom|right"
        android:layout_margin="15dp"
        app:srcCompat="@android:drawable/ic_menu_add" /></androidx.coordinatorlayout.widget.CoordinatorLayout>
展示效果如下:

默认显示左上角,可以通过layout_gravity去设置显示位置。
当然咯,贴心的谷歌为我们内置了样式,一起来看一下吧~
style="@style/Widget.Design.FloatingActionButton":

当然咯,还有其他一些属性,如下:
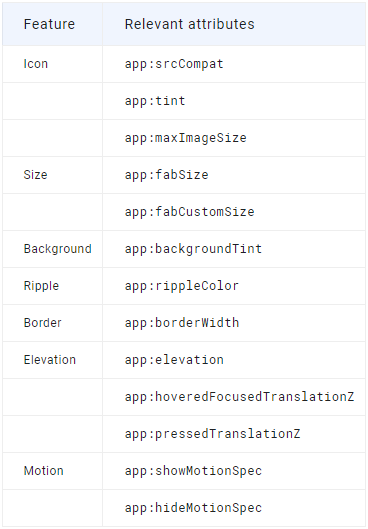
而设置事件也如同我们之前的View一样,下面直接官方盗图:

7. Material Button
Material Button是具有更新视觉样式的可自定义按钮组件,且内部内置了多种样式。
而使用起来也是很方便,如下:
<com.google.android.material.button.MaterialButton
    android:layout_width="wrap_content"
    android:layout_height="wrap_content"
    android:text="演示按钮" />
显示效果如下:

当我们设置android:enabled="false"时,显示如下效果:

使用系统内置样式效果一览:
style="@style/Widget.MaterialComponents.Button"效果如下:

style="@style/Widget.MaterialComponents.Button.TextButton"效果如下:

style="@style/Widget.MaterialComponents.Button.UnelevatedButton"效果如下:

当然除了这些,谷歌还为我们准备了其他的一些属性,如下表:

8. Material Card
MaterialCardView是基于CardView Android支持库的可自定义组件 。MaterialCardView提供了CardView所有功能,并添加了用于自定义描边的属性,并默认使用更新的材质样式。
下面附上一个简单例子:
<com.google.android.material.card.MaterialCardView
    android:layout_width="wrap_content"
    android:layout_height="wrap_content"
    android:layout_gravity="center"
    android:layout_margin="@dimen/mtrl_card_spacing"
    app:strokeColor="@color/colorPrimaryDark" // 设置边框颜色    app:strokeWidth="3dp"> // 设置边框宽度    <ImageView
        android:layout_width="200dp"
        android:layout_height="150dp"
        android:scaleType="fitXY"
        android:src="@mipmap/ic_launcher" /></com.google.android.material.card.MaterialCardView>
效果如下:

当然,系统为我们提供了Material Style效果,使用时只需要新增如下即可:
style="@style/Widget.MaterialComponents.CardView"
效果嘛,没看出有毛的不一样,这里不放图了~
9. Modal Bottom Sheet
BottomSheetDialogFragment是常规支持库Fragment顶部的一个薄层,呈现效果类似底部表单,当然也可充当对话框。
Modal bottom sheets会在它们下面的内容上产生阴影,本质上是对话框。 如果点击对话框外的内容,则底部表单将被解除。 可以垂直拖动Modal bottom sheets,并完全将其滑下。
10. Navigation View
NavigationView是从显示导航菜单的最简单方法。
通常与DrawerLayout结合使用以实现Material navigation drawers。 导航抽屉是用户从屏幕边缘/左侧的模式打开类似对话框,用于显示应用内导航链接。
具有属性如下:
app:menu: 指向将呈现的菜单资源的NavigationView
app:headerLayout: 指向一个将布局资源作为头部使用的NavigationView
当然通过setNavigationItemSelectedListener监听导航栏,去知晓用户触发具体菜单并链接到应有的业务逻辑上。
下面简单来例子:
<androidx.drawerlayout.widget.DrawerLayout
    android:layout_width="match_parent"
    android:layout_height="match_parent">

    <androidx.coordinatorlayout.widget.CoordinatorLayout
        android:layout_width="match_parent"
        android:layout_height="match_parent">
        <!-- Your content goes here -->
    </androidx.coordinatorlayout.widget.CoordinatorLayout>

    <com.google.android.material.navigation.NavigationView
        android:id="@+id/navigation"
        android:layout_width="wrap_content"
        android:layout_height="match_parent"
        android:layout_gravity="start|left"
        app:headerLayout="@layout/item_layout"
        app:menu="@menu/bottom_navigation_menu" /></androidx.drawerlayout.widget.DrawerLayout>
效果如下:

11. Snackbar
Snackbar,这个就不解释了,Android 5.0推出效果就包含,感觉没啥特别的。
public void showSnakeBar(View view) {
    Snackbar.make(view, "这是一个测试样例", Snackbar.LENGTH_LONG)
            .setAction("确认", new View.OnClickListener() {                @Override
                public void onClick(View v) {
                    Toast.makeText(MainActivity.this, "点击了", Toast.LENGTH_SHORT).show();
                }
            }).show();
}
演示图如下:

12. Tab Layout
TabLayout提供了一个水平布局来显示选项卡。 该布局处理一组选项卡的交互,其中包括:
scrolling behavior:滚动
(swipe) gestures:(轻扫)手势
tab selection:标签选择
animations:动画
alignment:对齐
下面先来简单操练一番:
<com.google.android.material.tabs.TabLayout
    android:id="@+id/tabs"
    android:layout_width="match_parent"
    android:layout_height="wrap_content">

    <com.google.android.material.tabs.TabItem
        android:icon="@android:drawable/ic_menu_add"
        android:text="添加" />

    <com.google.android.material.tabs.TabItem
        android:icon="@android:drawable/ic_menu_call"
        android:text="拨打电话" />

    <com.google.android.material.tabs.TabItem
        android:icon="@android:drawable/ic_menu_camera"
        android:text="来个自拍" /></com.google.android.material.tabs.TabLayout>
效果也是很nice:

有的小伙伴说,忒丑了。。。
正好,谷歌Baba提供了几个内置样式,一起来看看吧~
style="@style/Widget.MaterialComponents.TabLayout"
效果如下:

style="@style/Widget.MaterialComponents.TabLayout.Colored":
效果如下:

style="@style/Widget.Design.TabLayout":
效果如下:

其次,选项卡布局应该在与相应选项卡关联的内容上方使用,并让用户在内容视图之间快速切换。 这些内容视图通常保存在ViewPager中。
使用setupWithViewPager(ViewPager)将TabLayout与ViewPager链接起来。 TabLayout中的各个选项卡将自动填充PagerAdapter的页面标题。
ViewPager pager;
TabLayout tabs = (TabLayout) findViewById(R.id.tabs);

tabs.setupWithViewPager(pager);
当然也可以将TabLayoutXML 添加到ViewPager中:
<android.support.v4.view.ViewPager
    android:layout_width="match_parent"
    android:layout_height="match_parent">

  <com.google.android.material.tabs.TabLayout
      android:layout_width="match_parent"
      android:layout_height="wrap_content"
      android:layout_gravity="top" /></android.support.v4.view.ViewPager>
当然,其中还包含其他的一些属性,如下:

13. Text Fields
TextInputLayout,一个基于Material text fields实现的nice控件。当它与TextInputEditText配合使用时,会为我们增添许多的惊喜。
而下面,我们简单撸一波~
<com.google.android.material.textfield.TextInputLayout
    android:layout_width="match_parent"
    android:layout_height="wrap_content">

    <com.google.android.material.textfield.TextInputEditText
        android:layout_width="match_parent"
        android:layout_height="wrap_content"
        android:hint="请输入用户名" /></com.google.android.material.textfield.TextInputLayout><com.google.android.material.textfield.TextInputLayout
    android:layout_width="match_parent"
    android:layout_height="wrap_content">

    <com.google.android.material.textfield.TextInputEditText
        android:layout_width="match_parent"
        android:layout_height="wrap_content"
        android:hint="请输入密码" /></com.google.android.material.textfield.TextInputLayout>
使用很easy,而效果又如何呢?

下面放一波关于系统内置样式效果:
style="@style/Widget.MaterialComponents.TextInputLayout.FilledBox":

style="@style/Widget.MaterialComponents.TextInputLayout.OutlineBox":

style="@style/Widget.MaterialComponents.TextInputLayout.FilledBox.Dense":

style="@style/Widget.MaterialComponents.TextInputLayout.OutlineBox.Dense":

当然,如果你觉得不够用,可以使用下图中的属性去设置Padding和Radiu:

其次,也可以使用下图中内置的属性去玩转其他的一些效果:

14. Top App Bar
AppBarLayout是一个ViewGroup,最常用于包装一个Toolbar,则这里也包含了很多Material Design效果以及交互。
这里截取一张官方说明图,大家简单了解下:

当然,具体详情可直接查看官方地址,下面附上链接:
https://material.io/design/components/app-bars-top.html#anatomy
开撸过程中遇到的小问题
这里记录下LZ撸码过程中遇到的问题,希望各位老铁避免LZ这睿智的问题~
1. error: resource android:attr/dialogCornerRadius not found
问题原因:
依赖关系与当前编译环境不匹配。
问题解决地址:
2.android.support.v4.app.INotificationSideChannel$Stub$Proxy
问题原因:
依赖项不兼容,查看配置。LZ这里由于compileSdkVersion版本以及配置异常导致。
问题解决地址:

 随时随地看视频


