
前提
org.springframework.core.env.Environment是当前应用运行环境的公开接口,主要包括应用程序运行环境的两个关键方面:配置文件(profiles)和属性。Environment继承自接口PropertyResolver,而PropertyResolver提供了属性访问的相关方法。这篇文章从源码的角度分析Environment的存储容器和加载流程,然后基于源码的理解给出一个生产级别的扩展。
本文较长,请用一个舒服的姿势阅读。
Environment类体系
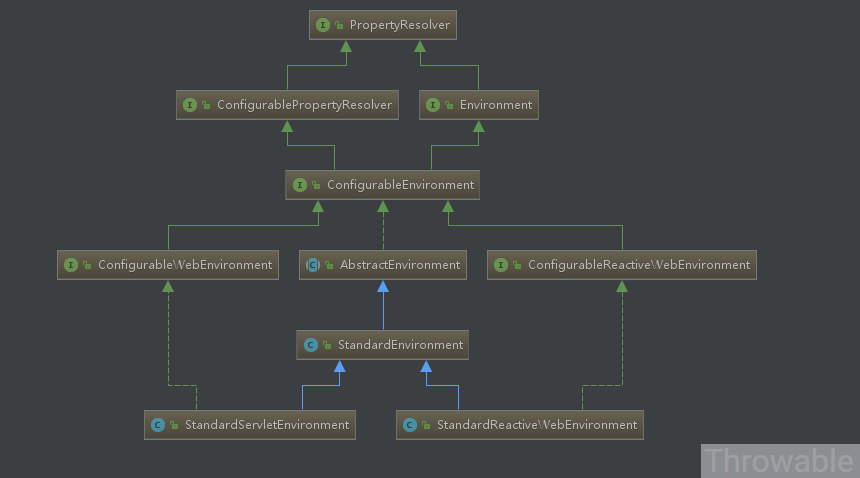
PropertyResolver:提供属性访问功能。
ConfigurablePropertyResolver:继承自PropertyResolver,主要提供属性类型转换(基于org.springframework.core.convert.ConversionService)功能。
Environment:继承自PropertyResolver,提供访问和判断profiles的功能。
ConfigurableEnvironment:继承自ConfigurablePropertyResolver和Environment,并且提供设置激活的profile和默认的profile的功能。
ConfigurableWebEnvironment:继承自ConfigurableEnvironment,并且提供配置Servlet上下文和Servlet参数的功能。
AbstractEnvironment:实现了ConfigurableEnvironment接口,默认属性和存储容器的定义,并且实现了ConfigurableEnvironment种的方法,并且为子类预留可覆盖了扩展方法。
StandardEnvironment:继承自AbstractEnvironment,非Servlet(Web)环境下的标准Environment实现。
StandardServletEnvironment:继承自StandardEnvironment,Servlet(Web)环境下的标准Environment实现。
reactive相关的暂时不研究。
Environment提供的方法
一般情况下,我们在SpringMVC项目中启用到的是StandardServletEnvironment,它的父接口问ConfigurableWebEnvironment,我们可以查看此接口提供的方法:

Environment的存储容器
Environment的静态属性和存储容器都是在AbstractEnvironment中定义的,ConfigurableWebEnvironment接口提供的getPropertySources()方法可以获取到返回的MutablePropertySources实例,然后添加额外的PropertySource。实际上,Environment的存储容器就是org.springframework.core.env.PropertySource的子类集合,AbstractEnvironment中使用的实例是org.springframework.core.env.MutablePropertySources,下面看下PropertySource的源码:
public abstract class PropertySource<T> {    protected final Log logger = LogFactory.getLog(getClass());    protected final String name;    protected final T source;    public PropertySource(String name, T source) {
        Assert.hasText(name, "Property source name must contain at least one character");
        Assert.notNull(source, "Property source must not be null");        this.name = name;        this.source = source;
    }    @SuppressWarnings("unchecked")    public PropertySource(String name) {        this(name, (T) new Object());
    }    public String getName() {        return this.name;
    }    public T getSource() {        return this.source;
    }

    public boolean containsProperty(String name) {        return (getProperty(name) != null);
    }

    @Nullable
    public abstract Object getProperty(String name);

    @Override
    public boolean equals(Object obj) {        return (this == obj || (obj instanceof PropertySource &&
                ObjectUtils.nullSafeEquals(this.name, ((PropertySource<?>) obj).name)));
    }

    @Override
    public int hashCode() {        return ObjectUtils.nullSafeHashCode(this.name);
    }
//省略其他方法和内部类的源码 }源码相对简单,预留了一个getProperty抽象方法给子类实现,重点需要关注的是覆写了的equals和hashCode方法,实际上只和name属性相关,这一点很重要,说明一个PropertySource实例绑定到一个唯一的name,这个name有点像HashMap里面的key,部分移除、判断方法都是基于name属性。PropertySource的最常用子类是MapPropertySource、PropertiesPropertySource、ResourcePropertySource、StubPropertySource、ComparisonPropertySource:
MapPropertySource:source指定为Map实例的PropertySource实现。
PropertiesPropertySource:source指定为Map实例的PropertySource实现,内部的Map实例由Properties实例转换而来。
ResourcePropertySource:继承自PropertiesPropertySource,source指定为通过Resource实例转化为Properties再转换为Map实例。
StubPropertySource:PropertySource的一个内部类,source设置为null,实际上就是空实现。
ComparisonPropertySource:继承自ComparisonPropertySource,所有属性访问方法强制抛出异常,作用就是一个不可访问属性的空实现。
AbstractEnvironment中的属性定义:
public static final String IGNORE_GETENV_PROPERTY_NAME = "spring.getenv.ignore";public static final String ACTIVE_PROFILES_PROPERTY_NAME = "spring.profiles.active";public static final String DEFAULT_PROFILES_PROPERTY_NAME = "spring.profiles.default";protected static final String RESERVED_DEFAULT_PROFILE_NAME = "default";private final Set<String> activeProfiles = new LinkedHashSet<>();private final Set<String> defaultProfiles = new LinkedHashSet<>(getReservedDefaultProfiles());private final MutablePropertySources propertySources = new MutablePropertySources(this.logger);private final ConfigurablePropertyResolver propertyResolver = new PropertySourcesPropertyResolver(this.propertySources);
上面的propertySources(MutablePropertySources类型)属性就是用来存放PropertySource列表的,PropertySourcesPropertyResolver是ConfigurablePropertyResolver的实现,默认的profile就是字符串default。MutablePropertySources的内部属性如下:
private final List<PropertySource<?>> propertySourceList = new CopyOnWriteArrayList<>();
没错,这个就是最底层的存储容器,也就是环境属性都是存放在一个CopyOnWriteArrayList<PropertySource<?>>实例中。MutablePropertySources是PropertySources的子类,它提供了get(String name)、addFirst、addLast、addBefore、addAfter、remove、replace等便捷方法,方便操作propertySourceList集合的元素,这里挑选addBefore的源码分析:
public void addBefore(String relativePropertySourceName, PropertySource<?> propertySource) {    if (logger.isDebugEnabled()) {
        logger.debug("Adding PropertySource '" + propertySource.getName() +                    "' with search precedence immediately higher than '" + relativePropertySourceName + "'");
    }    //前一个PropertySource的name指定为relativePropertySourceName时候必须和添加的PropertySource的name属性不相同
    assertLegalRelativeAddition(relativePropertySourceName, propertySource);    //尝试移除同名的PropertySource
    removeIfPresent(propertySource);    //获取前一个PropertySource在CopyOnWriteArrayList中的索引
    int index = assertPresentAndGetIndex(relativePropertySourceName);    //添加当前传入的PropertySource到指定前一个PropertySource的索引,相当于relativePropertySourceName对应的PropertySource后移到原来索引值+1的位置
    addAtIndex(index, propertySource);
}protected void assertLegalRelativeAddition(String relativePropertySourceName, PropertySource<?> propertySource) {
    String newPropertySourceName = propertySource.getName();    if (relativePropertySourceName.equals(newPropertySourceName)) {        throw new IllegalArgumentException(                    "PropertySource named '" + newPropertySourceName + "' cannot be added relative to itself");
    }
}protected void removeIfPresent(PropertySource<?> propertySource) {    this.propertySourceList.remove(propertySource);
}private int assertPresentAndGetIndex(String name) {    int index = this.propertySourceList.indexOf(PropertySource.named(name));    if (index == -1) {        throw new IllegalArgumentException("PropertySource named '" + name + "' does not exist");
    }    return index;
}private void addAtIndex(int index, PropertySource<?> propertySource) {    //注意,这里会再次尝试移除同名的PropertySource
    removeIfPresent(propertySource);    this.propertySourceList.add(index, propertySource);
}
大多数PropertySource子类的修饰符都是public,可以直接使用,这里写个小demo:
MutablePropertySources mutablePropertySources = new MutablePropertySources();
Map<String, Object> map = new HashMap<>(8);
map.put("name", "throwable");
map.put("age", 25);
MapPropertySource mapPropertySource = new MapPropertySource("map", map);
mutablePropertySources.addLast(mapPropertySource);
Properties properties = new Properties();
PropertiesPropertySource propertiesPropertySource = new PropertiesPropertySource("prop", properties);
properties.put("name", "doge");
properties.put("gourp", "group-a");
mutablePropertySources.addBefore("map", propertiesPropertySource);
System.out.println(mutablePropertySources);
Environment加载过程源码分析
Environment加载的源码位于SpringApplication#prepareEnvironment:
    private ConfigurableEnvironment prepareEnvironment(
            SpringApplicationRunListeners listeners,
            ApplicationArguments applicationArguments) {        // Create and configure the environment
        //创建ConfigurableEnvironment实例
        ConfigurableEnvironment environment = getOrCreateEnvironment();        //启动参数绑定到ConfigurableEnvironment中
        configureEnvironment(environment, applicationArguments.getSourceArgs());        //发布ConfigurableEnvironment准备完毕事件
        listeners.environmentPrepared(environment);        //绑定ConfigurableEnvironment到当前的SpringApplication实例中
        bindToSpringApplication(environment);        //这一步是非SpringMVC项目的处理,暂时忽略
        if (this.webApplicationType == WebApplicationType.NONE) {
            environment = new EnvironmentConverter(getClassLoader())
                    .convertToStandardEnvironmentIfNecessary(environment);
        }        //绑定ConfigurationPropertySourcesPropertySource到ConfigurableEnvironment中,name为configurationProperties,实例是SpringConfigurationPropertySources,属性实际是ConfigurableEnvironment中的MutablePropertySources
        ConfigurationPropertySources.attach(environment);        return environment;
}这里重点看下getOrCreateEnvironment方法:
private ConfigurableEnvironment getOrCreateEnvironment() {    if (this.environment != null) {        return this.environment;
    }    //在SpringMVC项目,ConfigurableEnvironment接口的实例就是新建的StandardServletEnvironment实例
    if (this.webApplicationType == WebApplicationType.SERVLET) {        return new StandardServletEnvironment();
    }    return new StandardEnvironment();
}//REACTIVE_WEB_ENVIRONMENT_CLASS=org.springframework.web.reactive.DispatcherHandler//MVC_WEB_ENVIRONMENT_CLASS=org.springframework.web.servlet.DispatcherServlet//MVC_WEB_ENVIRONMENT_CLASS={"javax.servlet.Servlet","org.springframework.web.context.ConfigurableWebApplicationContext"}//这里,默认就是WebApplicationType.SERVLETprivate WebApplicationType deduceWebApplicationType() {    if (ClassUtils.isPresent(REACTIVE_WEB_ENVIRONMENT_CLASS, null)
        && !ClassUtils.isPresent(MVC_WEB_ENVIRONMENT_CLASS, null)) {        return WebApplicationType.REACTIVE;
    }    for (String className : WEB_ENVIRONMENT_CLASSES) {        if (!ClassUtils.isPresent(className, null)) {            return WebApplicationType.NONE;
        }
    }    return WebApplicationType.SERVLET;
}还有一个地方要重点关注:发布ConfigurableEnvironment准备完毕事件listeners.environmentPrepared(environment),实际上这里用到了同步的EventBus,事件的监听者是ConfigFileApplicationListener,具体处理逻辑是onApplicationEnvironmentPreparedEvent方法:
private void onApplicationEnvironmentPreparedEvent(
            ApplicationEnvironmentPreparedEvent event) {
    List<EnvironmentPostProcessor> postProcessors = loadPostProcessors();
    postProcessors.add(this);
    AnnotationAwareOrderComparator.sort(postProcessors);    //遍历所有的EnvironmentPostProcessor对Environment实例进行处理
    for (EnvironmentPostProcessor postProcessor : postProcessors) {
        postProcessor.postProcessEnvironment(event.getEnvironment(),
                    event.getSpringApplication());
    }
}//从spring.factories文件中加载,一共有四个实例//ConfigFileApplicationListener//CloudFoundryVcapEnvironmentPostProcessor//SpringApplicationJsonEnvironmentPostProcessor//SystemEnvironmentPropertySourceEnvironmentPostProcessorList<EnvironmentPostProcessor> loadPostProcessors() {    return SpringFactoriesLoader.loadFactories(EnvironmentPostProcessor.class,
                getClass().getClassLoader());
}实际上,处理工作大部分都在ConfigFileApplicationListener中,见它的postProcessEnvironment方法:
public void postProcessEnvironment(ConfigurableEnvironment environment,
            SpringApplication application) {
    addPropertySources(environment, application.getResourceLoader());
}protected void addPropertySources(ConfigurableEnvironment environment,
            ResourceLoader resourceLoader) {
    RandomValuePropertySource.addToEnvironment(environment);    new Loader(environment, resourceLoader).load();
}主要的配置环境加载逻辑在内部类Loader,Loader会匹配多个路径下的文件把属性加载到ConfigurableEnvironment中,加载器主要是PropertySourceLoader的实例,例如我们用到application-${profile}.yaml文件做应用主配置文件,使用的是YamlPropertySourceLoader,这个时候activeProfiles也会被设置到ConfigurableEnvironment中。加载完毕之后,ConfigurableEnvironment中基本包含了所有需要加载的属性(activeProfiles是这个时候被写入ConfigurableEnvironment)。值得注意的是,几乎所有属性都是key-value形式存储,如xxx.yyyy.zzzzz=value、xxx.yyyy[0].zzzzz=value-1、xxx.yyyy[1].zzzzz=value-2。Loader中的逻辑相对复杂,有比较多的遍历和过滤条件,这里不做展开。
Environment属性访问源码分析
上文提到过,都是委托到PropertySourcesPropertyResolver,先看它的构造函数:
@Nullableprivate final PropertySources propertySources;public PropertySourcesPropertyResolver(@Nullable PropertySources propertySources) {        this.propertySources = propertySources;
    }
只依赖于一个PropertySources实例,在SpringBoot的SpringMVC项目中就是MutablePropertySources的实例。重点分析一下最复杂的一个方法:
protected <T> T getProperty(String key, Class<T> targetValueType, boolean resolveNestedPlaceholders) {    if (this.propertySources != null) {        //遍历所有的PropertySource
        for (PropertySource<?> propertySource : this.propertySources) {            if (logger.isTraceEnabled()) {
                logger.trace("Searching for key '" + key + "' in PropertySource '" +
                            propertySource.getName() + "'");
            }
            Object value = propertySource.getProperty(key);            //选用第一个不为null的匹配key的属性值
            if (value != null) {                if (resolveNestedPlaceholders && value instanceof String) {                    //处理属性占位符,如${server.port},底层委托到PropertyPlaceholderHelper完成
                    value = resolveNestedPlaceholders((String) value);
                }
                logKeyFound(key, propertySource, value);                //如果需要的话,进行一次类型转换,底层委托到DefaultConversionService完成
                return convertValueIfNecessary(value, targetValueType);
            }
        }
    }    if (logger.isDebugEnabled()) {
        logger.debug("Could not find key '" + key + "' in any property source");
    }    return null;
}
这里的源码告诉我们,如果出现多个PropertySource中存在同名的key,返回的是第一个PropertySource对应key的属性值的处理结果,因此我们如果需要自定义一些环境属性,需要十分清楚各个PropertySource的顺序。
扩展-实现分散配置
在不使用SpringCloud配置中心的情况下,一般的SpringBoot项目的配置文件如下:
- src
 - main
  - resources
   - application-prod.yaml
   - application-dev.yaml
   - application-test.yaml
随着项目发展,配置项越来越多,导致了application-${profile}.yaml迅速膨胀,大的配置文件甚至超过一千行,为了简化和划分不同功能的配置,可以考虑把配置文件拆分如下:
- src
 - main
  - resources
   - profiles
     - dev
       - business.yaml
       - mq.json
       - datasource.properties
     - prod
       - business.yaml
       - mq.json
       - datasource.properties
     - test
       - business.yaml
       - mq.json
       - datasource.properties
   - application-prod.yaml
   - application-dev.yaml
   - application-test.yaml
外层的application-${profile}.yaml只留下项目的核心配置如server.port等,其他配置打散放在/profiles/${profile}/各自的配置文件中。实现方式是:依据当前配置的spring.profiles.active属性,读取类路径中指定文件夹下的配置文件中,加载到Environment中,需要注意这一个加载步骤必须在Spring刷新上下文方法最后一步finishRefresh之前完成(这一点原因可以参考之前在个人博客写过的SpringBoot刷新上下文源码的分析),否则有可能会影响到占位符属性的自动装配(例如使用了@Value("${filed}"))。
先定义一个属性探索者接口:
public interface PropertySourceDetector {    /**
     * 获取支持的文件后缀数组
     *
     * @return String[]
     */
    String[] getFileExtensions();    /**
     * 加载目标文件属性到环境中
     *
     * @param environment environment
     * @param name        name
     * @param resource    resource
     * @throws IOException IOException
     */
    void load(ConfigurableEnvironment environment, String name, Resource resource) throws IOException;
}
然后需要一个抽象属性探索者把Resource转换为字符串,额外提供Map的缩进、添加PropertySource到Environment等方法:
public abstract class AbstractPropertySourceDetector implements PropertySourceDetector {    private static final String SERVLET_ENVIRONMENT_CLASS = "org.springframework.web."
            + "context.support.StandardServletEnvironment";    public boolean support(String fileExtension) {
        String[] fileExtensions = getFileExtensions();        return null != fileExtensions &&
                Arrays.stream(fileExtensions).anyMatch(extension -> extension.equals(fileExtension));
    }    private String findPropertySource(MutablePropertySources sources) {        if (ClassUtils.isPresent(SERVLET_ENVIRONMENT_CLASS, null) && sources
                .contains(StandardServletEnvironment.JNDI_PROPERTY_SOURCE_NAME)) {            return StandardServletEnvironment.JNDI_PROPERTY_SOURCE_NAME;
        }        return StandardEnvironment.SYSTEM_PROPERTIES_PROPERTY_SOURCE_NAME;
    }    protected void addPropertySource(ConfigurableEnvironment environment, PropertySource<?> source) {
        MutablePropertySources sources = environment.getPropertySources();
        String name = findPropertySource(sources);        if (sources.contains(name)) {
            sources.addBefore(name, source);
        } else {
            sources.addFirst(source);
        }
    }    protected Map<String, Object> flatten(Map<String, Object> map) {
        Map<String, Object> result = new LinkedHashMap<>();
        flatten(null, result, map);        return result;
    }    private void flatten(String prefix, Map<String, Object> result, Map<String, Object> map) {
        String namePrefix = (prefix != null ? prefix + "." : "");
        map.forEach((key, value) -> extract(namePrefix + key, result, value));
    }    @SuppressWarnings("unchecked")    private void extract(String name, Map<String, Object> result, Object value) {        if (value instanceof Map) {
            flatten(name, result, (Map<String, Object>) value);
        } else if (value instanceof Collection) {            int index = 0;            for (Object object : (Collection<Object>) value) {
                extract(name + "[" + index + "]", result, object);
                index++;
            }
        } else {
            result.put(name, value);
        }
    }    protected String getContentStringFromResource(Resource resource) throws IOException {        return StreamUtils.copyToString(resource.getInputStream(), Charset.forName("UTF-8"));
    }
}
上面的方法参考SpringApplicationJsonEnvironmentPostProcessor,然后编写各种类型配置属性探索者的实现:
//Json@Slf4jpublic class JsonPropertySourceDetector extends AbstractPropertySourceDetector {    private static final JsonParser JSON_PARSER = JsonParserFactory.getJsonParser();    @Override
    public String[] getFileExtensions() {        return new String[]{"json"};
    }    @Override
    public void load(ConfigurableEnvironment environment, String name, Resource resource) throws IOException {        try {
            Map<String, Object> map = JSON_PARSER.parseMap(getContentStringFromResource(resource));
            Map<String, Object> target = flatten(map);
            addPropertySource(environment, new MapPropertySource(name, target));
        } catch (Exception e) {
            log.warn("加载Json文件属性到环境变量失败,name = {},resource = {}", name, resource);
        }
    }
}//Propertiespublic class PropertiesPropertySourceDetector extends AbstractPropertySourceDetector {    @Override
    public String[] getFileExtensions() {        return new String[]{"properties", "conf"};
    }    @SuppressWarnings("unchecked")    @Override
    public void load(ConfigurableEnvironment environment, String name, Resource resource) throws IOException {
        Map map = PropertiesLoaderUtils.loadProperties(resource);
        addPropertySource(environment, new MapPropertySource(name, map));
    }
}//Yaml@Slf4jpublic class YamlPropertySourceDetector extends AbstractPropertySourceDetector {    private static final JsonParser YAML_PARSER = new YamlJsonParser();    @Override
    public String[] getFileExtensions() {        return new String[]{"yaml", "yml"};
    }    @Override
    public void load(ConfigurableEnvironment environment, String name, Resource resource) throws IOException {        try {
            Map<String, Object> map = YAML_PARSER.parseMap(getContentStringFromResource(resource));
            Map<String, Object> target = flatten(map);
            addPropertySource(environment, new MapPropertySource(name, target));
        } catch (Exception e) {
            log.warn("加载Yaml文件属性到环境变量失败,name = {},resource = {}", name, resource);
        }
    }
}子类的全部PropertySource都是MapPropertySource,name为文件的名称,所有PropertySource都用addBefore方法插入到systemProperties的前面,主要是为了提高匹配属性的优先级。接着需要定义一个属性探索者的合成类用来装载所有的子类:
public class PropertySourceDetectorComposite implements PropertySourceDetector {    private static final String DEFAULT_SUFFIX = "properties";    private final List<AbstractPropertySourceDetector> propertySourceDetectors = new ArrayList<>();    public void addPropertySourceDetector(AbstractPropertySourceDetector sourceDetector) {
        propertySourceDetectors.add(sourceDetector);
    }    public void addPropertySourceDetectors(List<AbstractPropertySourceDetector> sourceDetectors) {
        propertySourceDetectors.addAll(sourceDetectors);
    }    public List<AbstractPropertySourceDetector> getPropertySourceDetectors() {        return Collections.unmodifiableList(propertySourceDetectors);
    }    @Override
    public String[] getFileExtensions() {
        List<String> fileExtensions = new ArrayList<>(8);        for (AbstractPropertySourceDetector propertySourceDetector : propertySourceDetectors) {
            fileExtensions.addAll(Arrays.asList(propertySourceDetector.getFileExtensions()));
        }        return fileExtensions.toArray(new String[0]);
    }    @Override
    public void load(ConfigurableEnvironment environment, String name, Resource resource) throws IOException {        if (resource.isFile()) {
            String fileName = resource.getFile().getName();            int index = fileName.lastIndexOf(".");
            String suffix;            if (-1 == index) {                //如果文件没有后缀,当作properties处理
                suffix = DEFAULT_SUFFIX;
            } else {
                suffix = fileName.substring(index + 1);
            }            for (AbstractPropertySourceDetector propertySourceDetector : propertySourceDetectors) {                if (propertySourceDetector.support(suffix)) {
                    propertySourceDetector.load(environment, name, resource);                    return;
                }
            }
        }
    }
}
最后添加一个配置类作为入口:
public class PropertySourceDetectorConfiguration implements ImportBeanDefinitionRegistrar {    private static final String PATH_PREFIX = "profiles";    @Override
    public void registerBeanDefinitions(AnnotationMetadata importingClassMetadata, BeanDefinitionRegistry registry) {
        DefaultListableBeanFactory beanFactory = (DefaultListableBeanFactory) registry;
        ConfigurableEnvironment environment = beanFactory.getBean(ConfigurableEnvironment.class);
        List<AbstractPropertySourceDetector> propertySourceDetectors = new ArrayList<>();
        configurePropertySourceDetectors(propertySourceDetectors, beanFactory);
        PropertySourceDetectorComposite propertySourceDetectorComposite = new PropertySourceDetectorComposite();
        propertySourceDetectorComposite.addPropertySourceDetectors(propertySourceDetectors);
        String[] activeProfiles = environment.getActiveProfiles();
        ResourcePatternResolver resourcePatternResolver = new PathMatchingResourcePatternResolver();        try {            for (String profile : activeProfiles) {
                String location = PATH_PREFIX + File.separator + profile + File.separator + "*";
                Resource[] resources = resourcePatternResolver.getResources(location);                for (Resource resource : resources) {
                    propertySourceDetectorComposite.load(environment, resource.getFilename(), resource);
                }
            }
        } catch (IOException e) {            throw new IllegalStateException(e);
        }
    }    private void configurePropertySourceDetectors(List<AbstractPropertySourceDetector> propertySourceDetectors,
                                                  DefaultListableBeanFactory beanFactory) {
        Map<String, AbstractPropertySourceDetector> beansOfType = beanFactory.getBeansOfType(AbstractPropertySourceDetector.class);        for (Map.Entry<String, AbstractPropertySourceDetector> entry : beansOfType.entrySet()) {
            propertySourceDetectors.add(entry.getValue());
        }
        propertySourceDetectors.add(new JsonPropertySourceDetector());
        propertySourceDetectors.add(new YamlPropertySourceDetector());
        propertySourceDetectors.add(new PropertiesPropertySourceDetector());
    }
}
准备就绪,在/resources/profiles/dev下面添加两个文件app.json和conf:
//app.json{  "app": {    "name": "throwable",    "age": 25
  }
}//confname=doge
项目的application.yaml添加属性spring.profiles.active: dev,最后添加一个CommandLineRunner的实现用来观察数据:
@Slf4j@Componentpublic class CustomCommandLineRunner implements CommandLineRunner {    @Value("${app.name}")
    String name;    @Value("${app.age}")
    Integer age;    @Autowired
    ConfigurableEnvironment configurableEnvironment;    @Override
    public void run(String... args) throws Exception {
        log.info("name = {},age = {}", name, age);
    }
}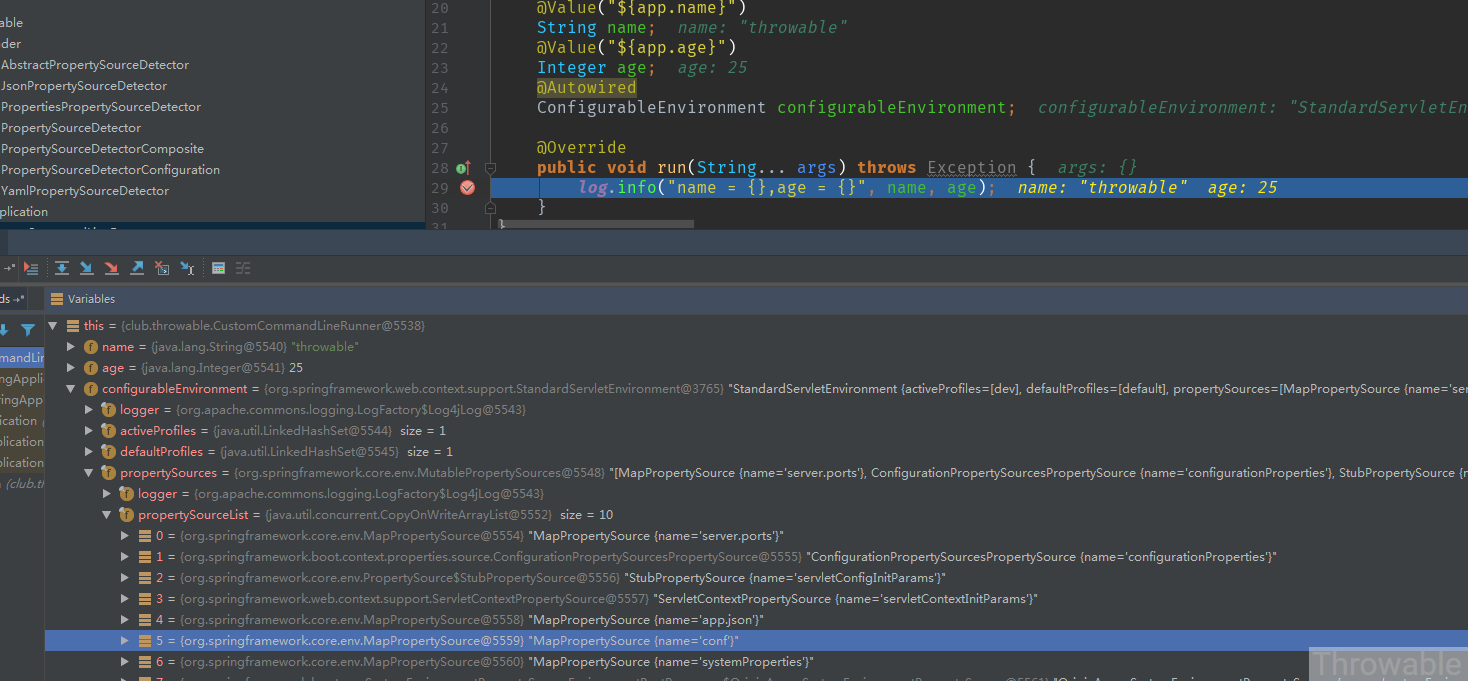
自动装配的属性值和Environment实例中的属性和预期一样,改造是成功的。
小结
Spring中的环境属性管理的源码个人认为是最清晰和简单的:从文件中读取数据转化为key-value结构,key-value结构存放在一个PropertySource实例中,然后得到的多个PropertySource实例存放在一个CopyOnWriteArrayList中,属性访问的时候总是遍历CopyOnWriteArrayList中的PropertySource进行匹配。可能相对复杂的就是占位符的解析和参数类型的转换,后者牵连到Converter体系,这些不在本文的讨论范围内。最后附上一张Environment存储容器的示例图:

参考资料:
spring-boot-starter-web:2.0.3.RELEASE源码。
(本文完)
原文出处:https://www.cnblogs.com/throwable/p/9411100.html