偷懒了几天,好几天没写springboot了。真的不是没什么可写,是因为坚持做一件事真的很难。
今天抽空弄了一个springboot整合redis的小例子。
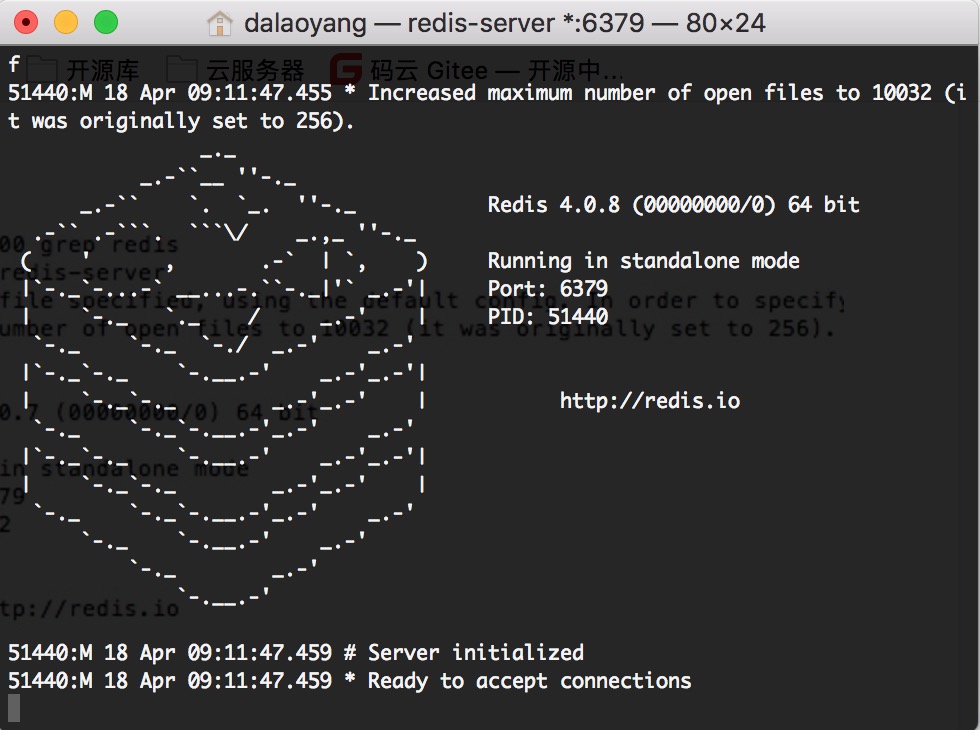
首先做好准备工作,在本地安装一个redis,具体步骤可以自行百度,然后启动redis。出现下图页面就启动成功了。
然后新建项目,加入redis依赖,pom文件如下:
<?xml version="1.0" encoding="UTF-8"?>
<project xmlns="http://maven.apache.org/POM/4.0.0" xmlns:xsi="http://www.w3.org/2001/XMLSchema-instance"
	xsi:schemaLocation="http://maven.apache.org/POM/4.0.0 http://maven.apache.org/xsd/maven-4.0.0.xsd">
	<modelVersion>4.0.0</modelVersion>

	<groupId>com.dalaoyang</groupId>
	<artifactId>springboot_redis</artifactId>
	<version>0.0.1-SNAPSHOT</version>
	<packaging>jar</packaging>

	<name>springboot_redis</name>
	<description>springboot_redis</description>

	<parent>
		<groupId>org.springframework.boot</groupId>
		<artifactId>spring-boot-starter-parent</artifactId>
		<version>1.5.9.RELEASE</version>
		<relativePath/> <!-- lookup parent from repository -->
	</parent>

	<properties>
		<project.build.sourceEncoding>UTF-8</project.build.sourceEncoding>
		<project.reporting.outputEncoding>UTF-8</project.reporting.outputEncoding>
		<java.version>1.8</java.version>
	</properties>

	<dependencies>
		<dependency>
			<groupId>org.springframework.boot</groupId>
			<artifactId>spring-boot-starter-data-redis</artifactId>
		</dependency>
		<dependency>
			<groupId>org.springframework.boot</groupId>
			<artifactId>spring-boot-starter-web</artifactId>
		</dependency>

		<dependency>
			<groupId>org.springframework.boot</groupId>
			<artifactId>spring-boot-devtools</artifactId>
			<scope>runtime</scope>
		</dependency>
		<dependency>
			<groupId>org.springframework.boot</groupId>
			<artifactId>spring-boot-starter-test</artifactId>
			<scope>test</scope>
		</dependency>

	</dependencies>

	<build>
		<plugins>
			<plugin>
				<groupId>org.springframework.boot</groupId>
				<artifactId>spring-boot-maven-plugin</artifactId>
			</plugin>
		</plugins>
	</build>


</project>
然后在application.properties加入redis配置:
##端口号
server.port=8888

# Redis数据库索引(默认为0)
spring.redis.database=0
# Redis服务器地址
spring.redis.host=localhost
# Redis服务器连接端口
spring.redis.port=6379
# Redis服务器连接密码(默认为空)
spring.redis.password=
#连接池最大连接数(使用负值表示没有限制)
spring.redis.pool.max-active=8
# 连接池最大阻塞等待时间(使用负值表示没有限制)
spring.redis.pool.max-wait=-1
# 连接池中的最大空闲连接
spring.redis.pool.max-idle=8
# 连接池中的最小空闲连接
spring.redis.pool.min-idle=0
# 连接超时时间(毫秒)
spring.redis.timeout=0
RedisConfig配置类,其中@EnableCaching开启注解
package com.dalaoyang.config;

import org.springframework.cache.CacheManager;
import org.springframework.cache.annotation.CachingConfigurerSupport;
import org.springframework.cache.annotation.EnableCaching;
import org.springframework.context.annotation.Bean;
import org.springframework.context.annotation.Configuration;
import org.springframework.data.redis.cache.RedisCacheManager;
import org.springframework.data.redis.connection.RedisConnectionFactory;
import org.springframework.data.redis.core.RedisTemplate;

/**
 * @author dalaoyang
 * @Description
 * @project springboot_learn
 * @package com.dalaoyang.config
 * @email yangyang@dalaoyang.cn
 * @date 2018/4/18
 */
@Configuration
@EnableCaching//开启缓存
public class RedisConfig extends CachingConfigurerSupport {

    @Bean
    public CacheManager cacheManager(RedisTemplate<?,?> redisTemplate) {
        CacheManager cacheManager = new RedisCacheManager(redisTemplate);
        return cacheManager;
    }

    @Bean
    public RedisTemplate<String, String> redisTemplate(RedisConnectionFactory factory) {
        RedisTemplate<String, String> redisTemplate = new RedisTemplate<String, String>();
        redisTemplate.setConnectionFactory(factory);
        return redisTemplate;
    }
}
由于只是简单整合,我只创建了一个RedisService来用来存取缓存数据,实际项目中可以根据需求创建interface,impl等等,代码如下:
package com.dalaoyang.service;
import javax.annotation.Resource;

import org.springframework.data.redis.core.RedisTemplate;
import org.springframework.data.redis.core.ValueOperations;
import org.springframework.data.redis.serializer.RedisSerializer;
import org.springframework.data.redis.serializer.StringRedisSerializer;
import org.springframework.stereotype.Service;

/**
 * @author dalaoyang
 * @Description
 * @project springboot_learn
 * @package com.dalaoyang.service
 * @email yangyang@dalaoyang.cn
 * @date 2018/4/18
 */
@Service
public class RedisService {
    @Resource
    private RedisTemplate<String,Object> redisTemplate;

    public void set(String key, Object value) {
        //更改在redis里面查看key编码问题
        RedisSerializer redisSerializer =new StringRedisSerializer();
        redisTemplate.setKeySerializer(redisSerializer);
        ValueOperations<String,Object> vo = redisTemplate.opsForValue();
        vo.set(key, value);
    }

    public Object get(String key) {
        ValueOperations<String,Object> vo = redisTemplate.opsForValue();
        return vo.get(key);
    }
}
实体类City:
package com.dalaoyang.entity;

import java.io.Serializable;

/**
 * @author dalaoyang
 * @Description
 * @project springboot_learn
 * @package com.dalaoyang.Entity
 * @email 397600342@qq.com
 * @date 2018/4/7
 */
public class City implements Serializable {
    private int cityId;
    private String cityName;
    private String cityIntroduce;

    public City(int cityId, String cityName, String cityIntroduce) {
        this.cityId = cityId;
        this.cityName = cityName;
        this.cityIntroduce = cityIntroduce;
    }

    public City(String cityName, String cityIntroduce) {
        this.cityName = cityName;
        this.cityIntroduce = cityIntroduce;
    }

    public City() {
    }

    public int getCityId() {
        return cityId;
    }

    public void setCityId(int cityId) {
        this.cityId = cityId;
    }

    public String getCityName() {
        return cityName;
    }

    public void setCityName(String cityName) {
        this.cityName = cityName;
    }

    public String getCityIntroduce() {
        return cityIntroduce;
    }

    public void setCityIntroduce(String cityIntroduce) {
        this.cityIntroduce = cityIntroduce;
    }
}
测试类CityController
package com.dalaoyang.controller;

import com.dalaoyang.entity.City;
import com.dalaoyang.service.RedisService;
import org.springframework.beans.factory.annotation.Autowired;
import org.springframework.web.bind.annotation.GetMapping;
import org.springframework.web.bind.annotation.RestController;

/**
 * @author dalaoyang
 * @Description
 * @project springboot_learn
 * @package com.dalaoyang.controller
 * @email 397600342@qq.com
 * @date 2018/4/7
 */
@RestController
public class CityController {

    @Autowired
    private RedisService redisService;


    //http://localhost:8888/saveCity?cityName=北京&cityIntroduce=中国首都&cityId=1
    @GetMapping(value = "saveCity")
    public String saveCity(int cityId,String cityName,String cityIntroduce){
        City city = new City(cityId,cityName,cityIntroduce);
        redisService.set(cityId+"",city);
        return "success";
    }


    //http://localhost:8888/getCityById?cityId=1
    @GetMapping(value = "getCityById")
    public City getCity(int cityId){
        City city = (City) redisService.get(cityId+"");
        return city;
    }
}
到这里配置基本上都完成了,然后启动项目访问http://localhost:8888/saveCity?cityName=北京&cityIntroduce=中国首都&cityId=18
发现报错了,看了一下后台,如下

发现是实体类没有序列化,然后给City类序列化,然后访问http://localhost:8888/saveCity?cityName=北京&cityIntroduce=中国首都&cityId=18发现这次成功了。
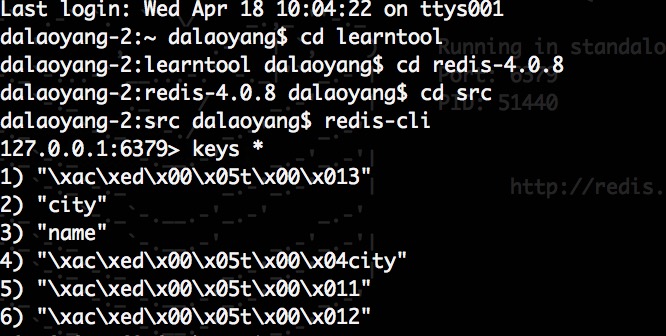
然后查看redis,发现key值的编码不对
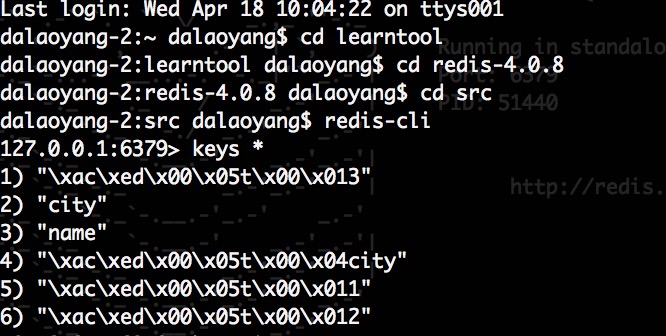
在RedisService中加入
 //更改在redis里面查看key编码问题
        RedisSerializer redisSerializer =new StringRedisSerializer();
        redisTemplate.setKeySerializer(redisSerializer);
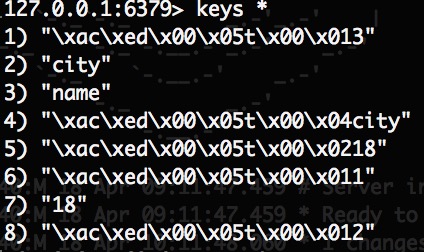
在查看redis的key发现编码正确了
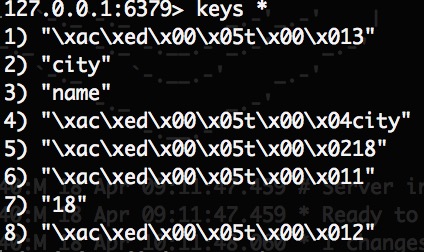
源码下载 :大老杨码云
个人网站:https://dalaoyang.cn
偷懒了几天,好几天没写springboot了。真的不是没什么可写,是因为坚持做一件事真的很难。
今天抽空弄了一个springboot整合redis的小例子。
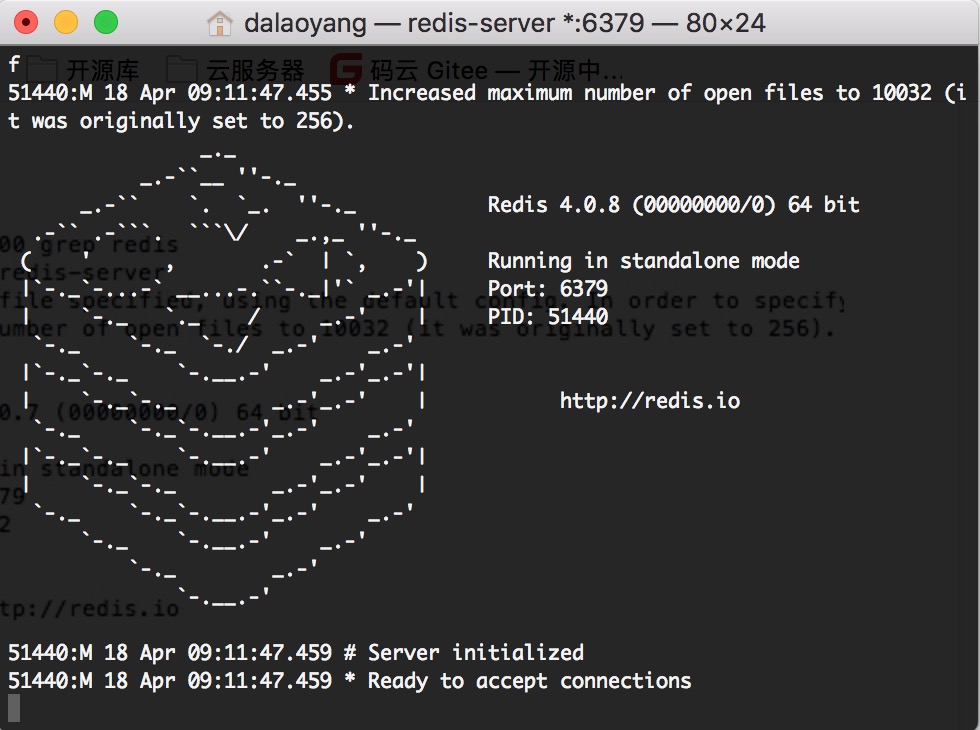
首先做好准备工作,在本地安装一个redis,具体步骤可以自行百度,然后启动redis。出现下图页面就启动成功了。
然后新建项目,加入redis依赖,pom文件如下:
<?xml version="1.0" encoding="UTF-8"?>
<project xmlns="http://maven.apache.org/POM/4.0.0" xmlns:xsi="http://www.w3.org/2001/XMLSchema-instance"
	xsi:schemaLocation="http://maven.apache.org/POM/4.0.0 http://maven.apache.org/xsd/maven-4.0.0.xsd">
	<modelVersion>4.0.0</modelVersion>

	<groupId>com.dalaoyang</groupId>
	<artifactId>springboot_redis</artifactId>
	<version>0.0.1-SNAPSHOT</version>
	<packaging>jar</packaging>

	<name>springboot_redis</name>
	<description>springboot_redis</description>

	<parent>
		<groupId>org.springframework.boot</groupId>
		<artifactId>spring-boot-starter-parent</artifactId>
		<version>1.5.9.RELEASE</version>
		<relativePath/> <!-- lookup parent from repository -->
	</parent>

	<properties>
		<project.build.sourceEncoding>UTF-8</project.build.sourceEncoding>
		<project.reporting.outputEncoding>UTF-8</project.reporting.outputEncoding>
		<java.version>1.8</java.version>
	</properties>

	<dependencies>
		<dependency>
			<groupId>org.springframework.boot</groupId>
			<artifactId>spring-boot-starter-data-redis</artifactId>
		</dependency>
		<dependency>
			<groupId>org.springframework.boot</groupId>
			<artifactId>spring-boot-starter-web</artifactId>
		</dependency>

		<dependency>
			<groupId>org.springframework.boot</groupId>
			<artifactId>spring-boot-devtools</artifactId>
			<scope>runtime</scope>
		</dependency>
		<dependency>
			<groupId>org.springframework.boot</groupId>
			<artifactId>spring-boot-starter-test</artifactId>
			<scope>test</scope>
		</dependency>

	</dependencies>

	<build>
		<plugins>
			<plugin>
				<groupId>org.springframework.boot</groupId>
				<artifactId>spring-boot-maven-plugin</artifactId>
			</plugin>
		</plugins>
	</build>


</project>
然后在application.properties加入redis配置:
##端口号
server.port=8888

# Redis数据库索引(默认为0)
spring.redis.database=0
# Redis服务器地址
spring.redis.host=localhost
# Redis服务器连接端口
spring.redis.port=6379
# Redis服务器连接密码(默认为空)
spring.redis.password=
#连接池最大连接数(使用负值表示没有限制)
spring.redis.pool.max-active=8
# 连接池最大阻塞等待时间(使用负值表示没有限制)
spring.redis.pool.max-wait=-1
# 连接池中的最大空闲连接
spring.redis.pool.max-idle=8
# 连接池中的最小空闲连接
spring.redis.pool.min-idle=0
# 连接超时时间(毫秒)
spring.redis.timeout=0
RedisConfig配置类,其中@EnableCaching开启注解
package com.dalaoyang.config;

import org.springframework.cache.CacheManager;
import org.springframework.cache.annotation.CachingConfigurerSupport;
import org.springframework.cache.annotation.EnableCaching;
import org.springframework.context.annotation.Bean;
import org.springframework.context.annotation.Configuration;
import org.springframework.data.redis.cache.RedisCacheManager;
import org.springframework.data.redis.connection.RedisConnectionFactory;
import org.springframework.data.redis.core.RedisTemplate;

/**
 * @author dalaoyang
 * @Description
 * @project springboot_learn
 * @package com.dalaoyang.config
 * @email yangyang@dalaoyang.cn
 * @date 2018/4/18
 */
@Configuration
@EnableCaching//开启缓存
public class RedisConfig extends CachingConfigurerSupport {

    @Bean
    public CacheManager cacheManager(RedisTemplate<?,?> redisTemplate) {
        CacheManager cacheManager = new RedisCacheManager(redisTemplate);
        return cacheManager;
    }

    @Bean
    public RedisTemplate<String, String> redisTemplate(RedisConnectionFactory factory) {
        RedisTemplate<String, String> redisTemplate = new RedisTemplate<String, String>();
        redisTemplate.setConnectionFactory(factory);
        return redisTemplate;
    }
}
由于只是简单整合,我只创建了一个RedisService来用来存取缓存数据,实际项目中可以根据需求创建interface,impl等等,代码如下:
package com.dalaoyang.service;
import javax.annotation.Resource;

import org.springframework.data.redis.core.RedisTemplate;
import org.springframework.data.redis.core.ValueOperations;
import org.springframework.data.redis.serializer.RedisSerializer;
import org.springframework.data.redis.serializer.StringRedisSerializer;
import org.springframework.stereotype.Service;

/**
 * @author dalaoyang
 * @Description
 * @project springboot_learn
 * @package com.dalaoyang.service
 * @email yangyang@dalaoyang.cn
 * @date 2018/4/18
 */
@Service
public class RedisService {
    @Resource
    private RedisTemplate<String,Object> redisTemplate;

    public void set(String key, Object value) {
        //更改在redis里面查看key编码问题
        RedisSerializer redisSerializer =new StringRedisSerializer();
        redisTemplate.setKeySerializer(redisSerializer);
        ValueOperations<String,Object> vo = redisTemplate.opsForValue();
        vo.set(key, value);
    }

    public Object get(String key) {
        ValueOperations<String,Object> vo = redisTemplate.opsForValue();
        return vo.get(key);
    }
}
实体类City:
package com.dalaoyang.entity;

import java.io.Serializable;

/**
 * @author dalaoyang
 * @Description
 * @project springboot_learn
 * @package com.dalaoyang.Entity
 * @email 397600342@qq.com
 * @date 2018/4/7
 */
public class City implements Serializable {
    private int cityId;
    private String cityName;
    private String cityIntroduce;

    public City(int cityId, String cityName, String cityIntroduce) {
        this.cityId = cityId;
        this.cityName = cityName;
        this.cityIntroduce = cityIntroduce;
    }

    public City(String cityName, String cityIntroduce) {
        this.cityName = cityName;
        this.cityIntroduce = cityIntroduce;
    }

    public City() {
    }

    public int getCityId() {
        return cityId;
    }

    public void setCityId(int cityId) {
        this.cityId = cityId;
    }

    public String getCityName() {
        return cityName;
    }

    public void setCityName(String cityName) {
        this.cityName = cityName;
    }

    public String getCityIntroduce() {
        return cityIntroduce;
    }

    public void setCityIntroduce(String cityIntroduce) {
        this.cityIntroduce = cityIntroduce;
    }
}
测试类CityController
package com.dalaoyang.controller;

import com.dalaoyang.entity.City;
import com.dalaoyang.service.RedisService;
import org.springframework.beans.factory.annotation.Autowired;
import org.springframework.web.bind.annotation.GetMapping;
import org.springframework.web.bind.annotation.RestController;

/**
 * @author dalaoyang
 * @Description
 * @project springboot_learn
 * @package com.dalaoyang.controller
 * @email 397600342@qq.com
 * @date 2018/4/7
 */
@RestController
public class CityController {

    @Autowired
    private RedisService redisService;


    //http://localhost:8888/saveCity?cityName=北京&cityIntroduce=中国首都&cityId=1
    @GetMapping(value = "saveCity")
    public String saveCity(int cityId,String cityName,String cityIntroduce){
        City city = new City(cityId,cityName,cityIntroduce);
        redisService.set(cityId+"",city);
        return "success";
    }


    //http://localhost:8888/getCityById?cityId=1
    @GetMapping(value = "getCityById")
    public City getCity(int cityId){
        City city = (City) redisService.get(cityId+"");
        return city;
    }
}
到这里配置基本上都完成了,然后启动项目访问http://localhost:8888/saveCity?cityName=北京&cityIntroduce=中国首都&cityId=18
发现报错了,看了一下后台,如下

发现是实体类没有序列化,然后给City类序列化,然后访问http://localhost:8888/saveCity?cityName=北京&cityIntroduce=中国首都&cityId=18发现这次成功了。
然后查看redis,发现key值的编码不对
在RedisService中加入
 //更改在redis里面查看key编码问题
        RedisSerializer redisSerializer =new StringRedisSerializer();
        redisTemplate.setKeySerializer(redisSerializer);
在查看redis的key发现编码正确了
源码下载 :大老杨码云
个人网站:https://dalaoyang.cn


 随时随地看视频


