
目录结构
这是《基于nuxt和iview搭建OM后台管理系统实践》这一个系列文章的目录,大致思路如下:
自行开发的公共组件,富文本quill[已完成]、地图、上传组件(阿里oss已经完成)的封装过程
项目上线流程,自动化打包(Jenkins)
项目总结,总结开发过程中的坑点,避免以后再掉坑
前言
上一篇记录了阿里oss上传组件的封装过程,这一篇开始讲解七牛上传组件的封装。原本计划上传组件用一篇文章来写,发现代码有点多,索性就分两篇来写。
看东西
如动图所示,为七牛上传组件演示,可以看到组件有上传、预览、删除重新上传等功能。(功能与前面阿里oss上传组件相同)
七牛上传组件演示
七牛上传组件实现过程
其实这里的封装很简单,直接用的ivivew提供的upload组件,翻阅iview文档发现可以在upload组件的data属性里传七牛token即可完成上传功能。然后token值官方推荐后端生成,google一下发现github上有人封装了npm包(qiniu-uptoken),可以不需要后端支持直接在前端生成token,简直爽歪歪咯,谁叫我不会后端呢,哈哈哈哈!此处我想给自己一个尴尬而不失礼貌的微笑
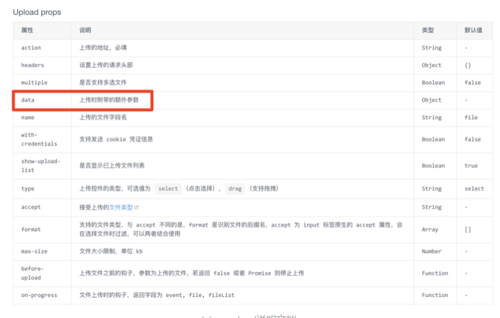
iview upload说明文档
完整代码
// 文件componets/qiniu-upload.vue<template><div>
  <div class="demo-upload-list" v-for="(item,index) in uploadList" :key="index">
        <template v-if="item.status === 'finished'">
            <img :src="item.url">
            <div class="demo-upload-list-cover">
                <Icon type="ios-eye-outline" @click.native="handleView(item.name)"></Icon>
                <Icon type="ios-trash-outline" @click.native="handleRemove(item)"></Icon>
            </div>
        </template>
        <template v-else>
            <Progress v-if="item.showProgress" :percent="item.percentage" hide-info></Progress>
        </template>
    </div>
    <Upload
        ref="upload"
        :show-upload-list="false"
        :default-file-list="defaultList"
        :on-success="handleSuccess"
        :format="['jpg','jpeg','png']"
        :max-size="maxSize"
        :on-format-error="handleFormatError"
        :on-exceeded-size="handleMaxSize"
        :before-upload="handleBeforeUpload"
        :multiple="!multiple"
        type="drag"
        :data="uptoken"
        :action="actionUrl"
        :style="{'display': 'inline-block','width':width}">
        <div :style="{'width': width,'height':height,'line-height': '58px'}" v-if="multiple&&uploadList.length==0">
            <Icon type="camera" size="20"></Icon>
        </div>
    </Upload>
    <Modal title="图片预览" v-model="visible">
        <img :src="picHostName + imgName" v-if="visible" style="width: 100%">
    </Modal></div></template><script>import {qiniuConfig} from '~/config';//七牛配置const QiniuUPToken = require('qiniu-uptoken');//引入前端生成七牛token的包export default {  props:{    maxSize:{      type:Number,      default:2048
    },    multiple:{      type:Boolean,      default:true
    },    width:{      default:"58px"
    },    height:{      default:'58px'
    }
  },
  data() {    return {      defaultList: [],      imgName: "",      picHostName:qiniuConfig.pic_hostname,      visible: false,      uploadList: [],      uptoken:{},      actionUrl:qiniuConfig.action_url,      fileList:[]
    };
  },  methods: {
    getToken(){      this.uptoken.token = QiniuUPToken(qiniuConfig.access_key,qiniuConfig.secret_key,qiniuConfig.bucketname);
    },
    handleView(name) {      this.imgName = name;      this.visible = true;
    },
    handleRemove(file) {      const fileList = this.$refs.upload.fileList;      this.$refs.upload.fileList.splice(fileList.indexOf(file), 1);
    },
    handleSuccess(res, file) {      // console.log(res);
      file.url = qiniuConfig.pic_hostname+res.key;
      file.name = res.key;      this.$emit('handleSuccess',qiniuConfig.pic_hostname+res.key);//传递给父组件
    },
    handleFormatError(file) {      this.$Notice.warning({        title: "上传的格式不正确",        desc:          "文件'" +
          file.name +          "'不合法, 请重新选择jpg or png.的格式"
      });
    },
    handleMaxSize(file) {      this.$Notice.warning({        title: "文件大小超出限制",        desc: "文件'" + file.name + "'大小超出"+this.maxSize/1024+'M限制'
      });
    },
    handleBeforeUpload() {      const check = this.uploadList.length < 5;      if (!check) {        this.$Notice.warning({          title: "最多只能上传五张图片"
        });
      }      return check;
    }
  },
  mounted() {    this.getToken();    this.uploadList = this.$refs.upload.fileList;
  }
};</script><style>.demo-upload-list {  display: inline-block;  width: 60px;  height: 60px;  text-align: center;  line-height: 60px;  border: 1px solid transparent;  border-radius: 4px;  overflow: hidden;  background: #fff;  position: relative;  box-shadow: 0 1px 1px rgba(0, 0, 0, 0.2);  margin-right: 4px;
}.demo-upload-list img {  width: 100%;  height: 100%;
}.demo-upload-list-cover {  display: none;  position: absolute;  top: 0;  bottom: 0;  left: 0;  right: 0;  background: rgba(0, 0, 0, 0.6);
}.demo-upload-list:hover .demo-upload-list-cover {  display: block;
}.demo-upload-list-cover i {  color: #fff;  font-size: 20px;  cursor: pointer;  margin: 0 2px;
}</style>
使用方法:按照vue标准引用局部组件的方式引入即可,调用handleSuccess方法即可获取上传完成的url。在此推荐写一个箭头回调函数(如下),这样在一个页面有多个引用的时候可以减少很多冗余代码。
<qiniu-upload
    @handleSuccess = "(url) => this.formItem.litpic = url"></qiniu-upload>
总结
坦率来讲这个组件不叫封装,其实就只做了一件最核心的事情,那就是在前端生成七牛token。
尽管iview有一些坑,但不得不说其用户体验做得是非常不错的,通过查看其源码也学到了很多东西,比如代码规范、前端用户体验,iview都做得蛮出色的,在此安利一波iview。
作者:愿爱无忧dk_
链接:https://www.jianshu.com/p/e84f47e09b0f


热门评论
-

weibo_机智无敌的小黄_02018-08-14 0
查看全部评论返回的url是hash和key,url怎么获得