
monkey 压力测试android
Monkey的特征
测试的对象仅为应用程序包,有一定的局限性。
Monkey测试使用的事件流数据流是随机的,不能进行自定义。
可对MonkeyTest的对象,事件数量,类型,频率等进行设置。
Monkey的基本用法
基本语法如下:
$ adb shell monkey [options]
如果不指定options,Monkey将以无反馈模式启动,并把事件任意发送到安装在目标环境中的全部包。下面是一个更为典型的命令行示例,它启动指定的应用程序,并向其发送500个伪随机事件:
$ adb shell monkey -p your.package.name -v 500
分析日志
通过Android trace文件分析死锁ANR实例过程
system/build.prop 日志文件主要记录手机系统信息,如版本,型号,品牌
adb logcat 导出日志文件
monkey.ini 配置文件
cmd=adb shell monkey -p com.dgm.user --throttle 500 --ignore-timeouts --ignore-crashes   --monitor-native-crashes -v -v
package_name=com.dgm.user
logdir=d:\android
remote_path=d:\android_server
phone_msg_log=d:\android_temp\phone.txt
sum = 100 -
activity = com.dgm.user.SplashActivity
exceptions=['NullPointer','IllegalState','IllegalArgument','ArrayIndexOutOfBounds','RuntimeException','SecurityException']
throttle 每次事件等待500毫秒
sum 定义随机事件数
exceptions 异常定义,用于后面扩展
结果生成为可视化图片 使用的是matplotlib
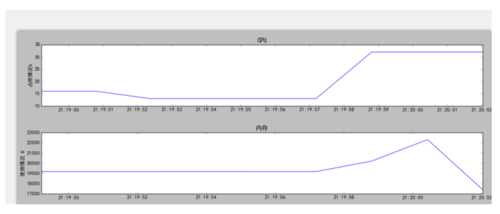
Paste_Image.png
当然可以看日志文件
代码分析
获得cpu-men
# -*- coding: utf-8 -*-import subprocess
pkg_name = "com.dgm.user"cpu = []
men = []def top_cpu(pkg_name):
    cmd = "adb shell dumpsys cpuinfo | grep " + pkg_name
    temp = []    # cmd = "adb shell top -n %s -s cpu | grep %s$" %(str(times), pkg_name)
    top_info = subprocess.Popen(cmd, shell=True, stdout=subprocess.PIPE, stderr=subprocess.PIPE).stdout.readlines()    for info in top_info:
        temp.append(info.split()[2].decode()) # bytes转换为string
        # print("cpu占用:%s" %cpu)
    for i in temp:         if i != "0%":
            cpu.append(i.split("%")[0])    return cpudef get_men(pkg_name):
    cmd = "adb shell  dumpsys  meminfo %s"  %(pkg_name)
    print(cmd)
    temp = []
    m = []
    men_s = subprocess.Popen(cmd, shell=True, stdout=subprocess.PIPE, stderr=subprocess.PIPE).stdout.readlines()    for info in men_s:
        temp.append(info.split())        # print("内存占用:%s" %men[19][1].decode()+"K")
    m.append(temp)    for t in m:
        men.append(t[19][1].decode())    return men
入口代码
import monkeyConfigfrom adb_common import AndroidDebugBridge as aiimport matplotlibBase as mtimport MenCpu as mimport datetime as dt
CPU = [[],[]] # time,使用情况MEN = [[],[]] #当前时间,和内存使用情况# 得到手机信息def getPhoneMsg(cmd_log):
    l_list = []
    f = open(cmd_log, "r")
    lines = f.readlines()    for line in lines:
        line = line.split('=')        #Android 系统,如anroid 4.0
        if (line[0] == 'ro.build.version.release'):
            l_list.append(line[1])            #手机名字
        if (line[0]=='ro.product.model'):
            l_list.append(line[1])            #手机品牌
        if (line[0]=='ro.product.brand'):
            l_list.append(line[1])
    f.close()    return l_list#开始脚本测试def start_monkey(cmd, logdir, now1, logcatname):
    print(cmd)
    os.popen(cmd)    # os.kill()
    #print"使用Logcat导出日志"
    cmd2 = "adb logcat -d >%s" % logcatname
    os.popen(cmd2)    #print"导出traces文件"
    tracesname = logdir + "\\" + now1 + r"traces.log"
    cmd3 = "adb shell cat /data/anr/traces.txt>%s" % tracesname
    os.popen(cmd3)if __name__ == '__main__':
    ini_file = 'monkey.ini'
    if os.path.isfile(ini_file):        if ai().attached_devices():
            mc = monkeyConfig.baseReadnin(ini_file)
            ai().open_app(mc.get_package_name(), mc.get_activity())
            os.system('adb shell cat /system/build.prop >'+mc.get_phone_msg_log()) #存放的手机信息
            ll_list = getPhoneMsg(mc.get_phone_msg_log())            # monkey开始测试
            sum = mc.get_sum()
            temp = ""
            monkeylog = ""
            start_monkey(mc.get_cmd(), mc.get_logdir(), mc.get_now(), mc.get_logcatname())            for i in range(sum):
                time.sleep(1)
                print(i)
                dn = dt.datetime.now()
                CPU[0].append(dn)
                m.top_cpu(mc.get_package_name())
                MEN[0].append(dn)
                m.get_men(mc.get_package_name())
                monkeylog = open(mc.get_logdir() + "\\" + mc.get_now()+"monkey.log")
                temp = monkeylog.read()
                monkeylog.close()                if temp.count('Monkey finished')>0:
                    print("测试完成咯")
                    CPU[1].append(m.cpu)
                    MEN[1].append(m.men)                    # geterror(ll_list, mc.get_log(), mc.get_remote_path(), mc.now) 错误显示
                    mt.cpu_men_plots(CPU, MEN)                    break
        else:
            print("设备不存在")    else:
        print(u"配置文件不存在"+ini_file)
结果以曲线图展示
def cpu_men_plots(cpu, men):
    import matplotlib.pyplot as pl    import matplotlib.dates as mdates    import datetime    # 处理异常数据,有时候得到数据(占用情况)会比时间多一次循环的数据,造成xy的数据不一致,而引起报错
    if len(cpu[0]) != len(cpu[1][0]):
        cpu[1][0]= cpu[1][0][0:len(cpu[0])]    if len(men[0]) != len(men[1][0]):
        men[1][0]= men[1][0][0:len(men[0])]
    print(men[0])
    print(men[1][0])
    a1 = pl.subplot(311)
    a1.set_title("CPU")
    a1.set_ylabel("占用情况%")
    a1.plot(cpu[0], cpu[1][0])
    a1.xaxis.set_major_locator(mdates.SecondLocator(interval=1))
    a1.xaxis.set_major_formatter(mdates.DateFormatter('%H:%M:%S'))

    a2 = pl.subplot(312)
    a2.set_title("内存")
    a2.set_ylabel("使用情况 K")
    a2.plot(men[0], men[1][0])
    a2.xaxis.set_major_locator(mdates.SecondLocator(interval=2))
    a2.xaxis.set_major_formatter(mdates.DateFormatter('%H:%M:%S'))    # a3 = pl.subplot(313)
    # a3.set_title("流量")
    # a3.set_ylabel("使用情况 K")
    # a3.plot(x,list2)
    # a3.xaxis.set_major_formatter(mdates.DateFormatter('%H:%M:%S'))

    # a1.margins(x=0.2)
    pl.tight_layout()
    pl.show()
更多请参考我的源码
作者:望月成三人
链接:https://www.jianshu.com/p/f79493d431ff