这是我们全栈GraphQL + React教程的第5部分,它指导您创建消息传递应用程序。 每个部分都是独立的,并且引入了新的关键概念,这意味着在执行此操作之前,您不必完成所有其他部分。 但万一你好奇,以下是我们到目前为止的内容:
Part 5: 输入类型和自定义解析器(你在此!)
在第4部分中,我们介绍了如何使用store更新和良好的用户界面来处理示例应用的channel列表视图中的网络延迟。
在这一部分中,我们将构建一个频道详情视图,显示channel中的所有消息并允许您发布新消息。 到最后,你会知道如何:
在查询中使用字段参数
充分利用Apollo的标准缓存
使用GraphQL输入类型
在开始之前,我们先克隆git仓库并安装依赖关系:
git clone https://github.com/apollographql/graphql-tutorial.gitcd graphql-tutorialgit checkout t5-startcd server && npm installcd ../client && npm install
为了确保它的工作,让我们启动服务器和客户端,每个都在一个单独的终端中:
cd servernpm start
在另一个终端:
cd clientnpm start
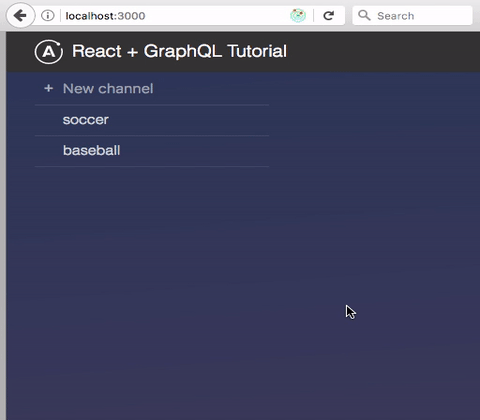
您现在可以导航到localhost:3000并浏览channel详情视图的当前状态。 我们已经为你做了一些工作,所以它应该看起来像这样:

由于本教程主要关注GraphQL,因此我们已经为您制作了channel详细信息视图的路由和模板。 您不需要知道它如何在本教程中使用,但是如果您好奇,我们会使用react-router(查看react-router tutorial 和 documentation).
看起来我们已经完成了所有的工作,但新视图目前只是一个存根。 为了使其真正起作用,您需要编写一个GraphQL查询来获取来自服务器的channel名称和消息,并且您需要创建一个mutation来添加新消息。
添加channel详细信息视图
channel详情视图应显示channel名称,其信息和新的信息输入。 首先,我们修改架构并编写查询以显示当前channel中的消息。
在schema中(在服务器上),我们需要创建一个消息类型,将消息字段添加到channel类型,并提供一种通过向根查询类型添加channel字段来获取单个channel的方法。 在进行这些更改之后,在schema.js中输入Define应如下所示:
//server/src/schema.js
const typeDefs = type Channel { id: ID! name: String messages: [Message]!}type Message { id: ID! text: String}# This type specifies the entry points into our APItype Query { channels: [Channel] channel(id: ID!): Channel}# The mutation root type, used to define all mutationstype Mutation { addChannel(name: String!): Channel};const schema = makeExecutableSchema({ typeDefs, resolvers });export { schema };请注意,我们获取单个channel的方式是将id添加为字段参数。 这是GraphQL中非常常见的模式,您可能会在您的应用程序中使用它。 参数可以是任何标量或输入类型,我们将在本教程后面详细介绍。
接下来,新查询需要由解析器支持,该解析器返回适当的channel。 为此,将加粗的查询添加到resolvers.js中:
//server/src/resolvers.js
const channels = [{ id: '1', name: 'baseball', messages: [{ id: '2', text: 'baseball is life', }]}];let nextId = 3;export const resolvers = { Query: { channels: () => { ... }, channel: (root, { id }) => { return channels.find(channel => channel.id === id);
}, },};注意:我们为channel创建了一个预填充消息的数组。 如果你没有检查t5-start分支,你必须自己创建这个数组.
现在服务器支持查询特定channel,客户端 - 特别是ChannelDetails组件 - 需要执行查询。 GraphQL中的最佳做法是使用查询变量作为参数(在这种情况下,为$id)。 GraphQL规范要求我们在查询关键字后面定义我们使用的变量。 如果我们不这样做,服务器会抱怨我们使用了一个变量而没有定义它。 该定义必须与参数期望的类型相匹配。 在这种情况下,它是ID。
在channelDetails.js中写入以下查询:
//client/src/components/channelDetails.js
export const channelDetailsQuery = gql query ChannelDetailsQuery($channelId : ID!) { channel(id: $channelId) { id name messages { id text } } };在ChannelDetails React组件中,将存根替换为呈现实际数据的代码。 首先检查查询是否正在加载(data.loading),然后检查以确保没有错误(data.error),并最终呈现channel名称和MessagesList。
如果你这样做了,你应该得到一个看起来像这样的组件:
//client/src/components/ChannelDetails.js
const ChannelDetails = ({ data: {loading, error, channel }, match }) => {  if (loading) {    return Loading...;
}  if (error) {    return {error.message};
}  if(channel === null){    return   }
return ( {channel.name} );}//export const channelDetailsQuery = gql...;
// ...
现在,您只需使用之前编写的查询来打包组件,然后将其导出即可。
//client/src/components/ChannelDetails.js (at the bottom)
export default (graphql(channelDetailsQuery, { options: (props) => ({ variables: { channelId: props.match.params.channelId }, }),})(ChannelDetails));我们正在通往正常运行的可交流的应用程序,亲自尝试一下! 它应该是这样的:

现在我们有一个channel名称和消息流,让我们添加消息mutation来发布新消息。
发布新消息
创建函数AddMessage与第三部分添加频道非常相似, 所以首先建议使用带字段的mutation来显示消息文本和channel ID。 但是在将来,我们可能想要关联用户名,时间戳,文本编码,图片,提到的用户或其他元信息。 将这些添加到Mutation的签名中很快变得笨拙和不灵活。 为了保持整洁,我们将使用GraphQL输入类型, 这是一个只能包含基本标量类型,列表类型和其他输入类型的对象。 输入类型允许客户端mutation签名保持不变并在模式中提供更好的可读性。
从服务器开始,我们定义MessageInput输入类型,并在schema.js中包含mutation,如下所示:
//server/src/schema.js
input MessageInput{ channelId: ID! text: String}type Mutation { # A mutation to add a new channel to the list of channels addChannel(name: String!): Channel addMessage(message: MessageInput!): Message}resolver.js中的addMessage解析器应该检查输入
//server/src/resolvers.js
Mutation: { addChannel: {...}, addMessage: (root, { message }) => { const channel = channels.find(channel => channel.id === message.channelId);if(!channel) throw new Error("Channel does not exist"); const newMessage = { id: String(nextMessageId++), text: message.text };
channel.messages.push(newMessage);return newMessage;
},},接下来在客户端,我们需要完成AddMessage.js,从查询开始:
//client/src/components/AddMessage.js
const addMessageMutation = gql mutation addMessage($message: MessageInput!) { addMessage(message: $message) { id text } };AddMessage组件主体将变量添加到AddChannel的基本代码中,其中包括我们在其中使用的相同的UI功能 last tutorial. 唯一不同的部分是变量。 我在下面以粗体突出显示了这些变化:
//client/src/components/AddMessage.js
const AddMessage = ({ mutate, match }) => {  const handleKeyUp = (evt) => {    if (evt.keyCode === 13) {      mutate({        variables: {          message: {            channelId: match.params.channelId,            text: evt.target.value          }        },        optimisticResponse: {          addMessage: {            text: evt.target.value,            id: Math.round(Math.random() * -1000000),            __typename: 'Message',          },        },        update: (store, { data: { addMessage } }) => {          // Read the data from the cache for this query.          const data = store.readQuery({            query: channelDetailsQuery,            variables: {              channelId: match.params.channelId,            }          });// Add our Message from the mutation to the end.          data.channel.messages.push(addMessage);// Write the data back to the cache.          store.writeQuery({            query: channelDetailsQuery,            variables: {              channelId: match.params.channelId,            },            data          });},      });
evt.target.value = '';
}  };
return ( ... );};
//const addMessageMutation = gql...
const AddMessageWithMutation = graphql( addMessageMutation,)(withRouter(AddMessage));
export default AddMessageWithMutation;
Note: match 是react-router提供的url属性的接口 withRouter
现在我们有一个功能齐全的消息channel! 但是,有一个小问题:如果网络速度较慢,用户必须等待channel名称和消息从服务器加载。 在加载所有数据之前,用户甚至不知道他们在哪个channel,这是坏的UX。 理想情况下,我们希望用户在加载邮件时看到良好的channel预览。 这就是我们在本教程的最后部分要做的。
从缓存中读取频channel名称
正如您可能已经注意到的,客户端已经知道channel名称,因为它在主页上加载了ChannelNameListQuery。 如果有方法让我们保留channel名称,我们可以在不向服务器提出其他请求的情况下显示它!
幸运的是,Apollo Client会自动将每个查询结果存储在normalized cache中,这意味着我们可以查询数据 我们希望让Apollo Client找出它是否可以从缓存中加载。 但是,有一个小问题:
默认情况下,Apollo客户端使用查询路径(例如/channel(id:5)/name)来确定对象是否被缓存。
由于channels和channel查询导致到同一对象的路径不同,Apollo Client不知道它们是相同的,除非您明确告诉它channel查询可能解析为channel查询检索到的对象。 我们可以通过向App.js中的ApolloClient构造函数添加一个自定义解析器来告诉Apollo客户端这种关系。 每当我们进行channel查询时,这个自定义解析器就会告诉Apollo客户端检查它的缓存中是否有ID $ channelId的Channel对象。 如果它在缓存中找到具有该ID的channel,则不会向服务器发出请求。
以下自定义解析器在App.js中创建此映射:
//client/src/App.js
//function dataIdFromObject (result) {...}const client = new ApolloClient({ networkInterface, customResolvers: { Query: { channel: (_, args) => { return toIdValue(dataIdFromObject({ __typename: 'Channel', id: args['id'] })) }, }, }, dataIdFromObject,});ApolloClient uses dataIdFromObject to tag GraphQL objects in the cache and toIdValue ensures an ID type is returned.
现在您只需要像通常那样创建ChannelPreview组件:
//client/src/components/ChannelPreview.js
const ChannelPreview = ({ data: {loading, error, channel } }) => { return (Loading Messages );};
export const channelQuery = gql query ChannelQuery($channelId : ID!) { channel(id: $channelId) { id name } };export default (graphql(channelQuery, { options: (props) => ({ variables: { channelId: props.channelId }, }),})(ChannelPreview));最后,我们需要用ChannelPreview组件替换ChannelDetails组件的加载消息:
//client/src/components/ChannelDetails.js
const ChannelDetails = (...) => {  if (loading) {    return ;
}
通过从缓存中提取数据,我们创建了一个channel详细视图,可以在后台加载消息的同时立即显示channel名称。
总结
恭喜,您现在有一个可以提供channel标记的消息流的应用程序! 该服务几乎已经准备好用于生产,经过几次改进之后:首先,我们需要一种使用GraphQL订阅实时显示消息的方法,从下一部分的服务器端开始. 其次,我们希望分页消息,因为一次加载所有消息可能会很慢。 最后,我们还需要添加登录和身份验证,以确保我们知道消息来自哪里。
如果您喜欢本教程并希望继续学习Apollo和GraphQL,请务必点击下面的“关注”按钮,然后在Twitter上关注我们 @apollographql 以及作者 @evanshauser.
非常感谢Jonas Helfer 的指导!