
因为公司使用的spring版本太高,在集成swagger的时候会存在一些问题,而网上的很多实例大多都是版本比较低的,为了是朋友们少才坑,我这边将集成的过程记录一下:
1. 引入spring、swagger的相关jar包(springfox-swagger2、springfox-swagger-ui),在pom.xml中配置:
<dependency>
            <groupId>io.springfox</groupId>
            <artifactId>springfox-swagger2</artifactId>
            <version>2.4.0</version>
            <exclusions>
                <exclusion>
                    <groupId>org.springframework</groupId>
                    <artifactId>spring-core</artifactId>
                </exclusion>
                <exclusion>
                    <groupId>org.springframework</groupId>
                    <artifactId>spring-beans</artifactId>
                </exclusion>
                <exclusion>
                    <groupId>org.springframework</groupId>
                    <artifactId>spring-context</artifactId>
                </exclusion>
                <exclusion>
                    <groupId>org.springframework</groupId>
                    <artifactId>spring-context-support</artifactId>
                </exclusion>
                <exclusion>
                    <groupId>org.springframework</groupId>
                    <artifactId>spring-aop</artifactId>
                </exclusion>
                <exclusion>
                    <groupId>org.springframework</groupId>
                    <artifactId>spring-tx</artifactId>
                </exclusion>
                <exclusion>
                    <groupId>org.springframework</groupId>
                    <artifactId>spring-orm</artifactId>
                </exclusion>
                <exclusion>
                    <groupId>org.springframework</groupId>
                    <artifactId>spring-jdbc</artifactId>
                </exclusion>
                <exclusion>
                    <groupId>org.springframework</groupId>
                    <artifactId>spring-web</artifactId>
                </exclusion>
                <exclusion>
                    <groupId>org.springframework</groupId>
                    <artifactId>spring-webmvc</artifactId>
                </exclusion>
                <exclusion>
                    <groupId>org.springframework</groupId>
                    <artifactId>spring-oxm</artifactId>
                </exclusion>
            </exclusions>
        </dependency>
        <dependency>
            <groupId>io.springfox</groupId>
            <artifactId>springfox-swagger-ui</artifactId>
            <version>2.4.0</version>
        </dependency>
提醒: 特别注意,springfox-swagger2在集成的时候,已经引入了spring的相关jar,特别是spring-context、spring-context-support的版本和项目中使用的版本完全不一致,项目在启动的时候出现很多包冲突的问题,这边在引入pom.xml文件的时候过滤掉了spring的相关jar包,如绿色标志。
2. 编写Swagger的配置类:
package com.ml.honghu.swagger.web;

import org.springframework.context.annotation.Bean;
import org.springframework.context.annotation.ComponentScan;
import org.springframework.context.annotation.Configuration;
import org.springframework.web.servlet.config.annotation.EnableWebMvc;

import springfox.documentation.builders.ApiInfoBuilder;
import springfox.documentation.builders.PathSelectors;
import springfox.documentation.builders.RequestHandlerSelectors;
import springfox.documentation.service.ApiInfo;
import springfox.documentation.service.Contact;
import springfox.documentation.spi.DocumentationType;
import springfox.documentation.spring.web.plugins.Docket;
import springfox.documentation.swagger2.annotations.EnableSwagger2;

@EnableWebMvc
@EnableSwagger2
@Configuration
@ComponentScan(basePackages ={"com.ml.honghu.**.rest"})
public class SwaggerConfig {
    @Bean
    public Docket createRestApi() {
        return new Docket(DocumentationType.SWAGGER_2)
                .apiInfo(apiInfo())
                .select()
                .apis(RequestHandlerSelectors.basePackage("com.ml.honghu"))
                .paths(PathSelectors.any())
                .build();
    }

    private ApiInfo apiInfo() {
        return new ApiInfoBuilder()
                .title("接口列表 v1.0")
                .description("接口信息")
                .termsOfServiceUrl("http://honghu.com")
                .contact(new Contact("", "", "HongHu"))
                .version("1.1.0")
                .build();
    }
}
3. 在spring-mvc.xml文件中进行过滤器的配置,过滤掉swagger的相关访问配置:
<mvc:exclude-mapping path="/swagger*/**"/>
<mvc:exclude-mapping path="/v2/**"/>
<mvc:exclude-mapping path="/webjars/**"/>
4. 服务配置项
<span style="color: #ff0000;">@Api("区域服务")</span>
@RestController
@RequestMapping(value = "/rest/area")
public class AreaService  {

    @Autowired
    private AreaService areaService;

    <span style="color: #ff0000;">@ApiOperation(value = "区域列表", httpMethod = "GET", notes = "区域列表")</span>
    @IsLogin
    @ResponseBody
    @RequestMapping(value = "treeData", method = RequestMethod.GET)
    public List<Map<String, Object>> treeData(
            <span style="color: #ff0000;">@ApiParam(required = true, value = "区域ID")</span>  @RequestParam(required=false) String extId, HttpServletResponse response) {
        List<Map<String, Object>> mapList = Lists.newArrayList();
        List<Area> list = areaService.findAll();
        for (int i=0; i<list.size(); i++){
            Area e = list.get(i);
            if (StringUtils.isBlank(extId) || (extId!=null && !extId.equals(e.getId()) && e.getParentIds().indexOf(","+extId+",")==-1)){
                Map<String, Object> map = Maps.newHashMap();
                map.put("id", e.getId());
                map.put("pId", e.getParentId());
                map.put("name", e.getName());
                mapList.add(map);
            }
        }
        return mapList;
    }
}
4. 启动项目,查看结果:
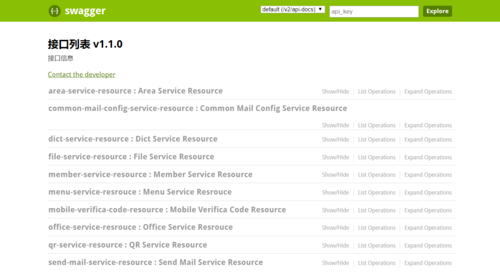
到此结束!!源码来源


热门评论
-

qq_IT达人_02018-06-08 0
查看全部评论这个必须赞一下,资料很全的