
原文链接:http://www.codeceo.com/article/android-animation-vector.html
我们经常可以看见很多拥有酷炫动画的App,并且给人感觉具有高逼格的气息,自从Google更新Android 5.0以来,Android世界变的异常丰富多彩,本篇主要讲解 Android5.0/6.0 以后实现酷炫动画的新技术。有矢量图动画VectorDrawable,静态VectorDrawable,动态VectorDrawable,轨迹动画,路径变换动画,并指出了目前常见的一些兼容性问题。干货满满。
学习矢量图动画之前,我们需要先回顾一下属性动画的知识点,动态矢量图动画是需要结合属性动画来实现的。
1.属性动画框架
使用动态的VectorDrawable需要结合 属性动画 来实现,所以下面先回顾一下属性动画。
Android 3.0 中加入的新的属性动画系统。这个新的动画系统使得任何对象做任何类型的属性的动画都变得容易,包括那些在 Android 3.0 中加入 View 中的新属性。在 Android 3.1 中,又加入了一些工具类使得 View 对象做属性动画更加容易。
传统动画(Animation)是系统不断调用onDraw方法重绘界面以实现动画效果,不适合做交互动画效果,只适用于做显示动画;而属性动画(Animator)则是操作一个属性的get、set方法去真实的改变一个属性。这里只针对属性动画(Animator)进行说明。
注意:属性动画在Google提供的APIDemo中已经有非常多的案例实现,建议多加揣摩学习。
1.ObjectAnimator的使用
属性动画中最简单最常用的就是ObjectAnimator:
1)作用单个属性的动画实现:
/**
  * 参数1: 操纵的控件
  * 参数2: 操纵的属性, 常见的有偏移translationX、translationY, 绝对值x、y, 3D旋转rotation、
  *     水平\竖直方向旋转rotationX\rotationY, 水平\竖直方向缩放scaleX\scaleX,透明度alpha
  * 参数3,4: 变化范围
  * setDuration: 设置显示时长
  */ObjectAnimator.ofFloat(imageView, "translationX", 0F, 200F).setDuration(1000).start();
同样属性动画也可以在res/animator文件夹下进行创建anim.xml并配置(多个objectAnimator可以用set进行包裹):
<?xml version="1.0" encoding="utf-8"?><objectAnimator xmlns:androd="http://schemas.android.com/apk/res/android"
    androd:duration="1000"
    androd:propertyName="translationX"
    androd:valueFrom="0F"
    androd:valueTo="200F"
    androd:valueType="floatType"></objectAnimator>
这段XML实现的效果和我们刚才通过代码来实现的组合动画的效果是一模一样的,每个参数的含义都非常清楚,相信大家都是一看就懂,我就不再一一解释了。
XML文件是编写好了,那么我们如何在代码中把文件加载进来并将动画启动呢?只需调用如下代码即可:
Animator animator = AnimatorInflater.loadAnimator(context, R.animator.anim);
animator.setTarget(view);
animator.start();
调用AnimatorInflater的loadAnimator来将XML动画文件加载进来,然后再调用setTarget()方法将这个动画设置到某一个对象上面,最后再调用start()方法启动动画就可以了,就是这么简单。
2)同时作用多个属性的动画实现:
所有动画同时播放:
ObjectAnimator animator1 = ObjectAnimator.ofFloat(imageView, "translationX", 0F, 200F);
ObjectAnimator animator2 = ObjectAnimator.ofFloat(imageView, "translationY", 0F, 200F);
AnimatorSet set = new AnimatorSet();set.playTogether(animator1, animator2);set.setDuration(1000).start();

所有动画按顺序播放:
ObjectAnimator animator1 = ObjectAnimator.ofFloat(imageView, "translationX", 0F, 200F);
ObjectAnimator animator2 = ObjectAnimator.ofFloat(imageView, "translationY", 0F, 200F);
AnimatorSet set = new AnimatorSet();set.playSequentially(animator1, animator2);set.setDuration(1000).start();

有的同时播放有的按顺序:
ObjectAnimator animator1 = ObjectAnimator.ofFloat(imageView, "translationX", 0F, 200F);
ObjectAnimator animator2 = ObjectAnimator.ofFloat(imageView, "translationY", 0F, 200F);
ObjectAnimator animator3 = ObjectAnimator.ofFloat(imageView, "rotation", 0F, 360F);
AnimatorSet set = new AnimatorSet();set.play(animator1).with(animator2);//同时set.play(animator3).after(animator1);//之后, 另外还有before之前set.setDuration(1000).start();

3)属性动画的结束监听事件
animator.addListener(new AnimatorListenerAdapter() {    @Override
    public void onAnimationEnd(Animator animation) {        super.onAnimationEnd(animation);
    }
});
2.ValueAnimator的使用
ValueAnimator不会作用于任何一个属性,简单来说,它就是“数值发生器”,实际上在属性动画中,产生每一步的具体动画实现效果都是通过ValueAnimator计算出来的。ObjectAnimator是继承自ValueAnimator的,ValueAnimator并没有ObjectAnimator使用的广泛。
ValueAnimator通过动画已经继续的时间和总时间的比值产生一个0~1点时间因子,有了这样的时间因子,经过相应的变换,就可以根据startValue和endValue来生成中间相应的值。
1)显示ValueAnimator生成出来的数值(这里没有指定插值器,默认线性增长):
ValueAnimator animator = ValueAnimator.ofInt(0, 100);
animator.setDuration(5000);
animator.addUpdateListener(new ValueAnimator.AnimatorUpdateListener() {
    @Override    public void onAnimationUpdate(ValueAnimator valueAnimator) {
        Integer value = (Integer) valueAnimator.getAnimatedValue();
        textView.setText(""+value);
    }
});
animator.start();
2)自定义数值生成器
ValueAnimator animator = ValueAnimator.ofObject(new TypeEvaluator() {    /**
     * 通过重写evaluate方法返回各种各样的值
     * @param fraction 时间因子 0到1之间变化到数值
     * @param startValue
     * @param endValue
     * @return
     */
    @Override
    public Object evaluate(float fraction, Object startValue, Object endValue) {        return null;
    }
});
3.属性动画常用方法\类总结
ValueAnimator\ObjectAnimator
AnimatorUpdateListener\AnimatorListenerAdapter   做监听器的
PropertyValuesHolder\AnimatorSet    控制动态集合的显示效果、顺序、流程的
TypeEvaluators          值计算器
Interpolators           插值器
Interpolator图示:
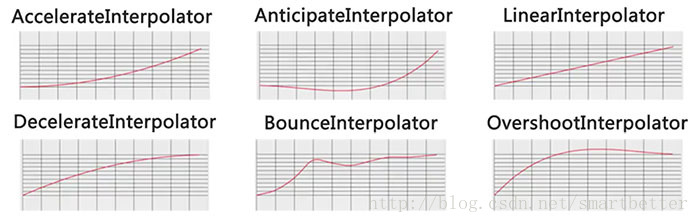
这些常用 方法\类官方API 都有详细说明,建议多阅读 官方API文档。https://developer.android.google.cn/reference/android/animation/package-summary.html
下面正式开始 矢量图动画 的开发:
2.矢量图动画(VectorDrawable)
| - | Vector(矢量图) 对比 Bitmap(位图) |
|---|---|
| 绘制效率 | Vector依赖于CUP计算,适合图像简单的情况。Bitmap可借助于GPU加速,适合图像复杂的情况。 |
| 适用情况 | Vector适用于ICON、Button、ImageView的小图片,或者需要动画效果时。Bitmap由于在GPU中有缓存功能,所以Bitmap不能做频繁的重绘。 |
| 加载速度 | SVG快于PNG,但PNG有硬件加速,平均下来加载速度的提升弥补了绘制的速度缺陷。 |
VectorDrawable,矢量图动画。使用需要添加兼容库,在app的build.gradle文件相关节点下添加:
android {
    defaultConfig {
        vectorDrawables.useSupportLibrary = true
    }
}
dependencies {
    compile 'com.android.support:appcompat-v7:25.1.0'//23.2及以上}
3.SVG和Vector
SVG是一套语法规范,在前端中使用。Vector只实现了SVG语法的Path标签(为了提高解析效率),在Android中使用。
Vector的语法通过字母和数字的组合来描述一个路径,不同字母则代表不同含义,例如:
M = moveto(M X,Y): 将画笔移动到指定的坐标位置L = lineto(L X,Y): 画直线到指定的坐标位置Z = closepath(): 关闭路径
Vector还提供了一些封装好的方法:
H = horizontal lineto(H X): 画水平线到指定的X坐标位置V = vertical lineto(V Y): 画垂直线到指定的Y坐标位置
例如下面这个 Vector Asset 代表一个黑色的正方形:
<vector xmlns:android="http://schemas.android.com/apk/res/android"
    android:width="24dp"
    android:height="24dp"
    android:viewportWidth="24.0"
    android:viewportHeight="24.0">
    <path
        android:name="square"
        android:fillColor="#FF000000"
        android:pathData="M10,10 L20,10 L20,20 L10,20 z"/></vector>
解释:
1)如上是依次以 M10,10 -> L20,10 -> L20,20 -> L10,20 -> z 进行绘制;
2)width/height 代表vector的大小;viewportWidth/viewportHeight 则代表把vector均匀分为24整份,pathData就按照这里的标准来绘制。
4.使用静态的VectorDrawable
在像ImageView、ImageButton这样的控件中使用是非常简单的:
<!-- 注意:这里用的是srcCompat -->app:srcCompat="@drawable/vector_image"
如果要在Button这种带点击效果的控件中使用,则需要通过selector来进行设置,并在对应Activity中开启下面的设置:
static {    AppCompatDelegate.setCompatVectorFromResourcesEnabled(true);
}
5.使用动态的VectorDrawable
这里需要 结合 属性动画 来实现动态的VectorDrawable效果:
1)创建VectorDrawable文件 arrow.xml
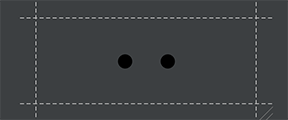
<vector xmlns:android="http://schemas.android.com/apk/res/android"
    android:width="24dp"
    android:height="24dp"
    android:viewportHeight="24.0"
    android:viewportWidth="24.0">
    <group android:name="left">
        <path
            android:fillColor="#FF000000"
            android:pathData="M6,10c-1.1,0 -2,0.9 -2,2s0.9,2 2,2 2,-0.9 2,-2 -0.9,-2 -2,-2z"/>
    </group>
    <group android:name="right">
        <path
            android:fillColor="#FF000000"
            android:pathData="M18,10c-1.1,0 -2,0.9 -2,2s0.9,2 2,2 2,-0.9 2,-2 -0.9,-2 -2,-2z"/>
    </group></vector>
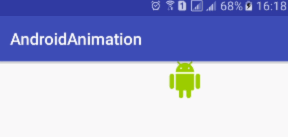
Android Studio 的 Preview窗口显示效果如下:
2)为VectorDrawable创建属性动画:
左边小球的属性动画 anim_left.xml 如下:
<?xml version="1.0" encoding="utf-8"?><objectAnimator
    xmlns:androd="http://schemas.android.com/apk/res/android"
    androd:duration="1000"
    androd:interpolator="@android:interpolator/overshoot"
    androd:propertyName="translateX"
    androd:repeatCount="infinite"
    androd:repeatMode="reverse"
    androd:valueFrom="0"
    androd:valueTo="10"
    androd:valueType="floatType"></objectAnimator><!--
    duration="1000"          持续时间/毫秒
    interpolator             修饰动画效果,定义动画的变化率(加速,减速,重复,弹跳)
    propertyName="translateX"属性名(还有前面回顾属性动画提到的属性,另外还有颜色渐变fillColor/轨迹绘制trimPathStart)
    repeatCount="infinite"   无限次
    repeatMode="reverse"     重复模式:循环使用
    valueFrom="0"            起始值
    valueTo="10"             结束值
    valueType="floatType"    变化值的类型:浮点型变化
 -->
右边小球的属性动画 anim_right.xml 如下:
<?xml version="1.0" encoding="utf-8"?><objectAnimator
    xmlns:androd="http://schemas.android.com/apk/res/android"
    androd:duration="1000"
    androd:interpolator="@android:interpolator/overshoot"
    androd:propertyName="translateX"
    androd:repeatCount="infinite"
    androd:repeatMode="reverse"
    androd:valueFrom="0"
    androd:valueTo="-10"
    androd:valueType="floatType"></objectAnimator>
3)下来我们需要配置动画粘合剂 animated-vector(arrow_anim.xml),让属性动画作用于VectorDrawable:
<?xml version="1.0" encoding="utf-8"?><animated-vector
    xmlns:android="http://schemas.android.com/apk/res/android"
    android:drawable="@drawable/arrow">
    <target
        android:animation="@animator/anim_left"
        android:name="left"/>
    <target
        android:animation="@animator/anim_right"
        android:name="right"/></animated-vector>
4)粘合到一起之后,我们就可以在Activity的Layout文件中引用了:
<?xml version="1.0" encoding="utf-8"?><RelativeLayout xmlns:android="http://schemas.android.com/apk/res/android"
    xmlns:app="http://schemas.android.com/apk/res-auto"
    android:id="@+id/activity_main"
    android:layout_width="match_parent"
    android:layout_height="match_parent">
    <ImageView
        android:layout_width="match_parent"
        android:layout_height="45dp"
        app:srcCompat="@drawable/arrow_anim"
        android:onClick="anim"/></RelativeLayout>
5)在Activity中添加点击事件anim:
public void anim(View view) {
    ImageView imageView = (ImageView) view;
    Drawable drawable = imageView.getDrawable();    if (drawable instanceof Animatable) {
        ((Animatable) drawable).start();
    }
}
到此,动态的VectorDrawable就编写完毕了,我们运行程序,点击ImageView,出现了如下的效果:
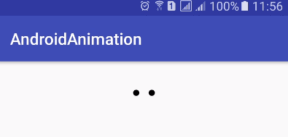
有木有很赞。
6.VectorDrawable实现轨迹动画
轨迹动画关键的配置就是 objectAnimator 中 androd:propertyName=”trimPathStart” 属性。
1)创建VectorDrawable文件 path.xml
<vector xmlns:android="http://schemas.android.com/apk/res/android"
    android:width="200dp"
    android:height="200dp"
    android:viewportHeight="500"
    android:viewportWidth="500">
    <group
        android:scaleX="5.0"
        android:scaleY="5.0">
        <path
            android:name="start"
            android:pathData="M 50.0,90.0 L 82.9193546357,27.2774101308 L 12.5993502926,35.8158045183 L 59.5726265715,88.837672697 L 76.5249063296,20.0595700732 L 10.2916450361,45.1785327898 L 68.5889268818,85.4182410261 L 68.5889268818,14.5817589739 L 10.2916450361,54.8214672102 L 76.5249063296,79.9404299268 L 59.5726265715,11.162327303 L 12.5993502926,64.1841954817 L 82.9193546357,72.7225898692 L 50.0,10.0 L 17.0806453643,72.7225898692 L 87.4006497074,64.1841954817 L 40.4273734285,11.162327303 L 23.4750936704,79.9404299268 L 89.7083549639,54.8214672102 L 31.4110731182,14.5817589739 L 31.4110731182,85.4182410261 L 89.7083549639,45.1785327898 L 23.4750936704,20.0595700732 L 40.4273734285,88.837672697 L 87.4006497074,35.8158045183 L 17.0806453643,27.2774101308 L 50.0,90.0Z"
            android:strokeColor="#000000"
            android:strokeWidth="2"/>
    </group></vector>
Android Studio 的 Preview窗口显示效果如下:

2)为VectorDrawable创建属性动画:
属性动画 anim_path.xml 如下:
<?xml version="1.0" encoding="utf-8"?><set xmlns:androd="http://schemas.android.com/apk/res/android">
    <objectAnimator
        androd:duration="10000"
        androd:propertyName="trimPathStart"
        androd:repeatCount="infinite"
        androd:repeatMode="reverse"
        androd:valueFrom="1"
        androd:valueTo="0"
        androd:valueType="floatType">
    </objectAnimator>
    <objectAnimator
        androd:duration="10000"
        androd:propertyName="strokeColor"
        androd:repeatCount="infinite"
        androd:repeatMode="reverse"
        androd:valueFrom="@android:color/holo_red_dark"
        androd:valueTo="@android:color/holo_blue_dark"
        androd:valueType="colorType">
    </objectAnimator></set>
3)下来我们需要配置动画粘合剂 animated-vector(path_anim.xml),让属性动画作用于VectorDrawable:
<?xml version="1.0" encoding="utf-8"?><animated-vector
    xmlns:android="http://schemas.android.com/apk/res/android"
    android:drawable="@drawable/path">
    <target
        android:animation="@animator/anim_path"
        android:name="start"/></animated-vector>
4)粘合到一起之后,我们就可以在Activity的Layout文件中引用了:
<?xml version="1.0" encoding="utf-8"?><RelativeLayout xmlns:android="http://schemas.android.com/apk/res/android"
    xmlns:app="http://schemas.android.com/apk/res-auto"
    android:id="@+id/activity_main"
    android:layout_width="match_parent"
    android:layout_height="match_parent">
    <ImageView
        android:layout_width="match_parent"
        android:layout_height="100dp"
        app:srcCompat="@drawable/path_anim"
        android:onClick="anim"/></RelativeLayout>
5)在Activity中添加点击事件anim:
public void anim(View view) {
    ImageView imageView = (ImageView) view;
    Drawable drawable = imageView.getDrawable();    if (drawable instanceof Animatable) {
        ((Animatable) drawable).start();
    }
}
到此,动态的VectorDrawable就编写完毕了,我们运行程序,点击ImageView,出现了如下的效果:

7.VectorDrawable实现路径变换动画
轨迹动画关键的配置就是 objectAnimator 中 androd:propertyName=”pathData” 和 androd:valueType=”pathType”属性。这里我们实现五角星向五边形的变换动画。
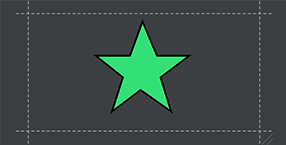
1)创建五角星VectorDrawable文件 fivestar.xml
<vector xmlns:android="http://schemas.android.com/apk/res/android"
    android:width="120dp"
    android:height="120dp"
    android:viewportHeight="64"
    android:viewportWidth="64">
    <group>
        <path
            android:name="star"
            android:fillColor="#22e171"
            android:pathData="M 48,54 L 31,42 15,54 21,35 6,23 25,23 32,4 40,23 58,23 42,35 z"
            android:strokeColor="#000000"
            android:strokeWidth="1"/>
    </group></vector>
Android Studio 的 Preview窗口显示效果如下:
2)为VectorDrawable创建属性动画:
五角星的属性动画 anim_fivestar.xml 如下:
<?xml version="1.0" encoding="utf-8"?><objectAnimator
    xmlns:androd="http://schemas.android.com/apk/res/android"
    androd:duration="3000"
    androd:propertyName="pathData"
    androd:valueFrom="M 48,54 L 31,42 15,54 21,35 6,23 25,23 32,4 40,23 58,23 42,35 z"
    androd:valueTo="M 48,54 L 31,54 15,54 10,35 6,23 25,10 32,4 40,10 58,23 54,35 z"
    androd:valueType="pathType"></objectAnimator>
3)下来我们需要配置动画粘合剂 animated-vector(fivestar_anim.xml),让属性动画作用于VectorDrawable:
<?xml version="1.0" encoding="utf-8"?><animated-vector
    xmlns:android="http://schemas.android.com/apk/res/android"
    android:drawable="@drawable/fivestar">
    <target
        android:animation="@animator/anim_fivestar"
        android:name="star"/></animated-vector>
4)粘合到一起之后,我们就可以在Activity的Layout文件中引用了:
<?xml version="1.0" encoding="utf-8"?><RelativeLayout xmlns:android="http://schemas.android.com/apk/res/android"
    xmlns:app="http://schemas.android.com/apk/res-auto"
    android:id="@+id/activity_main"
    android:layout_width="match_parent"
    android:layout_height="match_parent">
    <ImageView
        android:layout_width="match_parent"
        android:layout_height="100dp"
        app:srcCompat="@drawable/fivestar_anim"
        android:onClick="animL"/></RelativeLayout>
5)在Activity中添加点击事件anim:
/**
* 指该方法适用Android版本大于等于Android L
* @param view
*/@TargetApi(Build.VERSION_CODES.LOLLIPOP)public void animL(View view) {
ImageView imageView = (ImageView) view;
AnimatedVectorDrawable drawable = (AnimatedVectorDrawable) getDrawable(R.drawable.fivestar_anim);
imageView.setImageDrawable(drawable); if (drawable != null) {
drawable.start();
}
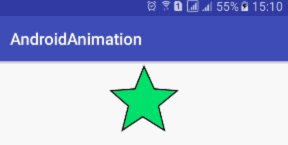
}这里的点击事件和前面介绍过的略有不同,需要考虑到VectorDrawable实现路径变换动画的兼容性问题,故路径变换动画目前存在兼容性问题。不能在4.X版本运行,这一点格外注意。不过我们同样希望Google可以在后续版本中优化路径变换动画,提高兼容性。
到此,动态的VectorDrawable就编写完毕了,我们运行程序,点击ImageView,出现了如下的效果:
8.动态VectorDrawable的兼容性问题
1.向下兼容问题
1)路径变换动画(Path Morphing)
在Android pre-L版本下是无法使用的,例如将圆形变换成三角形的动画。
2)路径插值器(Path Interpolation)
在Android pre-L版本只能使用系统的插值器(一般情况下,系统提供的27种插值器已经足够我们使用了),不能自定义。
2.向上兼容问题
1)路径变换动画(Path Morphing)
在Android L版本以上需要使用代码配置。
3.抽取string兼容问题
不支持从String.xml中读取
<PathData>
同时这里也希望Google可以在后面的版本中修复这些动态VectorDrawable的兼容性问题。


