
概述:
技术栈方面,会采用Spring Boot 2.0 作为底层框架,主要为了后续能够接入Spring Cloud 进行学习拓展。并且Spring Boot 2.0基于Spring5,也可以提前预习一些Spring5的新特性。后续技术会在相应博客中提出。
介绍一下目录结构:
Spring-Blog(Parent 项目)
Spring-Blog-common( Util 模块)
Spring-Blog-business(Repository模块)
Spring-Blog-api (Web 模块)
Spring-Blog-webflux (基于Spring Boot 2.0 的 Web模块)
为了让各位朋友能够更好理解这一模块的内容
1、DataSource
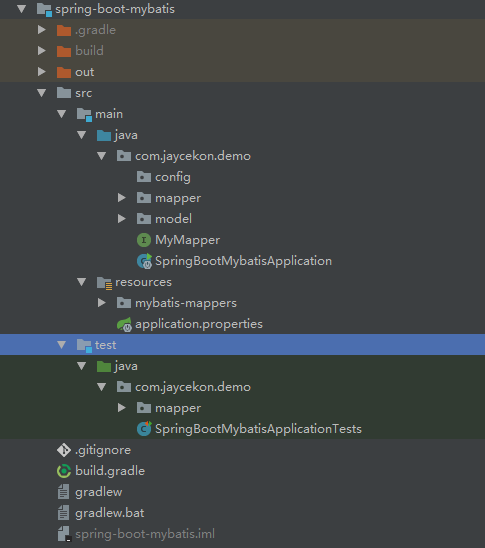
在开始讲解前,我们需要先构建后我们的运行环境。Spring Boot 引入 Mybatis 的教程 可以参考 传送门 。这里我们不细述了,首先来看一下我们的目录结构:
有使用过Spring Boot 的童鞋应该清楚,当我们在application.properties 配置好了我们的数据库连接信息后,Spring Boot 将会帮我们自动装载好DataSource。但如果我们需要进行读写分离操作是,如何配置自己的数据源,是我们必须掌握的。
首先我们来看一下配置文件中的信息:
spring.datasource.url=jdbc:mysql://localhost:3306/charles_blog2
spring.datasource.username=root
spring.datasource.password=root
spring.datasource.driver-class-name=com.mysql.jdbc.Driver

#别名扫描目录
mybatis.type-aliases-package=com.jaycekon.demo.model
#Mapper.xml扫描目录
mybatis.mapper-locations=classpath:mybatis-mappers/*.xml

#tkmapper 帮助工具
mapper.mappers=com.jaycekon.demo.MyMapper
mapper.not-empty=false
mapper.identity=MYSQL
1.1 DataSourceBuilder
我们首先来看一下使用 DataSourceBuilder 来构建出DataSource:
@Configuration
@MapperScan("com.jaycekon.demo.mapper")
@EnableTransactionManagement
public class SpringJDBCDataSource {

    /**
     * 通过Spring JDBC 快速创建 DataSource
     * 参数格式
     * spring.datasource.master.jdbcurl=jdbc:mysql://localhost:3306/charles_blog
     * spring.datasource.master.username=root
     * spring.datasource.master.password=root
     * spring.datasource.master.driver-class-name=com.mysql.jdbc.Driver
     *
     * @return DataSource
     */
    @Bean
    @ConfigurationProperties(prefix = "spring.datasource.master")
    public DataSource dataSource() {
        return DataSourceBuilder.create().build();
    }
}
从代码中我们可以看出,使用DataSourceBuilder 构建DataSource 的方法非常简单,但是需要注意的是: - DataSourceBuilder 只能自动识别配置文件中的 jdbcurl,username,password,driver-class-name等命名,因此我们需要在方法体上加上 @ ConfigurationProperties 注解。 - 数据库连接地址变量名需要使用 jdbcurl - 数据库连接池使用 com.zaxxer.hikari.HikariDataSource
执行单元测试时,我们可以看到 DataSource 创建以及关闭的过程。

1.2 DruidDataSource
除了使用上述的构建方法外,我们可以选择使用阿里提供的 Druid 数据库连接池创建 DataSource
@Configuration
@EnableTransactionManagement
public class DruidDataSourceConfig {

    @Autowired
    private DataSourceProperties properties;

    @Bean
    public DataSource dataSoucre() throws Exception {
        DruidDataSource dataSource = new DruidDataSource();
        dataSource.setUrl(properties.getUrl());
        dataSource.setDriverClassName(properties.getDriverClassName());
        dataSource.setUsername(properties.getUsername());
        dataSource.setPassword(properties.getPassword());
        dataSource.setInitialSize(5);
        dataSource.setMinIdle(5);
        dataSource.setMaxActive(100);
        dataSource.setMaxWait(60000);
        dataSource.setTimeBetweenEvictionRunsMillis(60000);
        dataSource.setMinEvictableIdleTimeMillis(300000);
        dataSource.setValidationQuery("SELECT 'x'");
        dataSource.setTestWhileIdle(true);
        dataSource.setTestOnBorrow(false);
        dataSource.setTestOnReturn(false);
        dataSource.setPoolPreparedStatements(true);
        dataSource.setMaxPoolPreparedStatementPerConnectionSize(20);
        dataSource.setFilters("stat,wall");
        return dataSource;
    }
}
使用 DruidDataSource 作为数据库连接池可能看起来会比较麻烦,但是换一个角度来说,这个更加可控。我们可以通过 DataSourceProperties 来获取 application.properties 中的配置文件:
spring.datasource.url=jdbc:mysql://localhost:3306/charles_blog2
spring.datasource.username=root
spring.datasource.password=root
spring.datasource.driver-class-name=com.mysql.jdbc.Driver
需要注意的是,DataSourceProperties 读取的配置文件 前缀是 spring.datasource ,我们可以进入到 DataSourceProperties 的源码中观察:
@ConfigurationProperties(prefix = "spring.datasource")
public class DataSourceProperties
        implements BeanClassLoaderAware, EnvironmentAware, InitializingBean
可以看到,在源码中已经默认标注了前缀的格式。
除了使用 DataSourceProperties 来获取配置文件 我们还可以使用通用的环境变量读取类:
@Autowired
    private Environment env;

    env.getProperty("spring.datasource.write")
2、多数据源配置
配置多数据源主要需要以下几个步骤:
2.1 DatabaseType 数据源名称
这里直接使用枚举类型区分,读数据源和写数据源
public enum DatabaseType {
    master("write"), slave("read");


    DatabaseType(String name) {
        this.name = name;
    }

    private String name;

    public String getName() {
        return name;
    }

    public void setName(String name) {
        this.name = name;
    }

    @Override
    public String toString() {
        return "DatabaseType{" +
                "name='" + name + '\'' +
                '}';
    }
}
2.2 DatabaseContextHolder
该类主要用于记录当前线程使用的数据源,使用 ThreadLocal 进行记录数据
public class DatabaseContextHolder {
    private static final ThreadLocal<DatabaseType> contextHolder = new ThreadLocal<>();

    public static void setDatabaseType(DatabaseType type) {
        contextHolder.set(type);
    }

    public static DatabaseType getDatabaseType() {
        return contextHolder.get();
    }
}
2.3 DynamicDataSource
该类继承 AbstractRoutingDataSource 用于管理 我们的数据源,主要实现了 determineCurrentLookupKey 方法。 后续细述这个类是如何进行多数据源管理的。
public class DynamicDataSource extends AbstractRoutingDataSource {


    @Nullable
    @Override
    protected Object determineCurrentLookupKey() {
        DatabaseType type = DatabaseContextHolder.getDatabaseType();
        logger.info("====================dataSource ==========" + type);
        return type;
    }

}
2.4 DataSourceConfig
最后一步就是配置我们的数据源,将数据源放置到 DynamicDataSource 中:
@Configuration
@MapperScan("com.jaycekon.demo.mapper")
@EnableTransactionManagement
public class DataSourceConfig {

    @Autowired
    private DataSourceProperties properties;

    /**
     * 通过Spring JDBC 快速创建 DataSource
     * 参数格式
     * spring.datasource.master.jdbcurl=jdbc:mysql://localhost:3306/charles_blog
     * spring.datasource.master.username=root
     * spring.datasource.master.password=root
     * spring.datasource.master.driver-class-name=com.mysql.jdbc.Driver
     *
     * @return DataSource
     */
    @Bean(name = "masterDataSource")
    @Qualifier("masterDataSource")
    @ConfigurationProperties(prefix = "spring.datasource.master")
    public DataSource masterDataSource() {
        return DataSourceBuilder.create().build();
    }

 /**
     * 手动创建DruidDataSource,通过DataSourceProperties 读取配置
     * 参数格式
     * spring.datasource.url=jdbc:mysql://localhost:3306/charles_blog
     * spring.datasource.username=root
     * spring.datasource.password=root
     * spring.datasource.driver-class-name=com.mysql.jdbc.Driver
     *
     * @return DataSource
     * @throws SQLException
     */
    @Bean(name = "slaveDataSource")
    @Qualifier("slaveDataSource")
    public DataSource slaveDataSource() throws SQLException {
        DruidDataSource dataSource = new DruidDataSource();
        dataSource.setUrl(properties.getUrl());
        dataSource.setDriverClassName(properties.getDriverClassName());
        dataSource.setUsername(properties.getUsername());
        dataSource.setPassword(properties.getPassword());
        dataSource.setInitialSize(5);
        dataSource.setMinIdle(5);
        dataSource.setMaxActive(100);
        dataSource.setMaxWait(60000);
        dataSource.setTimeBetweenEvictionRunsMillis(60000);
        dataSource.setMinEvictableIdleTimeMillis(300000);
        dataSource.setValidationQuery("SELECT 'x'");
        dataSource.setTestWhileIdle(true);
        dataSource.setTestOnBorrow(false);
        dataSource.setTestOnReturn(false);
        dataSource.setPoolPreparedStatements(true);
        dataSource.setMaxPoolPreparedStatementPerConnectionSize(20);
        dataSource.setFilters("stat,wall");
        return dataSource;
    }

    /**
     *  构造多数据源连接池
     *  Master 数据源连接池采用 HikariDataSource
     *  Slave  数据源连接池采用 DruidDataSource
     * @param master
     * @param slave
     * @return
     */
    @Bean
    @Primary
    public DynamicDataSource dataSource(@Qualifier("masterDataSource") DataSource master,
                                        @Qualifier("slaveDataSource") DataSource slave) {
        Map<Object, Object> targetDataSources = new HashMap<>();
        targetDataSources.put(DatabaseType.master, master);
        targetDataSources.put(DatabaseType.slave, slave);

        DynamicDataSource dataSource = new DynamicDataSource();
        dataSource.setTargetDataSources(targetDataSources);// 该方法是AbstractRoutingDataSource的方法
        dataSource.setDefaultTargetDataSource(slave);// 默认的datasource设置为myTestDbDataSourcereturn dataSource;
    }

    @Bean
    public SqlSessionFactory sqlSessionFactory(@Qualifier("masterDataSource") DataSource myTestDbDataSource,
                                               @Qualifier("slaveDataSource") DataSource myTestDb2DataSource) throws Exception {
        SqlSessionFactoryBean fb = new SqlSessionFactoryBean();
        fb.setDataSource(this.dataSource(myTestDbDataSource, myTestDb2DataSource));
        fb.setTypeAliasesPackage(env.getProperty("mybatis.type-aliases-package"));
        fb.setMapperLocations(new PathMatchingResourcePatternResolver().getResources(env.getProperty("mybatis.mapper-locations")));
        return fb.getObject();
    }
}
上述代码块比较长,我们来解析一下:
masterDataSource 和 slaveDataSource 主要是用来创建数据源的,这里分别使用了 hikaridatasource 和 druidDataSource 作为数据源
DynamicDataSource 方法体中,我们主要是将两个数据源都放到 DynamicDataSource 中进行统一管理
SqlSessionFactory 方法则是将所有数据源(DynamicDataSource )统一管理
2.5 UserMapperTest
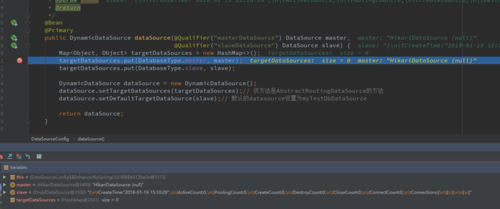
接下来我们来简单观察一下 DataSource 的创建过程:
首先我们可以看到我们的两个数据源以及构建好了,分别使用的是HikariDataSource 和 DruidDataSource,然后我们会将两个数据源放入到 targetDataSource 中,并且这里讲我们的 slave 作为默认数据源 defaultTargetDataSource
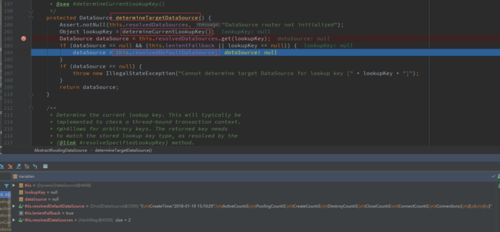
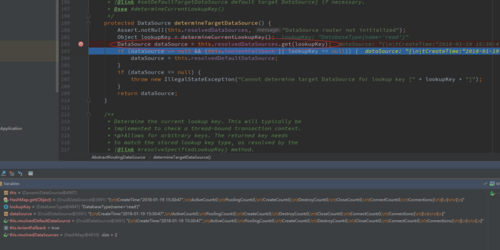
然后到获取数据源这一块:
主要是从 AbstractRoutingDataSource 这个类中的 determineTargetDataSource( ) 方法中进行判断,这里会调用到我们在 DynamicDataSource 中的方法, 去判断需要使用哪一个数据源。如果没有设置数据源,将采用默认数据源,就是我们刚才设置的DruidDataSource 数据源。
在最后的代码运行结果中:
我们可以看到确实是使用了我们设置的默认数据源。

3、读写分离
在经历了千山万水后,终于来到我们的读写分离模块了,首先我们需要添加一些我们的配置信息:
spring.datasource.read = get,select,count,list,query
spring.datasource.write = add,create,update,delete,remove,insert
这两个变量主要用于切面判断中,区分哪一些部分是需要使用 读数据源,哪些是需要使用写的。
3.1 DynamicDataSource 修改
public class DynamicDataSource extends AbstractRoutingDataSource {

    static final Map<DatabaseType, List<String>> METHOD_TYPE_MAP = new HashMap<>();


    @Nullable
    @Override
    protected Object determineCurrentLookupKey() {
        DatabaseType type = DatabaseContextHolder.getDatabaseType();
        logger.info("====================dataSource ==========" + type);
        return type;
    }

    void setMethodType(DatabaseType type, String content) {
        List<String> list = Arrays.asList(content.split(","));
        METHOD_TYPE_MAP.put(type, list);
    }
}
在这里我们需要添加一个Map 进行记录一些读写的前缀信息。
3.2 DataSourceConfig 修改
在DataSourceConfig 中,我们再设置DynamicDataSource 的时候,将前缀信息设置进去。
@Bean
    @Primary
    public DynamicDataSource dataSource(@Qualifier("masterDataSource") DataSource master,
                                        @Qualifier("slaveDataSource") DataSource slave) {
        Map<Object, Object> targetDataSources = new HashMap<>();
        targetDataSources.put(DatabaseType.master, master);
        targetDataSources.put(DatabaseType.slave, slave);

        DynamicDataSource dataSource = new DynamicDataSource();
        dataSource.setTargetDataSources(targetDataSources);// 该方法是AbstractRoutingDataSource的方法
        dataSource.setDefaultTargetDataSource(slave);// 默认的datasource设置为myTestDbDataSource

        String read = env.getProperty("spring.datasource.read");
        dataSource.setMethodType(DatabaseType.slave, read);

        String write = env.getProperty("spring.datasource.write");
        dataSource.setMethodType(DatabaseType.master, write);

        return dataSource;
    }
3.3 DataSourceAspect
在配置好读写的方法前缀后,我们需要配置一个切面,监听在进入Mapper 方法前将数据源设置好:
主要的操作点在于 DatabaseContextHolder.setDatabaseType(type); 结合我们上面多数据源的获取数据源方法,这里就是我们设置读或写数据源的关键了。
@Aspect
@Component
@EnableAspectJAutoProxy(proxyTargetClass = true)
public class DataSourceAspect {
    private static Logger logger = LoggerFactory.getLogger(DataSourceAspect.class);

    @Pointcut("execution(* com.jaycekon.demo.mapper.*.*(..))")
    public void aspect() {

    }


    @Before("aspect()")
    public void before(JoinPoint point) {
        String className = point.getTarget().getClass().getName();
        String method = point.getSignature().getName();
        String args = StringUtils.join(point.getArgs(), ",");
        logger.info("className:{}, method:{}, args:{} ", className, method, args);
        try {
            for (DatabaseType type : DatabaseType.values()) {
                List<String> values = DynamicDataSource.METHOD_TYPE_MAP.get(type);
                for (String key : values) {
                    if (method.startsWith(key)) {
                        logger.info(">>{} 方法使用的数据源为:{}<<", method, key);
                        DatabaseContextHolder.setDatabaseType(type);
                        DatabaseType types = DatabaseContextHolder.getDatabaseType();
                        logger.info(">>{}方法使用的数据源为:{}<<", method, types);
                    }
                }
            }
        } catch (Exception e) {
            logger.error(e.getMessage(), e);
        }
    }
}
3.4 UserMapperTest
方法启动后,先进入切面中,根据methodName 设置数据源类型。
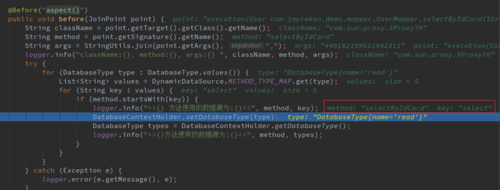
然后进入到determineTargetDataSource 方法中 获取到数据源:
运行结果:


