PWA(Progressive Web Apps)是谷歌近几年一直在推进的 web 应用新模型。PWA 借助 Service Worker 缓存网站的静态资源,甚至是网络请求,使网站在离线时也能访问。并且我们能够为网站指定一个图标添加在手机桌面,实现点击桌面图标即可访问网站。
Web App Manifest
Web App Manifest 是一个 JSON 文件,它用来定义网站添加到桌面的图标以及从桌面图标进入网站时的一系列行为,如:启动样式,全屏主题等。
先创建 manifest.json:
{  "name": "blog-pwa",  "short_name": "blog-pwa",  "icons": [
    {      "src": "/img/icons/android-chrome-192x192.png",      "sizes": "192x192",      "type": "image/png"
    },
    {      "src": "/img/icons/android-chrome-512x512.png",      "sizes": "512x512",      "type": "image/png"
    }
  ],  "start_url": "/index.html",  "display": "standalone",  "background_color": "#000000",  "theme_color": "#4DBA87"}
将文件引入:
<link rel=manifest href=/manifest.json>
我们可以从开发者工具上看我们的配置:


icons 属性定义了添加到桌面的图标, display: standalone 表示我们要从桌面全屏启动,theme_color": "#4DBA87 是全屏启动时手机顶部状态栏的背景色,background_color": "#000000 是启动页的背景色,启动页目前不能定制,默认由 background_color 加 icon 加 name 组合而成。
Web App Manifest很简单,只要照着文档每个属性看一遍就行。
Service Worker
Service Worker 是浏览器在后台独立于网页运行的脚本。是它让 PWA 拥有极快的访问速度和离线运行能力。
那它是如何做到的呢?我们一步步来看。
注册 Service Worker
if ('serviceWorker' in navigator) {
  navigator.serviceWorker
    .register('/service-worker.js')
    .then(registration => {      console.log(        'ServiceWorker registration successful with scope: ',
        registration.scope
      )
    })
    .catch(err => {      console.log('ServiceWorker registration failed: ', err)
    })
}需要注意的是,Service Worker 脚本除了域名为 localhost 时能运行在 http 协议下以外,只能运行 https 协议下。
安装
const CACHE_NAME = 'cache-v1'const DATA_CACHE_NAME = 'data-cache-v1'const PRE_CACHE = ['/index.html', '/css/app.css', '/js/app.js']

self.addEventListener('install', e => {  console.log('[ServiceWorker] Install')
  e.waitUntil(
    caches.open(CACHE_NAME).then(cache => {      return cache.addAll(PRE_CACHE)
    })
  )
})
在安装的时候预缓存网站的静态资源,任何资源路径出错都会造成 Service Worker 安装失败。
代理请求
self.addEventListener('fetch', e => {
  e.respondWith(
    caches.match(e.request).then(response => {      if (response) {        return response
      }      const fetchRequest = e.request.clone()      return fetch(fetchRequest).then(response => {        // Check if we received a valid response
        if (!response || response.status !== 200) {          return response
        }        const responseToCache = response.clone()

        caches.open(DATA_CACHE_NAME).then(cache => {
          cache.put(e.request, responseToCache)
        })        return response
      })
    })
  )
})安装成功后,Service Worker 就可以监听网站的所有请求,匹配到缓存时直接返回,未匹配到时请求服务器,服务器成功返回时添加到缓存。
更新
现在网站的 Service Worker 已经可以正常工作了,那如何更新它呢?
我们只需要修改 Service Worker 文件就可以更新它。当我们每次访问网站时都会去下载这个文件,当发现文件不一致时,就会安装这个新 Service Worker ,安装成功后,它将进入等待阶段。当我们关闭窗口重新导航到网站时(刷新网页不行),新 Service Worker 将开始控制网站。旧 Service Worker 终止工作并触发 activate 事件:
self.addEventListener('activate', e => {
  e.waitUntil(
    caches.keys().then(keyList => {      return Promise.all(
        keyList.map(key => {          if (key !== CACHE_NAME && key !== DATA_CACHE_NAME) {
            console.log('[ServiceWorker] Removing old cache', key)            return caches.delete(key)
          }
        })
      )
    })
  )
})
在其卸载时一定要删除旧缓存,不然我们的网站永远无法更新。
上面只简单讲了 Service Worker 如何工作。我们会发现有很多问题需要我们进一步解决:
预缓存的静态资源修改后在下一次发版本时的文件名都不一样,手动写死太低效,最好每次都自动生成资源文件名。
缓存资源是以硬编码字符串判断是否有效,这样每次发版本都需要手动修改,才能更新缓存。并且每次都是全量更新。能否以文件的粒度进行资源缓存呢?
请求代理没有区分静态资源和动态接口。已经缓存的动态接口也会一直返回缓存,无法请求新数据。
上面只列出了三个明显的问题,还有很多问题是没有考虑到的。如果让我们自己来解决这些问题,不仅是工作量很大,而且也很难写出生产环境可用的 Service Worker。
workbox
既然如此,我们最好是站在巨人的肩膀上,这个巨人就是谷歌。workbox 是由谷歌浏览器团队发布,用来协助创建 PWA 应用的 JavaScript 库。当然直接用 workbox 还是太复杂了,谷歌还很贴心的发布了一个 webpack 插件,能够自动生成 Service Worker 和 静态资源列表 - workbox-webpack-plugin。
只需简单一步就能生成生产环境可用的 Service Worker :
const { GenerateSW } = require('workbox-webpack-plugin')new GenerateSW()打包一下:
还能说什么呢?谷歌大法好!当然这只是最简单的可用版本,其实这里有一个最严重的问题不知道有没人发现,那就是 importScripts 引用的是谷歌域名下的 cdn ,这让我们墙内的网站怎么用,所以我们需要把这个问题解决并自定义一些配置增强 Service Worker 的能力:
new GenerateSW({  importWorkboxFrom: 'local',  skipWaiting: true,  clientsClaim: true,  runtimeCaching: [
    {      // To match cross-origin requests, use a RegExp that matches
      // the start of the origin:
      urlPattern: new RegExp('^https://api'),      handler: 'staleWhileRevalidate',      options: {        // Configure which responses are considered cacheable.
        cacheableResponse: {          statuses: [200]
        }
      }
    },
    {      urlPattern: new RegExp('^https://cdn'),      // Apply a network-first strategy.
      handler: 'networkFirst',      options: {        // Fall back to the cache after 2 seconds.
        networkTimeoutSeconds: 2,        cacheableResponse: {          statuses: [200]
        }
      }
    }
  ]
})
首先 importWorkboxFrom 我们指定从本地引入,这样插件就会将 workbox 所有源文件下载到本地,墙内开发者的福音。上面提到过新 Service Worker 安装成功后需要进入等待阶段,skipWaiting: true 将使其跳过等待,安装成功后立即接管网站,注意这个要和 clientsClaim 一起设置为 true。runtimeCaching 顾名思义是配置运行时如何缓存请求的,这里只说一点,缓存跨域请求时 urlPattern 的值必须为 ^ 开头的正则表达式,其它的配置看文档都能得到详细的介绍。
再打包一次:
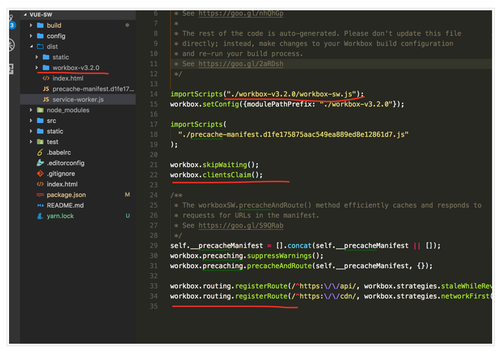
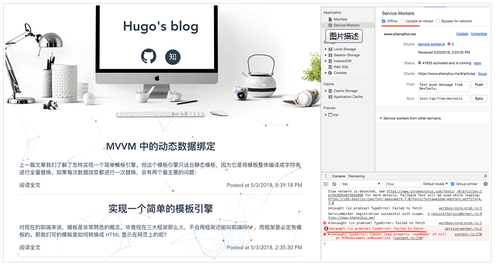
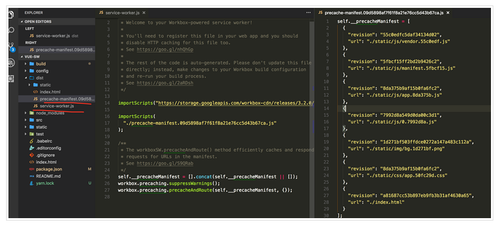
现在我们就可以将打包好的代码部署到网站上了,最后再上几张图: