
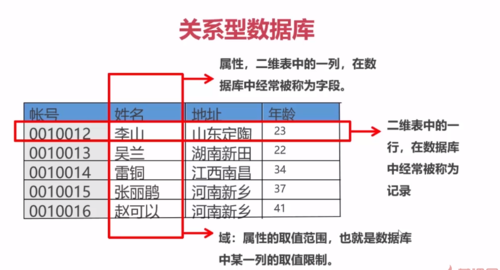
数据库的列:一般称为字段;
数据库中的行:在数据库中经常被称为记录;
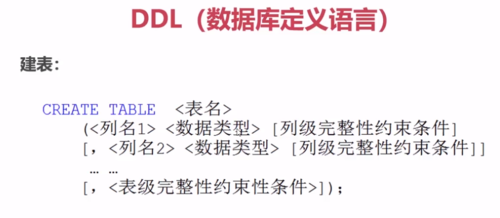
CREATE TABLE 是关键字,自己取一个表名,接下来,整个表的结构就在一个小括号里概括出来。
首先取一个列名,指定它的数据类型,中括号的是你可以指定一些限制条件(比如主键,非空等等);
一张表,至少要保证有一个列名。
如果还要写其他的,你需要以逗号分隔;
然后尖括号的为必填;


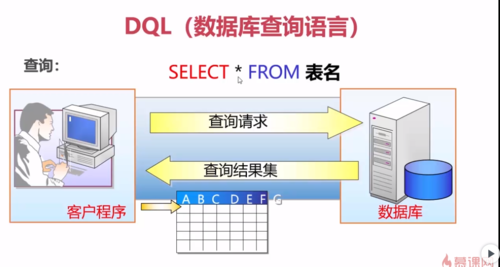
这里的“*”可以用列名来代替,然后列名可以用逗号分隔。


Sql 案例示例:
需要涉及两个类,第一个是SQLiteOpenHelper :

第二个类是SQLiteDatabase ,
用于管理和操作SQLite数据库,几乎所有的数据库操作,最终都是由这个类完成。(增删改查)
首先把界面设置好:
<?xml version="1.0" encoding="utf-8"?>
<LinearLayout
    xmlns:android="http://schemas.android.com/apk/res/android"
    xmlns:app="http://schemas.android.com/apk/res-auto"
    xmlns:tools="http://schemas.android.com/tools"
    android:layout_width="match_parent"
    android:orientation="vertical"
    android:layout_height="match_parent"
    tools:context=".MainActivity">

        <ListView
            android:id="@+id/foods"
            android:layout_width="match_parent"
            android:layout_height="match_parent"
            android:layout_weight="1"/>

  <LinearLayout
      android:layout_width="match_parent"
      android:layout_height="wrap_content"
      android:orientation="horizontal">
      <Button
          android:id="@+id/add"
          android:layout_width="0dp"
          android:layout_margin="5dp"
          android:text="增加"
          android:padding="2dp"
          android:textSize="15dp"
          android:layout_height="30dp"
          android:layout_weight="1"/>
      <Button
          android:id="@+id/delete"
          android:layout_width="0dp"
          android:layout_margin="5dp"
          android:text="删除"
          android:padding="2dp"
          android:textSize="15dp"
          android:layout_height="30dp"
          android:layout_weight="1"/>
      <Button
          android:id="@+id/modify"
          android:layout_width="0dp"
          android:layout_margin="5dp"
          android:text="修改"
          android:padding="2dp"
          android:textSize="15dp"
          android:layout_height="30dp"
          android:layout_weight="1"/>
  </LinearLayout>
2.接着创建一个FoodDao ,用于数据操作:
package com.example.sqlmenuapplication.dao;

import android.content.Context;
import android.database.sqlite.SQLiteDatabase;
import android.database.sqlite.SQLiteOpenHelper;
import android.util.Log;

public class FoodDao {
    private SQLiteDatabase db; // 创建一个可以调动数据库的对象
    public FoodDao(Context ctx) {
       // SQLiteOpenHelper
       // SQLiteDatabase
        String path = ctx.getFilesDir().getAbsolutePath()+"/food.db";
        SQLiteOpenHelper helper = new SQLiteOpenHelper(ctx,path,null,1) {
            @Override
            public void onCreate(SQLiteDatabase db) {
                //建表
                Log.e("TP","创建");
                String sql = "create table foodTb(" +
                        "_id integer primary key autoincrement," +
                        "name varchar(20)," +
                        "steps varchar(500)," +
                        "img integer)";
                //创建表格
                db.execSQL(sql);

            }


            @Override
            public void onUpgrade(SQLiteDatabase db, int oldVersion, int newVersion) {

            }
        };

        db = helper.getReadableDatabase();


    }
}
接着你需要在MainActivity中引入dao :
package com.example.sqlmenuapplication;

import androidx.appcompat.app.AppCompatActivity;

import android.content.Intent;
import android.os.Bundle;
import android.view.View;
import android.widget.Button;
import android.widget.ListView;

import com.example.sqlmenuapplication.dao.foodDao;

public class MainActivity extends AppCompatActivity {
    private ListView food;
    private Button add ,delete,modify;
    private foodDao dao;

    @Override
    protected void onCreate(Bundle savedInstanceState) {
        super.onCreate(savedInstanceState);
        setContentView(R.layout.activity_main);
        dao = new foodDao(this);
        initView();
        initEvent();
    }


    private void initView() {
        food = findViewById(R.id.foods);
        add = findViewById(R.id.add);
        delete = findViewById(R.id.delete);
        modify = findViewById(R.id.modify);

    }

    private void initEvent() {
        add.setOnClickListener(new View.OnClickListener() {
            @Override
            public void onClick(View v) {
                Intent intent = new Intent(MainActivity.this,OperateActivity.class);
                startActivity(intent);
            }
        });


    }
}
接下来我们要对数据库进行操作。由于我们是刚创建好的,里面还没有任何数据。
因此我们先来执行数据的添加操作。
public Cursor getAllFood(){
    String sql = "select * from MenuTb";
    Cursor c = db.rawQuery(sql,null);
   //  c.moveToPosition(1); 表示指向第2行的数据
   //  c.moveToNext() ;表示为true,因为所有
    /**
    while(c.moveToNext()){
        c.getString(1); //可以按照列获取数据
    }
     **/
    return c;
}
接着写一个item:
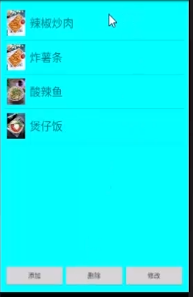
<?xml version="1.0" encoding="utf-8"?>
<LinearLayout
    xmlns:android="http://schemas.android.com/apk/res/android"
    android:orientation="horizontal"
    android:layout_width="match_parent"
    android:layout_height="wrap_content">
    <ImageView
        android:id="@+id/img"
        android:layout_width="90dp"
        android:layout_height="90dp"
        android:layout_margin="10dp"
        android:src="@mipmap/f1"/>
    <TextView
        android:id="@+id/name"
        android:layout_width="wrap_content"
        android:layout_height="wrap_content"
        android:text="菜名"
        android:layout_gravity="center_vertical"
        android:textColor="#000000"
        android:textSize="18dp"/>

</LinearLayout>
接着,在MainActivity中,添加适配器和把Cursor拿出来:
package com.example.trymenuapplication;

import androidx.appcompat.app.AppCompatActivity;

import android.content.Intent;
import android.database.Cursor;
import android.os.Bundle;
import android.view.View;
import android.widget.Button;
import android.widget.ListView;
import android.widget.SimpleCursorAdapter;

import com.example.trymenuapplication.dao.FoodDao;

public class MainActivity extends AppCompatActivity {
    private FoodDao dao ;
    private Button add , delete,modify;
    private ListView foods;
    private Cursor c;

    @Override
    protected void onCreate(Bundle savedInstanceState) {
        super.onCreate(savedInstanceState);
        setContentView(R.layout.activity_main);
        dao = new FoodDao(this);
        add = findViewById(R.id.add);
        delete = findViewById(R.id.delete);
        modify = findViewById(R.id.modify);
        foods = findViewById(R.id.foods);
        c = dao.getAllFood();
        //把食物展示出来,需要考虑适配器
        String[] from = {"img","name"};
        int[] to = {R.id.img,R.id.name};
        SimpleCursorAdapter adapter = new SimpleCursorAdapter(this,R.layout.item,c,from,to,0);
        foods.setAdapter(adapter);
        initEvent();
    }

    private void initEvent() {
        add.setOnClickListener(new View.OnClickListener() {
            @Override
            public void onClick(View v) {
                Intent intent = new Intent(MainActivity.this,OperateActivity.class);
                startActivity(intent);
            }
        });
    }
}
接着我们优化下,让一添加就能在首页中显示
首先,我们需要在MainActivity中添加resume:
并把SimpleCursorAdapter,from ,to 提到全局
@Override
protected void onResume() {
    super.onResume();
    c = dao.getAllFood();

    cursorAdapter = new SimpleCursorAdapter(this,R.layout.item,c,from,to,0);
    foods.setAdapter(cursorAdapter);

}
接着我们添加长按显示按钮:
//长按弹出制作方法
foods.setOnItemLongClickListener(new AdapterView.OnItemLongClickListener() {
    @Override
    public boolean onItemLongClick(AdapterView<?> parent, View view, int position, long id) {
        //我们需要获取cursor,到对应行
        c.moveToPosition(position);
        //然后获得对应列的数据
        String step = c.getString(2);
        Toast.makeText(MainActivity.this,step, Toast.LENGTH_SHORT).show();

        //必须要return true,要不然会在执行完长按之后再执行点击
        return true;
    }
});
接下来我们要实现删除操作:
我们先实现,点击选中某一条之后,那一条的背景色会变成灰色:
先在Dao里添加一个删除的method:
//删除(我们要根据每个点击到的数据的id来删除)
public void delete(String _id){
    String sql = "delete from MenuTb where _id ="+_id;
    db.execSQL(sql);

}
接下来,我们要在MainActivity里使用:
先添加一个点一下就会背景变灰色的做法。记得,先把lastIndex设为-1:
//实现子项点击事件(这里是选中,还不需要删除)
foods.setOnItemClickListener(new AdapterView.OnItemClickListener() {
    @Override
    public void onItemClick(AdapterView<?> parent, View view, int position, long id) {
        // position 用于指定是点击了哪里
        //_id在下面的删除操作还需要,所以需要声明为全局
        c.moveToPosition(position);
       _id = c.getString(0);

        //view 用于做UI 界面反应这里,我们把点击之后的背景色设置为灰色,再点击别的之前的又恢复会白色
        view.setBackgroundColor(Color.GRAY);
        //lastPosition为上一次点到的那一项
        if(lastPosition != -1){
         foods.getChildAt(lastPosition).setBackgroundColor(Color.WHITE);
        }
        lastPosition = position;


    }
});
接着,我们要实现绑定在删除按钮:
//删除
delete.setOnClickListener(new View.OnClickListener() {
    @Override
    public void onClick(View v) {
        dao.delete(_id);
        Cursor cursor = dao.getAllFood();
        SimpleCursorAdapter adapter = new SimpleCursorAdapter(MainActivity.this,R.layout.item,cursor,from,to,0);
        foods.setAdapter(adapter);
        adapter.notifyDataSetChanged();
    }
});
最后一个操作 ,修改,
思路:点击某一项之后,会跳转到编辑界面,但是编辑界面会保留之前的信息。
这里需要注意两个点:
记得Food类要序列化
记得要判断用户点中哪个(需要在Foods list 的item onclick 才能判断)
把Food 取一个全局变量 f:
//实现子项点击事件(这里是选中,还不需要删除)
foods.setOnItemClickListener(new AdapterView.OnItemClickListener() {
    @Override
    public void onItemClick(AdapterView<?> parent, View view, int position, long id) {
        // position 用于指定是点击了哪里
        //_id在下面的删除操作还需要,所以需要声明为全局
        c.moveToPosition(position);
       _id = c.getString(0);
       //拿到被点击的food对象
        f = new Food(c.getInt(0),c.getString(1),c.getString(2),c.getInt(3));

        //view 用于做UI 界面反应这里,我们把点击之后的背景色设置为灰色,再点击别的之前的又恢复会白色
        view.setBackgroundColor(Color.GRAY);
        //lastPosition为上一次点到的那一项
        if(lastPosition != -1){
         foods.getChildAt(lastPosition).setBackgroundColor(Color.WHITE);
        }
        lastPosition = position;


    }
});
拿到food对象之后,我们就要判断,f是否为null,如果不为null,就就跳转到OperateActivity的界面:
//修改
modify.setOnClickListener(new View.OnClickListener() {
    @Override
    public void onClick(View v) {
        if(f != null){
            Intent intent = new Intent(MainActivity.this,OperateActivity.class);
            intent.putExtra("food",f);
            startActivity(intent);
        }
        else{
            Toast.makeText(MainActivity.this, "你啥都没选", Toast.LENGTH_SHORT).show();
            return;
        }
    }
});
接着,如果f不为null的情况下,我们要把上一个Intent里的内容都取出来:
 //若f不为空,把上一个intent的名字和步骤取出
f = (Food) getIntent().getSerializableExtra("food");
if(f != null){
    edt_name.setText(f.getName());
    edt_steps.setText(f.getSteps());
}
接着思考让之前已经选中的图片保持0.6半透明状态:
f = (Food) getIntent().getSerializableExtra("food");
//初始化,点击的图片为-1;
int imgIndex = -1;
if(f != null){
    edt_name.setText(f.getName());
    edt_steps.setText(f.getSteps());
    //被选中的那个图像
    imgIndex = f.getImg();

}
for(int i = 0 ;i<gl.getChildCount();i++){
//我们要把遍历的每个ImageView取出来
final ImageView img = (ImageView)gl.getChildAt(i);
//如果被选中的那个图像等于遍历到的那个图像,那么这个图像就设为半透明,被选中的索引也为最后一次的索引
if(imgs[i] == imgIndex){
img.setAlpha(0.4f);
lastIndex = i;
}
//给每一个遍历的img添加点击事件
final int index = i;
img.setOnClickListener(new View.OnClickListener() {
@Override
public void onClick(View v) {
imgId =imgs[index]; //获取被点击图片的资源索引
img.setAlpha(0.4f);
//为了能够实现单选图片,选择其它图片的时候,之前的图片应该恢复原色
if(lastIndex != -1 && lastIndex !=index){
gl.getChildAt(lastIndex).setAlpha(1f);
}
lastIndex = index;
}
});
}接着,需要把update的信息添加到数据库:
首先在Dao,里添加一个更新的method:
//更新
public void update(Food food){
    String sql = "update MenuTb set =?,steps = ?,img =? where _id =?";
    Object[] args = {food.getName(),food.getSteps(),food.getImg(),food.get_id()} ;
    db.execSQL(sql,args);
}
接着,在OperateActivity里,改变一下add的操作,当f不为空时,调用update:
//点击上传,需要获取所有输入的数据
btn_upload.setOnClickListener(new View.OnClickListener() {
    @Override
    public void onClick(View v) {
        String nameTv = edt_name.getText().toString();
        String stepsTv = edt_steps.getText().toString();
        //需要获取图片的索引,为int类型 imgId;
        //传入Food的对象,把所以的参数传入
       final Food food = new Food(0, nameTv, stepsTv, imgId);
        //使用dao的添加操作,add();
        if (f == null) {
            //dao的添加操作
            dao.add(food);
            Toast.makeText(OperateActivity.this, "添加成功", Toast.LENGTH_SHORT).show();
        }
        else{
            //不为空的情况下,修改过
           food.set_id(f.get_id());
           dao.update(food);
            Toast.makeText(OperateActivity.this, "修改成功", Toast.LENGTH_SHORT).show();

        }
        edt_name.setText("");
        edt_steps.setText("");
        gl.getChildAt(lastIndex).setAlpha(1f);
        Intent intent = new Intent(OperateActivity.this, MainActivity.class);
        startActivity(intent);
    }


});


