JS基本数据类型有哪些?引用数据类型有哪些?
在 JS 中,存在着 7 种原始值,分别是: boolean null undefined number string symbol
引用数据类型:
对象Object(包含普通对象-Object,数组对象-Array,正则对象-RegExp,日期对象-Date,数学函数-Math,函数对象-Function)
null和undefined 有什么区别?
(1)null是一个表示”无”的对象,转我数值是为0,undefined是一个表示”无”的原始值,转为数值时为NaN。当声明的变量还未被初始化时,能量的默认值为undefined
(2)Null用来表示尚未存在的对象,常用来表示函数企图返回一个不存在的对象
(3)Undefined表示”缺少值”,就是此处应该有一个值,但是还没有定义。
典型用法是:
a、变量被声明了,但没有赋值时,就等于undefined
b、调用函数时,应该提供的参数没有提供,该参数等于undefined
c、对象没有赋值属性,该属性的值为undefined
d、函数没有返回值时,默认返回undefined
(4)null表示”没有对象”,即该处不应该有值。典型用法是: a、作为函数的参数,表示该函数的参数不是对象 b、作为对象原型链的终点
Javascript中的数据类型(8种)
简单数据类型:Number、String、Boolean、undefined、null、Symbol、Bigint(ES2020新增)
复杂数据类型:Object
Object又有一些子类型,Array、Function、RegExp、Date这些都属于Object类型
for循环setTimeout打印输出
如果不采用立即执行函数或者let的形式就会直接打印出10个10,通过采取闭包或者let有了块级作用域之后就不会出现这样的问题
for (var i = 0; i < 10; i++) {
  (function (j) {    setTimeout(() => {      console.log(j)
    }, 1000)
  })(i)
}复制代码
给定时器传入第三个参数, 定时器可以传多个参数给定时器函数,此处将外层的i传递给了定时器中回调函数作为参数使用。
for(var i = 1;i <= 5; i++){  setTimeout(function timer(j){    console.log(j)
  }, 0, i)
}复制代码
用let给定块级作用域
for (let i = 0; i < 10; i++) {  setTimeout(() => {    console.log(i)
  }, 1000)
}
请你谈谈Cookie的弊端
cookie虽然在持久保存客户端数据提供了方便,分担了服务器存储的负担,但还是有很多局限性的。
第一:每个特定的域名下最多生成20个cookie
<code style="font-family: Consolas, Menlo, Monaco, 'Courier New', monospace; font-size: 1em; padding: 0px; color: inherit; background-color: transparent;"><span class="hljs-number" style="color: rgb(42, 161, 152);">1.</span>IE6或更低版本最多<span class="hljs-number" style="color: rgb(42, 161, 152);">20</span>个cookie
<span class="hljs-number" style="color: rgb(42, 161, 152);">2.</span>IE7和之后的版本最后可以有<span class="hljs-number" style="color: rgb(42, 161, 152);">50</span>个cookie。
<span class="hljs-number" style="color: rgb(42, 161, 152);">3.F</span>irefox最多<span class="hljs-number" style="color: rgb(42, 161, 152);">50</span>个cookie
<span class="hljs-number" style="color: rgb(42, 161, 152);">4.</span>chrome和Safari没有做硬性限制
</code>
IE和Opera 会清理近期最少使用的cookie,Firefox会随机清理cookie。
cookie的最大大约为4096字节,为了兼容性,一般不能超过4095字节。
IE 提供了一种存储可以持久化用户数据,叫做uerData,从IE5.0就开始支持。每个数据最多128K,每个域名下最多1M。这个持久化数据放在缓存中,如果缓存没有清理,那么会一直存在。
优点:极高的扩展性和可用性
<code style="font-family: Consolas, Menlo, Monaco, 'Courier New', monospace; font-size: 1em; padding: 0px; color: inherit; background-color: transparent;">1.通过良好的编程,控制保存在cookie中的session对象的大小。
2.通过加密和安全传输技术(SSL),减少cookie被破解的可能性。
3.只在cookie中存放不敏感数据,即使被盗也不会有重大损失。
4.控制cookie的生命期,使之不会永远有效。偷盗者很可能拿到一个过期的cookie。
</code>
缺点:
<code style="font-family: Consolas, Menlo, Monaco, 'Courier New', monospace; font-size: 1em; padding: 0px; color: inherit; background-color: transparent;"><span class="hljs-number" style="color: rgb(42, 161, 152);">1.</span>`<span class="javascript">Cookie</span>`数量和长度的限制。每个domain最多只能有<span class="hljs-number" style="color: rgb(42, 161, 152);">20</span>条cookie,每个cookie长度不能超过<span class="hljs-number" style="color: rgb(42, 161, 152);">4</span>KB,否则会被截掉。

<span class="hljs-number" style="color: rgb(42, 161, 152);">2.</span>安全性问题。如果cookie被人拦截了,那人就可以取得所有的session信息。即使加密也与事无补,因为拦截者并不需要知道cookie的意义,他只要原样转发cookie就可以达到目的了。

<span class="hljs-number" style="color: rgb(42, 161, 152);">3.</span>有些状态不可能保存在客户端。例如,为了防止重复提交表单,我们需要在服务器端保存一个计数器。如果我们把这个计数器保存在客户端,那么它起不到任何作用。
</code>
浏览器本地存储
在较高版本的浏览器中,js提供了sessionStorage和globalStorage。在HTML5中提供了localStorage来取代globalStorage。
html5中的Web Storage包括了两种存储方式:sessionStorage和localStorage。
sessionStorage用于本地存储一个会话(session)中的数据,这些数据只有在同一个会话中的页面才能访问并且当会话结束后数据也随之销毁。因此sessionStorage不是一种持久化的本地存储,仅仅是会话级别的存储。
而localStorage用于持久化的本地存储,除非主动删除数据,否则数据是永远不会过期的。
web storage和cookie的区别
Web Storage的概念和cookie相似,区别是它是为了更大容量存储设计的。Cookie的大小是受限的,并且每次你请求一个新的页面的时候Cookie都会被发送过去,这样无形中浪费了带宽,另外cookie还需要指定作用域,不可以跨域调用。
除此之外,Web Storage拥有setItem,getItem,removeItem,clear等方法,不像cookie需要前端开发者自己封装setCookie,getCookie。
但是Cookie也是不可以或缺的:Cookie的作用是与服务器进行交互,作为HTTP规范的一部分而存在 ,而Web Storage仅仅是为了在本地“存储”数据而生
浏览器的支持除了IE7及以下不支持外,其他标准浏览器都完全支持(ie及FF需在web服务器里运行),值得一提的是IE总是办好事,例如IE7、IE6中的UserData其实就是javascript本地存储的解决方案。通过简单的代码封装可以统一到所有的浏览器都支持web storage。
localStorage和sessionStorage都具有相同的操作方法,例如setItem、getItem和removeItem等
CSS 相关问题
display:none和visibility:hidden的区别?
<code style="font-family: Consolas, Menlo, Monaco, 'Courier New', monospace; font-size: 1em; padding: 0px; color: inherit; background-color: transparent;"><span class="hljs-tag" style="color: rgb(133, 153, 0);">display</span><span class="hljs-pseudo" style="color: rgb(203, 75, 22);">:none</span> 隐藏对应的元素,在文档布局中不再给它分配空间,它各边的元素会合拢,
就当他从来不存在。
<span class="hljs-tag" style="color: rgb(133, 153, 0);">visibility</span><span class="hljs-pseudo" style="color: rgb(203, 75, 22);">:hidden</span> 隐藏对应的元素,但是在文档布局中仍保留原来的空间。
</code>
CSS中 link 和@import 的区别是?
<code style="font-family: Consolas, Menlo, Monaco, 'Courier New', monospace; font-size: 1em; padding: 0px; color: inherit; background-color: transparent;">A:(<span class="hljs-number" style="color: rgb(42, 161, 152);">1</span>) <span class="hljs-keyword" style="color: rgb(133, 153, 0);">link</span>属于HTML标签,而<span class="hljs-variable" style="color: rgb(181, 137, 0);">@import</span>是CSS提供的; (<span class="hljs-number" style="color: rgb(42, 161, 152);">2</span>) 页面被加载的时,<span class="hljs-keyword" style="color: rgb(133, 153, 0);">link</span>会同时被加载,而<span class="hljs-variable" style="color: rgb(181, 137, 0);">@import</span>引用的CSS会等到页面被加载完再加载;(<span class="hljs-number" style="color: rgb(42, 161, 152);">3</span>) import只在IE5以上才能识别,而<span class="hljs-keyword" style="color: rgb(133, 153, 0);">link</span>是HTML标签,无兼容问题; (<span class="hljs-number" style="color: rgb(42, 161, 152);">4</span>) <span class="hljs-keyword" style="color: rgb(133, 153, 0);">link</span>方式的样式的权重 高于<span class="hljs-variable" style="color: rgb(181, 137, 0);">@import</span>的权重.
</code>
position的absolute与fixed共同点与不同点
<code style="font-family: Consolas, Menlo, Monaco, 'Courier New', monospace; font-size: 1em; padding: 0px; color: inherit; background-color: transparent;">A:共同点:
<span class="hljs-number" style="color: rgb(42, 161, 152);">1.</span>改变行内元素的呈现方式,display被置为block;<span class="hljs-number" style="color: rgb(42, 161, 152);">2.</span>让元素脱离普通流,不占据空间;<span class="hljs-number" style="color: rgb(42, 161, 152);">3.</span>默认会覆盖到非定位元素上

B不同点:
absolute的”根元素“是可以设置的,而<span class="hljs-keyword" style="color: rgb(133, 153, 0);">fixed</span>的”根元素“固定为浏览器窗口。当你滚动网页,<span class="hljs-keyword" style="color: rgb(133, 153, 0);">fixed</span>元素与浏览器窗口之间的距离是不变的。
</code>
介绍一下CSS的盒子模型?
<code style="font-family: Consolas, Menlo, Monaco, 'Courier New', monospace; font-size: 1em; padding: 0px; color: inherit; background-color: transparent;">1)有两种, IE 盒子模型、标准 W3C 盒子模型;IE的content部分包含了 border 和 pading;

2)盒模型: 内容(content)、填充(padding)、边界(margin)、 边框(border).
</code>

CSS 选择符有哪些?哪些属性可以继承?优先级算法如何计算? CSS3新增伪类有那些?
<code style="font-family: Consolas, Menlo, Monaco, 'Courier New', monospace; font-size: 1em; padding: 0px; color: inherit; background-color: transparent;"> * 1<span class="hljs-class" style="color: rgb(155, 112, 63);">.id</span>选择器( # <span class="hljs-tag" style="color: rgb(133, 153, 0);">myid</span>)
2.类选择器(<span class="hljs-class" style="color: rgb(155, 112, 63);">.myclassname</span>)
3.标签选择器(<span class="hljs-tag" style="color: rgb(133, 153, 0);">div</span>, <span class="hljs-tag" style="color: rgb(133, 153, 0);">h1</span>, <span class="hljs-tag" style="color: rgb(133, 153, 0);">p</span>)
4.相邻选择器(<span class="hljs-tag" style="color: rgb(133, 153, 0);">h1</span> + <span class="hljs-tag" style="color: rgb(133, 153, 0);">p</span>)
5.子选择器(<span class="hljs-tag" style="color: rgb(133, 153, 0);">ul</span> > <span class="hljs-tag" style="color: rgb(133, 153, 0);">li</span>)
6.后代选择器(<span class="hljs-tag" style="color: rgb(133, 153, 0);">li</span> <span class="hljs-tag" style="color: rgb(133, 153, 0);">a</span>)
7.通配符选择器( * )
8.属性选择器(<span class="hljs-tag" style="color: rgb(133, 153, 0);">a</span><span class="hljs-attr_selector" style="color: rgb(203, 75, 22);">[rel = "external"]</span>)
9.伪类选择器(<span class="hljs-tag" style="color: rgb(133, 153, 0);">a</span>: <span class="hljs-tag" style="color: rgb(133, 153, 0);">hover</span>, <span class="hljs-tag" style="color: rgb(133, 153, 0);">li</span><span class="hljs-pseudo" style="color: rgb(203, 75, 22);">:nth-child</span>)
* 可继承的样式: <span class="hljs-tag" style="color: rgb(133, 153, 0);">font-size</span> <span class="hljs-tag" style="color: rgb(133, 153, 0);">font-family</span> <span class="hljs-tag" style="color: rgb(133, 153, 0);">color</span>, <span class="hljs-tag" style="color: rgb(133, 153, 0);">text-indent</span>;
* 不可继承的样式:<span class="hljs-tag" style="color: rgb(133, 153, 0);">border</span> <span class="hljs-tag" style="color: rgb(133, 153, 0);">padding</span> <span class="hljs-tag" style="color: rgb(133, 153, 0);">margin</span> <span class="hljs-tag" style="color: rgb(133, 153, 0);">width</span> <span class="hljs-tag" style="color: rgb(133, 153, 0);">height</span> ;
* 优先级就近原则,同权重情况下样式定义最近者为准;
* 载入样式以最后载入的定位为准;
优先级为:
!<span class="hljs-tag" style="color: rgb(133, 153, 0);">important</span> > <span class="hljs-tag" style="color: rgb(133, 153, 0);">id</span> > <span class="hljs-tag" style="color: rgb(133, 153, 0);">class</span> > <span class="hljs-tag" style="color: rgb(133, 153, 0);">tag</span>
<span class="hljs-tag" style="color: rgb(133, 153, 0);">important</span> 比 内联优先级高,但内联比 <span class="hljs-tag" style="color: rgb(133, 153, 0);">id</span> 要高
<span class="hljs-tag" style="color: rgb(133, 153, 0);">CSS3</span>新增伪类举例:
<span class="hljs-tag" style="color: rgb(133, 153, 0);">p</span><span class="hljs-pseudo" style="color: rgb(203, 75, 22);">:first-of-type</span> 选择属于其父元素的首个 <<span class="hljs-tag" style="color: rgb(133, 153, 0);">p</span>> 元素的每个 <<span class="hljs-tag" style="color: rgb(133, 153, 0);">p</span>> 元素。
<span class="hljs-tag" style="color: rgb(133, 153, 0);">p</span><span class="hljs-pseudo" style="color: rgb(203, 75, 22);">:last-of-type</span> 选择属于其父元素的最后 <<span class="hljs-tag" style="color: rgb(133, 153, 0);">p</span>> 元素的每个 <<span class="hljs-tag" style="color: rgb(133, 153, 0);">p</span>> 元素。
<span class="hljs-tag" style="color: rgb(133, 153, 0);">p</span><span class="hljs-pseudo" style="color: rgb(203, 75, 22);">:only-of-type</span> 选择属于其父元素唯一的 <<span class="hljs-tag" style="color: rgb(133, 153, 0);">p</span>> 元素的每个 <<span class="hljs-tag" style="color: rgb(133, 153, 0);">p</span>> 元素。
<span class="hljs-tag" style="color: rgb(133, 153, 0);">p</span><span class="hljs-pseudo" style="color: rgb(203, 75, 22);">:only-child</span> 选择属于其父元素的唯一子元素的每个 <<span class="hljs-tag" style="color: rgb(133, 153, 0);">p</span>> 元素。
<span class="hljs-tag" style="color: rgb(133, 153, 0);">p</span><span class="hljs-pseudo" style="color: rgb(203, 75, 22);">:nth-child(2)</span> 选择属于其父元素的第二个子元素的每个 <<span class="hljs-tag" style="color: rgb(133, 153, 0);">p</span>> 元素。
<span class="hljs-pseudo" style="color: rgb(203, 75, 22);">:enabled</span> <span class="hljs-pseudo" style="color: rgb(203, 75, 22);">:disabled</span> 控制表单控件的禁用状态。
<span class="hljs-pseudo" style="color: rgb(203, 75, 22);">:checked</span> 单选框或复选框被选中。
</code>
列出display的值,说明他们的作用。position的值, relative和absolute分别是相对于谁进行定位的?
<code style="font-family: Consolas, Menlo, Monaco, 'Courier New', monospace; font-size: 1em; padding: 0px; color: inherit; background-color: transparent;"><span class="hljs-number" style="color: rgb(42, 161, 152);">1.</span>
block 象块类型元素一样显示。
<span class="hljs-keyword" style="color: rgb(133, 153, 0);">inline</span> 缺省值。象行内元素类型一样显示。
<span class="hljs-keyword" style="color: rgb(133, 153, 0);">inline</span>-block 象行内元素一样显示,但其内容象块类型元素一样显示。
<span class="hljs-built_in" style="color: rgb(38, 139, 210);">list</span>-item 象块类型元素一样显示,并添加样式列表标记。
<span class="hljs-number" style="color: rgb(42, 161, 152);">2.</span>
*absolute
生成绝对定位的元素,相对于 <span class="hljs-keyword" style="color: rgb(133, 153, 0);">static</span> 定位以外的第一个祖先元素进行定位。
*fixed (老IE不支持)
生成绝对定位的元素,相对于浏览器窗口进行定位。
*relative
生成相对定位的元素,相对于其在普通流中的位置进行定位。
* <span class="hljs-keyword" style="color: rgb(133, 153, 0);">static</span> 默认值。没有定位,元素出现在正常的流中
*(忽略 top, bottom, left, right z-index 声明)。
* inherit 规定从父元素继承 position 属性的值。
</code>
CSS3有哪些新特性?
<code style="font-family: Consolas, Menlo, Monaco, 'Courier New', monospace; font-size: 1em; padding: 0px; color: inherit; background-color: transparent;"><span class="hljs-constant" style="color: rgb(181, 137, 0);">CSS3</span>实现圆角(border-radius),阴影(box-shadow),
对文字加特效(text-shadow、),线性渐变(gradient),旋转(transform)
<span class="hljs-symbol" style="color: rgb(203, 75, 22);">transform:</span>rotate(<span class="hljs-number" style="color: rgb(42, 161, 152);">9</span>deg) scale(<span class="hljs-number" style="color: rgb(42, 161, 152);">0</span>.<span class="hljs-number" style="color: rgb(42, 161, 152);">85</span>,<span class="hljs-number" style="color: rgb(42, 161, 152);">0</span>.<span class="hljs-number" style="color: rgb(42, 161, 152);">90</span>) translate(0px,-<span class="hljs-number" style="color: rgb(42, 161, 152);">30</span>px) skew(-<span class="hljs-number" style="color: rgb(42, 161, 152);">9</span>deg,0deg);<span class="hljs-regexp" style="color: rgb(42, 161, 152);">//</span>旋转,缩放,定位,倾斜
增加了更多的<span class="hljs-constant" style="color: rgb(181, 137, 0);">CSS</span>选择器 多背景 rgba
在<span class="hljs-constant" style="color: rgb(181, 137, 0);">CSS3</span>中唯一引入的伪元素是<span class="hljs-symbol" style="color: rgb(203, 75, 22);">:</span><span class="hljs-symbol" style="color: rgb(203, 75, 22);">:selection</span>.
媒体查询,多栏布局
border-image
</code>
为什么要初始化CSS样式。
<code style="font-family: Consolas, Menlo, Monaco, 'Courier New', monospace; font-size: 1em; padding: 0px; color: inherit; background-color: transparent;"> 因为浏览器的兼容问题,不同浏览器对有些标签的默认值是不同的,如果没对<span class="hljs-tag" style="color: rgb(133, 153, 0);">CSS</span>初始化往往会出现浏览器之间的页面显示差异。
当然,初始化样式会对<span class="hljs-tag" style="color: rgb(133, 153, 0);">SEO</span>有一定的影响,但鱼和熊掌不可兼得,但力求影响最小的情况下初始化。
*最简单的初始化方法就是: * <span class="hljs-rules">{<span class="hljs-rule"><span class="hljs-attribute" style="color: rgb(181, 137, 0);">padding</span>:<span class="hljs-value" style="color: rgb(42, 161, 152);"> <span class="hljs-number" style="color: rgb(0, 102, 102);">0</span></span></span>; <span class="hljs-rule"><span class="hljs-attribute" style="color: rgb(181, 137, 0);">margin</span>:<span class="hljs-value" style="color: rgb(42, 161, 152);"> <span class="hljs-number" style="color: rgb(0, 102, 102);">0</span></span></span>;<span class="hljs-rule">}</span></span> (不建议)
淘宝的样式初始化:
<span class="hljs-tag" style="color: rgb(133, 153, 0);">body</span>, <span class="hljs-tag" style="color: rgb(133, 153, 0);">h1</span>, <span class="hljs-tag" style="color: rgb(133, 153, 0);">h2</span>, <span class="hljs-tag" style="color: rgb(133, 153, 0);">h3</span>, <span class="hljs-tag" style="color: rgb(133, 153, 0);">h4</span>, <span class="hljs-tag" style="color: rgb(133, 153, 0);">h5</span>, <span class="hljs-tag" style="color: rgb(133, 153, 0);">h6</span>, <span class="hljs-tag" style="color: rgb(133, 153, 0);">hr</span>, <span class="hljs-tag" style="color: rgb(133, 153, 0);">p</span>, <span class="hljs-tag" style="color: rgb(133, 153, 0);">blockquote</span>, <span class="hljs-tag" style="color: rgb(133, 153, 0);">dl</span>, <span class="hljs-tag" style="color: rgb(133, 153, 0);">dt</span>, <span class="hljs-tag" style="color: rgb(133, 153, 0);">dd</span>, <span class="hljs-tag" style="color: rgb(133, 153, 0);">ul</span>, <span class="hljs-tag" style="color: rgb(133, 153, 0);">ol</span>, <span class="hljs-tag" style="color: rgb(133, 153, 0);">li</span>, <span class="hljs-tag" style="color: rgb(133, 153, 0);">pre</span>, <span class="hljs-tag" style="color: rgb(133, 153, 0);">form</span>, <span class="hljs-tag" style="color: rgb(133, 153, 0);">fieldset</span>, <span class="hljs-tag" style="color: rgb(133, 153, 0);">legend</span>, <span class="hljs-tag" style="color: rgb(133, 153, 0);">button</span>, <span class="hljs-tag" style="color: rgb(133, 153, 0);">input</span>, <span class="hljs-tag" style="color: rgb(133, 153, 0);">textarea</span>, <span class="hljs-tag" style="color: rgb(133, 153, 0);">th</span>, <span class="hljs-tag" style="color: rgb(133, 153, 0);">td</span> <span class="hljs-rules">{ <span class="hljs-rule"><span class="hljs-attribute" style="color: rgb(181, 137, 0);">margin</span>:<span class="hljs-value" style="color: rgb(42, 161, 152);"><span class="hljs-number" style="color: rgb(0, 102, 102);">0</span></span></span>; <span class="hljs-rule"><span class="hljs-attribute" style="color: rgb(181, 137, 0);">padding</span>:<span class="hljs-value" style="color: rgb(42, 161, 152);"><span class="hljs-number" style="color: rgb(0, 102, 102);">0</span></span></span>; <span class="hljs-rule">}</span></span>
<span class="hljs-tag" style="color: rgb(133, 153, 0);">body</span>, <span class="hljs-tag" style="color: rgb(133, 153, 0);">button</span>, <span class="hljs-tag" style="color: rgb(133, 153, 0);">input</span>, <span class="hljs-tag" style="color: rgb(133, 153, 0);">select</span>, <span class="hljs-tag" style="color: rgb(133, 153, 0);">textarea</span> <span class="hljs-rules">{ <span class="hljs-rule"><span class="hljs-attribute" style="color: rgb(181, 137, 0);">font</span>:<span class="hljs-value" style="color: rgb(42, 161, 152);"><span class="hljs-number" style="color: rgb(0, 102, 102);">12px</span>/<span class="hljs-number" style="color: rgb(0, 102, 102);">1.5</span>tahoma, arial, \<span class="hljs-number" style="color: rgb(0, 102, 102);">5</span>b8b\<span class="hljs-number" style="color: rgb(0, 102, 102);">4</span>f53</span></span>; <span class="hljs-rule">}</span></span>
<span class="hljs-tag" style="color: rgb(133, 153, 0);">h1</span>, <span class="hljs-tag" style="color: rgb(133, 153, 0);">h2</span>, <span class="hljs-tag" style="color: rgb(133, 153, 0);">h3</span>, <span class="hljs-tag" style="color: rgb(133, 153, 0);">h4</span>, <span class="hljs-tag" style="color: rgb(133, 153, 0);">h5</span>, <span class="hljs-tag" style="color: rgb(133, 153, 0);">h6</span><span class="hljs-rules">{ <span class="hljs-rule"><span class="hljs-attribute" style="color: rgb(181, 137, 0);">font-size</span>:<span class="hljs-value" style="color: rgb(42, 161, 152);"><span class="hljs-number" style="color: rgb(0, 102, 102);">100%</span></span></span>; <span class="hljs-rule">}</span></span>
<span class="hljs-tag" style="color: rgb(133, 153, 0);">address</span>, <span class="hljs-tag" style="color: rgb(133, 153, 0);">cite</span>, <span class="hljs-tag" style="color: rgb(133, 153, 0);">dfn</span>, <span class="hljs-tag" style="color: rgb(133, 153, 0);">em</span>, <span class="hljs-tag" style="color: rgb(133, 153, 0);">var</span> <span class="hljs-rules">{ <span class="hljs-rule"><span class="hljs-attribute" style="color: rgb(181, 137, 0);">font-style</span>:<span class="hljs-value" style="color: rgb(42, 161, 152);">normal</span></span>; <span class="hljs-rule">}</span></span>
<span class="hljs-tag" style="color: rgb(133, 153, 0);">code</span>, <span class="hljs-tag" style="color: rgb(133, 153, 0);">kbd</span>, <span class="hljs-tag" style="color: rgb(133, 153, 0);">pre</span>, <span class="hljs-tag" style="color: rgb(133, 153, 0);">samp</span> <span class="hljs-rules">{ <span class="hljs-rule"><span class="hljs-attribute" style="color: rgb(181, 137, 0);">font-family</span>:<span class="hljs-value" style="color: rgb(42, 161, 152);">couriernew, courier, monospace</span></span>; <span class="hljs-rule">}</span></span>
<span class="hljs-tag" style="color: rgb(133, 153, 0);">small</span><span class="hljs-rules">{ <span class="hljs-rule"><span class="hljs-attribute" style="color: rgb(181, 137, 0);">font-size</span>:<span class="hljs-value" style="color: rgb(42, 161, 152);"><span class="hljs-number" style="color: rgb(0, 102, 102);">12px</span></span></span>; <span class="hljs-rule">}</span></span>
<span class="hljs-tag" style="color: rgb(133, 153, 0);">ul</span>, <span class="hljs-tag" style="color: rgb(133, 153, 0);">ol</span> <span class="hljs-rules">{ <span class="hljs-rule"><span class="hljs-attribute" style="color: rgb(181, 137, 0);">list-style</span>:<span class="hljs-value" style="color: rgb(42, 161, 152);">none</span></span>; <span class="hljs-rule">}</span></span>
<span class="hljs-tag" style="color: rgb(133, 153, 0);">a</span> <span class="hljs-rules">{ <span class="hljs-rule"><span class="hljs-attribute" style="color: rgb(181, 137, 0);">text-decoration</span>:<span class="hljs-value" style="color: rgb(42, 161, 152);">none</span></span>; <span class="hljs-rule">}</span></span>
<span class="hljs-tag" style="color: rgb(133, 153, 0);">a</span><span class="hljs-pseudo" style="color: rgb(203, 75, 22);">:hover</span> <span class="hljs-rules">{ <span class="hljs-rule"><span class="hljs-attribute" style="color: rgb(181, 137, 0);">text-decoration</span>:<span class="hljs-value" style="color: rgb(42, 161, 152);">underline</span></span>; <span class="hljs-rule">}</span></span>
<span class="hljs-tag" style="color: rgb(133, 153, 0);">sup</span> <span class="hljs-rules">{ <span class="hljs-rule"><span class="hljs-attribute" style="color: rgb(181, 137, 0);">vertical-align</span>:<span class="hljs-value" style="color: rgb(42, 161, 152);">text-top</span></span>; <span class="hljs-rule">}</span></span>
<span class="hljs-tag" style="color: rgb(133, 153, 0);">sub</span><span class="hljs-rules">{ <span class="hljs-rule"><span class="hljs-attribute" style="color: rgb(181, 137, 0);">vertical-align</span>:<span class="hljs-value" style="color: rgb(42, 161, 152);">text-bottom</span></span>; <span class="hljs-rule">}</span></span>
<span class="hljs-tag" style="color: rgb(133, 153, 0);">legend</span> <span class="hljs-rules">{ <span class="hljs-rule"><span class="hljs-attribute" style="color: rgb(181, 137, 0);">color</span>:<span class="hljs-value" style="color: rgb(42, 161, 152);"><span class="hljs-hexcolor" style="color: rgb(0, 102, 102);">#000</span></span></span>; <span class="hljs-rule">}</span></span>
<span class="hljs-tag" style="color: rgb(133, 153, 0);">fieldset</span>, <span class="hljs-tag" style="color: rgb(133, 153, 0);">img</span> <span class="hljs-rules">{ <span class="hljs-rule"><span class="hljs-attribute" style="color: rgb(181, 137, 0);">border</span>:<span class="hljs-value" style="color: rgb(42, 161, 152);"><span class="hljs-number" style="color: rgb(0, 102, 102);">0</span></span></span>; <span class="hljs-rule">}</span></span>
<span class="hljs-tag" style="color: rgb(133, 153, 0);">button</span>, <span class="hljs-tag" style="color: rgb(133, 153, 0);">input</span>, <span class="hljs-tag" style="color: rgb(133, 153, 0);">select</span>, <span class="hljs-tag" style="color: rgb(133, 153, 0);">textarea</span> <span class="hljs-rules">{ <span class="hljs-rule"><span class="hljs-attribute" style="color: rgb(181, 137, 0);">font-size</span>:<span class="hljs-value" style="color: rgb(42, 161, 152);"><span class="hljs-number" style="color: rgb(0, 102, 102);">100%</span></span></span>; <span class="hljs-rule">}</span></span>
<span class="hljs-tag" style="color: rgb(133, 153, 0);">table</span> <span class="hljs-rules">{ <span class="hljs-rule"><span class="hljs-attribute" style="color: rgb(181, 137, 0);">border-collapse</span>:<span class="hljs-value" style="color: rgb(42, 161, 152);">collapse</span></span>; <span class="hljs-rule"><span class="hljs-attribute" style="color: rgb(181, 137, 0);">border-spacing</span>:<span class="hljs-value" style="color: rgb(42, 161, 152);"><span class="hljs-number" style="color: rgb(0, 102, 102);">0</span></span></span>; <span class="hljs-rule">}</span></span>
</code>
对BFC规范的理解?
<code style="font-family: Consolas, Menlo, Monaco, 'Courier New', monospace; font-size: 1em; padding: 0px; color: inherit; background-color: transparent;">      BFC,块级格式化上下文,一个创建了新的BFC的盒子是独立布局的,盒子里面的子元素的样式不会影响到外面的元素。在同一个BFC中的两个毗邻的块级盒在垂直方向(和布局方向有关系)的margin会发生折叠。
    (W3C CSS 2.1 规范中的一个概念,它决定了元素如何对其内容进行布局,以及与其他元素的关系和相互作用。)
</code>
解释下 CSS sprites,以及你要如何在页面或网站中使用它。
<code style="font-family: Consolas, Menlo, Monaco, 'Courier New', monospace; font-size: 1em; padding: 0px; color: inherit; background-color: transparent;">CSS Sprites其实就是把网页中一些背景图片整合到一张图片文件中,再利用CSS的“background-image”,“background- repeat”,“background-position”的组合进行背景定位,background-position可以用数字能精确的定位出背景图片的位置。这样可以减少很多图片请求的开销,因为请求耗时比较长;请求虽然可以并发,但是也有限制,一般浏览器都是<span class="hljs-number" style="color: rgb(42, 161, 152);">6</span>个。对于未来而言,就不需要这样做了,因为有了`<span class="javascript">http2</span>`。
</code>
什么是闭包?
我的理解是,闭包就是能够读取其他函数内部变量的函数。由于在Javascript语言中,只有函数内部的子函数才能读取局部变量,因此可以把闭包简单理解成"定义在一个函数内部的函数"。所以,在本质上,闭包就是将函数内部和函数外部连接起来的一座桥梁。
谈谈你对原型链的理解
在JavaScript中,每当定义一个函数数据类型(普通函数、类)时候,都会天生自带一个prototype属性,这个属性指向函数的原型对象。
当函数经过new调用时,这个函数就成为了构造函数,返回一个全新的实例对象,这个实例对象有一个__proto__属性,指向构造函数的原型对象。
JavaScript对象通过__proto__ 指向父类对象,直到指向Object对象为止,这样就形成了一个原型指向的链条, 即原型链。
定义一个函数add,实现add(2,3) //5 add(2,3)(5) //10
const add = (...args) => {
    let sum = args.reduce((pre, crt) => pre + crt);
    const accu = (...args2) => {
    sum += args2.reduce((pre, crt) => pre + crt);
        return accu;
    }
    accu.valueOf = () => sum;
    return accu;}console.log(add(2, 3)(5)) //10
关于setTimeout的一些冷知识
由于消息队列的机制,不一定能按照自己设置的时间执行
settimeout嵌套settimeout时,系统会设置最短时间间隔为4ms
未激活的页面,settimeout最小时间间隔为1000ms
延时执行时间最大值为2147483647(32bit),溢出这个值会导致定时器立即执行
setTimeout(()=> {    console.log('这里会立即执行')
} ,2147483648)复制代码
数组扁平化的方法
//使用ES6中的Array.prototype.flat方法arr.flat(Infinity)复制代码
//使用reduce的方式function arrFlat(arr) {  return arr.reduce((pre, cur) => {    return pre.concat(Array.isArray(cur) ? arrFlat(cur) : cur)
  }, [])
}复制代码
//使用递归加循环的方式function arrFlat(arr) { let result = []
arr.map((item, index) => { if (Array.isArray(item)) {
result = result.concat(arrFlat(item))
} else {
result.push(item)
}
}) return result
}复制代码//将数组先变成字符串,再复原 toString()//这种方法存在缺陷,就是数组中元素都是Number或者String类型的才能展开function arrFlat(arr) { return arr.toString().splite(',').map(item=> +item)
}复制代码数组去重
定义去重数据
let arr = [1, 1, "1", "1", null, null, undefined, undefined, /a/, /a/, NaN, NaN, {}, {}, [], []]复制代码我们先看下几种不能去掉重复的引用数据类型的写法
// 使用 Setlet res = [...new Set(arr)]console.log(res)复制代码
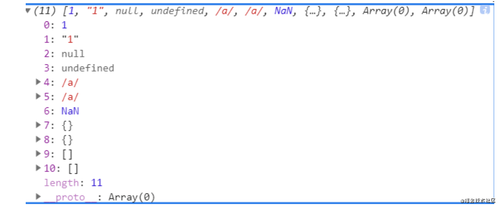 这种方法虽然很简洁,但是使用该种方法我们可以看到里面的引用数据类型并没有能成功去重,只能去除基本数据类型
//使用filterlet res = arr.filter((item, index) => {  return arr.indexOf(item) === index
})console.log(res)复制代码
//使用reducelet res = arr.reduce((pre, cur) => { return pre.includes(cur) ? pre : [...pre, cur]
}, [])console.log(res)复制代码使用该两种方法也和上面的方法一样,不能去掉引用数据类型。
我们再来看一下如何去除引用类型的重复值
利用对象的hasOwnProperty方法进行判断对象上是否含有该属性,如果含有则过滤掉,不含有则返回新数组中
let obj = {}let res = arr.filter(item => {  if (obj.hasOwnProperty(typeof item + item)) {    return false
  } else {
    obj[typeof item + item] = true
    return true
  }
})console.log(res)复制代码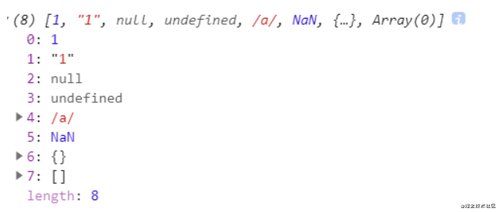
这次可以看到成功的将引用数据类型也去掉了。
除了以上这几种方法,还有一些循环遍历的方法也是类似的
说说你对语义化的理解?
<code style="font-family: Consolas, Menlo, Monaco, 'Courier New', monospace; font-size: 1em; padding: 0px; color: inherit; background-color: transparent;">1,去掉或者丢失样式的时候能够让页面呈现出清晰的结构
2,有利于SEO:和搜索引擎建立良好沟通,有助于爬虫抓取更多的有效信息:爬虫依赖于标签来确定上下文和各个关键字的权重;
3,方便其他设备解析(如屏幕阅读器、盲人阅读器、移动设备)以意义的方式来渲染网页;
4,便于团队开发和维护,语义化更具可读性,是下一步吧网页的重要动向,遵循W3C标准的团队都遵循这个标准,可以减少差异化。
</code>
Doctype作用? 严格模式与混杂模式如何区分?它们有何意义?
<code style="font-family: Consolas, Menlo, Monaco, 'Courier New', monospace; font-size: 1em; padding: 0px; color: inherit; background-color: transparent;">(1)、<span class="hljs-doctype" style="color: rgb(147, 161, 161);"><!DOCTYPE></span> 声明位于文档中的最前面,处于 <span class="hljs-tag" style="color: rgb(0, 102, 102);"><<span class="hljs-title" style="color: rgb(38, 139, 210);">html</span>></span> 标签之前。告知浏览器以何种模式来渲染文档。

(2)、严格模式的排版和 JS 运作模式是  以该浏览器支持的最高标准运行。

(3)、在混杂模式中,页面以宽松的向后兼容的方式显示。模拟老式浏览器的行为以防止站点无法工作。

(4)、DOCTYPE不存在或格式不正确会导致文档以混杂模式呈现。
</code>
你知道多少种Doctype文档类型?
<code style="font-family: Consolas, Menlo, Monaco, 'Courier New', monospace; font-size: 1em; padding: 0px; color: inherit; background-color: transparent;"> 该标签可声明三种 DTD 类型,分别表示严格版本、过渡版本以及基于框架的 HTML 文档。
 HTML 4.01 规定了三种文档类型:Strict、Transitional 以及 Frameset。
 XHTML 1.0 规定了三种 XML 文档类型:Strict、Transitional 以及 Frameset。
Standards (标准)模式(也就是严格呈现模式)用于呈现遵循最新标准的网页,而 Quirks
 (包容)模式(也就是松散呈现模式或者兼容模式)用于呈现为传统浏览器而设计的网页。
</code>
HTML与XHTML——二者有什么区别
<code style="font-family: Consolas, Menlo, Monaco, 'Courier New', monospace; font-size: 1em; padding: 0px; color: inherit; background-color: transparent;">区别:
<span class="hljs-number" style="color: rgb(42, 161, 152);">1.</span>所有的标记都必须要有一个相应的结束标记
<span class="hljs-number" style="color: rgb(42, 161, 152);">2.</span>所有标签的元素和属性的名字都必须使用小写
<span class="hljs-number" style="color: rgb(42, 161, 152);">3.</span>所有的XML标记都必须合理嵌套
<span class="hljs-number" style="color: rgb(42, 161, 152);">4.</span>所有的属性必须用引号<span class="hljs-string" style="color: rgb(42, 161, 152);">""</span>括起来
<span class="hljs-number" style="color: rgb(42, 161, 152);">5.</span>把所有<和&特殊符号用编码表示
<span class="hljs-number" style="color: rgb(42, 161, 152);">6.</span>给所有属性赋一个值
<span class="hljs-number" style="color: rgb(42, 161, 152);">7.</span>不要在注释内容中使“--”
<span class="hljs-number" style="color: rgb(42, 161, 152);">8.</span>图片必须有说明文字
</code>
常见兼容性问题?
<code style="font-family: Consolas, Menlo, Monaco, 'Courier New', monospace; font-size: 1em; padding: 0px; color: inherit; background-color: transparent;"><span class="hljs-bullet">* </span>png24位的图片在iE6浏览器上出现背景,解决方案是做成PNG8.也可以引用一段脚本处理.

<span class="hljs-bullet">* </span>浏览器默认的margin和padding不同。解决方案是加一个全局的*{margin:0;padding:0;}来统一。

<span class="hljs-bullet">* </span>IE6双边距bug:块属性标签float后,又有横行的margin情况下,在ie6显示margin比设置的大。

<span class="hljs-bullet">* </span>浮动ie产生的双倍距离(IE6双边距问题:在IE6下,如果对元素设置了浮动,同时又设置了margin-left或margin-right,margin值会加倍。)
  #box{ float:left; width:10px; margin:0 0 0 100px;}

 这种情况之下IE会产生20px的距离,解决方案是在float的标签样式控制中加入 ——<span class="hljs-emphasis">_display:inline;将其转化为行内属性。(_</span>这个符号只有ie6会识别)

<span class="hljs-bullet">*  </span>渐进识别的方式,从总体中逐渐排除局部。

  首先,巧妙的使用“\9”这一标记,将IE游览器从所有情况中分离出来。
  接着,再次使用“+”将IE8和IE7、IE6分离开来,这样IE8已经独立识别。

  css
<span class="hljs-code">      .bb{</span>
<span class="hljs-code">       background-color:#f1ee18;/*所有识别*/</span>
<span class="hljs-code">      .background-color:#00deff\9; /*IE6、7、8识别*/</span>
<span class="hljs-code">      +background-color:#a200ff;/*IE6、7识别*/</span>
<span class="hljs-code">      _background-color:#1e0bd1;/*IE6识别*/ </span>
<span class="hljs-code">      } </span>

<span class="hljs-bullet">*  </span>IE下,可以使用获取常规属性的方法来获取自定义属性,
   也可以使用getAttribute()获取自定义属性;
   Firefox下,只能使用getAttribute()获取自定义属性.
   解决方法:统一通过getAttribute()获取自定义属性.

<span class="hljs-bullet">* </span>IE下,event对象有x,y属性,但是没有pageX,pageY属性;
  Firefox下,event对象有pageX,pageY属性,但是没有x,y属性.

<span class="hljs-bullet">* </span>解决方法:(条件注释)缺点是在IE浏览器下可能会增加额外的HTTP请求数。

<span class="hljs-bullet">* </span>Chrome 中文界面下默认会将小于 12px 的文本强制按照 12px 显示,
  可通过加入 CSS 属性 -webkit-text-size-adjust: none; 解决.

<span class="hljs-bullet">* </span>超链接访问过后hover样式就不出现了 被点击访问过的超链接样式不在具有hover和active了解决方法是改变CSS属性的排列顺序:
L-V-H-A :  a:link {} a:visited {} a:hover {} a:active {}

<span class="hljs-bullet">* </span>怪异模式问题:漏写DTD声明,Firefox仍然会按照标准模式来解析网页,但在IE中会触发怪异模式。为避免怪异模式给我们带来不必要的麻烦,最好养成书写DTD声明的好习惯。现在可以使用[<span class="hljs-link_label" style="color: rgb(108, 113, 196);">html5</span>](<span class="hljs-link_url" style="color: rgb(42, 161, 152);">http://www.w3.org/TR/html5/single-page.html</span>)推荐的写法:<span class="hljs-code">`<doctype html>`</span>

<span class="hljs-bullet">* </span>上下margin重合问题
ie和ff都存在,相邻的两个div的margin-left和margin-right不会重合,但是margin-top和margin-bottom却会发生重合。
解决方法,养成良好的代码编写习惯,同时采用margin-top或者同时采用margin-bottom。
<span class="hljs-bullet">* </span>ie6对png图片格式支持不好(引用一段脚本处理)
</code>
实现一个instanceof
function myInstanceof(left,right) { if(typeof left !== 'object' || left === null) return false //获取原型 let proto = Object.getPrototypeOf(left) while(true){ //如果原型为null,则已经到了原型链顶端,判断结束 if(proto === null) return false //左边的原型等于右边的原型,则返回结果 if(proto === right.prototype) return true //否则就继续向上获取原型 proto = Object.getPrototypeOf(proto) } } 复制代码实现继承
ES5中实现继承
//实现一下继承 function Parent() { this.name = "大人" this.hairColor = "黑色" } function Child() { Parent.call(this) this.name = "小孩" } Child.prototype = Object.create(Parent.prototype) //将丢失的构造函数给添加回来 Child.prototype.constructor = Child let c1 = new Child() console.log(c1.name, c1.hairColor) //小孩,黑色 console.log(Object.getPrototypeOf(c1)) console.log(c1.constructor) //Child构造函数 let p1 = new Parent() console.log(p1.name, p1.hairColor) //大人,黑色 console.log(Object.getPrototypeOf(p1)) console.log(p1.constructor) //Parent构造函数 复制代码ES6中实现继承
// ES6的继承 class Parent { constructor() { this.name = "大人" this.hairColor = "黑色" } } class Child extends Parent { constructor() { super() //调用父级的方法和属性 this.name = "小孩" } } let c = new Child() console.log(c.name, c.hairColor) //小孩 黑色 let p = new Parent() console.log(p.name, p.hairColor) //大人 黑色 复制代码如何在ES5环境下实现const
此处需要用到Object.defineProperty(Obj,prop,desc)这个API
function _const (key, value) { const desc = { value, writable:false } Object.defineProperty(window,key,desc) } _const('obj',{a:1}) //定义obj obj = {} //重新赋值不生效 复制代码手写Call
//手写call let obj = { msg: "我叫王大锤", } function foo() { console.log(this.msg) } // foo.call(obj) //调用call的原理就跟这里一样,将函数挂载到对象上,然后在对象中执行这个函数 // obj.foo = foo // obj.foo() Function.prototype.myCall = function (thisArg, ...args) { const fn = Symbol("fn") // 声明一个独有的Symbol属性, 防止fn覆盖已有属性 thisArg = thisArg || window // 若没有传入this, 默认绑定window对象 thisArg[fn] = this //this指向调用者 const result = thisArg[fn](...args) //执行当前函数 delete thisArg[fn] return result } foo.myCall(obj) 复制代码手写apply
// 手写apply (args传入一个数组的形式),原理其实和call差不多,只是入参不一样 Function.prototype.myApply = function (thisArg, args = []) { const fn = Symbol("fn") thisArg = thisArg || window thisArg[fn] = this //虽然apply()接收的是一个数组,但在调用原函数时,依然要展开参数数组 //可以对照原生apply(),原函数接收到展开的参数数组 const result = thisArg[fn](...args) delete thisArg[fn] return result } foo.myApply(obj) 复制代码手写bind
Function.prototype.myBind = function (thisArg, ...args) { let self = this //这里的this是指向thisArg(调用者) let fnBound = function () { //this instanceof self ? this : thisArg 判断是构造函数还是普通函数 //后面的args.concat(Array.prototype.slice.call(arguments))是利用函数柯里化来获取调用时传入的参数 self.apply(this instanceof self ? this : thisArg, args.concat(Array.prototype.slice.call(arguments))) } // 继承原型上的属性和方法 fnBound.prototype = Object.create(self.prototype) //返回已经绑定的函数 return fnBound } //通过普通函数调用 // foo.myBind(obj, 1, 2, 3)() //通过构造函数调用 function fn(name, age) { this.test = "测试数据" } fn.prototype.protoData = "原型数据" let fnBound = fn.myBind(obj, "王大锤", 18) let newBind = new fnBound() console.log(newBind.protoData) // "原型数据" 复制代码另外之前看到的一个关于bind的问题,在此也收录一下
对于foo.bind(A).bind(B).bind(C) 这个问题
let obj = { a: 1 } let obj2 = { a: 2 } let obj3 = { a: 3 } let obj4 = { a: 4 } function foo() { console.log(this.a) } let boundFn = foo.bind(obj).bind(obj2).bind(obj3) boundFn.call(obj4) //打印结果为1 boundFn.apply(obj4) //打印结果为1 boundFn() //打印结果为1 复制代码由此我们可以看出bind是永久绑定,往后的操作都不会再更改其指向
从输入URL到页面加载完成期间经历了什么(简写)
1.浏览器根据请求的URL交给DNS域名解析,找到真实IP;
2.浏览器根据 IP 地址向服务器发起 TCP 连接,与浏览器建立 TCP 三次握手
3、发送HTTP请求,接受HTTP响应
5.服务器处理请求并返回内容。
6、根据 HTTP 请求中的内容来决定如何获取相应的 HTML 文件,浏览器解析HTML代码,请求js,css等资源,最后进行页面渲染,呈现给用户
7、断开TCP连接(四次挥手)
跨域的产生和解决方法
为了网络安全起见,浏览器设置了一个同源策略,规定只有域名,端口,协议全部相同,就叫做同源。当页面在执行一个脚本时,会检查访问的资源是否同源,如果不是,就会报错。可是在实际开发中,经常会有跨域加载资源的需求,避免不了跨域请求,所以就出现了跨域。
解决方法
1、JSONP – 原理就是利用了script标签,在标签外套了一层壳,利用标签特性达到跨域加载资源的效果。
2、CORS – 跨站资源共享,它是跨域的官方解决方案,升级版的JSONP。原理是使用自定义的HTTP头部让浏览器与服务器进行沟通,从而决定请求或响应是应该成功还是失败。请求和响应都不包含cookie信息。
3、webSockets – 不受同源策略影响。原理是因为它不使用HTTP协议,而使用一种自定义的协议,专门为快速传输小数据设计。
4、Nginx – 代理跨域。反向代理跨域。
webSockets了解吗?
WebSocket是HTML5中的协议,支持持久连接,http协议不支持持久性连接(长连接,循环连接的不算)。Http1.0和HTTP1.1都不支持持久性的链接。
其优点就是,只要建立一次连接,就可以连续不断的得到服务器推送的消息,节省带宽和服务器端的压力。
事件循环
(1)所有同步任务都在主线程上执行,形成一个[执行栈]
(2)主线程之外,还存在一个"任务队列"(task queue)。只要异步任务有了运行结果,就在"任务队列"之中放置一个事件。
(3)一旦"执行栈"中的所有同步任务执行完毕,系统就会读取"任务队列",看看里面有哪些事件。那些对应的异步任务,于是结束等待状态,进入执行栈,开始执行。
(4)主线程不断重复上面的第三步。
主线程从"任务队列"中读取事件,这个过程是循环不断的,所以整个的这种运行机制又称为Event Loop(事件循环)
事件模型
事件捕获:当某个元素触发某个事件(如onclick),顶层对象document就会发出一个事件流,随着DOM树的节点向目标元素节点流去,直到到达事件真正发生的目标元素。在这个过程中,事件相应的监听函数是不会被触发的。
事件目标:当到达目标元素之后,执行目标元素该事件相应的处理函数。如果没有绑定监听函数,那就不执行。
事件冒泡:从目标元素开始,往顶层元素传播。途中如果有节点绑定了相应的事件处理函数,这些函数都会被一次触发。
事件委托:通过监听一个父元素,来给不同的子元素绑定事件,减少监听次数,从而提升速度。
节流
节流可以控制事件触发的频率,节流就跟小水管一样,如果不加节流的话,水就会哗啦啦啦啦啦啦的流出来,但是一旦加了节流阀,你就可以自己控制水的流速了,加了节流后水可以从哗啦啦啦变成滴答滴答滴答,放到我们的函数事件里面说就是可以让事件触发变慢,比如说事件触发可以让它在每一秒内只触发一次,可以提高性能。
function throttle(fn, wait) { let prev = +new Date() return function() { let now = +new Date() /*当下一次事件触发的时间和初始事件触发的时间的差值大于 等待时间时才触发新事件 */ if(now - prev > wait) { fn.apply(this, arguments) } //重置初始触发时间 prev = +new Date() } } 复制代码防抖
防抖就是可以限制事件在一定时间内不能多次触发,比如说你疯狂按点击按钮,一顿操作猛如虎,不加防抖的话它也会跟着你疯起来,疯狂执行触发的方法。但是一旦加了防抖,无论你点击多少次,他都只会在你最后一次点击的时候才执行。 防抖常用于搜索框或滚动条等的监听事件处理,可以提高性能。
function debounce(fn, wait = 50) { //初始化一个定时器 let timer return function() { //如果timer存在就将其清除 if(timer) { clearTimeout(timer) } //重置timer timer = setTimeout(() => { //将入参绑定给调用对象 fn.apply(this, arguments) }, wait) } } 复制代码深拷贝和浅拷贝
浅拷贝: 顾名思义,所谓浅拷贝就是对对象进行浅层次的复制,只复制一层对象的属性,并不包括对象里面的引用类型数据 , 当遇到有子对象的情况时,子对象就会互相影响 ,修改拷贝出来的子对象也会影响原有的子对象
深拷贝: 深拷贝是对对象以及对象的所有子对象进行拷贝,也就是说新拷贝对象的子对象里的属性也不会影响到原来的对象
我们先定义一个对象
let obj = { a: 1, b: 2, c: { d: 3, e: 4 } } 复制代码实现浅拷贝
使用Object.assign()
let obj2 = Object.assign({}, obj) obj2.a = 111 obj2.c.e = 555 console.log(obj) console.log(obj2) 复制代码使用展开运算符
let obj2 = {...obj} obj2.a = 111 obj2.c.e = 555 console.log(obj) console.log(obj2) 复制代码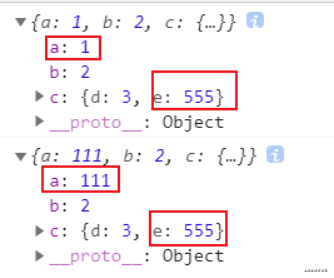
查看结果,发现第一层对象的a不互相影响,但是子对象c里的数据是会互相影响的
对数组的浅拷贝道理其实是一样的,对数组浅拷贝我们可以使用
展开运算符...
定义一个数组
let arr = [1, 2, { a: 3 }] 复制代码使用Array.prototype.slice()
let arr2 = arr.slice() arr2[0] = 222 arr[2].a = 333 console.log(arr) console.log(arr2) 复制代码
使用Array.prototype.concat()
let arr2 = arr.concat() arr2[0] = 222 arr[2].a = 333 console.log(arr) console.log(arr2) 复制代码
使用展开运算符...
let arr2 = [...arr] arr2[0] = 222 arr[2].a = 333 console.log(arr) console.log(arr2) 复制代码
他们最后的打印结果都是一样的 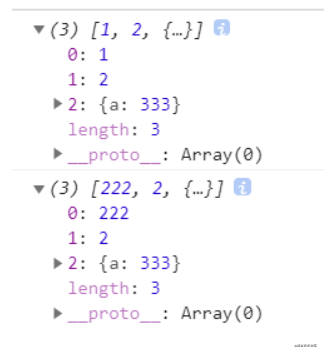
我们可以也可以使用遍历的方式写一个浅拷贝函数对数组和对象进行判断
source:源输入
target:目标输出
function shallowCopy(source) { //开头可以判断一下入参是不是一个对象 let target = Array.isArray(source) ? [] : {} for(let key in source) { //使用 hasOwnProperty 限制循环只在对象自身,不去遍历原型上的属性 if(source.hasOwnProperty(key)) { target[key] = source[key] } } return target } 复制代码实现深拷贝
最简单的深拷贝方式
let target = JSON.parse(JSON.stringify(source)) 复制代码
但是这种方法的话只支持object、array、string、number、true、false、null这几种数据或者值,其他的比如函数、undefined、Date、RegExp等数据类型都不支持。对于它不支持的数据都会直接忽略该属性。
递归的方式
浅拷贝由于只是复制一层对象的属性,当遇到有子对象的情况时, 其实我们也可以递归调用浅拷贝
function deepCopy(source) { //开头这里可以判断入参是不是一个对象 let target = Array.isArray(source) ? [] : {} for (let key in source) { if (source.hasOwnProperty(key)) { //这里我们再做一层判断看看是否有子属性 //这里也可以直接调用上面写过的那个checkType函数进行判断,就不用写两个typeof了 if (source[key] && typeof source[key] !== null && typeof source[key] === "object") { target[key] = Array.isArray(source[key]) ? [] : {} //递归调用 target[key] = deepCopy(source[key]) } else { target[key] = source[key] } } } return target } 复制代码这里的深拷贝只能进行简单数据类型的拷贝,如果是复杂数据类型则拷贝的过程种会丢失掉数据,比如说拷贝的对象里含有正则表达式或者函数,日期,这些是无法拷贝的,如果需要拷贝这些的话就需要我们单独去对每一种类型做出判断,另外就是递归的版本还会存在循环引用的问题 比如obj.obj = obj,这样无限循环下去就会出现爆栈的情况,所以我们还需要进行优化
我们再来看一下优化之后的版本
function deepCopy(source, cache = new Map()) { if (cache.has(source)) { //如果缓存中已经有值则直接返回,解决循环调用的问题 return cache.get(source) } //当入参属于Object复杂数据类型就开始做子类检测-> Function Array RegExp Date 都属于Object类型 if (source instanceof Object) { let target if (source instanceof Array) { //判断数组的情况 target = [] } else if (source instanceof Function) { //判断函数的情况 target = function () { return source.apply(this, arguments) } } else if (source instanceof RegExp) { //判断正则表达式的情况 target = source } else if (source instanceof Date) { target = new Date(source) } else { //普通对象 target = {} } // 将属性和拷贝后的值进行缓存 cache.set(source, target) //开始做遍历递归调用 for (let key in source) { if (source.hasOwnProperty(key)) { target[key] = deepCopy(source[key], cache) } } return target } else { //如果不是复杂数据类型的话就直接返回 return source } } 复制代码我们在此测试一下
let obj = { a: 1, b: undefined, c: null, d: Symbol(), e: new Date(), f: new RegExp("123", "ig"), g: function () { console.log("我叫王大锤") }, h: [1, 2, 3], i: { a: 1, b: 2 }, } let obj2 = deepCopy(obj) obj2.g = function () { console.log("我不叫王大锤") } obj.g() //我叫王大锤 obj2.g() //我不叫王大锤 obj2.h[0] = 111 console.log(obj) console.log(obj2) 复制代码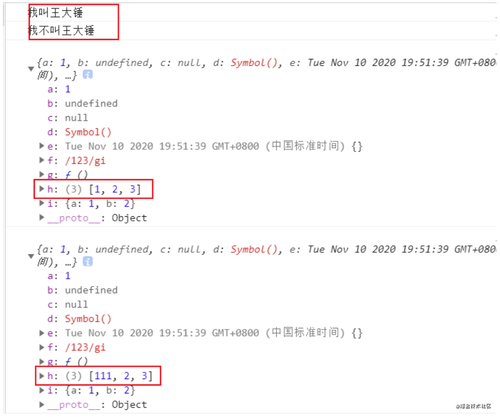
可以看到这次我们的深拷贝是比较完善的了,当然还可以做进一步的优化,比如for in循环的性能较低,可以改成while循环作为遍历,这里我们就不改了。
你如何对网站的文件和资源进行优化?
<code style="font-family: Consolas, Menlo, Monaco, 'Courier New', monospace; font-size: 1em; padding: 0px; color: inherit; background-color: transparent;">期待的解决方案包括:
 文件合并
 文件最小化/文件压缩
 使用 CDN 托管
 缓存的使用(多个域名来提供缓存)
 其他
</code>
请说出三种减少页面加载时间的方法。
<code style="font-family: Consolas, Menlo, Monaco, 'Courier New', monospace; font-size: 1em; padding: 0px; color: inherit; background-color: transparent;"> 1.优化图片
 2.图像格式的选择(GIF:提供的颜色较少,可用在一些对颜色要求不高的地方)
 3.优化CSS(压缩合并css,如margin-top,margin-left...)
 4.网址后加斜杠(如www.campr.com/目录,会判断这个“目录是什么文件类型,或者是目录。)
 5.标明高度和宽度(如果浏览器没有找到这两个参数,它需要一边下载图片一边计算大小,如果图片很多,浏览器需要不断地调整页面。这不但影响速度,也影响浏览体验。
当浏览器知道了高度和宽度参数后,即使图片暂时无法显示,页面上也会腾出图片的空位,然后继续加载后面的内容。从而加载时间快了,浏览体验也更好了。)

6.减少http请求(合并文件,合并图片)。
</code>
你都使用哪些工具来测试代码的性能?
<code style="font-family: Consolas, Menlo, Monaco, 'Courier New', monospace; font-size: 1em; padding: 0px; color: inherit; background-color: transparent;">Profiler, JSPerf(http:<span class="hljs-comment" style="color: rgb(147, 161, 161);">//jsperf.com/nexttick-vs-setzerotimeout-vs-settimeout), Dromaeo</span>
</code>
什么是 FOUC(无样式内容闪烁)?你如何来避免 FOUC?
<code style="font-family: Consolas, Menlo, Monaco, 'Courier New', monospace; font-size: 1em; padding: 0px; color: inherit; background-color: transparent;"> FOUC - Flash Of Unstyled Content 文档样式闪烁
 <span class="hljs-tag" style="color: rgb(0, 102, 102);"><<span class="hljs-title" style="color: rgb(38, 139, 210);">style</span> <span class="hljs-attribute" style="color: rgb(181, 137, 0);">type</span>=<span class="hljs-value" style="color: rgb(42, 161, 152);">"text/css"</span> <span class="hljs-attribute" style="color: rgb(181, 137, 0);">media</span>=<span class="hljs-value" style="color: rgb(42, 161, 152);">"all"</span>></span><span class="css"><span class="hljs-at_rule">@<span class="hljs-keyword" style="color: rgb(133, 153, 0);">import</span> <span class="hljs-string" style="color: rgb(42, 161, 152);">"../fouc.css"</span></span>;</span><span class="hljs-tag" style="color: rgb(0, 102, 102);"></<span class="hljs-title" style="color: rgb(38, 139, 210);">style</span>></span>
而引用CSS文件的@import就是造成这个问题的罪魁祸首。IE会先加载整个HTML文档的DOM,然后再去导入外部的CSS文件,因此,在页面DOM加载完成到CSS导入完成中间会有一段时间页面上的内容是没有样式的,这段时间的长短跟网速,电脑速度都有关系。
 解决方法简单的出奇,只要在<span class="hljs-tag" style="color: rgb(0, 102, 102);"><<span class="hljs-title" style="color: rgb(38, 139, 210);">head</span>></span>之间加入一个<span class="hljs-tag" style="color: rgb(0, 102, 102);"><<span class="hljs-title" style="color: rgb(38, 139, 210);">link</span>></span>或者<span class="hljs-tag" style="color: rgb(0, 102, 102);"><<span class="hljs-title" style="color: rgb(38, 139, 210);">script</span>></span><span class="javascript">元素就可以了。
</span></code>
null和undefined的区别?
null是一个表示"无"的对象,转为数值时为0;undefined是一个表示"无"的原始值,转为数值时为NaN。
当声明的变量还未被初始化时,变量的默认值为undefined。null用来表示尚未存在的对象,常用来表示函数企图返回一个不存在的对象。
undefined表示"缺少值",就是此处应该有一个值,但是还没有定义。典型用法是:
<code style="font-family: Consolas, Menlo, Monaco, 'Courier New', monospace; font-size: 1em; padding: 0px; color: inherit; background-color: transparent;">(<span class="hljs-number" style="color: rgb(42, 161, 152);">1</span>)变量被声明了,但没有赋值时,就等于<span class="hljs-literal" style="color: rgb(0, 102, 102);">undefined</span>。

(<span class="hljs-number" style="color: rgb(42, 161, 152);">2</span>) 调用函数时,应该提供的参数没有提供,该参数等于<span class="hljs-literal" style="color: rgb(0, 102, 102);">undefined</span>。

(<span class="hljs-number" style="color: rgb(42, 161, 152);">3</span>)对象没有赋值的属性,该属性的值为<span class="hljs-literal" style="color: rgb(0, 102, 102);">undefined</span>。

(<span class="hljs-number" style="color: rgb(42, 161, 152);">4</span>)函数没有返回值时,默认返回<span class="hljs-literal" style="color: rgb(0, 102, 102);">undefined</span>。
</code>
null表示"没有对象",即该处不应该有值。典型用法是:
<code style="font-family: Consolas, Menlo, Monaco, 'Courier New', monospace; font-size: 1em; padding: 0px; color: inherit; background-color: transparent;">(1) 作为函数的参数,表示该函数的参数不是对象。

(2) 作为对象原型链的终点。
</code>
new操作符具体干了什么呢?
<code style="font-family: Consolas, Menlo, Monaco, 'Courier New', monospace; font-size: 1em; padding: 0px; color: inherit; background-color: transparent;">   <span class="hljs-number" style="color: rgb(42, 161, 152);">1</span>、创建一个空对象,并且 <span class="hljs-keyword" style="color: rgb(133, 153, 0);">this</span> 变量引用该对象,同时还继承了该函数的原型。
   <span class="hljs-number" style="color: rgb(42, 161, 152);">2</span>、属性和方法被加入到 <span class="hljs-keyword" style="color: rgb(133, 153, 0);">this</span> 引用的对象中。
   <span class="hljs-number" style="color: rgb(42, 161, 152);">3</span>、新创建的对象由 <span class="hljs-keyword" style="color: rgb(133, 153, 0);">this</span> 所引用,并且最后隐式的返回 <span class="hljs-keyword" style="color: rgb(133, 153, 0);">this</span> 。

<span class="hljs-reserved">var</span> obj  = {};
obj.__proto__ = Base.prototype;
Base.call(obj);
</code>