
背景
在第一篇nacos介绍的时候提到nacos 是注册中心又是配置中心,
上一篇我们介绍了Spring Cloud Alibaba 使用nacos 注册中心的使用这一篇我们讲述 配置中心的使用。
nacos配置中心
之前的讲述了 配置文件的配置。这次我们只需要在之前的代码中 添加maven nacos配置中心的依赖
这个是配置到spring cloud alibaba 教程总pom版本控制 这个pom文件中。这样还是利用maven 自身的jar包依赖。discovery-server、cloud-discovery-client-common俩个模块自动引入nacos配置中心的依赖
       <!-- nacos config -->
        <dependency>
            <groupId>com.alibaba.cloud</groupId>
            <artifactId>spring-cloud-starter-alibaba-nacos-config</artifactId>
        </dependency>
修改对应yml文件添加
server端yaml配置文件
spring:
	cloud:
      config:
        server-addr: 47.99.209.72:8848
        file-extension: yaml
最后分别呈现结果
server:
  port: 9012

spring:
  profiles:
    active: dev
  application:
    name: cloud-discovery-server
  cloud:
    nacos:
      config:
        server-addr: 47.99.209.72:8848
				#指定文件后缀
        file-extension: yaml
      discovery:
        server-addr: 47.99.209.72:8848
修改http接口
package com.xian.cloud.controller;

import lombok.extern.slf4j.Slf4j;
import org.springframework.beans.factory.annotation.Value;
import org.springframework.cloud.context.config.annotation.RefreshScope;
import org.springframework.web.bind.annotation.GetMapping;
import org.springframework.web.bind.annotation.RequestMapping;
import org.springframework.web.bind.annotation.RequestParam;
import org.springframework.web.bind.annotation.RestController;

/**
 * @Author: xlr
 * @Date: Created in 2:57 PM 2019/10/27
 */
@RestController
@RequestMapping("server")
@Slf4j
# 提供分布式的配置动态刷新
@RefreshScope
public class DiscoverCotroller {


    @Value( "${nacos.yaml.age}" )
    private String age;

    /**
     * 对外提供的服务 HTTP接口
     * @param name
     * @return
     */
    @GetMapping("/hello")
    public String hello(@RequestParam String name) {
        log.info("invoked name = " + name+ " age = " + age);
        return "hello " + name + " age = " + age;
    }


}
然后在配置中心配置创建配置文件
点击登录nacos配置中心

创建 cloud-discovery-server-dev.yaml
配置
nacos.yaml.age= 30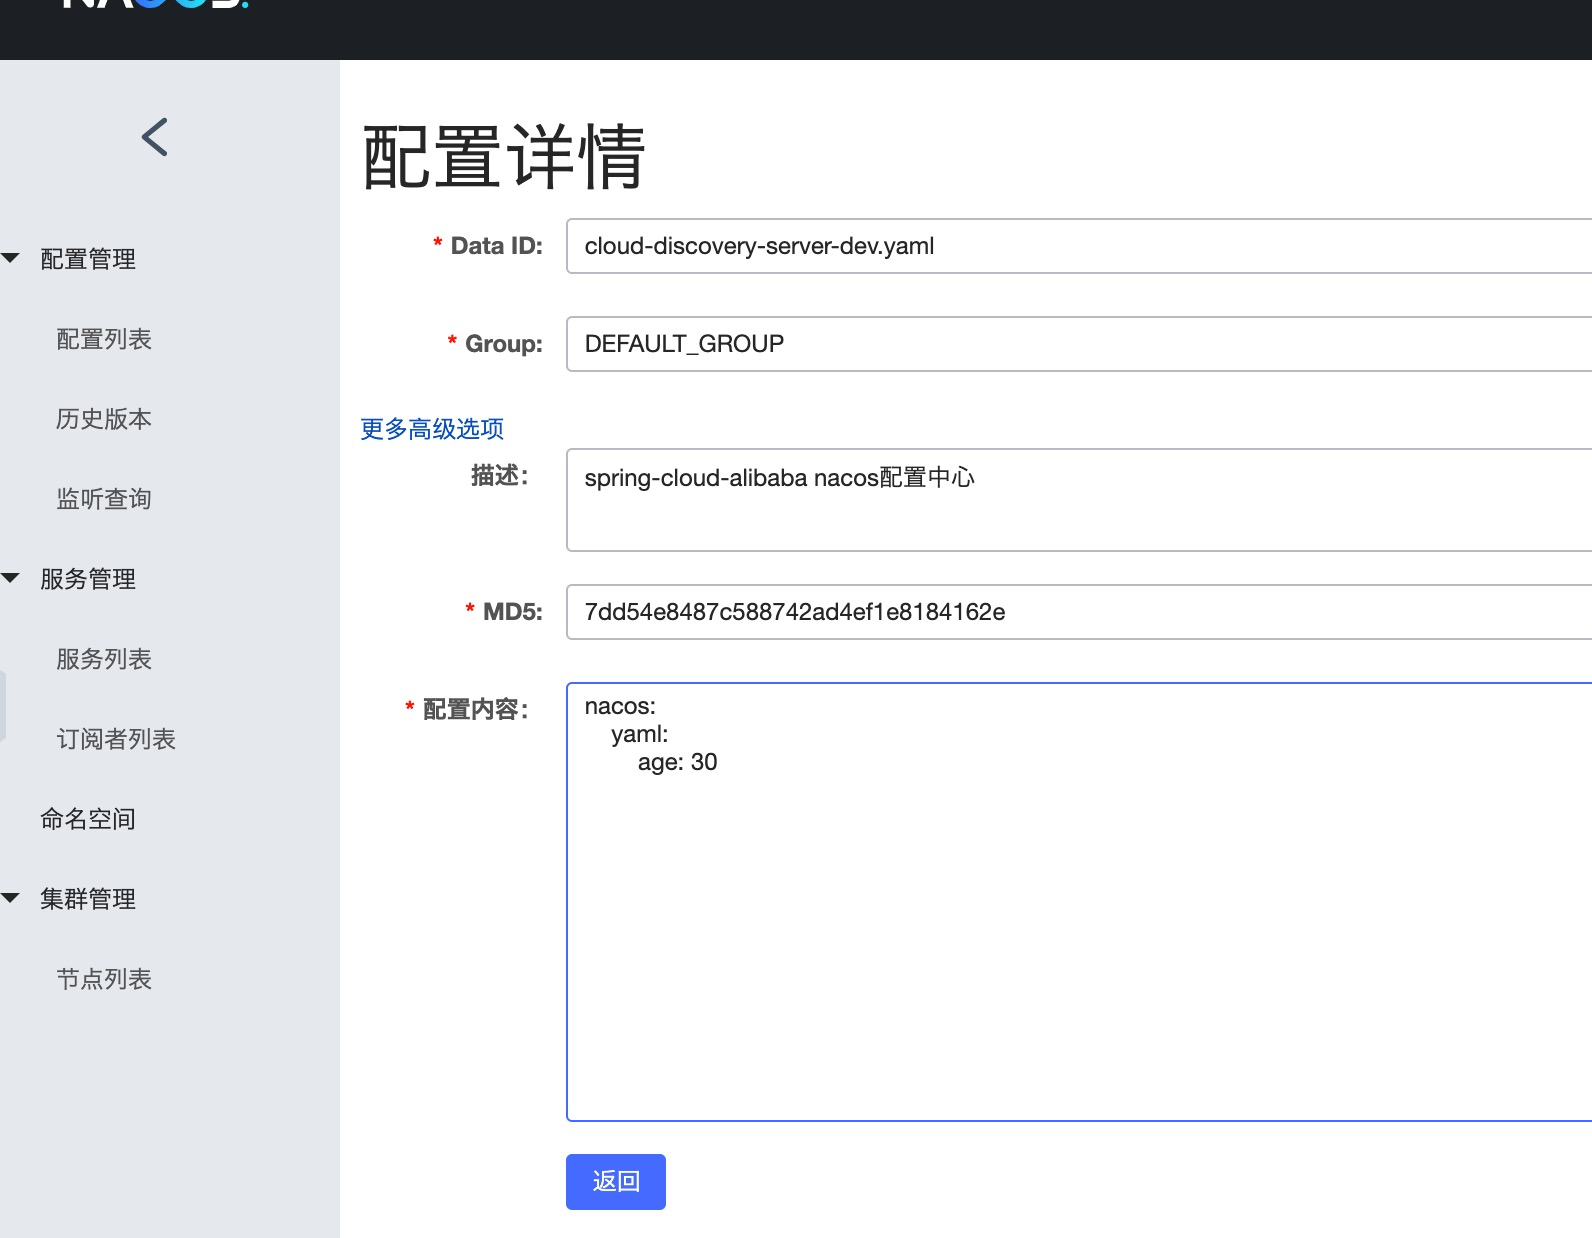
启动服务
访问 curl http://localhost:9012/server/hello?name=tom
日志打印

说明nacos配置中心已经生效
然后我们修改cloud-discovery-server-dev.yaml 配置文件age 为20参数 重新发布一下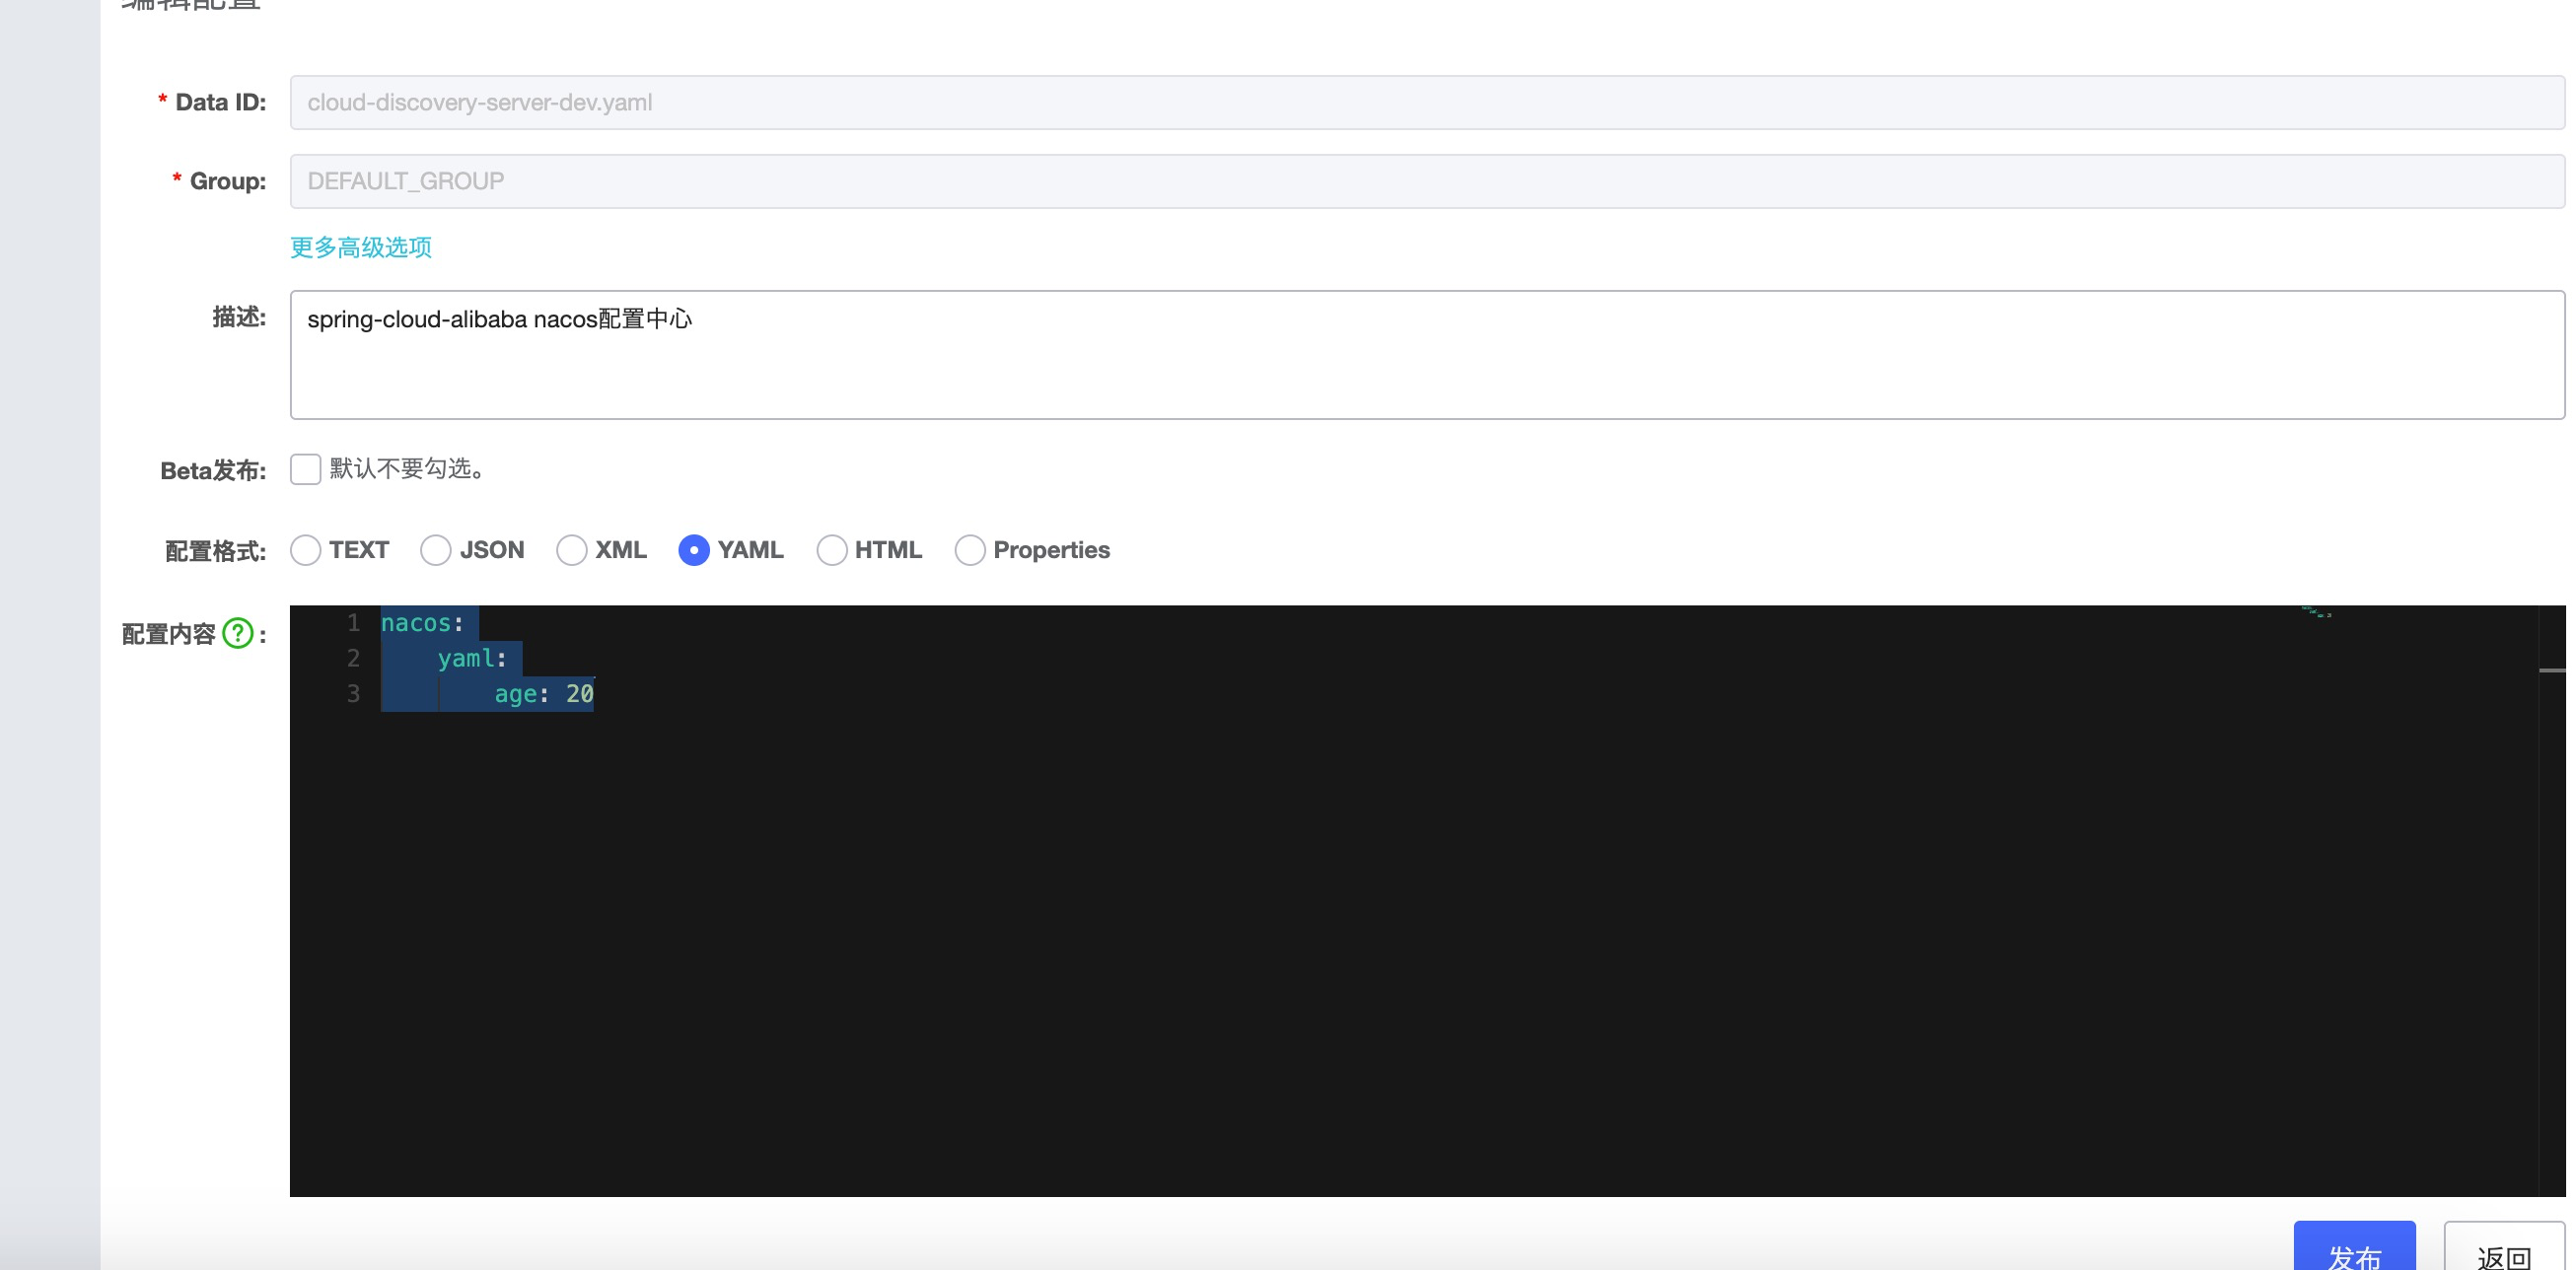
会看到后台日志打印
2019-10-27 19:53:08.884  INFO 44618 --- [.99.209.72_8848] trationDelegate$BeanPostProcessorChecker : Bean 'org.springframework.cloud.autoconfigure.ConfigurationPropertiesRebinderAutoConfiguration' of type [org.springframework.cloud.autoconfigure.ConfigurationPropertiesRebinderAutoConfiguration$$EnhancerBySpringCGLIB$$87d25f89] is not eligible for getting processed by all BeanPostProcessors (for example: not eligible for auto-proxying)
2019-10-27 19:53:09.091  INFO 44618 --- [.99.209.72_8848] c.a.c.n.c.NacosPropertySourceBuilder     : Loading nacos data, dataId: 'cloud-discovery-server-dev.yaml', group: 'DEFAULT_GROUP'
2019-10-27 19:53:09.092  INFO 44618 --- [.99.209.72_8848] b.c.PropertySourceBootstrapConfiguration : Located property source: CompositePropertySource {name='NACOS', propertySources=[NacosPropertySource {name='cloud-discovery-server-dev.yaml'}, NacosPropertySource {name='cloud-discovery-server.yaml'}]}
2019-10-27 19:53:09.093  INFO 44618 --- [.99.209.72_8848] o.s.boot.SpringApplication               : The following profiles are active: dev
2019-10-27 19:53:09.103  INFO 44618 --- [.99.209.72_8848] o.s.boot.SpringApplication               : Started application in 0.277 seconds (JVM running for 883.2)
2019-10-27 19:53:09.119  INFO 44618 --- [.99.209.72_8848] o.s.c.e.event.RefreshEventListener       : Refresh keys changed: [nacos.yaml.age]
不重启服务,再次请求.age 已发送改变
以上就是nacos的配置中心的配置。
然后我们讲解一下 nacos配置的匹配规则
dataID
在 Nacos Config Starter 中,
dataId (也就是上面cloud-discovery-server-dev.yaml)的拼接格式如下
${prefix} - ${spring.profiles.active} . ${file-extension}
prefix 默认为 spring.application.name 的值,也可以通过配置项 spring.cloud.nacos.config.prefix来配置。
spring.profiles.active 即为当前环境对应的 profile,详情可以参考 Spring Boot文档
注意,当 activeprofile 为空时,对应的连接符 - 也将不存在,dataId 的拼接格式变成 prefix.{prefix}.prefix.{file-extension}
file-extension 为配置内容的数据格式,可以通过配置项 spring.cloud.nacos.config.file-extension来配置。 目前只支持 properties 类型。
group
group 默认为 DEFAULT_GROUP,可以通过 spring.cloud.nacos.config.group 配置。
自动注入
Nacos Config Starter 实现了 org.springframework.cloud.bootstrap.config.PropertySourceLocator接口,并将优先级设置成了最高。
在 Spring Cloud 应用启动阶段,会主动从 Nacos Server 端获取对应的数据,并将获取到的数据转换成 PropertySource 且注入到 Environment 的 PropertySources 属性中,所以使用 @Value 注解也能直接获取 Nacos Server 端配置的内容。
动态刷新
Nacos Config Starter 默认为所有获取数据成功的 Nacos 的配置项添加了监听功能,在监听到服务端配置发生变化时会实时触发 org.springframework.cloud.context.refresh.ContextRefresher 的 refresh 方法 。
如果需要对 Bean 进行动态刷新,请参照 Spring 和 Spring Cloud 规范。推荐给类添加 @RefreshScope 或 @ConfigurationProperties 注解,
以上就是nacos配置中心的全部内容。
补充 命名空间
不管是 nacos的注册中心 还是nacos的配置中心 都有一个namespace属性。这个属性 是针对我们nacos 控制台命名空间。
特殊说明一下,命名空间的概念 因为配置中心和注册中心是通用的概念。所以放在里配置中心这里讲解。
我们在控制台创建lms的一个命名空间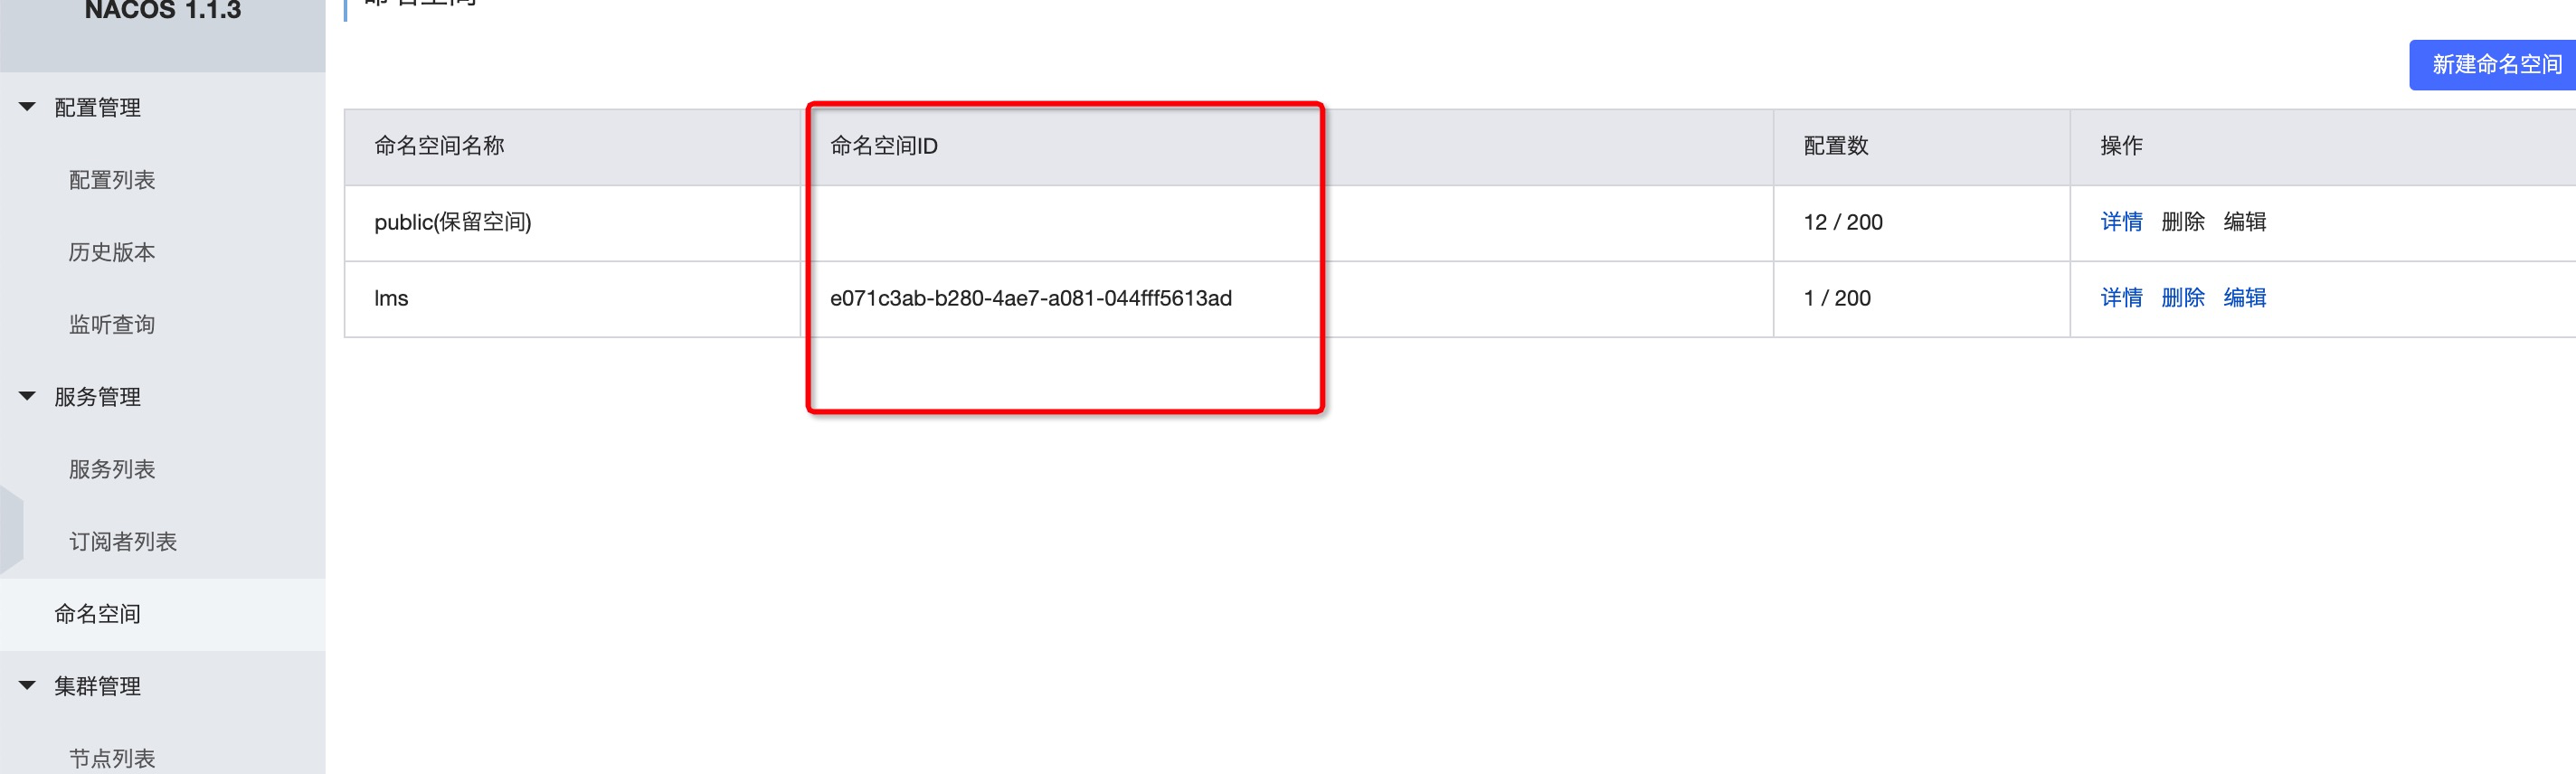
会有命名空间ID e071c3ab-b280-4ae7-a081-044fff5613ad
我们把这个ID 放到配置文件里面 对应namespace属性配置修改,如果不修改默认public空间
server:
  port: 9013

spring:
  profiles:
    active: dev
  application:
    name: cloud-discovery-server
  cloud:
    nacos:
      config:
        server-addr: 47.99.209.72:8848
        file-extension: yaml
        namespace: e071c3ab-b280-4ae7-a081-044fff5613ad
      discovery:
        server-addr: 47.99.209.72:8848
        namespace: e071c3ab-b280-4ae7-a081-044fff5613ad
重新启动会发现,服务注册到了 lms的命名空间上了。
反思
dataID、group 组合使用。${prefix} - ${spring.profiles.active} . ${file-extension} 。其中active参数的变化可以帮我们做到环境的隔离。group的变化。又可以帮我们做到项目组、版本的区分。这样配置就不会乱
配合俩种参数的变化达到我们想要的动态变化区分。其实这块的设计满足了我们大部分的场景的需要和支持
在加上命名空间的概念。我们有多了一种情况的变化 与选择。不过这样多了,当我们集群环境足够大的时候,反而会让很多同学找不到头绪。这就需要我们提前约定好。规则的使用
版权声明:本文为博主原创文章,遵循 CC 4.0 BY-SA 版权协议,转载请附上原文出处链接和本声明。转载请附带公众号信息