前言
Hi,大家好,看到标题后大家是不是一脸懵逼,这是啥?这小编搞事情?说好的六大布局咋又来个布局杀手?这就是咱们公众号和其他公众号的不同,我们并不是照本宣科的讲解Android知识,而是将项目当中实际运用到的并且是好用的东西分享给大家,还等什么呢?赶紧开始我们的学习吧!!
引入
简介:约束布局(ConstraintLayout) 是一个ViewGroup,它的出现主要是为了解决布局嵌套过多的问题,以灵活的方式定位和调整View。
说明:本博文是以ConstraintLayout1.1.3为基础编写,不同的依赖版本有不同的属性和方法,如果依照博文编写demo发现编译出错,请自行研究更新版本的约束布局或者与博主版本保持一致。
使用:检查依赖项,是否添加此依赖库。
//Android Studio2.3起,官方的模板默认使用ConstraintLayout。更新gradle插件版本之后,创建项目已经自动依赖,如果是老项目想要使用约束布局依赖如此
dependencies {
	implementation 'com.android.support.constraint:constraint-layout:1.1.3'
}
使用
在Android Studio2.3之后,创建一个layout文件,默认使用布局如下:
<?xml version="1.0" encoding="utf-8"?>
<android.support.constraint.ConstraintLayout 	xmlns:android="http://schemas.android.com/apk/res/android"
    xmlns:app="http://schemas.android.com/apk/res-auto"
    xmlns:tools="http://schemas.android.com/tools"
    android:layout_width="match_parent"
    android:layout_height="match_parent"
    tools:context=".MainActivity">
    <TextView
        android:layout_width="wrap_content"
        android:layout_height="wrap_content"
        android:text="Hello World!"
        app:layout_constraintBottom_toBottomOf="parent"
        app:layout_constraintLeft_toLeftOf="parent"
        app:layout_constraintRight_toRightOf="parent"
        app:layout_constraintTop_toTopOf="parent" />
</android.support.constraint.ConstraintLayout>
从上面发现有四个属性:
layout_constraintBottom_toBottomOf="parent" //View下边对齐parent底部
layout_constraintLeft_toLeftOf="parent"     //View左边对齐parent左边
layout_constraintRight_toRightOf="parent"   //View右边对齐parent右边
layout_constraintTop_toTopOf="parent"       //View上边对齐parent上边
除此之外还有几个其他的常用属性,表示View之间的关系
layout_constraintBottom_toTopOf="parent"    //View下边对齐parent上边
layout_constraintLeft_toRightOf="parent"    //View左边对齐parent右边
layout_constraintRight_toLeftOf="parent"    //View右边对齐parent左边
layout_constraintTop_toBottomOf="parent"    //View上边对齐parent下边
注意:此处parent可以换成其他想要与之关联的View的控件ID
模板中声明了一个TextView,且处于屏幕中间。如何做到的呢?上面四个属性顾名思义都指定了TextView与Parent(父布局)的关系,约束布局如果不指定水平和竖直方向的百分比,默认是50%,所以会居中。如果想要指定百分比使用如下属性:(使用横向比例需要指定左右关系,使用竖直比例需要指定上下关系)
layout_constraintHorizontal_bias="0.4"
layout_constraintVertical_bias="0.5"
这里有人会问,按照设计图的比例如何确定这个比例呢:这里有一个公式和描述是经过验证的
1.bias值=子View左相关的长度/(子View左相关的长度+其右相关的长度)
2.bias值与左相关的长度是成正比的,增大bias值,子View的左相关总是随之增长。至于控件具体往左往右移动,则视子View与关联控件的哪边相关。
无图无真相,计算说明这么复杂,想要搞晕我?直接上图!
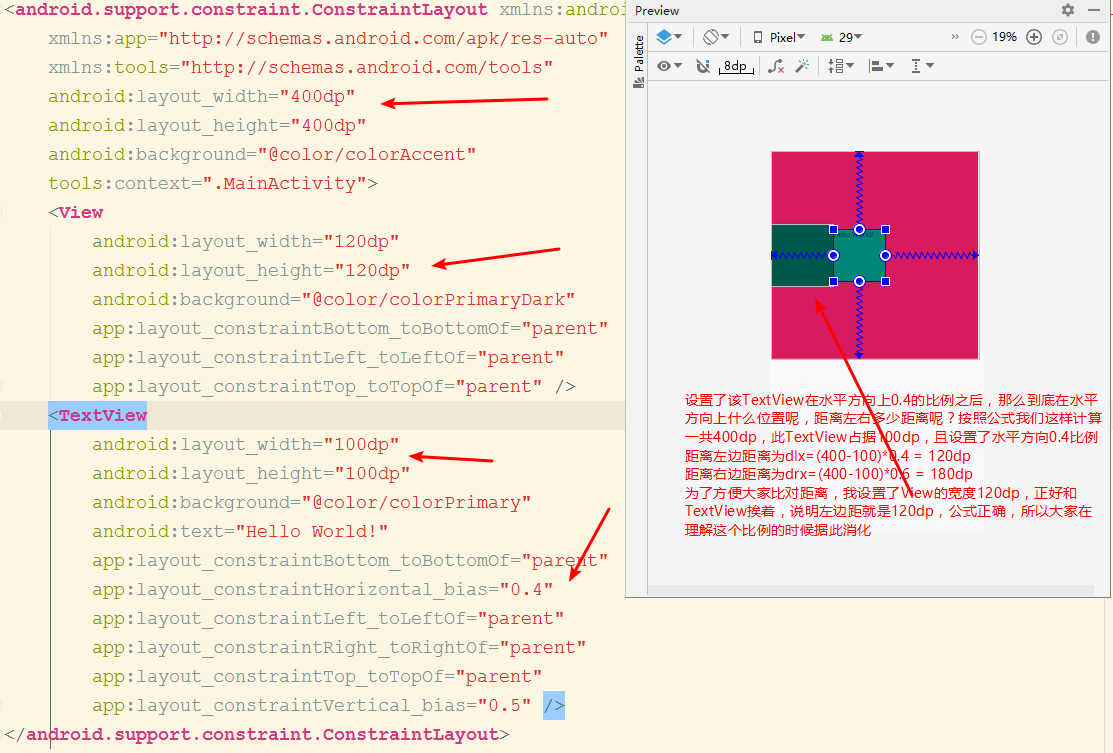
所以我们知道:想要使用约束布局固定一个View的位置,需要通过其与目标View相对的距离、位置,且从上(top)左(left)下(bottom)右(right)至少三个方位来说明关系
设置百分比布局
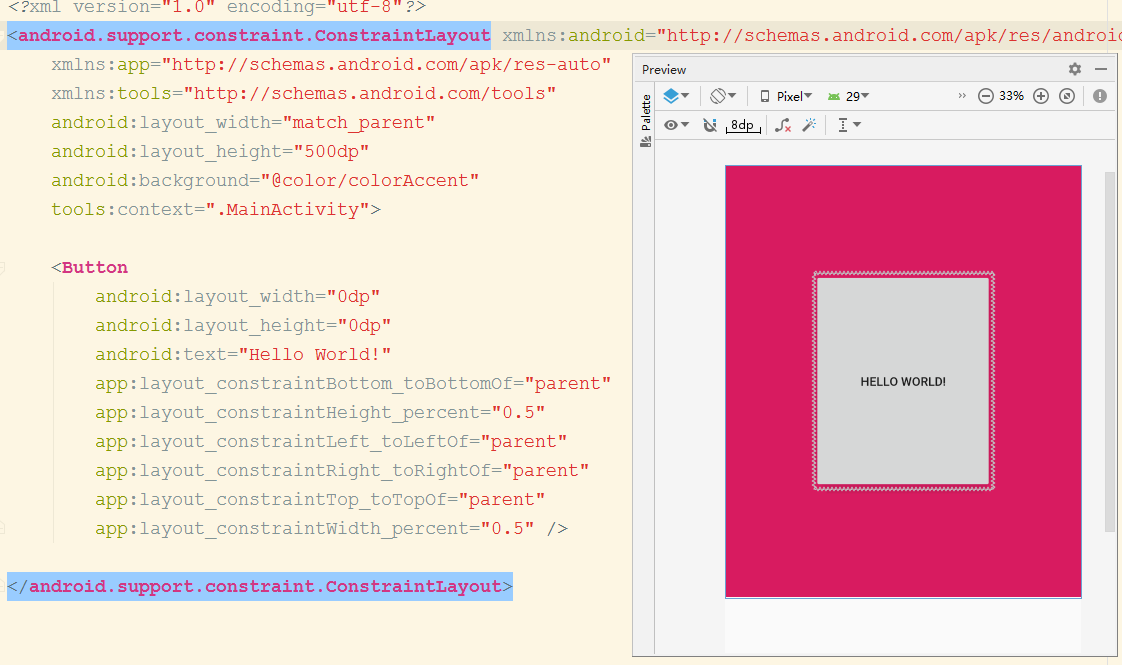
当 ConstraintLayout 子布局的宽或高设置为0dp时,可以对宽或高设置百分比
 <Button
        android:layout_width="0dp"
        android:layout_height="0dp"
        android:text="Hello World!"
        app:layout_constraintBottom_toBottomOf="parent"
        app:layout_constraintHeight_percent="0.5"
        app:layout_constraintLeft_toLeftOf="parent"
        app:layout_constraintRight_toRightOf="parent"
        app:layout_constraintTop_toTopOf="parent"
        app:layout_constraintWidth_percent="0.5" />
使用layout_constraintHeight_percent和layout_constraintWidth_percent属性设置横竖方向占比来确定宽度和高度,而不用具体尺寸,可以使用此属性做一般View的屏幕适配。效果如图所示:
设置宽高比例
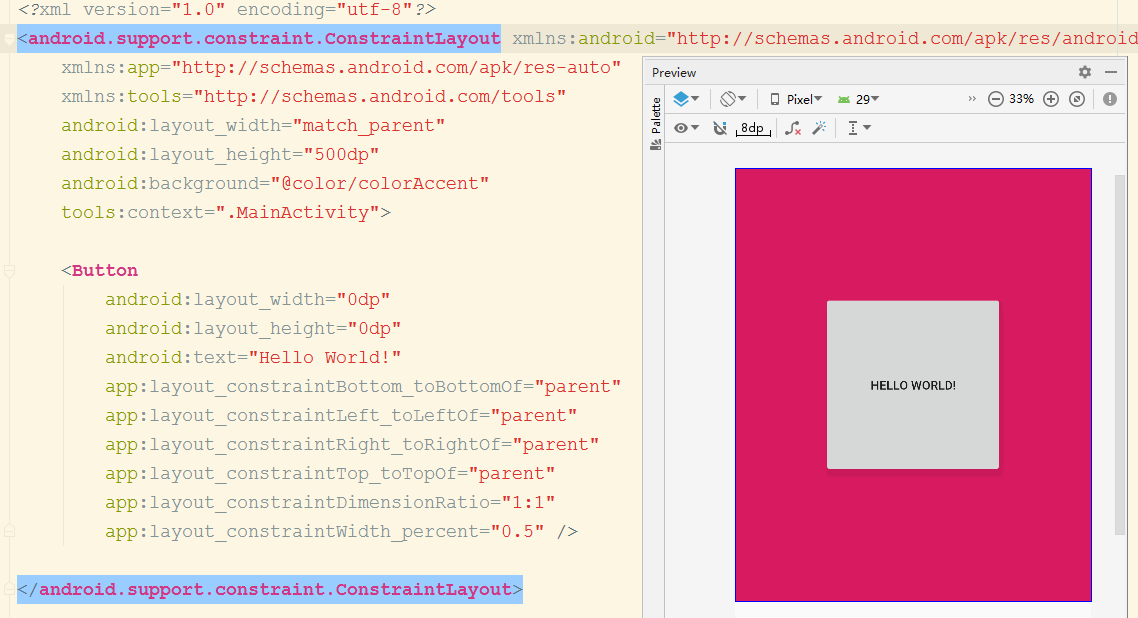
当 layout_width或者 layout_height设置为0dp时,还可以通过 layout_constraintDimensionRatio设置宽高比例。该比例默认表示 width:height的值。
<Button
        android:layout_width="0dp"
        android:layout_height="0dp"
        android:text="Hello World!"
        app:layout_constraintBottom_toBottomOf="parent"
        app:layout_constraintLeft_toLeftOf="parent"
        app:layout_constraintRight_toRightOf="parent"
        app:layout_constraintTop_toTopOf="parent"
        app:layout_constraintDimensionRatio="1:1"
        app:layout_constraintWidth_percent="0.5" />
使用layout_constraintDimensionRatio设置宽度和高度的比值来灵活设置View的尺寸。如果想要表示高度:宽度则可以配置属性类似h,16:9的含义是 h:w=16:9 也可设置 w,9:16是一样的。效果如图所示:
强制约束
当一个view的宽或高,设置成wrap_content时
<Button
        android:id="@+id/btn1"
        android:layout_width="wrap_content"
        android:layout_height="wrap_content"
        android:text="占位"
        app:layout_constraintBottom_toBottomOf="parent"
        app:layout_constraintLeft_toLeftOf="parent"
        app:layout_constraintTop_toTopOf="parent" />

    <Button
        android:id="@+id/btn2"
        android:layout_width="wrap_content"
        android:layout_height="wrap_content"
        android:text="测试测试测试测试测试测试测试测试测试测试测试测试"
        app:layout_constraintLeft_toRightOf="@id/btn1"
        app:layout_constraintRight_toRightOf="parent"
        android:layout_marginTop="40dp"
        app:layout_constraintTop_toTopOf="@id/btn1" />
实现效果如图所示:
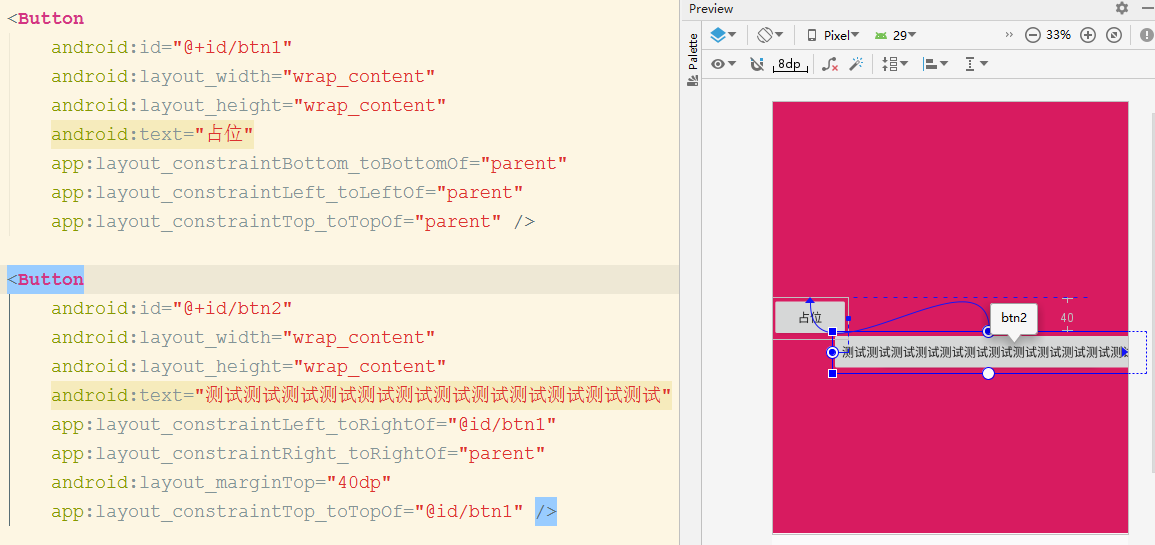
纳尼,怎么回事,不是应该右边不会超出父布局的么,我已经设置了layout_constraintRight_toRightOf="parent",这个就是设置了适应内容属性后出现的问题,此时需要强制使用约束宽度的属性 ,你会发现效果正常了。
app:layout_constrainedWidth="true"//在btn2上添加此属性
控件链条(Chain)
可以通过 layout_constraintHorizontal_chainStyle或 layout_constraintVertical_chainStyle设置链式控件的样式。这个属性有点像 LinearLayout中的 weight 属性平分布局。使用此属性,通常是权重分配不满足需求,但是又需要居中或者分配View的空间
- 先放一个官方解释的示例图
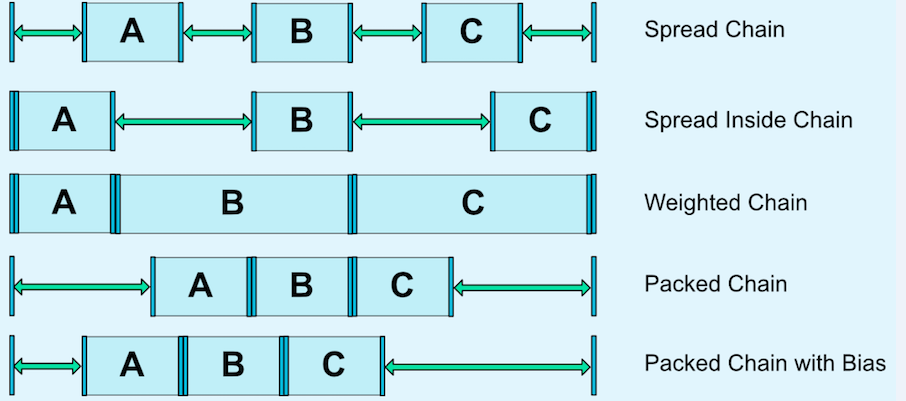
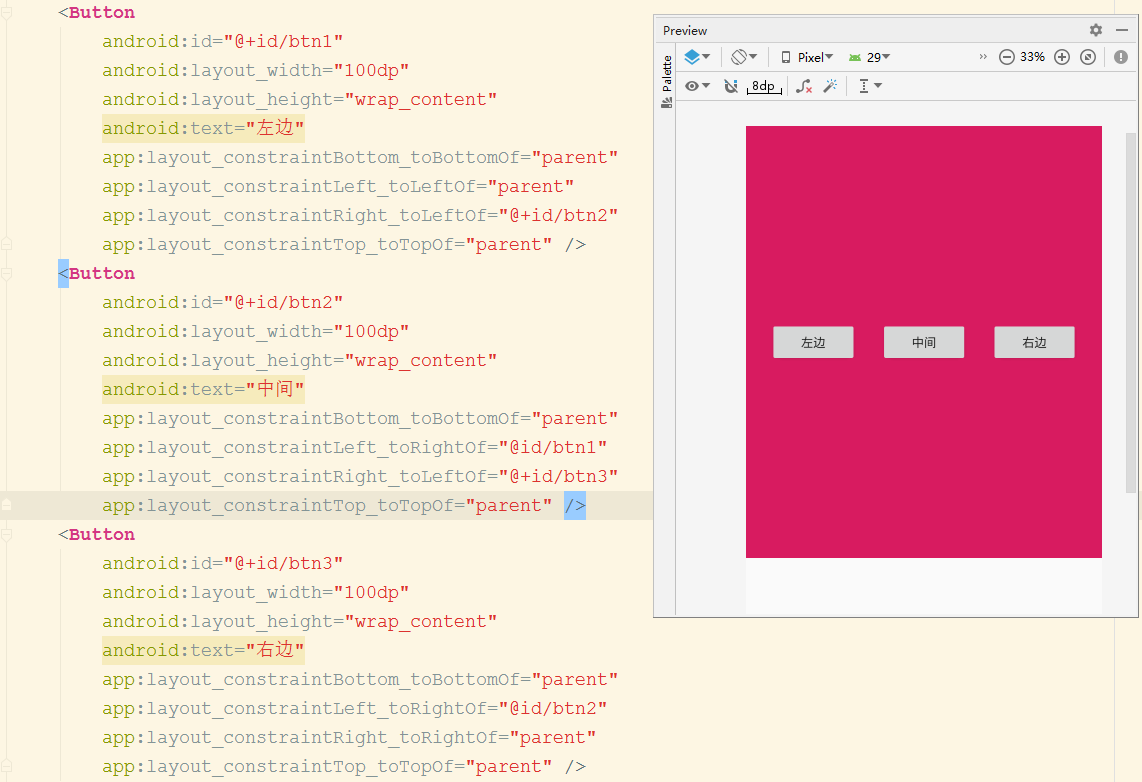
看完这个图是不是还觉得一头雾水,看起来很复杂的样子?其实不然,在开发中灵活使用此属性则能事半功倍且适配效果很好。使用此属性之前,需要把你即将连成链条的View彼此之间建立关联关系,水平方向则是控件彼此左右关联,竖直方向则是上下关联,每相邻两个View之间必须紧紧关联ID。即是:将一个方向上的控件形成锁链(相互依赖),默认属性是spread
Spread Chain
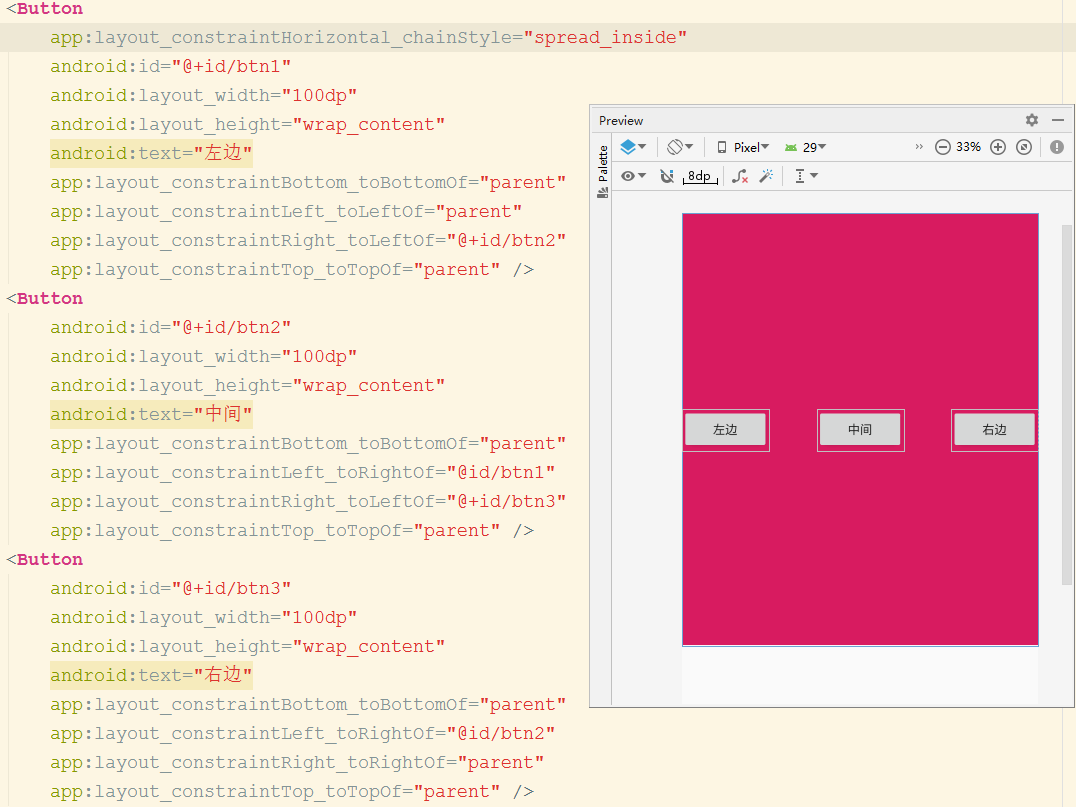
Spread Inside Chain
//在btn1上配置
app:layout_constraintHorizontal_chainStyle="spread_inside"
//左右靠边,中间剩余
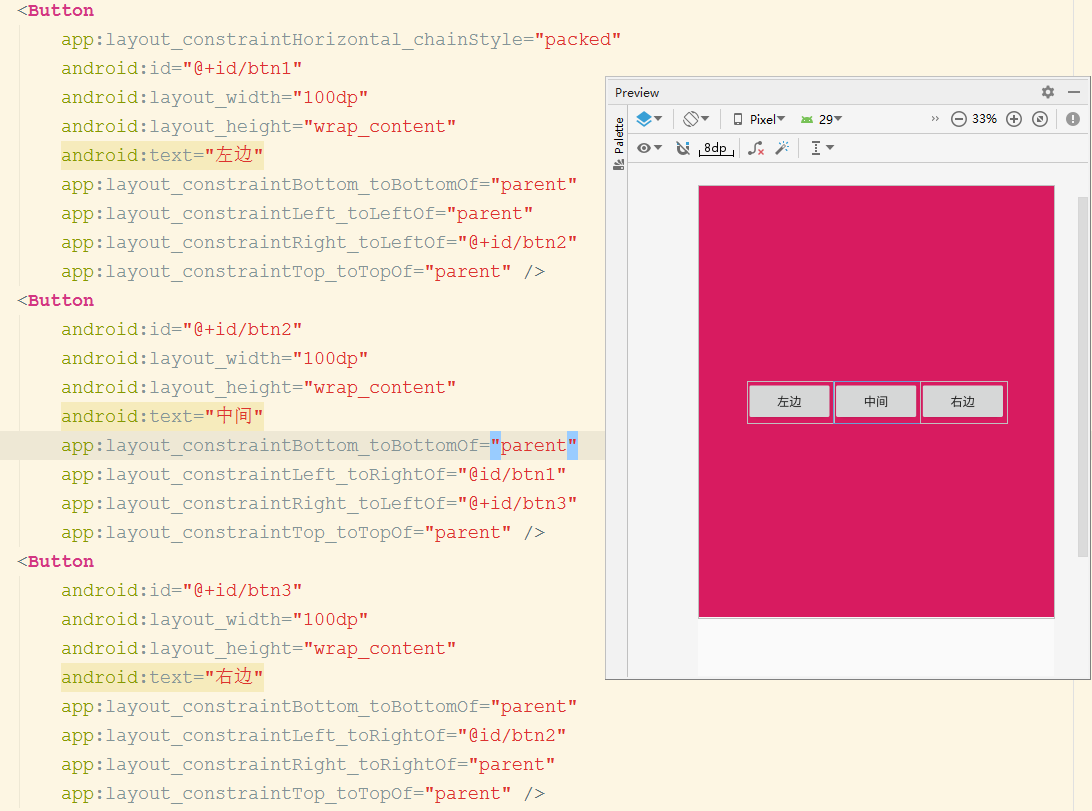
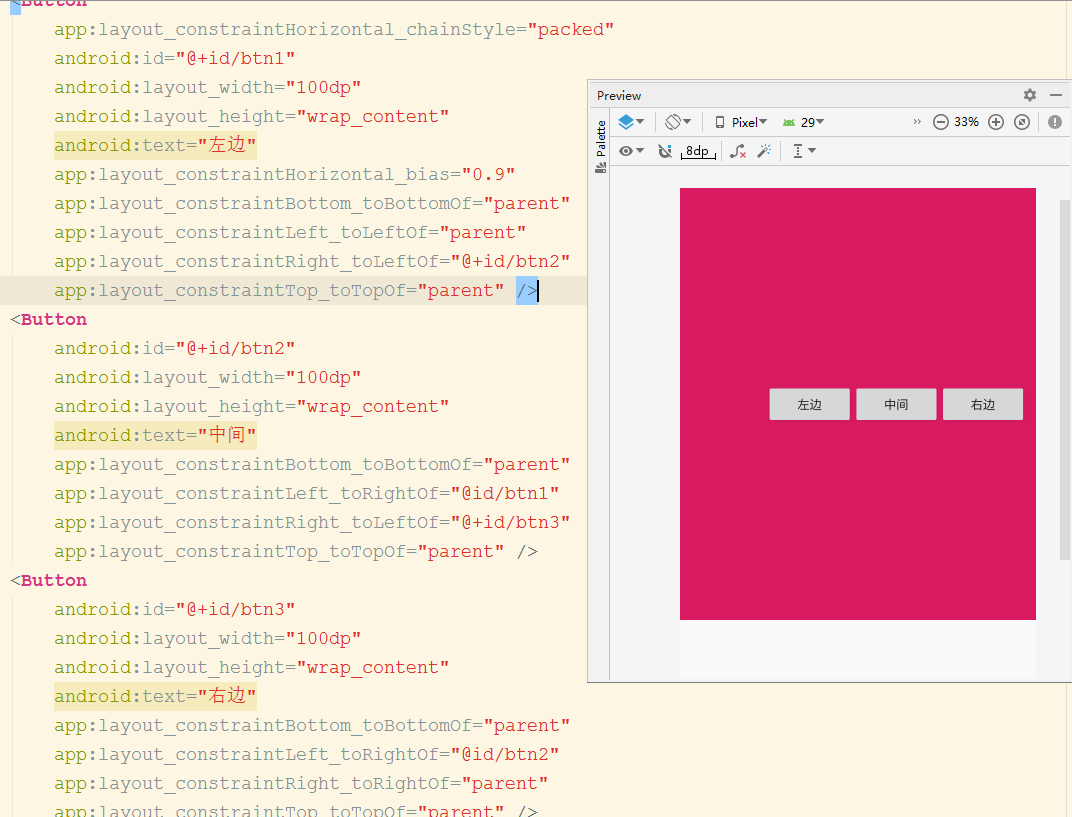
Packed Chain
//在btn1上配置
app:layout_constraintHorizontal_chainStyle="packed"
//三个控件彼此紧靠且整体居中
Packed Chain with Basis
//在btn1上配置
app:layout_constraintHorizontal_chainStyle="packed"
app:layout_constraintHorizontal_bias="0.9"
//三个控件彼此紧靠且整体在横方向设置比例处
结语
由于文章篇幅有限,且实际项目中还没有研究到更多更好用的新属性,暂时就告一段落,后期还会有关约束布局的更多好的玩法推送给大家,如果有小伙伴发现更高效或者更实用的属性,欢迎你们的留言,让我们共同成长吧~

 随时随地看视频


