继续浏览精彩内容
慕课网APP
程序员的梦工厂
打开
继续
感谢您的支持,我会继续努力的
赞赏金额会直接到老师账户
将二维码发送给自己后长按识别
微信支付
支付宝支付

Android项目重构学习:实现篇

当年话下
关注TA
已关注
手记 124
粉丝 14
获赞 50

前两篇文章Android项目重构学习:架构篇Android项目重构学习:界面篇已经讲了我的项目开始搭建时的架构设计和界面设计,这篇就讲讲具体怎么实现的,以实现最小化可用产品(MVP)的目标,用最简单的方式来搭建架构和实现代码。
IDE采用Android Studio,Demo实现的功能为用户注册、登录和展示一个券列表,数据采用我们现有项目的测试数据,接口也是我们项目中的测试接口。

项目搭建

根据架构篇所讲的,将项目分为了四个层级:模型层、接口层、核心层、界面层。四个层级之间的关系如下图所示:

5bc19d5e00011bcd03000278.jpg

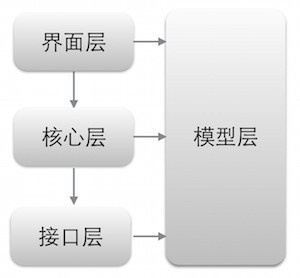
实现上,在Android Studio分为了相应的四个模块(Module):modelapicoreapp
model为模型层,api为接口层,core为核心层,app为界面层。
model、api、core这三个模块的类型为library,app模块的类型为application。
四个模块之间的依赖设置为:model没有任何依赖,接口层依赖了模型层,核心层依赖了模型层和接口层,界面层依赖了核心层和模型层。
项目搭建的步骤如下:

1.     创建新项目,项目名称为KAndroid,包名为com.keegan.kandroid。默认已创建了app模块,查看下app模块下的build.gradle,会看到第一行为:

[代码]xml代码:

?

1

apply plugin: 'com.android.application'


这行表明了app模块是application类型的。

2.     分别新建模块model、api、core,Module Type都选为Android Library,在Add an activity to module页面选择Add No Activity,这三个模块做为库使用,并不需要界面。创建完之后,查看相应模块的build.gradle,会看到第一行为:

[代码]xml代码:

?

1

apply plugin: 'com.android.library'


3.     建立模块之间的依赖关系。有两种方法可以设置:
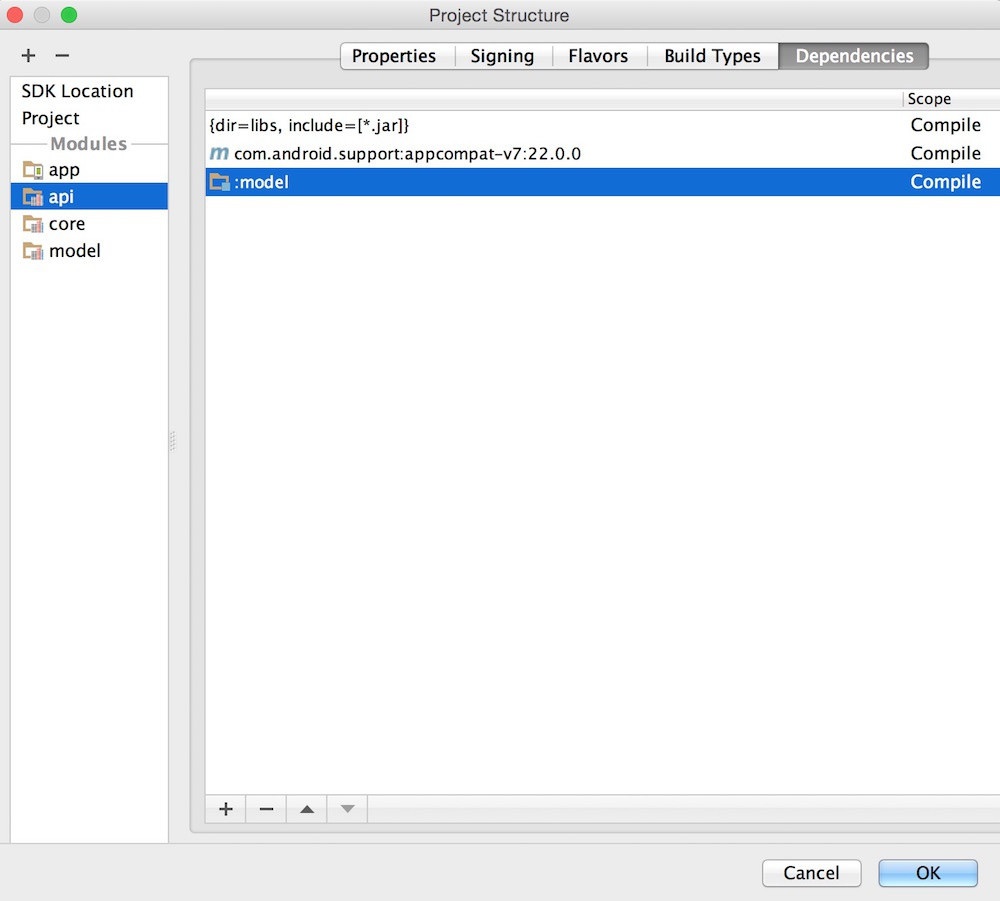
第一种:通过右键模块,然后Open Module Settings,选择模块的Dependencies,点击左下方的加号,选择Module dependency,最后选择要依赖的模块,下图为api模块添加了model依赖;

5bc19d510001156b10000901.jpg

第二种:直接在模块的build.gradle设置。打开build.gradle,在最后的dependencies一项里面添加新的一行:compile project(':ModuleName'),比如app模块添加对model模块和core模块依赖之后的dependencies如下:

[代码]xml代码:

?

1

2

3

4

5

6

dependencies {

    compile   fileTree(dir: 'libs', include: ['*.jar'])

    compile   'com.android.support:appcompat-v7:22.0.0'

    compile   project(':model')

    compile   project(':core')

}


通过上面两种方式的任意一种,创建了模块之间的依赖关系之后,每个模块的build.gradle的dependencies项的结果将会如下:
model:

[代码]xml代码:

?

1

2

3

4

dependencies {

    compile   fileTree(dir: 'libs', include: ['*.jar'])

    compile   'com.android.support:appcompat-v7:22.0.0'

}


api:

[代码]xml代码:

?

1

2

3

4

5

dependencies {

    compile   fileTree(dir: 'libs', include: ['*.jar'])

    compile   'com.android.support:appcompat-v7:22.0.0'

    compile   project(':model')

}


core:

[代码]xml代码:

?

1

2

3

4

5

6

dependencies {

    compile   fileTree(dir: 'libs', include: ['*.jar'])

    compile   'com.android.support:appcompat-v7:22.0.0'

    compile   project(':model')

    compile   project(':api')

}


app:

[代码]xml代码:

?

1

2

3

4

5

6

dependencies {

    compile   fileTree(dir: 'libs', include: ['*.jar'])

    compile   'com.android.support:appcompat-v7:22.0.0'

    compile   project(':model')

    compile   project(':core')

}


创建业务对象模型

业务对象模型统一存放于model模块,是对业务数据的封装,大部分都是从接口传过来的对象,因此,其属性也与接口传回的对象属性相一致。在这个Demo里,只有一个业务对象模型,封装了券的基本信息,以下是该实体类的代码:

[代码]java代码:

?

01

02

03

04

05

06

07

08

09

10

11

12

13

14

15

16

17

18

19

20

21

22

23

/**

 * 券的业务模型类,封装了券的基本信息。

 * 券分为了三种类型:现金券、抵扣券、折扣券。

 * 现金券是拥有固定面值的券,有固定的售价;

 * 抵扣券是满足一定金额后可以抵扣的券,比如满100减10元;

 * 折扣券是可以打折的券。

 *

 * @version 1.0 创建时间:15/6/21

 */

public class CouponBO   implements Serializable   {

    private static final long serialVersionUID = -8022957276104379230L;

    private int id;                  // 券id

    private String   name;           // 券名称

    private String   introduce;      // 券简介

    private int modelType;         // 券类型,1为现金券,2为抵扣券,3为折扣券

    private double faceValue;      // 现金券的面值

    private double estimateAmount; // 现金券的售价

    private double debitAmount;    // 抵扣券的抵扣金额

    private double discount;       // 折扣券的折扣率(0-100)

    private double miniAmount;     // 抵扣券和折扣券的最小使用金额


    // TODO 所有属性的getter和setter

}


接口层的封装

在这个Demo里,提供了4个接口:一个发送验证码的接口、一个注册接口、一个登录接口、一个获取券列表的接口。这4个接口具体如下:

·         发送验证码接口
URL:http://uat.b.quancome.com/platform/api
参数:

参数名

描述

类型

appKey

ANDROID_KCOUPON

String

method

service.sendSmsCode4Register

String

phoneNum

手机号码

String

·         输出样例:

·         [代码]xml代码:

?

1

{ "event": "0",   "msg": "success" }


·         注册接口
URL:http://uat.b.quancome.com/platform/api
参数:

参数名

描述

类型

appKey

ANDROID_KCOUPON

String

method

customer.registerByPhone

String

phoneNum

手机号码

String

code

验证码

String

password

MD5加密密码

String

·         输出样例:

·         [代码]xml代码:

?

1

{ "event": "0",   "msg": "success" }


·         登录接口
URL:http://uat.b.quancome.com/platform/api
其他参数:

参数名

描述

类型

appKey

ANDROID_KCOUPON

String

method

customer.loginByApp

String

loginName

登录名(手机号)

String

password

MD5加密密码

String

imei

手机imei串号

String

loginOS

系统,android为1

int

·         输出样例:

·         [代码]xml代码:

?

1

{ "event": "0",   "msg": "success" }


·         券列表
URL:http://uat.b.quancome.com/platform/api
其他参数:

参数名

描述

类型

appKey

ANDROID_KCOUPON

String

method

issue.listNewCoupon

String

currentPage

当前页数

int

pageSize

每页显示数量

int

·         输出样例:

·         [代码]xml代码:

?

1

2

3

4

5

{ "event": "0",   "msg": "success", "maxCount": 125,   "maxPage": 7, "currentPage": 1, "pageSize": 20,   "objList":[

    {"id":   1, "name": "测试现金券", "modelType": 1, ...},

    {...},

    ...

]}


在架构篇已经讲过,接口返回的json数据有三种固定结构:

[代码]xml代码:

?

1

2

3

{"event": "0",   "msg": "success"}

{"event": "0",   "msg": "success", "obj":{...}}

{"event": "0",   "msg": "success", "objList":[{...}, {...}],   "currentPage": 1, "pageSize": 20, "maxCount":   2, "maxPage": 1}


因此可以封装成实体类,代码如下:

[代码]java代码:

?

01

02

03

04

05

06

07

08

09

10

11

12

13

14

15

16

17

18

19

20

21

22

23

public class ApiResponse<t>   {

    private String event;    // 返回码,0为成功

    private String msg;        // 返回信息

    private T   obj;           // 单个对象

    private T   objList;       // 数组对象

    private int currentPage; // 当前页数

    private int pageSize;    // 每页显示数量

    private int maxCount;    // 总条数

    private int maxPage;     // 总页数


    // 构造函数,初始化code和msg

    public ApiResponse(String event, String msg) {

        this.event   = event;

        this.msg   = msg;

    }


    // 判断结果是否成功

    public boolean isSuccess() {

        return event.equals("0");

    }


    // TODO 所有属性的getter和setter

}</t>


上面4个接口,URL和appKey都是一样的,用来区别不同接口的则是method字段,因此,URL和appKey可以统一定义,method则根据不同接口定义不同常量。而除去appKey和method,剩下的参数才是每个接口需要定义的参数。因此,对上面4个接口的定义如下:

[代码]java代码:

?

01

02

03

04

05

06

07

08

09

10

11

12

13

14

15

16

17

18

19

20

21

22

23

24

25

26

27

28

29

30

31

32

33

34

35

36

37

38

39

40

41

42

43

44

45

46

47

48

public interface Api {

    // 发送验证码

    public final static String   SEND_SMS_CODE = "service.sendSmsCode4Register";

    // 注册

    public final static String   REGISTER = "customer.registerByPhone";

    // 登录

    public final static String   LOGIN = "customer.loginByApp";

    // 券列表

    public final static String   LIST_COUPON = "issue.listNewCoupon";


    /**

     * 发送验证码

     *

     * @param   phoneNum 手机号码

     * @return 成功时返回:{ "event":   "0", "msg":"success" }

     */

    public ApiResponse<void>   sendSmsCode4Register(String phoneNum);


    /**

     * 注册

     *

     * @param   phoneNum 手机号码

     * @param   code     验证码

     * @param   password MD5加密的密码

     * @return 成功时返回:{ "event":   "0", "msg":"success" }

     */

    public ApiResponse<void>   registerByPhone(String phoneNum, String code, String password);


    /**

     * 登录

     *

     * @param   loginName 登录名(手机号)

     * @param   password  MD5加密的密码

     * @param   imei      手机IMEI串号

     * @param   loginOS   Android为1

     * @return 成功时返回:{ "event":   "0", "msg":"success" }

     */

    public ApiResponse<void> loginByApp(String   loginName, String password, String imei, int loginOS);


    /**

     * 券列表

     *

     * @param   currentPage 当前页数

     * @param   pageSize    每页显示数量

     * @return 成功时返回:{ "event":   "0", "msg":"success", "objList":[...]   }

     */

    public ApiResponse<list<couponbo>>   listNewCoupon(int currentPage, int pageSize);

}</list<couponbo></void></void></void>

Api的实现类则是ApiImpl了,实现类需要封装好请求数据并向服务器发起请求,并将响应结果的数据转为ApiResonse返回。而向服务器发送请求并将响应结果返回的处理则封装到http引擎类去处理。另外,这里引用了gson将json转为对象。ApiImpl的实现代码如下:

[代码]java代码:

?

01

02

03

04

05

06

07

08

09

10

11

12

13

14

15

16

17

18

19

20

21

22

23

24

25

26

27

28

29

30

31

32

33

34

35

36

37

38

39

40

41

42

43

44

45

46

47

48

49

50

51

52

53

54

55

56

57

58

59

60

61

62

63

64

65

66

67

68

69

70

71

72

73

74

75

76

77

78

public class ApiImpl   implements Api {

    private final static String   APP_KEY = "ANDROID_KCOUPON";

    private final static String   TIME_OUT_EVENT = "CONNECT_TIME_OUT";

    private final static String   TIME_OUT_EVENT_MSG = "连接服务器失败";

    // http引擎

    private HttpEngine httpEngine;


    public ApiImpl() {

        httpEngine   = HttpEngine.getInstance();

    }


    @Override

    public ApiResponse<void>   sendSmsCode4Register(String phoneNum) {

        Map<string,   string=""> paramMap = new HashMap<string, string="">();

        paramMap.put("appKey",   APP_KEY);

        paramMap.put("method",   SEND_SMS_CODE);

        paramMap.put("phoneNum",   phoneNum);


        Type   type = new TypeToken<apiresponse<void>>(){}.getType();

        try {

            return httpEngine.postHandle(paramMap, type);

        }   catch (IOException   e) {

            return new ApiResponse(TIME_OUT_EVENT, TIME_OUT_EVENT_MSG);

        }

    }


    @Override

    public ApiResponse<void>   registerByPhone(String phoneNum, String code, String password) {

        Map<string,   string=""> paramMap = new HashMap<string, string="">();

        paramMap.put("appKey",   APP_KEY);

        paramMap.put("method",   REGISTER);

        paramMap.put("phoneNum",   phoneNum);

        paramMap.put("code",   code);

        paramMap.put("password",   EncryptUtil.makeMD5(password));


        Type   type = new TypeToken<apiresponse<list<couponbo>>>(){}.getType();

        try {

            return httpEngine.postHandle(paramMap, type);

        }   catch (IOException   e) {

            return new ApiResponse(TIME_OUT_EVENT, TIME_OUT_EVENT_MSG);

        }

    }


    @Override

    public ApiResponse<void> loginByApp(String   loginName, String password, String imei, int loginOS) {

        Map<string,   string=""> paramMap = new HashMap<string, string="">();

        paramMap.put("appKey",   APP_KEY);

        paramMap.put("method",   LOGIN);

        paramMap.put("loginName",   loginName);

        paramMap.put("password",   EncryptUtil.makeMD5(password));

        paramMap.put("imei",   imei);

        paramMap.put("loginOS",   String.valueOf(loginOS));


        Type   type = new TypeToken<apiresponse<list<couponbo>>>(){}.getType();

        try {

            return httpEngine.postHandle(paramMap, type);

        }   catch (IOException   e) {

            return new ApiResponse(TIME_OUT_EVENT, TIME_OUT_EVENT_MSG);

        }

    }


    @Override

    public ApiResponse<list<couponbo>>   listNewCoupon(int currentPage, int pageSize) {

        Map<string,   string=""> paramMap = new HashMap<string, string="">();

        paramMap.put("appKey",   APP_KEY);

        paramMap.put("method",   LIST_COUPON);

        paramMap.put("currentPage",   String.valueOf(currentPage));

        paramMap.put("pageSize",   String.valueOf(pageSize));


        Type   type = new TypeToken<apiresponse<list<couponbo>>>(){}.getType();

        try {

            return httpEngine.postHandle(paramMap, type);

        }   catch (IOException   e) {

            return new ApiResponse(TIME_OUT_EVENT, TIME_OUT_EVENT_MSG);

        }

    }


}</apiresponse<list<couponbo></string,></string,></list<couponbo></apiresponse<list<couponbo></string,></string,></void></apiresponse<list<couponbo></string,></string,></void></apiresponse<void></string,></string,></void>


而http引擎类的实现如下:

[代码]java代码:

?

01

02

03

04

05

06

07

08

09

10

11

12

13

14

15

16

17

18

19

20

21

22

23

24

25

26

27

28

29

30

31

32

33

34

35

36

37

38

39

40

41

42

43

44

45

46

47

48

49

50

51

52

53

54

55

56

57

58

59

60

61

62

63

64

65

66

67

68

69

70

71

72

73

74

75

76

77

78

79

80

81

82

83

84

85

86

87

88

89

90

91

92

93

94

95

96

97

98

public class HttpEngine   {

    private final static String   SERVER_URL = "http://uat.b.quancome.com/platform/api";

    private final static String   REQUEST_MOTHOD = "POST";

    private final static String   ENCODE_TYPE = "UTF-8";

    private final static int TIME_OUT = 15000;


    private static HttpEngine instance = null;


    private HttpEngine() {

    }


    public static HttpEngine getInstance() {

        if (instance == null) {

            instance   = new HttpEngine();

        }

        return instance;

    }


    public <t> T postHandle(Map<string,   string=""> paramsMap, Type typeOfT) throws IOException {

        String   data = joinParams(paramsMap);

        HttpUrlConnection   connection = getConnection();

        connection.setRequestProperty("Content-Length",   String.valueOf(data.getBytes().length));

        connection.connect();

        OutputStream   os = connection.getOutputStream();

        os.write(data.getBytes());

        os.flush();

        if (connection.getResponseCode() == 200) {

            //   获取响应的输入流对象

            InputStream   is = connection.getInputStream();

            //   创建字节输出流对象

            ByteArrayOutputStream   baos = new ByteArrayOutputStream();

            //   定义读取的长度

            int len = 0;

            //   定义缓冲区

            byte buffer[] = new byte[1024];

            //   按照缓冲区的大小,循环读取

            while ((len = is.read(buffer)) != -1) {

                //   根据读取的长度写入到os对象中

                baos.write(buffer,   0, len);

            }

            //   释放资源

            is.close();

            baos.close();

            connection.disconnect();

            //   返回字符串

            final String result = new String(baos.toByteArray());

            Gson   gson = new Gson();

            return gson.fromJson(result, typeOfT);

        }   else {

            connection.disconnect();

            return null;

        }

    }


    private HttpURLConnection getConnection() {

        HttpURLConnection   connection = null;

        //   初始化connection

        try {

            //   根据地址创建URL对象

            URL   url = new URL(SERVER_URL);

            //   根据URL对象打开链接

            connection   = (HttpURLConnection) url.openConnection();

            //   设置请求的方式

            connection.setRequestMethod(REQUEST_MOTHOD);

            //   发送POST请求必须设置允许输入,默认为true

            connection.setDoInput(true);

            //   发送POST请求必须设置允许输出

            connection.setDoOutput(true);

            //   设置不使用缓存

            connection.setUseCaches(false);

            //   设置请求的超时时间

            connection.setReadTimeout(TIME_OUT);

            connection.setConnectTimeout(TIME_OUT);

            connection.setRequestProperty("Content-Type",   "application/x-www-form-urlencoded");

            connection.setRequestProperty("Connection",   "keep-alive");

            connection.setRequestProperty("Response-Type",   "json");

            connection.setChunkedStreamingMode(0);

        }   catch (IOException   e) {

            e.printStackTrace();

        }

        return connection;

    }


    private String joinParams(Map<string, string="">   paramsMap) {

        StringBuilder   stringBuilder = new StringBuilder();

        for (String key : paramsMap.keySet()) {

            stringBuilder.append(key);

            stringBuilder.append("=");

            try {

                stringBuilder.append(URLEncoder.encode(paramsMap.get(key),   ENCODE_TYPE));

            }   catch (UnsupportedEncodingException   e) {

                e.printStackTrace();

            }

            stringBuilder.append("&");

        }

        return stringBuilder.substring(0,   stringBuilder.length() - 1);

    }

}</string,></string,></t>


至此,接口层的封装就完成了。接下来再往上看看核心层吧。

核心层的逻辑

核心层处于接口层和界面层之间,向下调用Api,向上提供Action,它的核心任务就是处理复杂的业务逻辑。先看看我对Action的定义:

[代码]java代码:

?

01

02

03

04

05

06

07

08

09

10

public interface AppAction {

    // 发送手机验证码

    public void sendSmsCode(String phoneNum, ActionCallbackListener<void>   listener);

    // 注册

    public void register(String phoneNum, String code, String password,   ActionCallbackListener<void> listener);

    // 登录

    public void login(String loginName, String password, ActionCallbackListener<void>   listener);

    // 按分页获取券列表

    public void listCoupon(int currentPage, ActionCallbackListener<list<couponbo>>   listener);

}</list<couponbo></void></void></void>


首先,和Api接口对比就会发现,参数并不一致。登录并没有iemi和loginOS的参数,获取券列表的参数里也少了pageSize。这是因为,这几个参数,跟界面其实并没有直接关系。Action只要定义好跟界面相关的就可以了,其他需要的参数,在具体实现时再去获取。
另外,大部分action的处理都是异步的,因此,添加了回调监听器ActionCallbackListener,回调监听器的泛型则是返回的对象数据类型,例如获取券列表,返回的数据类型就是List,没有对象数据时则为Void。回调监听器只定义了成功和失败的方法,如下:

[代码]java代码:

?

01

02

03

04

05

06

07

08

09

10

11

12

13

14

15

16

public interface ActionCallbackListener<t> {

    /**

     * 成功时调用

     *

     * @param   data 返回的数据

     */

    public void onSuccess(T data);


    /**

     * 失败时调用

     *

     * @param   errorEvemt 错误码

     * @param   message    错误信息

     */

    public void onFailure(String errorEvent, String message);

}</t>


接下来再看看Action的实现。首先,要获取imei,那就需要传入一个Context;另外,还需要loginOS和pageSize,这定义为常量就可以了;还有,要调用接口层,所以还需要Api实例。而接口的实现分为两步,第一步做参数检查,第二步用异步任务调用Api。具体实现如下:

[代码]java代码:

?

001

002

003

004

005

006

007

008

009

010

011

012

013

014

015

016

017

018

019

020

021

022

023

024

025

026

027

028

029

030

031

032

033

034

035

036

037

038

039

040

041

042

043

044

045

046

047

048

049

050

051

052

053

054

055

056

057

058

059

060

061

062

063

064

065

066

067

068

069

070

071

072

073

074

075

076

077

078

079

080

081

082

083

084

085

086

087

088

089

090

091

092

093

094

095

096

097

098

099

100

101

102

103

104

105

106

107

108

109

110

111

112

113

114

115

116

117

118

119

120

121

122

123

124

125

126

127

128

129

130

131

132

133

134

135

136

137

138

139

140

141

142

143

144

145

146

147

148

149

150

151

152

153

154

155

156

157

158

159

160

161

162

163

164

165

166

167

168

169

170

171

172

173

174

175

176

public class AppActionImpl   implements AppAction   {

    private final static int LOGIN_OS = 1; // 表示Android

    private final static int PAGE_SIZE = 20; // 默认每页20条


    private Context context;

    private Api api;


    public AppActionImpl(Context context) {

        this.context   = context;

        this.api   = new ApiImpl();

    }


    @Override

    public void sendSmsCode(final String phoneNum, final ActionCallbackListener<void> listener) {

        //   参数为空检查

        if (TextUtils.isEmpty(phoneNum)) {

            if (listener != null) {

                listener.onFailure(ErrorEvent.PARAM_NULL,   "手机号为空");

            }

            return;

        }

        //   参数合法性检查

        Pattern   pattern = Pattern.compile("1\\d{10}");

        Matcher   matcher = pattern.matcher(phoneNum);

        if (!matcher.matches()) {

            if (listener != null) {

                listener.onFailure(ErrorEvent.PARAM_ILLEGAL,   "手机号不正确");

            }

            return;

        }


        //   请求Api

        new AsyncTask<void, void,="" apiresponse<void="">>()   {

            @Override

            protected ApiResponse<void>   doInBackground(Void... voids) {

                return api.sendSmsCode4Register(phoneNum);

            }


            @Override

            protected void onPostExecute(ApiResponse<void> response) {

                if (listener != null && response != null) {

                    if (response.isSuccess()) {

                        listener.onSuccess(null);

                    }   else {

                        listener.onFailure(response.getEvent(),   response.getMsg());

                    }

                }

            }

        }.execute();

    }


    @Override

    public void register(final String phoneNum, final String code, final String password, final ActionCallbackListener<void> listener) {

        //   参数为空检查

        if (TextUtils.isEmpty(phoneNum)) {

            if (listener != null) {

                listener.onFailure(ErrorEvent.PARAM_NULL,   "手机号为空");

            }

            return;

        }

        if (TextUtils.isEmpty(code)) {

            if (listener != null) {

                listener.onFailure(ErrorEvent.PARAM_NULL,   "验证码为空");

            }

            return;

        }

        if (TextUtils.isEmpty(password)) {

            if (listener != null) {

                listener.onFailure(ErrorEvent.PARAM_NULL,   "密码为空");

            }

            return;

        }


        //   参数合法性检查

        Pattern   pattern = Pattern.compile("1\\d{10}");

        Matcher   matcher = pattern.matcher(phoneNum);

        if (!matcher.matches()) {

            if (listener != null) {

                listener.onFailure(ErrorEvent.PARAM_ILLEGAL,   "手机号不正确");

            }

            return;

        }


        //   TODO 长度检查,密码有效性检查等


        //   请求Api

        new AsyncTask<void, void,="" apiresponse<void="">>()   {

            @Override

            protected ApiResponse<void>   doInBackground(Void... voids) {

                return api.registerByPhone(phoneNum, code,   password);

            }


            @Override

            protected void onPostExecute(ApiResponse<void> response) {

                if (listener != null && response != null) {

                    if (response.isSuccess()) {

                        listener.onSuccess(null);

                    }   else {

                        listener.onFailure(response.getEvent(),   response.getMsg());

                    }

                }

            }

        }.execute();

    }


    @Override

    public void login(final String loginName, final String password, final ActionCallbackListener<void> listener) {

        //   参数为空检查

        if (TextUtils.isEmpty(loginName)) {

            if (listener != null) {

                listener.onFailure(ErrorEvent.PARAM_NULL,   "登录名为空");

            }

            return;

        }

        if (TextUtils.isEmpty(password)) {

            if (listener != null) {

                listener.onFailure(ErrorEvent.PARAM_NULL,   "密码为空");

            }

            return;

        }


        //   TODO 长度检查,密码有效性检查等       


        //   请求Api

        new AsyncTask<void, void,="" apiresponse<void="">>()   {

            @Override

            protected ApiResponse<void>   doInBackground(Void... voids) {

                TelephonyManager   telephonyManager = (TelephonyManager)   context.getSystemService(Context.TELEPHONY_SERVICE);

                String   imei = telephonyManager.getDeviceId();

                return api.loginByApp(loginName, password, imei,   LOGIN_OS);

            }


            @Override

            protected void onPostExecute(ApiResponse<void> response) {

                if (listener != null && response != null) {

                    if (response.isSuccess()) {

                        listener.onSuccess(null);

                    }   else {

                        listener.onFailure(response.getEvent(),   response.getMsg());

                    }

                }

            }

        }.execute();

    }


    @Override

    public void listCoupon(final int currentPage,   final ActionCallbackListener<list<couponbo>>   listener) {

        //   参数检查

        if (currentPage < 0) {

            if (listener != null) {

                listener.onFailure(ErrorEvent.PARAM_ILLEGAL,   "当前页数小于零");

            }

        }


        //   TODO 添加缓存


        //   请求Api

        new AsyncTask<void, void,="" apiresponse<list<couponbo="">>>()   {

            @Override

            protected ApiResponse<list<couponbo>>   doInBackground(Void... voids) {

                return api.listNewCoupon(currentPage,   PAGE_SIZE);

            }


            @Override

            protected void onPostExecute(ApiResponse<list<couponbo>> response) {

                if (listener != null && response != null) {

                    if (response.isSuccess()) {

                        listener.onSuccess(response.getObjList());

                    }   else {

                        listener.onFailure(response.getEvent(),   response.getMsg());

                    }

                }

            }

        }.execute();

    }

}</list<couponbo></list<couponbo></void,></list<couponbo></void></void></void,></void></void></void></void,></void></void></void></void,></void>


简单的实现代码就是这样,其实,这还有很多地方可以优化,比如,将参数为空的检查、手机号有效性的检查、数字型范围的检查等等,都可以抽成独立的方法,从而减少重复代码的编写。异步任务里的代码也一样,都是可以通过重构优化的。另外,需要扩展时,比如添加缓存,那就在调用Api之前处理。
核心层的逻辑就是这样了。最后就到界面层了。

界面层

在这个Demo里,只有三个页面:登录页、注册页、券列表页。在这里,也会遵循界面篇提到的三个基本原则:规范性、单一性、简洁性。
首先,界面层需要调用核心层的Action,而这会在整个应用级别都用到,因此,Action的实例最好放在Application里。代码如下:

[代码]java代码:

?

01

02

03

04

05

06

07

08

09

10

11

12

13

14

public class KApplication   extends Application   {


    private AppAction appAction;


    @Override

    public void onCreate() {

        super.onCreate();

        appAction   = new AppActionImpl(this);

    }


    public AppAction getAppAction() {

        return appAction;

    }

}


另外,一个Activity的基类也是很有必要的,可以减少很多重复的工作。基类的代码如下:

[代码]java代码:

?

01

02

03

04

05

06

07

08

09

10

11

12

13

14

15

16

public abstract class KBaseActivity   extends FragmentActivity   {

    // 上下文实例

    public Context context;

    // 应用全局的实例

    public KApplication application;

    // 核心层的Action实例

    public AppAction appAction;


    @Override

    protected void onCreate(Bundle savedInstanceState) {

        super.onCreate(savedInstanceState);

        context   = getApplicationContext();

        application   = (KApplication) this.getApplication();

        appAction   = application.getAppAction();

    }

}


再看看登录的Activity:

[代码]java代码:

?

01

02

03

04

05

06

07

08

09

10

11

12

13

14

15

16

17

18

19

20

21

22

23

24

25

26

27

28

29

30

31

32

33

34

35

36

37

38

39

40

41

42

43

44

45

46

47

48

49

50

51

52

53

54

55

56

57

58

59

60

61

62

63

public class LoginActivity   extends KBaseActivity   {


    private EditText phoneEdit;

    private EditText passwordEdit;

    private Button loginBtn;


    @Override

    protected void onCreate(Bundle savedInstanceState) {

        super.onCreate(savedInstanceState);

        setContentView(R.layout.activity_login);

        //   初始化View

        initViews();

    }


    @Override

    public boolean onCreateOptionsMenu(Menu menu) {

        getMenuInflater().inflate(R.menu.menu_login,   menu);

        return true;

    }


    @Override

    public boolean onOptionsItemSelected(MenuItem item) {

        int id = item.getItemId();


        //   如果是注册按钮

        if (id == R.id.action_register) {

            Intent   intent = new Intent(this,   RegisterActivity.class);

            startActivity(intent);

            return true;

        }


        return super.onOptionsItemSelected(item);

    }


    // 初始化View

    private void initViews() {

        phoneEdit   = (EditText) findViewById(R.id.edit_phone);

        passwordEdit   = (EditText) findViewById(R.id.edit_password);

        loginBtn   = (Button) findViewById(R.id.btn_login);

    }


    // 准备登录

    public void toLogin(View view) {

        String   loginName = phoneEdit.getText().toString();

        String   password = passwordEdit.getText().toString();

        loginBtn.setEnabled(false);

        this.appAction.login(loginName,   password, new ActionCallbackListener<void>()   {

            @Override

            public void onSuccess(Void data) {

                Toast.makeText(context,   R.string.toast_login_success, Toast.LENGTH_SHORT).show();

                Intent   intent = new Intent(context,   CouponListActivity.class);

                startActivity(intent);

                finish();

            }


            @Override

            public void onFailure(String errorEvent, String message) {

                Toast.makeText(context,   message, Toast.LENGTH_SHORT).show();

                loginBtn.setEnabled(true);

            }

        });

    }

}</void>


登录页的布局文件则如下:

[代码]xml代码:

?

1

2

3

4

5

6

7

8

9

<linearlayout xmlns:android="http://schemas.android.com/apk/res/android" xmlns:tools="http://schemas.android.com/tools" android:layout_width="match_parent" android:layout_height="match_parent" android:orientation="vertical" android:paddingbottom="@dimen/activity_vertical_margin" android:paddingleft="@dimen/activity_horizontal_margin" android:paddingright="@dimen/activity_horizontal_margin" android:paddingtop="@dimen/activity_vertical_margin" tools:context="com.keegan.kandroid.activity.LoginActivity">


    <edittext android:id="@+id/edit_phone" android:layout_width="match_parent" android:layout_height="wrap_content" android:layout_margintop="@dimen/edit_vertical_margin" android:layout_marginbottom="@dimen/edit_vertical_margin" android:hint="@string/hint_phone" android:inputtype="phone" android:singleline="true">


    <edittext android:id="@+id/edit_password" android:layout_width="match_parent" android:layout_height="wrap_content" android:layout_margintop="@dimen/edit_vertical_margin" android:layout_marginbottom="@dimen/edit_vertical_margin" android:hint="@string/hint_password" android:inputtype="textPassword" android:singleline="true">


    <button android:id="@+id/btn_login" android:layout_width="match_parent" android:layout_height="wrap_content" android:layout_margintop="@dimen/btn_vertical_margin" android:layout_marginbottom="@dimen/btn_vertical_margin" android:="toLogin" android:text="@string/btn_login">


</button></edittext></edittext></linearlayout>


可以看到,EditText的id命名统一以edit开头,而在Activity里的控件变量名则以Edit结尾。按钮的onClick也统一用toXXX的方式命名,明确表明这是一个将要做的动作。还有,string,dimen也都统一在相应的资源文件里按照相应的规范去定义。
注册页和登陆页差不多,这里就不展示代码了。主要再看看券列表页,因为用到了ListView,ListView需要添加适配器。实际上,适配器很多代码都是可以复用的,因此,我抽象了一个适配器的基类,代码如下:

[代码]java代码:

?

01

02

03

04

05

06

07

08

09

10

11

12

13

14

15

16

17

18

19

20

21

22

23

24

25

26

27

28

29

30

31

32

33

34

35

36

37

38

39

40

41

42

43

44

45

46

47

48

49

50

51

52

53

54

55

56

57

58

59

60

61

62

63

64

65

66

67

public abstract class KBaseAdapter<t>   extends BaseAdapter   {


    protected Context context;

    protected LayoutInflater inflater;

    protected List<t> itemList = new ArrayList<t>();


    public KBaseAdapter(Context context) {

        this.context   = context;

        inflater   = LayoutInflater.from(context);

    }


    /**

     * 判断数据是否为空

     *

     * @return 为空返回true,不为空返回false

     */

    public boolean isEmpty() {

        return itemList.isEmpty();

    }


    /**

     * 在原有的数据上添加新数据

     *

     * @param   itemList

     */

    public void addItems(List<t> itemList) {

        this.itemList.addAll(itemList);

        notifyDataSetChanged();

    }


    /**

     * 设置为新的数据,旧数据会被清空

     *

     * @param   itemList

     */

    public void setItems(List<t> itemList) {

        this.itemList.clear();

        this.itemList   = itemList;

        notifyDataSetChanged();

    }


    /**

     * 清空数据

     */

    public void clearItems() {

        itemList.clear();

        notifyDataSetChanged();

    }


    @Override

    public int getCount() {

        return itemList.size();

    }


    @Override

    public Object getItem(int i) {

        return itemList.get(i);

    }


    @Override

    public long getItemId(int i) {

        return i;

    }


    @Override

    abstract public View getView(int i, View view, ViewGroup viewGroup);

}</t></t></t></t></t>


这个抽象基类集成了设置数据的方法,每个具体的适配器类只要再实现各自的getView方法就可以了。本Demo的券列表的适配器如下:

[代码]java代码:

?

01

02

03

04

05

06

07

08

09

10

11

12

13

14

15

16

17

18

19

20

21

22

23

24

25

26

27

28

29

30

31

32

33

34

35

36

37

38

39

40

41

42

43

44

45

46

47

48

49

public class CouponListAdapter   extends KBaseAdapter<couponbo>   {


    public CouponListAdapter(Context context) {

        super(context);

    }


    @Override

    public View getView(int i, View view, ViewGroup viewGroup) {

        ViewHolder   holder;

        if (view == null) {

            view   = inflater.inflate(R.layout.item_list_coupon, viewGroup, false);

            holder   = new ViewHolder();

            holder.titleText   = (TextView) view.findViewById(R.id.text_item_title);

            holder.infoText   = (TextView) view.findViewById(R.id.text_item_info);

            holder.priceText   = (TextView) view.findViewById(R.id.text_item_price);

            view.setTag(holder);

        }   else {

            holder   = (ViewHolder) view.getTag();

        }


        CouponBO   coupon = itemList.get(i);

        holder.titleText.setText(coupon.getName());

        holder.infoText.setText(coupon.getIntroduce());

        SpannableString   priceString;

        //   根据不同的券类型展示不同的价格显示方式

        switch (coupon.getModelType()) {

            default:

            case CouponBO.TYPE_CASH:

                priceString   = CouponPriceUtil.getCashPrice(context, coupon.getFaceValue(),   coupon.getEstimateAmount());

                break;

            case CouponBO.TYPE_DEBIT:

                priceString   = CouponPriceUtil.getVoucherPrice(context, coupon.getDebitAmount(),   coupon.getMiniAmount());

                break;

            case CouponBO.TYPE_DISCOUNT:

                priceString   = CouponPriceUtil.getDiscountPrice(context, coupon.getDiscount(),   coupon.getMiniAmount());

                break;

        }

        holder.priceText.setText(priceString);


        return view;

    }


    static class ViewHolder {

        TextView   titleText;

        TextView   infoText;

        TextView   priceText;

    }


}</couponbo>


而券列表的Activity简单实现如下:

[代码]java代码:

?

01

02

03

04

05

06

07

08

09

10

11

12

13

14

15

16

17

18

19

20

21

22

23

24

25

26

27

28

29

30

31

32

33

34

35

36

37

38

39

40

41

42

43

44

45

46

47

48

49

50

51

52

53

54

55

public class CouponListActivity   extends KBaseActivity   implements SwipeRefreshLayout.OnRefreshListener   {

    private SwipeRefreshLayout swipeRefreshLayout;

    private ListView listView;

    private CouponListAdapter listAdapter;

    private int currentPage = 1;


    @Override

    protected void onCreate(Bundle savedInstanceState) {

        super.onCreate(savedInstanceState);

        setContentView(R.layout.activity_coupon_list);


        initViews();

        getData();


        //   TODO 添加上拉加载更多的功能

    }


    private void initViews() {

        swipeRefreshLayout   = (SwipeRefreshLayout) findViewById(R.id.swipe_refresh_layout);

        swipeRefreshLayout.setOnRefreshListener(this);

        listView   = (ListView) findViewById(R.id.list_view);

        listAdapter   = new CouponListAdapter(this);

        listView.setAdapter(listAdapter);

    }


    private void getData() {

        this.appAction.listCoupon(currentPage,   new ActionCallbackListener<list<couponbo>>()   {

            @Override

            public void onSuccess(List<couponbo> data) {

                if (!data.isEmpty()) {

                    if (currentPage == 1) { // 第一页

                        listAdapter.setItems(data);

                    }   else { // 分页数据

                        listAdapter.addItems(data);

                    }

                }

                swipeRefreshLayout.setRefreshing(false);

            }


            @Override

            public void onFailure(String errorEvent, String message) {

                Toast.makeText(context,   message, Toast.LENGTH_SHORT).show();

                swipeRefreshLayout.setRefreshing(false);

            }

        });

    }


    @Override

    public void onRefresh() {

        //   需要重置当前页为第一页,并且清掉数据

        currentPage   = 1;

        listAdapter.clearItems();

        getData();

    }

}</couponbo></list<couponbo>


完结

原文链接:http://www.apkbus.com/blog-705730-60893.html

打开App,阅读手记
0人推荐
发表评论
随时随地看视频慕课网APP