
o 几个月之前在做项目的布局优化时,使用 Hierarchy Viewer 查看项目的层级结构,然后发现顶层的布局并不是在XML中我写的根布局,而是嵌套了多层 Layout ,简单查阅了一些资料之后明白这是系统为我们加上的。把这个知识点写在了印象笔记中的 TODO list(里面还有好多知识想研究,一直在拖延T.T),搁置了好久最近重新拿出来好好研究了一下,争取做到温故知新,融会贯通嘛。
也许有的同学没看过 Hierarchy Viewer 下项目的界面布局,没关系,我现在带大家了解下。
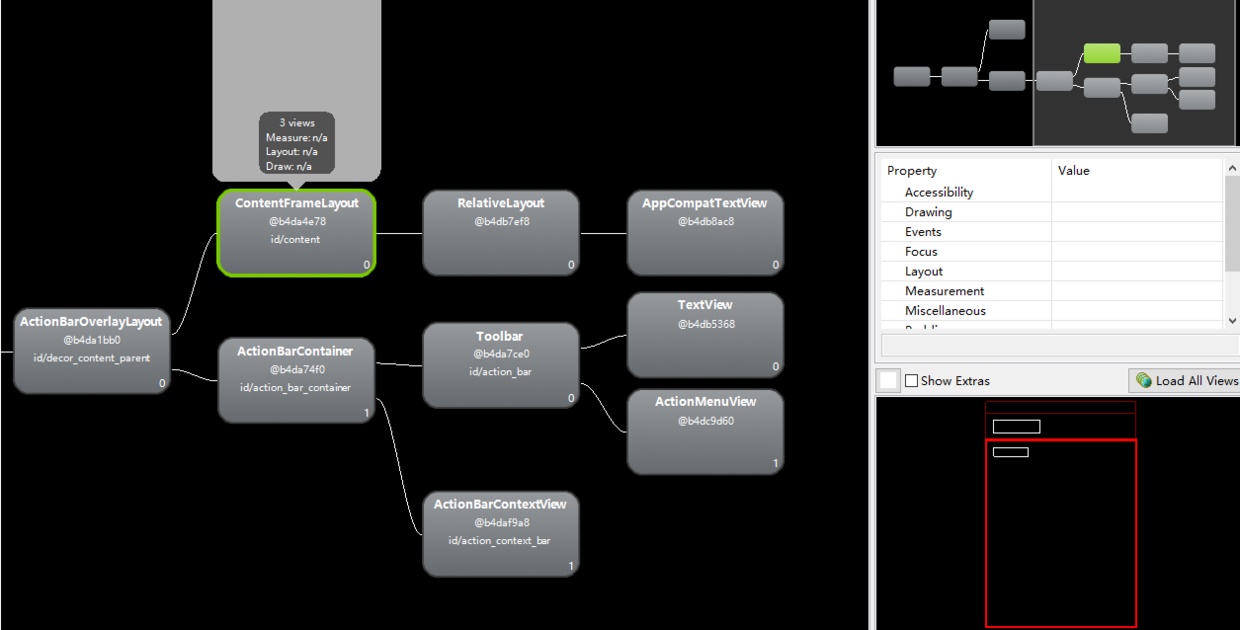
新建一个 module ,打开 sdk tool 文件夹下的 Hierarchy Viewer ,布局结构展示如下:

先别着急找放大镜,想想我们新建项目的默认布局,按理说根布局应该是 RelativeLayout ,并且子 View 是一个 TextView 写着 “Hello World”才对啊~ 多出来的这些布局层级是什么?
既然陌生又看不懂,那就先从我们熟悉的入手,找一下我们自己写的布局:
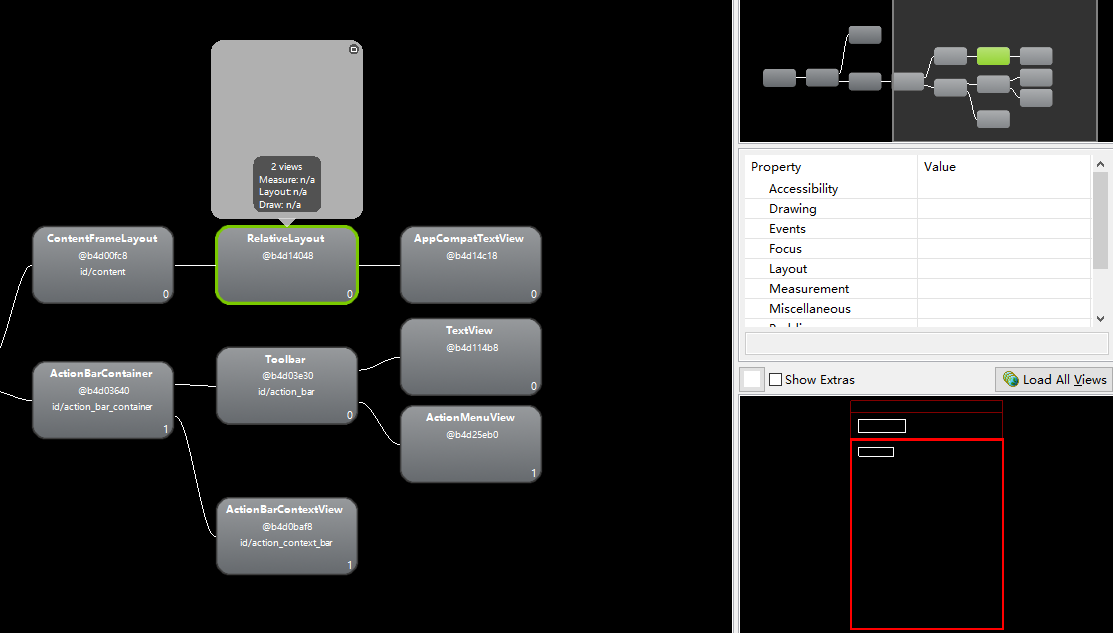
原来 RelativeLayout 和它的子 View TextView 在这里,看一下左下角的位置标识,红框部分指明 RelativeLayout 是 Toolbar 以下的部分。
再想想,我们是通过什么方法将这个布局填充到 Activity 上的呢?
没错是 setContentView
那就在 setContentView 中寻找蛛丝马迹吧
因为在 Android Studio 中 MainActivity 默认继承于v7包下的 AppCompatActivity ,目的是为了提供控件的向下兼容或者新控件,AppCompatActivity 也是层层继承于 Activity ,所以我们直接去看 Activity 的 setContentView
1 2 3 4 5 6 7 8 9 10 11 12 13 | /** * Set the activity content from a layout resource. The resource will be * inflated, adding all top-level views to the activity. * * @param layoutResID Resource ID to be inflated. * * @see #setContentView(android.view.View) * @see #setContentView(android.view.View, android.view.ViewGroup.LayoutParams) */ public void setContentView(int layoutResID) { getWindow().setContentView(layoutResID); initWindowDecorActionBar(); } |
getWindow() 拿到了 Activity 的成员变量 mWindow ,进而调用了 setContentView() 方法,mWindow 是 Window 类,继续跟进,看看 Window 类是什么
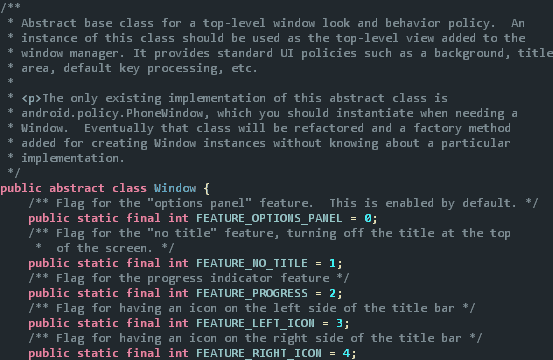
注释中的描述翻译过来就是,Window 是 视觉和行为表现的顶层抽象基类,它的实例会当作顶层视图添加进 WindowManager , 它有一个唯一的实现类是 PhoneWindow。
本文我们不会去剖析 WindowManager 有哪些作用和行为,我默默地把它加入了我的 TODO list 中,拖延到什么时候就不一定了哈T.T。
为了防止你忘了我们在做什么和我们即将做什么,先来一个中场回顾:
首先我们查看布局时发现有很多“超出我们预料和理解范畴”的布局出现,跟进 setContentView() 方法,发现 Acitvity 中是 Window 调用了 setContentView() ,而抽象基类 Window 有一个唯一的实现类 PhoneWindow。不多说,来看看实现类 PhoneWindow 中的 setContentView() 方法。
1 2 3 4 5 6 7 8 9 10 11 12 13 14 15 16 17 18 19 20 21 22 23 24 25 | @Override public void setContentView(int layoutResID) { // Note: FEATURE_CONTENT_TRANSITIONS may be set in the process of installing the window // decor, when theme attributes and the like are crystalized. Do not check the feature // before this happens. if (mContentParent == null) { //初始化 DectorView 和 mContentParent installDecor(); } else if (!hasFeature(FEATURE_CONTENT_TRANSITIONS)) { mContentParent.removeAllViews(); } if (hasFeature(FEATURE_CONTENT_TRANSITIONS)) { final Scene newScene = Scene.getSceneForLayout(mContentParent, layoutResID, getContext()); transitionTo(newScene); } else { //首次 setContentView 走到这里 mLayoutInflater.inflate(layoutResID, mContentParent); } final Callback cb = getCallback(); if (cb != null && !isDestroyed()) { cb.onContentChanged(); } } |
当我们没有调用 setContentView() 时,mContentParent (是ViewGroup) 是 null ,所以有两行代码值得我们关注 installDecor() 和 mLayoutInflater.inflate(layoutResID, mContentParent)
首先 mContentParent 作为第二个参数传入了 inflate 方法中, 也就是说 我的布局中的 RelativeLayout 被层层解析之后的 View 视图树 作为了 mContentParent 的子 View 插入。
现在不知道 mContentParent 是什么没关系,继续跟进 installDecor() 方法。
随着API level的升高,源码发生了很多有关 Feature 、 Style 和 Wiget 的细微变化,还是蛮有意思的
这里我还想说一句,相信在 Android 设计之初 PhoneWindow 这个类就存在了,显然现在的这个命名有些问题,毕竟目前的设备不仅仅是 phone 了,也许改成 DeviceWindow 会比较合适
1 2 3 4 5 6 7 8 9 10 11 12 13 14 15 16 17 18 19 20 21 22 23 24 25 26 27 | private void installDecor() { if (mDecor == null) { // new 一个 DecorView mDecor = generateDecor(); mDecor.setDescendantFocusability(ViewGroup.FOCUS_AFTER_DESCENDANTS); } if (mContentParent == null) { //初始化 mContentParent mContentParent = generateLayout(mDecor); // Set up decor part of UI to ignore fitsSystemWindows if appropriate. mDecor.makeOptionalFitsSystemWindows(); // 找到一个带ActionBar属性的布局容器 decorContentParent final DecorContentParent decorContentParent = (DecorContentParent) mDecor.findViewById( R.id.decor_content_parent); if (decorContentParent != null) { mDecorContentParent = decorContentParent; mDecorContentParent.setWindowCallback(getCallback()); //配置UI设置 mDecorContentParent.setUiOptions(mUiOptions); } } else { if (mContentParent instanceof FrameLayout) { ((FrameLayout)mContentParent).setForeground(null); } } } |
省略了与分析无关的代码,其中很多是对 feature 和 style 属性的一些判断和设置,首先installDecor() 方法从字面意思看,很有可能是初始化加载 DecorView 的,首先看看 PhoneWindow 中两个成员变量 mDecor 和 mContentParent 分别是什么:

描述的信息可以概括为 mDector 是 窗体的顶级视图,mContentParent 是放置窗体内容的容器,也就是我们 setContentView() 时,所加入的 View 视图树。
当二者为 null 时,有两行代码值得关注,分别为 mDecor = generateDecor() 和 mContentParent = generateLayout(mDecor)
不过在此之前,先来看看这行寻找 decorContentParent 布局的代码
1 2 | final DecorContentParent decorContentParent = (DecorContentParent) mDecor.findViewById( R.id.decor_content_parent); |
decor_content_parent 看起来很眼熟的样子,点击它进入布局来看看:
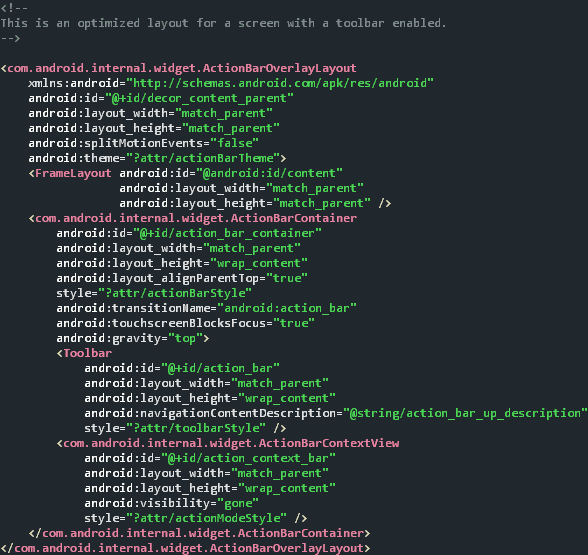
为什么说 decor_content_parent 眼熟呢?打开布局查看器来看看
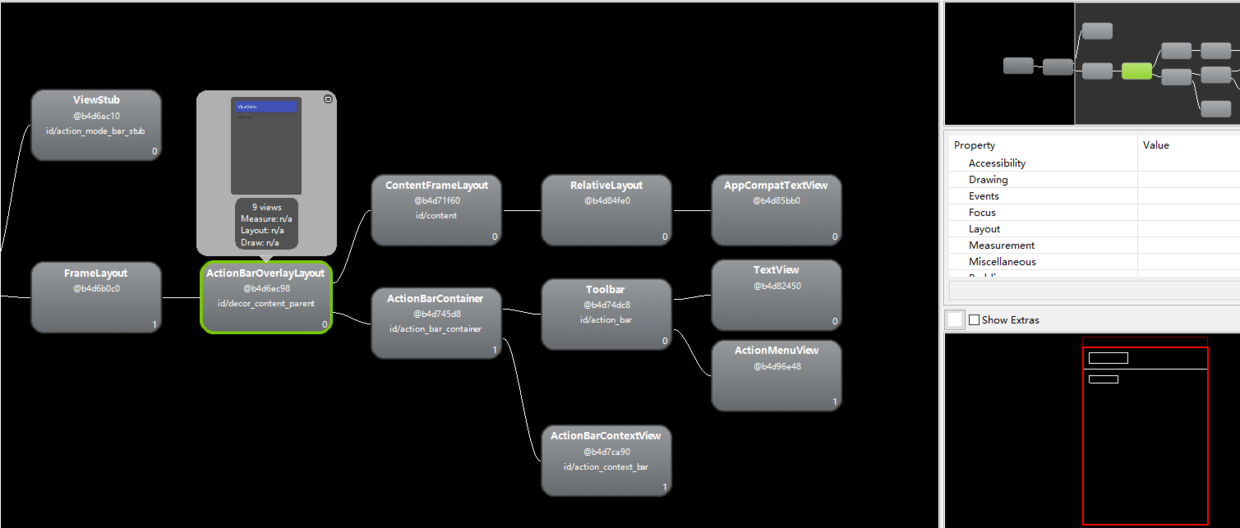
在 Hierarchy Viewer 中可以看到 ActionBarOverlayLayout 的布局文件的 id 正是decor_content_parent 不光如此 布局文件中的每个 View 节点的名称和 id 都与 Hierarchy Viewer 视图中的一一对应。再看其中的 FrameLayout 的 id 为 content , 我们自然而然的猜测它就是我们根布局 RelativeLayout 的父布局,心里一下有了底,继续研究~
跟进 generateDecor() 方法:
1 2 3 | protected DecorView generateDecor() { return new DecorView(getContext(), -1); } |
这个没什么可多说的,就是为我们的窗体 new 了 一个 DecorView 。
再来看 generateLayout(mDecor)
1 2 3 4 5 6 7 8 9 10 11 12 13 14 15 16 17 18 19 20 21 22 23 24 25 26 27 28 29 30 31 | protected ViewGroup generateLayout(DecorView decor) { // Apply data from current theme. // 获得窗体的 style 样式 TypedArray a = getWindowStyle();
// 省略大量无关代码
// Inflate the window decor. int layoutResource; int features = getLocalFeatures(); //填充带有 style 和 feature 属性的 layoutResource (是一个layout id) View in = mLayoutInflater.inflate(layoutResource, null); // 插入的顶层布局 DecorView 中 decor.addView(in, new ViewGroup.LayoutParams(MATCH_PARENT, MATCH_PARENT)); mContentRoot = (ViewGroup) in; // 找到我们XML文件的父布局 contentParent ViewGroup contentParent = (ViewGroup)findViewById(ID_ANDROID_CONTENT); if (contentParent == null) { throw new RuntimeException("Window couldn't find content container view"); } // 省略无关代码 mDecor.finishChanging(); // 返回 contentParent 并赋值给成员变量 mContentParent return contentParent; } |
这个方法的代码有300多行,剔除了很多无关代码,我们分模块来看:
1 2 3 | View in = mLayoutInflater.inflate(layoutResource, null); decor.addView(in, new ViewGroup.LayoutParams(MATCH_PARENT, MATCH_PARENT)); mContentRoot = (ViewGroup) in; |
首先 layoutResource 是系统的 xml 布局文件的 id,里面有我们设置窗体的 features 和 style 属性,然后通过 decor.addView 添加进 mDector 视图。这里也是我们要在 setContentView() 之前执行requestWindowFeature() 才可以的原因
1 2 3 4 5 6 7 8 9 10 11 | ViewGroup contentParent = (ViewGroup)findViewById(ID_ANDROID_CONTENT); if (contentParent == null) { throw new RuntimeException("Window couldn't find content container view"); } // Remaining setup -- of background and title -- that only applies // to top-level windows.
mDecor.finishChanging(); return contentParent; |
关键点来了, ViewGroup contentParent = (ViewGroup)findViewById(ID_ANDROID_CONTENT);
通过 findViewById 找到系统修饰布局文件中 id 为:
这个 id 是不是非常眼熟,与我们上文的猜测不谋而合,这就是我们一直在寻找的作为activity_main 的父布局的 FrameLayout
我们在布局文件查看器中再找一下:
return contentParent 这一步就返回了我们的成员变量 mContentParent
到现在为止其实整个知识点主干的逻辑已经走完了,为大家花了一张简单的思维导图
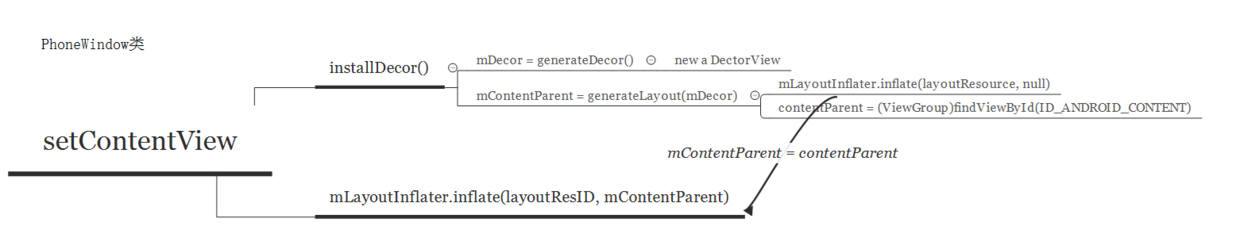
并不复杂,线性逻辑调用还是蛮清晰的。
不过相信你也许会问,上文你仅仅提到了两个布局呀,一个顶层的 DecorView 和 我们布局文件的父布局 FrameLayout ,而查看布局层级时,为什么有这么多其他这么多额外的布局呢?
因为随着 Android API level 的不断变化,组件也在随之增多,比如 ActionBar Toolbar 等等,这些组件相关的布局是否加载与你的 feature 设置设备的特性相关联,而且版本不同,布局文件的层级结构也在不断变化着丰富着,我这个是 API22 的源码,我做了一些对比,有许多代码细节是不一样的,比如在这里的 feature 就新增了 Toolbar ,但是大体上的逻辑框架肯定不会变
比如我们目前的 MainActivity 的视图主要有两大分支,一条设置 Toolbar 的相关配置,一条就是我们的 RelativeLayout 了。
写在后面:
写这篇博客的原因一是我自己要研究梳理总结这个知识点,二是想让大家明白,Android 版本之间的迭代很快,一年前的博客阐述的观点到今天可能就再不适用了,但是 PhoneWindow 管理布局视图的这套逻辑框架,却一直没怎么改变。通过阅读源码,可以学习 Google 工程师们良好的代码风格,汲取他们搭建框架的思想,让我们自己写的代码也能如此健壮。


