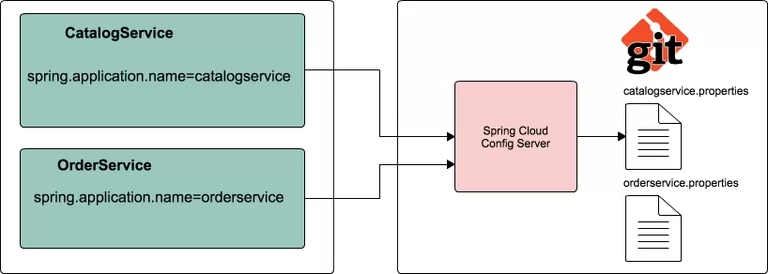
SpringBoot通过properties或者YAML文件为开发者提供了灵活的系统配置方案,我们可以通过多个properties配置为开发环节的各个环境定制不同的系统配置,比如application.properties, application-dev.properties, application-prod.properties等。然而应用一旦启动,要想更新配置,就必须重启应用,新的配置才能生效。
与此同时,在拥有许多服务应用的微服务架构中,开发者们希望可以通过统一管理的方式来管理各个微服务的系统配置。
如何才能一举两得地解决以上这些问题呢?
解决方案答案就是:Spring Cloud配置中心(Spring Cloud Config)。开发者可以通过Spring Cloud Config Server来统一获取系统配置,并通过Spring Cloud Config Client来消费这些配置信息。通过Spring Cloud配置中心,甚至可以不用重新启动应用就可以更新应用配置。
Spring Cloud Config Server
Spring Cloud Config Server其实仅仅是一个带有配置来源属性的SpringBoot应用,其配置源可以是git仓库、SVN仓库或者一个Consul服务。
本文将使用git仓库作为配置源。

首先需要一个Git仓库用于存储properties文件,笔者已经在github上创建好了一个配置仓库,地址是https://github.com/sivaprasadreddy/config-repo.git.
假设需要开发两个SpringBoot微服务应用,一个是catalog-service,另一个是order-service。我们先分别为这两个应用创建配置文件catalogservice.properties和orderservice.properties
config-repo/catalogservice.properties
spring.datasource.driver-class-name=com.mysql.jdbc.Driver
spring.datasource.url=jdbc:mysql://localhost:3306/catalog
spring.datasource.username=root
spring.datasource.password=admin
config-repo/orderservice.properties
spring.rabbitmq.host=localhost
spring.rabbitmq.port=5672
spring.rabbitmq.username=guest
spring.rabbitmq.password=guest
我们可以顺手为这两个应用创建开发和生产配置文件:catalogservice-dev.properties, catalogservice-prod.properties, orderservice-dev.properties, orderservice-prod.properties.
config-repo/catalogservice-prod.properties
spring.datasource.driver-class-name=com.mysql.jdbc.Driver
spring.datasource.url=jdbc:mysql://appsrv1:3306/catalog
spring.datasource.username=appuser46
spring.datasource.password=T(iV&#)X84@1!
config-repo/orderservice-prod.properties
spring.rabbitmq.host=srv245.ind.com
spring.rabbitmq.port=5672
spring.rabbitmq.username=admin23
spring.rabbitmq.password=uY7&%we@1!
创建好这些文件之后,记得提交到git仓库中。
Spring Cloud Config Server应用
笔者建议使用Maven构建Spring项目,配置POM.XML文件为:
<?xml version="1.0" encoding="UTF-8"?>
<project xmlns="http://maven.apache.org/POM/4.0.0"
  xmlns:xsi="http://www.w3.org/2001/XMLSchema-instance"
    xsi:schemaLocation="http://maven.apache.org/POM/4.0.0
  http://maven.apache.org/xsd/maven-4.0.0.xsd">
    <modelVersion>4.0.0</modelVersion>

    <groupId>com.sivalabs</groupId>
    <artifactId>spring-cloud-config-server</artifactId>
    <version>1.0.0-SNAPSHOT</version>
    <packaging>jar</packaging>
    <name>spring-cloud-config-server</name>

    <parent>
        <groupId>org.springframework.boot</groupId>
        <artifactId>spring-boot-starter-parent</artifactId>
        <version>1.5.6.RELEASE</version>
        <relativePath/>
    </parent>

    <properties>
        <project.build.sourceEncoding>UTF-8</project.build.sourceEncoding>
        <project.reporting.outputEncoding>UTF-8</project.reporting.outputEncoding>
        <java.version>1.8</java.version>
        <spring-cloud.version>Dalston.SR2</spring-cloud.version>
    </properties>

    <dependencies>
        <dependency>
            <groupId>org.springframework.boot</groupId>
            <artifactId>spring-boot-starter-actuator</artifactId>
        </dependency>
        <dependency>
            <groupId>org.springframework.cloud</groupId>
            <artifactId>spring-cloud-config-server</artifactId>
        </dependency>
        <dependency>
            <groupId>org.springframework.boot</groupId>
            <artifactId>spring-boot-starter-test</artifactId>
            <scope>test</scope>
        </dependency>
    </dependencies>

    <dependencyManagement>
        <dependencies>
            <dependency>
                <groupId>org.springframework.cloud</groupId>
                <artifactId>spring-cloud-dependencies</artifactId>
                <version>${spring-cloud.version}</version>
                <type>pom</type>
                <scope>import</scope>
            </dependency>
        </dependencies>
    </dependencyManagement>

    <build>
        <plugins>
            <plugin>
                <groupId>org.springframework.boot</groupId>
                <artifactId>spring-boot-maven-plugin</artifactId>
            </plugin>
        </plugins>
    </build>
</project>
为了将这个SpringBoot应用配置为SpringCloud Config Server,只需要在主程序入口类中添加@EnableConfigServer注解并且在应用配置中设置spring.cloud.config.server.git.uri的值为git仓库地址即可,simple。
package com.sivalabs.configserver;

import org.springframework.boot.SpringApplication;
import org.springframework.boot.autoconfigure.SpringBootApplication;
import org.springframework.cloud.config.server.EnableConfigServer;

@EnableConfigServer
@SpringBootApplication
public class ConfigServerApplication {

    public static void main(String[] args) {
        SpringApplication.run(ConfigServerApplication.class, args);
    }
}
spring-cloud-config-server/src/main/resources/application.properties
server.port=8888
spring.cloud.config.server.git.uri=https://github.com/sivaprasadreddy/config-repo.git
management.security.enabled=false
除了配置git仓库地址之外,我们还另外配置了应用的服务端口以及禁用了actuator安全配置。
Spring Cloud Config Server暴露了以下REST端点用于获取应用配置信息:
/{application}/{profile}[/{label}]
/{application}-{profile}.yml
/{label}/{application}-{profile}.yml
/{application}-{profile}.properties
/{label}/{application}-{profile}.properties
这里的 {application}是spring.config.name属性的配置, {profile}是活动的profile,{label}是可选的git label,dufault表示master分支。
现在,访问http://localhost:8888/catalogservice/default 应用将会返回catalogservice的默认应用配置。
{
    "name": "catalogservice",
    "profiles": [
        "default"
    ],
    "label": null,
    "version": "8a06f25aeb3f28a8f06b5634eae01858b2c6465d",
    "state": null,
    "propertySources": [
        {
            "name": "https://github.com/sivaprasadreddy/config-repo.git/catalogservice.properties",
            "source": {
                "spring.datasource.username": "root",
                "spring.datasource.driver-class-name": "com.mysql.jdbc.Driver",
                "spring.datasource.password": "admin",
                "spring.datasource.url": "jdbc:mysql://localhost:3306/catalog"
            }
        }
    ]
}
如果访问http://localhost:8888/catalogservice/prod 将会获取到catalogservice 生产环境配置信息。
{
    "name": "catalogservice",
    "profiles": [
        "prod"
    ],
    "label": null,
    "version": "8a06f25aeb3f28a8f06b5634eae01858b2c6465d",
    "state": null,
    "propertySources": [
        {
            "name": "https://github.com/sivaprasadreddy/config-repo.git/catalogservice-prod.properties",
            "source": {
                "spring.datasource.username": "appuser46",
                "spring.datasource.driver-class-name": "com.mysql.jdbc.Driver",
                "spring.datasource.password": "T(iV&#)X84@1!",
                "spring.datasource.url": "jdbc:mysql://appsrv1:3306/catalog"
            }
        },
        {
            "name": "https://github.com/sivaprasadreddy/config-repo.git/catalogservice.properties",
            "source": {
                "spring.datasource.username": "root",
                "spring.datasource.driver-class-name": "com.mysql.jdbc.Driver",
                "spring.datasource.password": "admin",
                "spring.datasource.url": "jdbc:mysql://localhost:3306/catalog"
            }
        }
    ]
}
同样,可以通过访问http://localhost:8888/orderservice/default 来获取到orderservice的配置信息。
{
    "name": "orderservice",
    "profiles": [
        "default"
    ],
    "label": null,
    "version": "8a06f25aeb3f28a8f06b5634eae01858b2c6465d",
    "state": null,
    "propertySources": [
        {
            "name": "https://github.com/sivaprasadreddy/config-repo.git/orderservice.properties",
            "source": {
              "spring.rabbitmq.host": "localhost"
              "spring.rabbitmq.port": "5672"
              "spring.rabbitmq.username": "guest"
              "spring.rabbitmq.password": "guest"
            }
        },
        {
            "name": "https://github.com/sivaprasadreddy/config-repo.git/application.properties",
            "source": {
                "message": "helloworld",
                "jdbc.datasource.url": "jdbc:mysql://localhost:3306/defapp"
            }
        }
    ]
}
到此为止,已经完成了如何通过Spring Cloud Config Server来创建一个配置服务并且通过REST API获取到特定的配置信息了。接下来将会通过创建一个客户端应用,该应用将通过从配置中心服务器端获取应用配置,取代直接将配置文件植入到应用中的配置方式。
Spring Cloud Config Client应用
使用Config Client, Web和Actuator starters来创建一个Sping Cloud Config客户端应用catalog-service。
<?xml version="1.0" encoding="UTF-8"?>
<project xmlns="http://maven.apache.org/POM/4.0.0"
  xmlns:xsi="http://www.w3.org/2001/XMLSchema-instance"
    xsi:schemaLocation="http://maven.apache.org/POM/4.0.0
  http://maven.apache.org/xsd/maven-4.0.0.xsd">
    <modelVersion>4.0.0</modelVersion>

    <groupId>com.sivalabs</groupId>
    <artifactId>catalog-service</artifactId>
    <version>1.0.0-SNAPSHOT</version>
    <packaging>jar</packaging>

    <name>spring-cloud-config-client</name>

    <parent>
        <groupId>org.springframework.boot</groupId>
        <artifactId>spring-boot-starter-parent</artifactId>
        <version>1.5.6.RELEASE</version>
        <relativePath/>
    </parent>

    <properties>
        <project.build.sourceEncoding>UTF-8</project.build.sourceEncoding>
        <project.reporting.outputEncoding>UTF-8</project.reporting.outputEncoding>
        <java.version>1.8</java.version>
        <spring-cloud.version>Dalston.SR2</spring-cloud.version>
    </properties>

    <dependencies>
        <dependency>
            <groupId>org.springframework.cloud</groupId>
            <artifactId>spring-cloud-starter-config</artifactId>
        </dependency>
        <dependency>
            <groupId>org.springframework.boot</groupId>
            <artifactId>spring-boot-starter-actuator</artifactId>
        </dependency>
        <dependency>
            <groupId>org.springframework.boot</groupId>
            <artifactId>spring-boot-starter-web</artifactId>
        </dependency>
        <dependency>
            <groupId>org.springframework.boot</groupId>
            <artifactId>spring-boot-starter-test</artifactId>
            <scope>test</scope>
        </dependency>
    </dependencies>

    <dependencyManagement>
        <dependencies>
            <dependency>
                <groupId>org.springframework.cloud</groupId>
                <artifactId>spring-cloud-dependencies</artifactId>
                <version>${spring-cloud.version}</version>
                <type>pom</type>
                <scope>import</scope>
            </dependency>
        </dependencies>
    </dependencyManagement>

    <build>
        <plugins>
            <plugin>
                <groupId>org.springframework.boot</groupId>
                <artifactId>spring-boot-maven-plugin</artifactId>
            </plugin>
        </plugins>
    </build>

</project>
通常,在SpringBoot应用中是使用application.properties来配置应用属性的。但是在使用Spring Cloud Config Server时,我们使用bootstrap.properties或者bootstrap.yml来配置Config Server的URL,客户端应用会通过从Server端获取相应的配置来启动。
src/main/resources/bootstrap.properties:
server.port=8181
spring.application.name=catalogservice
spring.cloud.config.uri=http://localhost:8888
management.security.enabled=false
通过spring.cloud.config.uri属性来配置Server的URI,并且通过spring.application.name属性配置应用名称。
通过catalogservice的Main入口启动应用:
package com.sivalabs.catalogservice;

import org.springframework.boot.SpringApplication;
import org.springframework.boot.autoconfigure.SpringBootApplication;

@SpringBootApplication
public class CatalogServiceApplication {

    public static void main(String[] args) {
        SpringApplication.run(CatalogServiceApplication.class, args);
    }
}
可以通过http://localhost:8181/env 获取到应用的属性配置。
{
    "profiles": [],
    "server.ports": {
        "local.server.port": 8080
    },
    "configService:configClient": {
        "config.client.version": "8a06f25aeb3f28a8f06b5634eae01858b2c6465d"
    },
    "configService:https://github.com/sivaprasadreddy/config-repo.git/catalogservice.properties": {
        "spring.datasource.username": "root",
        "spring.datasource.driver-class-name": "com.mysql.jdbc.Driver",
        "spring.datasource.password": "******",
        "spring.datasource.url": "jdbc:mysql://localhost:3306/catalog"
    },
    "configService:https://github.com/sivaprasadreddy/config-repo.git/application.properties": {
        "message": "helloworld",
        "jdbc.datasource.url": "jdbc:mysql://localhost:3306/defapp"
    },
    "servletContextInitParams": {},
    "systemProperties": {
        ...
        ...
    },
    "systemEnvironment": {
        ...
        ...
    },
    "springCloudClientHostInfo": {
        "spring.cloud.client.hostname": "192.168.0.101",
        "spring.cloud.client.ipAddress": "192.168.0.101"
    },
    "applicationConfig: [classpath:/bootstrap.properties]": {
        "management.security.enabled": "false",
        "spring.cloud.config.uri": "http://localhost:8888",
        "spring.application.name": "catalogservice"
    },
    "defaultProperties": {}
}
可以发现,catalog-service应用在启动时从配置Server获取到了其应用配置。你甚至可以通过@Value或者@EnableConfigurationProperties注解在应用程序中使用这些配置信息。
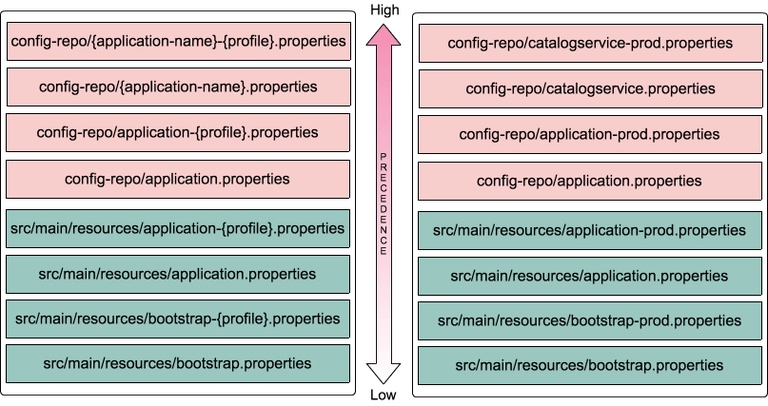
配置优先级
下图展示了配置文件的使用优先级顺序:

运行时刷新配置
Let us see how we can update the configuration properties of catalog-service at runtime without requiring to restart the application.
最后,看看如何通过spring Cloud配置中心在运行时更新配置,而不必重启应用。
首先更新catalogservice.properties文件并提交到git仓库中,此时你如果访问http://localhost:8181/env 看到的仍将是旧的配置信息。
为了刷新配置,首先需要在需要实时更新的Bean上加上@RefreshScope注解,然后通过POST请求访问http://localhost:8181/refresh 即可实时更新应用配置。
@RestController
@RefreshScope
class HomeController
{
    @Value("${name}")
    String name;

    @GetMapping("/name")
    public String name()
    {
        return name;
    }
}
动手试一试吧!
写到这里,读者们可能还有一个疑问,通过手动POST请求更新SpringBoot应用的而配置虽然方便,但是当微服务系统数目增多的情况下,将带来极大的不便,有没有办法可以在commit更新的时候自动触发刷新配置呢?答案是肯定的,欲知后事,且看下回:《使用Spring Cloud Bus自动刷新应用配置》。


 随时随地看视频


