大家好,我叫黄轶,来自滴滴公共前端团队,最近在幕课网上线了一门 Vue.js 的实战课程——《Vue.js高仿饿了么外卖App 2016最火前端框架》,同时,我们团队最近写了一本书 ——《Vue.js 权威指南》,内容丰富,由浅入深。不过有一些同学反馈说缺少 Vuex 的介绍的章节。既然 Vue.js 2.0 已经正式发布了,我们也要紧跟步伐,和大家聊一聊 Vuex 2.0。本文并不打算讲官网已有的内容,而会通过源码分析的方式,让同学们从另外一个角度认识和理解 Vuex 2.0。
当我们用 Vue.js 开发一个中到大型的单页应用时,经常会遇到如下问题:
- 如何让多个 Vue 组件共享状态
- Vue 组件间如何通讯
通常,在项目不是很复杂的时候,我们会利用全局事件总线 (global event bus)解决,但是随着复杂度的提升,这些代码将变的难以维护。因此,我们需要一种更加好用的解决方案,于是,Vuex 诞生了。
本文并不是 Vuex 的科普文章,对于还不了解 Vuex 的同学,建议先移步 Vuex 官方文档;看英文文档吃力的同学,可以看 Vuex 的中文文档。

Vuex 的设计思想受到了 Flux,Redux 和 The Elm Architecture 的启发,它的实现又十分巧妙,和 Vue.js 配合相得益彰,下面就让我们一起来看它的实现吧。
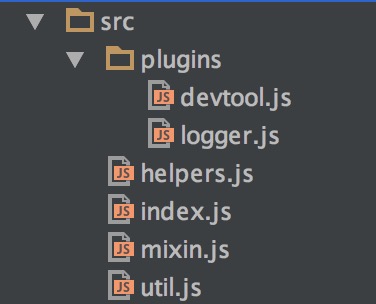
目录结构Vuex 的源码托管在 github,我们首先通过 git 把代码 clone 到本地,选一款适合自己的 IDE 打开源码,展开 src 目录,如下图所示:

src 目录下的文件并不多,包含几个 js 文件和 plugins 目录, plugins 目录里面包含 2 个 Vuex 的内置插件,整个源码加起来不过 500-600 行,可谓非常轻巧的一个库。
麻雀虽小,五脏俱全,我们先直观的感受一下源码的结构,接下来看一下其中的实现细节。
源码分析本文的源码分析过程不会是自上而下的给代码加注释,我更倾向于是从 Vuex 提供的 API 和我们的使用方法等维度去分析。Vuex 的源码是基于 es6 的语法编写的,对于不了解 es6 的同学,建议还是先学习一下 es6。
从入口开始
看源码一般是从入口开始,Vuex 源码的入口是 src/index.js,先来打开这个文件。
我们首先看这个库的 export ,在 index.js 代码最后。
export default {
  Store,
  install,
  mapState,
  mapMutations,
  mapGetters,
  mapActions
}
这里可以一目了然地看到 Vuex 对外暴露的 API。其中, Store 是 Vuex 提供的状态存储类,通常我们使用 Vuex 就是通过创建 Store 的实例,稍后我们会详细介绍。接着是 install 方法,这个方法通常是我们编写第三方 Vue 插件的“套路”,先来看一下“套路”代码:
function install (_Vue) {
  if (Vue) {
    console.error(
      '[vuex] already installed. Vue.use(Vuex) should be called only once.'
    )
    return
  }
  Vue = _Vue
  applyMixin(Vue)
}

// auto install in dist mode
if (typeof window !== 'undefined' && window.Vue) {
  install(window.Vue)
}
我们实现了一个 install 方法,这个方法当我们全局引用 Vue ,也就是 window 上有 Vue 对象的时候,会手动调用 install 方法,并传入 Vue 的引用;当 Vue 通过 npm 安装到项目中的时候,我们在代码中引入第三方 Vue 插件通常会编写如下代码:
import Vue from 'vue'
import Vuex from 'vuex'
...
Vue.use(Vuex)
当我们执行 Vue.use(Vuex) 这句代码的时候,实际上就是调用了 install 的方法并传入 Vue 的引用。install 方法顾名思义,现在让我们来看看它的实现。它接受了一个参数 _Vue,函数体首先判断 Vue ,这个变量的定义在 index.js 文件的开头部分:
let Vue // bind on install对 Vue 的判断主要是保证 install 方法只执行一次,这里把 install 方法的参数 _Vue 对象赋值给 Vue 变量,这样我们就可以在 index.js 文件的其它地方使用 Vue 这个变量了。install 方法的最后调用了 applyMixin 方法,我们顺便来看一下这个方法的实现,在 src/mixin.js 文件里定义:
export default function (Vue) {
  const version = Number(Vue.version.split('.')[0])

  if (version >= 2) {
    const usesInit = Vue.config._lifecycleHooks.indexOf('init') > -1
    Vue.mixin(usesInit ? { init: vuexInit } : { beforeCreate: vuexInit })
  } else {
    // override init and inject vuex init procedure
    // for 1.x backwards compatibility.
    const _init = Vue.prototype._init
    Vue.prototype._init = function (options = {}) {
      options.init = options.init
        ? [vuexInit].concat(options.init)
        : vuexInit
      _init.call(this, options)
    }
  }

  /**
   * Vuex init hook, injected into each instances init hooks list.
   */

  function vuexInit () {
    const options = this.$options
    // store injection
    if (options.store) {
      this.$store = options.store
    } else if (options.parent && options.parent.$store) {
      this.$store = options.parent.$store
    }
  }
}
这段代码的作用就是在 Vue 的生命周期中的初始化(1.0 版本是 init,2.0 版本是 beforeCreated)钩子前插入一段 Vuex 初始化代码。这里做的事情很简单——给 Vue 的实例注入一个 $store 的属性,这也就是为什么我们在 Vue 的组件中可以通过 this.$store.xxx 访问到 Vuex 的各种数据和状态。
认识 Store 构造函数
我们在使用 Vuex 的时候,通常会实例化 Store 类,然后传入一个对象,包括我们定义好的 actions、getters、mutations、state等,甚至当我们有多个子模块的时候,我们可以添加一个 modules 对象。那么实例化的时候,到底做了哪些事情呢?带着这个疑问,让我们回到 index.js 文件,重点看一下 Store 类的定义。Store 类定义的代码略长,我不会一下就贴上所有代码,我们来拆解分析它,首先看一下构造函数的实现:
class Store {
  constructor (options = {}) {
    assert(Vue, `must call Vue.use(Vuex) before creating a store instance.`)
    assert(typeof Promise !== 'undefined', `vuex requires a Promise polyfill in this browser.`)

    const {
      state = {},
      plugins = [],
      strict = false
    } = options

    // store internal state
    this._options = options
    this._committing = false
    this._actions = Object.create(null)
    this._mutations = Object.create(null)
    this._wrappedGetters = Object.create(null)
    this._runtimeModules = Object.create(null)
    this._subscribers = []
    this._watcherVM = new Vue()

    // bind commit and dispatch to self
    const store = this
    const { dispatch, commit } = this
    this.dispatch = function boundDispatch (type, payload) {
      return dispatch.call(store, type, payload)
    }
    this.commit = function boundCommit (type, payload, options) {
      return commit.call(store, type, payload, options)
    }

    // strict mode
    this.strict = strict

    // init root module.
    // this also recursively registers all sub-modules
    // and collects all module getters inside this._wrappedGetters
    installModule(this, state, [], options)

    // initialize the store vm, which is responsible for the reactivity
    // (also registers _wrappedGetters as computed properties)
    resetStoreVM(this, state)

    // apply plugins
    plugins.concat(devtoolPlugin).forEach(plugin => plugin(this))
  }
  ...
}
构造函数的一开始就用了“断言函数”,来判断是否满足一些条件。
assert(Vue, `must call Vue.use(Vuex) before creating a store instance.`)这行代码的目的是确保 Vue 的存在,也就是在我们实例化 Store 之前,必须要保证之前的 install 方法已经执行了。
assert(typeof Promise !== 'undefined', `vuex requires a Promise polyfill in this browser.`)这行代码的目的是为了确保 Promsie 可以使用的,因为 Vuex 的源码是依赖 Promise 的。Promise 是 es6 提供新的 API,由于现在的浏览器并不是都支持 es6 语法的,所以通常我们会用 babel 编译我们的代码,如果想使用 Promise 这个 特性,我们需要在 package.json 中添加对 babel-polyfill 的依赖并在代码的入口加上 import 'babel-polyfill' 这段代码。
再来看看 assert 这个函数,它并不是浏览器原生支持的,它的实现在 src/util.js 里,代码如下:
export function assert (condition, msg) {
  if (!condition) throw new Error(`[vuex] ${msg}`)
}
非常简单,对 condition 判断,如果不不为真,则抛出异常。这个函数虽然简单,但这种编程方式值得我们学习。
再来看构造函数接下来的代码:
const {
  state = {},
  plugins = [],
  strict = false
} = options
这里就是利用 es6 的结构赋值拿到 options 里的 state,plugins 和 strict。state 表示 rootState,plugins 表示应用的插件、strict 表示是否开启严格模式。
接着往下看:
// store internal state
this._options = options
this._committing = false
this._actions = Object.create(null)
this._mutations = Object.create(null)
this._wrappedGetters = Object.create(null)
this._runtimeModules = Object.create(null)
this._subscribers = []
this._watcherVM = new Vue()
这里主要是创建一些内部的属性:
this._options 存储参数 options。
this._committing 标志一个提交状态,作用是保证对 Vuex 中 state 的修改只能在 mutation 的回调函数中,而不能在外部随意修改 state。
this._actions 用来存储用户定义的所有的 actions。
this._mutations 用来存储用户定义所有的 mutatins。
this._wrappedGetters 用来存储用户定义的所有 getters 。
this._runtimeModules 用来存储所有的运行时的 modules。
this._subscribers 用来存储所有对 mutation 变化的订阅者。
this._watcherVM 是一个 Vue 对象的实例,主要是利用 Vue 实例方法 $watch 来观测变化的。
继续往下看:
// bind commit and dispatch to self
const store = this
const { dispatch, commit } = this
this.dispatch = function boundDispatch (type, payload) {
  return dispatch.call(store, type, payload)
}
this.commit = function boundCommit (type, payload, options) {
  return commit.call(store, type, payload, options)
}

// strict mode
this.strict = strict
这里的代码也不难理解,把 Store 类的 dispatch 和 commit 的方法的 this 指针指向当前 store 的实例上,dispatch 和 commit 的实现我们稍后会分析。this.strict 表示是否开启严格模式,在严格模式下会观测所有的 state 的变化,建议在开发环境时开启严格模式,线上环境要关闭严格模式,否则会有一定的性能开销。
Vuex 的初始化核心
installModule
我们接着往下看:
// init root module.
// this also recursively registers all sub-modules
// and collects all module getters inside this._wrappedGetters
installModule(this, state, [], options)

// initialize the store vm, which is responsible for the reactivity
// (also registers _wrappedGetters as computed properties)
resetStoreVM(this, state)

// apply plugins
plugins.concat(devtoolPlugin).forEach(plugin => plugin(this))
这段代码是 Vuex 的初始化的核心,其中,installModule 方法是把我们通过 options 传入的各种属性模块注册和安装;resetStoreVM 方法是初始化 store._vm,观测 state 和 getters 的变化;最后是应用传入的插件。
下面,我们先来看一下 installModule 的实现:
function installModule (store, rootState, path, module, hot) {
  const isRoot = !path.length
  const {
    state,
    actions,
    mutations,
    getters,
    modules
  } = module

  // set state
  if (!isRoot && !hot) {
    const parentState = getNestedState(rootState, path.slice(0, -1))
    const moduleName = path[path.length - 1]
    store._withCommit(() => {
      Vue.set(parentState, moduleName, state || {})
    })
  }

  if (mutations) {
    Object.keys(mutations).forEach(key => {
      registerMutation(store, key, mutations[key], path)
    })
  }

  if (actions) {
    Object.keys(actions).forEach(key => {
      registerAction(store, key, actions[key], path)
    })
  }

  if (getters) {
    wrapGetters(store, getters, path)
  }

  if (modules) {
    Object.keys(modules).forEach(key => {
      installModule(store, rootState, path.concat(key), modules[key], hot)
    })
  }
}
installModule 函数可接收5个参数,store、rootState、path、module、hot,store 表示当前 Store 实例,rootState 表示根 state,path 表示当前嵌套模块的路径数组,module 表示当前安装的模块,hot 当动态改变 modules 或者热更新的时候为 true。
先来看这部分代码:
 const isRoot = !path.length
 const {
   state,
   actions,
   mutations,
   getters,
   modules
 } = module
代码首先通过 path 数组的长度判断是否为根。我们在构造函数调用的时候是 installModule(this, state, [], options),所以这里 isRoot 为 true。module 为传入的 options,我们拿到了 module 下的 state、actions、mutations、getters 以及嵌套的 modules。
接着看下面的代码:
// set state
if (!isRoot && !hot) {
  const parentState = getNestedState(rootState, path.slice(0, -1))
  const moduleName = path[path.length - 1]
  store._withCommit(() => {
    Vue.set(parentState, moduleName, state || {})
  })
}
这里判断当不为根且非热更新的情况,然后设置级联状态,这里乍一看不好理解,我们先放一放,稍后来回顾。
再往下看代码:
if (mutations) {
  Object.keys(mutations).forEach(key => {
    registerMutation(store, key, mutations[key], path)
  })
}

if (actions) {
  Object.keys(actions).forEach(key => {
    registerAction(store, key, actions[key], path)
  })
}

if (getters) {
  wrapGetters(store, getters, path)
}
这里分别是对 mutations、actions、getters 进行注册,如果我们实例化 Store 的时候通过 options 传入这些对象,那么会分别进行注册,我稍后再去介绍注册的具体实现。那么到这,如果 Vuex 没有 module ,这个 installModule 方法可以说已经做完了。但是 Vuex 巧妙了设计了 module 这个概念,因为 Vuex 本身是单一状态树,应用的所有状态都包含在一个大对象内,随着我们应用规模的不断增长,这个 Store 变得非常臃肿。为了解决这个问题,Vuex 允许我们把 store 分 module(模块)。每一个模块包含各自的 state、mutations、actions 和 getters,甚至是嵌套模块。所以,接下来还有一行代码:
if (modules) {
  Object.keys(modules).forEach(key => {
    installModule(store, rootState, path.concat(key), modules[key], hot)
  })
}
这里通过遍历 modules,递归调用 installModule 去安装子模块。这里传入了 store、rootState、path.concat(key)、和 modules[key],和刚才不同的是,path 不为空,module 对应为子模块,那么我们回到刚才那段代码:
// set state
if (!isRoot && !hot) {
  const parentState = getNestedState(rootState, path.slice(0, -1))
  const moduleName = path[path.length - 1]
  store._withCommit(() => {
    Vue.set(parentState, moduleName, state || {})
  })
}
当递归初始化子模块的时候,isRoot 为 false,注意这里有个方法getNestedState(rootState, path),来看一下 getNestedState 函数的定义:
function getNestedState (state, path) {
  return path.length
    ? path.reduce((state, key) => state[key], state)
    : state
}
这个方法很简单,就是根据 path 查找 state 上的嵌套 state。在这里就是传入 rootState 和 path,计算出当前模块的父模块的 state,由于模块的 path 是根据模块的名称 concat 连接的,所以 path 的最后一个元素就是当前模块的模块名,最后调用
store._withCommit(() => {
  Vue.set(parentState, moduleName, state || {})
})
把当前模块的 state 添加到 parentState 中。
这里注意一下我们用了 store._withCommit 方法,来看一下这个方法的定义:
_withCommit (fn) {
  const committing = this._committing
  this._committing = true
  fn()
  this._committing = committing
}
由于我们是在修改 state,Vuex 中所有对 state 的修改都会用 _withCommit函数包装,保证在同步修改 state 的过程中 this._committing 的值始终为true。这样当我们观测 state 的变化时,如果 this._committing 的值不为 true,则能检查到这个状态修改是有问题的。
看到这里,有些同学可能会有点困惑,举个例子来直观感受一下,以 Vuex 源码中的 example/shopping-cart 为例,打开 store/index.js,有这么一段代码:
export default new Vuex.Store({
  actions,
  getters,
  modules: {
    cart,
    products
  },
  strict: debug,
  plugins: debug ? [createLogger()] : []
})
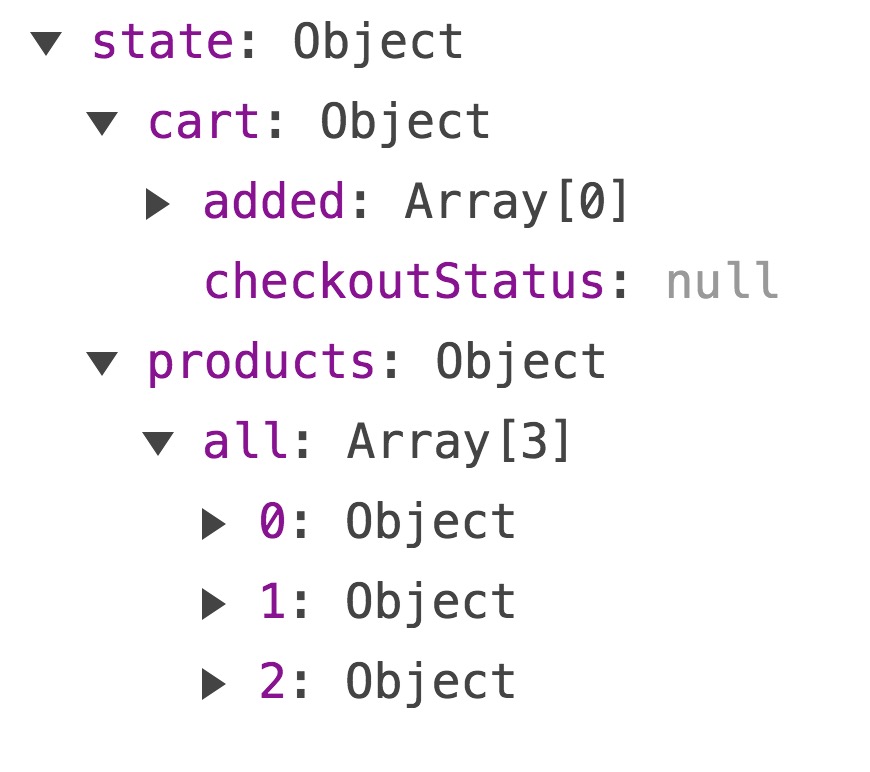
这里有两个子 module,cart 和 products,我们打开 store/modules/cart.js,看一下 cart 模块中的 state 定义,代码如下:
const state = {
  added: [],
  checkoutStatus: null
}
我们运行这个项目,打开浏览器,利用 Vue 的调试工具来看一下 Vuex 中的状态,如下图所示:

可以看到,在 rootState 下,分别有 cart 和 products 2个属性,key 根据模块名称而来,value 就是在每个模块文件中定义的 state,这就把模块 state 挂载到 rootState 上了。
我们了解完嵌套模块 state 是怎么一回事后,我们回过头来看一下 installModule 过程中的其它 3 个重要方法:registerMutation、registerAction 和 wrapGetters。顾名思义,这 3 个方法分别处理 mutations、actions 和 getters。我们先来看一下 registerMutation 的定义:
registerMutation
function registerMutation (store, type, handler, path = []) {
  const entry = store._mutations[type] || (store._mutations[type] = [])
  entry.push(function wrappedMutationHandler (payload) {
    handler(getNestedState(store.state, path), payload)
  })
}
registerMutation 是对 store 的 mutation 的初始化,它接受 4 个参数,store为当前 Store 实例,type为 mutation 的 key,handler 为 mutation 执行的回调函数,path 为当前模块的路径。mutation 的作用就是同步修改当前模块的 state ,函数首先通过 type 拿到对应的 mutation 对象数组, 然后把一个 mutation 的包装函数 push 到这个数组中,这个函数接收一个参数 payload,这个就是我们在定义 mutation 的时候接收的额外参数。这个函数执行的时候会调用 mutation 的回调函数,并通过 getNestedState(store.state, path) 方法得到当前模块的 state,和 playload 一起作为回调函数的参数。举个例子:
// ...
mutations: {
  increment (state, n) {
    state.count += n
  }
}
这里我们定义了一个 mutation,通过刚才的 registerMutation 方法,我们注册了这个 mutation,这里的 state 对应的就是当前模块的 state,n 就是额外参数 payload,接下来我们会从源码分析的角度来介绍这个 mutation 的回调是何时被调用的,参数是如何传递的。
我们有必要知道 mutation 的回调函数的调用时机,在 Vuex 中,mutation 的调用是通过 store 实例的 API 接口 commit 来调用的,来看一下 commit 函数的定义:
commit (type, payload, options) {
  // check object-style commit
  if (isObject(type) && type.type) {
    options = payload
    payload = type
    type = type.type
  }
  const mutation = { type, payload }
  const entry = this._mutations[type]
  if (!entry) {
    console.error(`[vuex] unknown mutation type: ${type}`)
    return
  }
  this._withCommit(() => {
    entry.forEach(function commitIterator (handler) {
      handler(payload)
    })
  })
  if (!options || !options.silent) {
    this._subscribers.forEach(sub => sub(mutation, this.state))
  }
}
commit 支持 3 个参数,type 表示 mutation 的类型,payload 表示额外的参数,options 表示一些配置,比如 silent 等,稍后会用到。commit 函数首先对 type 的类型做了判断,处理了 type 为 object 的情况,接着根据 type 去查找对应的 mutation,如果找不到,则输出一条错误信息,否则遍历这个 type 对应的 mutation 对象数组,执行 handler(payload) 方法,这个方法就是之前定义的 wrappedMutationHandler(handler),执行它就相当于执行了 registerMutation 注册的回调函数,并把当前模块的 state 和 额外参数 payload 作为参数传入。注意这里我们依然使用了 this._withCommit 的方法提交 mutation。commit 函数的最后,判断如果不是静默模式,则遍历 this._subscribers,调用回调函数,并把 mutation 和当前的根 state 作为参数传入。那么这个 this._subscribers 是什么呢?原来 Vuex 的 Store 实例提供了 subscribe API 接口,它的作用是订阅(注册监听) store 的 mutation。先来看一下它的实现:
subscribe (fn) {
  const subs = this._subscribers
  if (subs.indexOf(fn) < 0) {
    subs.push(fn)
  }
  return () => {
    const i = subs.indexOf(fn)
    if (i > -1) {
      subs.splice(i, 1)
    }
  }
}
subscribe 方法很简单,他接受的参数是一个回调函数,会把这个回调函数保存到 this._subscribers 上,并返回一个函数,当我们调用这个返回的函数,就可以解除当前函数对 store 的 mutation 的监听。其实,Vuex 的内置 logger 插件就是基于 subscribe 接口实现对 store 的 muation的监听,稍后我们会详细介绍这个插件。
registerAction
在了解完 registerMutation,我们再来看一下 registerAction 的定义:
function registerAction (store, type, handler, path = []) {
const entry = store._actions[type] || (store._actions[type] = [])
  const { dispatch, commit } = store
  entry.push(function wrappedActionHandler (payload, cb) {
    let res = handler({
      dispatch,
      commit,
      getters: store.getters,
      state: getNestedState(store.state, path),
      rootState: store.state
    }, payload, cb)
    if (!isPromise(res)) {
      res = Promise.resolve(res)
    }
    if (store._devtoolHook) {
      return res.catch(err => {
        store._devtoolHook.emit('vuex:error', err)
        throw err
      })
    } else {
      return res
    }
  })
 }
registerAction 是对 store 的 action 的初始化,它和 registerMutation 的参数一致,和 mutation 不同一点,mutation 是同步修改当前模块的 state,而 action 是可以异步去修改 state,这里不要误会,在 action 的回调中并不会直接修改 state ,仍然是通过提交一个 mutation 去修改 state(在 Vuex 中,mutation 是修改 state 的唯一途径)。那我们就来看看 action 是如何做到这一点的。
函数首先也是通过 type 拿到对应 action 的对象数组,然后把一个 action 的包装函数 push 到这个数组中,这个函数接收 2 个参数,payload 表示额外参数 ,cb 表示回调函数(实际上我们并没有使用它)。这个函数执行的时候会调用 action 的回调函数,传入一个 context 对象,这个对象包括了 store 的 commit 和 dispatch 方法、getter、当前模块的 state 和 rootState 等等。接着对这个函数的返回值做判断,如果不是一个 Promise 对象,则调用 Promise.resolve(res) 给res 包装成了一个 Promise 对象。这里也就解释了为何 Vuex 的源码依赖 Promise,这里对 Promise 的判断也和简单,参考代码 src/util.js,对 isPromise 的判断如下:
export function isPromise (val) {
  return val && typeof val.then === 'function'
}
其实就是简单的检查对象的 then 方法,如果包含说明就是一个 Promise 对象。
接着判断 store._devtoolHook,这个只有当用到 Vuex devtools 开启的时候,我们才能捕获 promise 的过程中的 。 action 的包装函数最后返回 res ,它就是一个地地道道的 Promise 对象。来看个例子:
actions: {
  checkout ({ commit, state }, payload) {
    // 把当前购物车的商品备份起来
    const savedCartItems = [...state.cart.added]
    // 发送结帐请求,并愉快地清空购物车
    commit(types.CHECKOUT_REQUEST)
    // 购物 API 接收一个成功回调和一个失败回调
    shop.buyProducts(
      products,
      // 成功操作
      () => commit(types.CHECKOUT_SUCCESS),
      // 失败操作
      () => commit(types.CHECKOUT_FAILURE, savedCartItems)
    )
  }
}
这里我们定义了一个 action,通过刚才的 registerAction 方法,我们注册了这个 action,这里的 commit 就是 store 的 API 接口,可以通过它在 action 里提交一个 mutation。state 对应的就是当前模块的 state,我们在这个 action 里即可以同步提交 mutation,也可以异步提交。接下来我们会从源码分析的角度来介绍这个 action 的回调是何时被调用的,参数是如何传递的。
我们有必要知道 action 的回调函数的调用时机,在 Vuex 中,action 的调用是通过 store 实例的 API 接口 dispatch 来调用的,来看一下 dispatch 函数的定义:
 dispatch (type, payload) {
  // check object-style dispatch
   if (isObject(type) && type.type) {
     payload = type
     type = type.type
   }
   const entry = this._actions[type]
   if (!entry) {
     console.error(`[vuex] unknown action type: ${type}`)
     return
   }
   return entry.length > 1
     ? Promise.all(entry.map(handler => handler(payload)))
     : entry[0](payload)
 }
dispatch 支持2个参数,type 表示 action 的类型,payload 表示额外的参数。前面几行代码和 commit 接口非常类似,都是找到对应 type 下的 action 对象数组,唯一和 commit 不同的地方是最后部分,它对 action 的对象数组长度做判断,如果长度为 1 则直接调用 entry[0](payload), 这个方法就是之前定义的 wrappedActionHandler(payload, cb),执行它就相当于执行了 registerAction 注册的回调函数,并把当前模块的 context 和 额外参数 payload 作为参数传入。所以我们在 action 的回调函数里,可以拿到当前模块的上下文包括 store 的 commit 和 dispatch 方法、getter、当前模块的 state 和 rootState,可见 action 是非常灵活的。


 随时随地看视频


热门评论
-

Mr慕风2016-11-25 2
-

Mr慕风2016-11-25 2
-

uu6439298602017-11-28 0
查看全部评论大赞!希望能出结合vuex的实战
大赞!希望能出结合vuex的实战
怎么在 vue-cli下面实现跨域请求&&webpack 的 dev-server 里面的after和before方法怎么使用?
https://segmentfault.com/q/1010000012193066?_ea=2905353 谢谢