
一、Spring Secutity简介
Spring 是一个非常流行和成功的 Java 应用开发框架。Spring Security 基于 Spring 框架,提供了一套 Web 应用安全性的完整解决方案。一般来说,Web 应用的安全性包括用户认证(Authentication)和用户授权(Authorization)两个部分。用户认证指的是验证某个用户是否为系统中的合法主体,也就是说用户能否访问该系统。用户认证一般要求用户提供用户名和密码。系统通过校验用户名和密码来完成认证过程。用户授权指的是验证某个用户是否有权限执行某个操作。在一个系统中,不同用户所具有的权限是不同的。比如对一个文件来说,有的用户只能进行读取,而有的用户可以进行修改。一般来说,系统会为不同的用户分配不同的角色,而每个角色则对应一系列的权限。
对于上面提到的两种应用情景,Spring Security 框架都有很好的支持。在用户认证方面,Spring Security 框架支持主流的认证方式,包括 HTTP 基本认证、HTTP 表单验证、HTTP 摘要认证、OpenID 和 LDAP 等。在用户授权方面,Spring Security 提供了基于角色的访问控制和访问控制列表(Access Control List,ACL),可以对应用中的领域对象进行细粒度的控制。
另外Spring Security也集成了OAuth2.0,接下来我们就介绍下这两种使用的,当然Spring Security还集成CAS等等,如果你要了解更多请查看官方文档,我们下面的都是使用Spring Boot2.0做的demo,2.0以后已经集成了Spring Security5.0以上的版本;
二、Basic认证
这个也是我们经常使用的基于表单的认证,输入一个账号和密码点击登录这种,就是Basic认证,我们接下主要会讲一下使用以及5.0以后做了那些升级;
1.使用以及常用的一些参数的介绍
第一步使用Maven引入Spring Security jia包,这里我们使用Thymeleaf作为前端模板页面,这里也有一个地方可以探讨一波,为什么Spring MVC可以自由切换模板,这个地方我们找个机会一起探讨,这里先做下简单的介绍;


<dependencies> <dependency> <groupId>org.springframework.boot</groupId> <artifactId>spring-boot-starter</artifactId> </dependency> <dependency> <groupId>org.springframework.boot</groupId> <artifactId>spring-boot-starter-security</artifactId> </dependency> <!-- 前端模板 thymeleaf 依赖 --> <dependency> <groupId>org.springframework.boot</groupId> <artifactId>spring-boot-starter-thymeleaf</artifactId> </dependency> <!--安全认证框架--> <dependency> <groupId>org.springframework.boot</groupId> <artifactId>spring-boot-starter-web</artifactId> </dependency> <dependency> <groupId>org.springframework.boot</groupId> <artifactId>spring-boot-starter-test</artifactId> <scope>test</scope> </dependency> <dependency> <groupId>org.springframework.boot</groupId> <artifactId>spring-boot-starter-thymeleaf</artifactId> </dependency> <dependency> <groupId>org.springframework.boot</groupId> <artifactId>spring-boot-starter-security</artifactId> </dependency> </dependencies>
第二步引入Java配置配置方案
这里我们先使用@Configuration和@EnableWebSecurity对Java类进行配置,不懂这是什么原因的可以参考下我这篇文章,接下来我们就是继承WebSecurityConfigurerAdapter,对里面的方法重写就可以了,分别是对AuthenticationManagerBuilder,WebSecurity,HttpSecurity方法,我们主要介绍AuthenticationManagerBuilder和HttpSecurity,通过对这两种方法重写最终实现我们自定义认证;
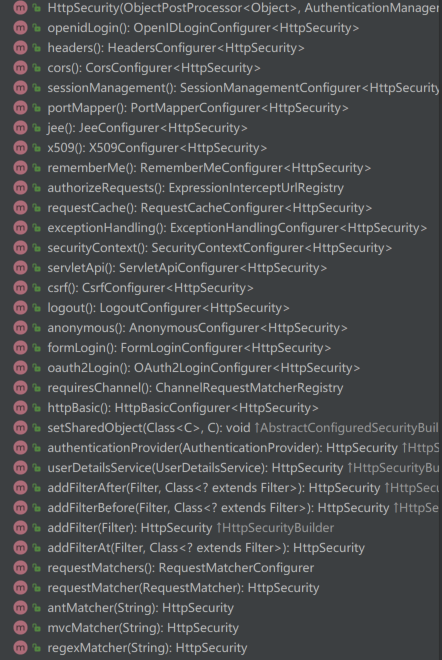
先来介绍一下HttpSecurity常用参数,如下图用法基本脱离不了下面这些方法,可以基于认证的方式有formLogin、openidLogin、oauth2Login,还可以做一些记住账号操作rememberMe,还可以进行session配置管理,还支持登出loginout等等,使用起来还是蛮简单的,大家可以参照一下这篇文章,还是蛮详细的;
接下来我们再看下AuthenticationManagerBuilder,我们重写这个方法,可以基于内存用户认证、数据库认证、LDAP认证、还可以自定义用户服务、还可以自己定义认证。这里我们使用自定义认证的做demo,另外这个大家还可能有一个困惑的点,configGlobal和configure的差别在哪里,这里大家可以参考下这篇文章,Spring Security从3.2版本以后就默认开启了CRSF防护,这里是通过Token方式去检测的,在登陆的时候Thymeleaf模板会生成_csrf的标签来防止CRSF,对CSRF不懂的大家可以看下这篇文章,这个里面介绍一些防护CSRF的手段,大家可以思考下,我的demo只是一个简单的架子,为了是给大家介绍一些知识,可扩展大家根据这些介绍的知识可以随心所欲的扩展自己想要的,不要拘泥于一种方法;
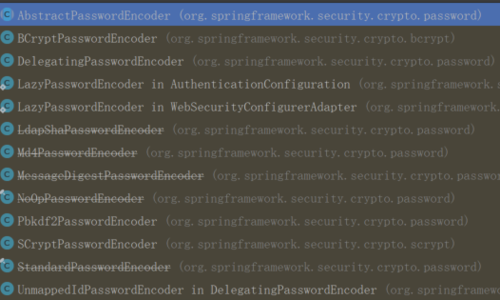
最后我还要介绍一下加密的方式,Spring Security 4的时候我们常用的加密方式是MD5加盐的方式,5.0以后版本就找不到Md5PasswordEncoder,说明这个方法还是不够安全,还是可以通过暴力破解可以搞定,可能我不行但是拦不住一些高手,大家可以看下官方支持的以及弃用一些方法:
使用我就不介绍了,有兴趣可以自己探索一波,还可以参考一下文章一、文章二,下面我粘贴我的代码,讲到的这些可以扩展的地方大家我在代码中会标识清楚,喜欢动手可以尝试一下,我的重点是OAuth2验证;
/** *自定义认证 * Created by wangt on 2018/7/29. */ @Configuration @EnableWebSecurity @EnableGlobalMethodSecurity public class WebSecurityConfig extends WebSecurityConfigurerAdapter { /** * http资源认证 * @param http * @throws Exception */ @Override protected void configure(HttpSecurity http) throws Exception { http.authorizeRequests() .antMatchers("/","/home").permitAll() .anyRequest().authenticated() .and() .formLogin() .loginPage("/login") .permitAll() .and() .logout() .permitAll(); } /** * 自定义认证策略 */ @Autowired public void configGlobal(AuthenticationManagerBuilder auth) throws Exception { auth.authenticationProvider(authProvider()).eraseCredentials(true); } @Bean public AuthProvider authProvider(){ return new AuthProvider(); } } /** * 自定义认证 * Created by wangt on 2018/8/18. */ public class AuthProvider implements AuthenticationProvider { private final BCryptPasswordEncoder bCryptPasswordEncoder=new BCryptPasswordEncoder(); @Override public Authentication authenticate(Authentication authentication) throws AuthenticationException { String userName = authentication.getName(); String inputPassword = (String) authentication.getCredentials(); //如果你要使用thymeleaf认证方言可以扩展一下User //GrantedAuthority这个是使用方言的属性,有兴趣了解下 //其实也就是通过这个使用if去判断 User user =new User(); user.setName("admin"); user.setPassword("admin"); if (user == null) { throw new AuthenticationCredentialsNotFoundException("authError"); } //这一块可以自定义一些加密方式 //自己动手实现一下 if (true) { //这块有好几个构造 //如果使用方言你可以使用3个参数的构造函数 return new UsernamePasswordAuthenticationToken(user, null); } throw new BadCredentialsException("authError"); } @Override public boolean supports(Class<?> aClass) { return true; } } /** * Created by wangt on 2018/8/18. */ @Configuration public class WebMvcConfig implements WebMvcConfigurer { //如果使用thymeleaf方言在这块扩展 @Override public void addViewControllers(ViewControllerRegistry registry) { registry.addViewController("/index").setViewName("index"); registry.addViewController("/").setViewName("index"); registry.addViewController("/hello").setViewName("hello"); registry.addViewController("/login").setViewName("login"); } } <!DOCTYPE html> <html> <head> <meta charset="UTF-8"> <title>Title</title> </head> <body> <!--主页面 index--> 您好!欢迎光临! <a href="/login">登录</a> <a href="/hello">限制访问的页面</a> </body> </html> <!DOCTYPE html> <html> <head> <meta charset="UTF-8"> <title>Title</title> </head> <body> <!--hello页面--> hello </body> </html> <!DOCTYPE html> <html xmlns:th="http://www.thymeleaf.org"> <head> <meta charset="UTF-8"> <title>Title</title> </head> <body> <!--登录页面--> <form th:action="@{/login}" method="post"> <div><label> User Name : <input type="text" name="username"/> </label></div> <div><label> Password: <input type="password" name="password"/> </label></div> <div><input type="submit" value="登录"/></div> </form> </body> </html> /** * 登录控制器 * Created by wangt on 2018/8/18. */ @Controller public class LoginController { @GetMapping("/login") public String login(){ return "/login"; } } /** * 主页 * Created by wangt on 2018/7/28. */ @Controller public class HomeController { @GetMapping("/") public String index(){ return "index"; } } /** * hello页 * Created by wangt on 2018/8/19. */ @Controller public class HelloController { @GetMapping("/hello") public String index(){ return "hello"; } }
原文出处:https://www.cnblogs.com/wtzbk/p/9387859.html


