前言
写上一篇看英文资料,耗费了心力呀,这章,相对来说简单点。也比较熟悉,但是这很实用。不扯了,开始~
多环境配置
在开发应用时,常用部署的应用是多个的,比如:开发、测试、联调、生产等不同的应用环境,这些应用环境都对应不同的配置项,比如
swagger一般上在生产时是关闭的;不同环境数据库地址、端口号等都是不尽相同的,要是没有多环境的自由切换,部署起来是很繁琐也容易出错的。
maven的多环境配置
在没有使用过
springboot的多环境配置时,原先是利用maven的profile功能进行多环境配置,这里我简单回顾下。
maven配置
   <profiles>
       <profile>
          <id>dev</id>
          <activation>
                <activeByDefault>true</activeByDefault>
            </activation>
            <properties>
               <pom.port>8080</pom.port>
            </properties>
       </profile>
       <profile>
          <id>test</id>
            <properties>
               <pom.port>8888</pom.port>
            </properties>
       </profile>
    </profiles>
    <build>
    <resources>
        <resource>
            <directory>src/main/resources</directory>
            <includes>
                <include>**/*</include>
            </includes>
        </resource>
        <resource>
            <directory>${project.basedir}/src/main/resources</directory>
            <includes>
                <include>**/*.properties</include>
            </includes>
            <!-- 加入此属性,才会进行过滤 -->
            <filtering>true</filtering>
        </resource>
    </resources>
    <plugins>
        <plugin>
            <artifactId>maven-resources-plugin</artifactId>
            <configuration>
                <encoding>utf-8</encoding>
                <!-- 需要加入,因为maven默认的是${},而springbooot 默认会把此替换成@{} -->
                <useDefaultDelimiters>true</useDefaultDelimiters>
            </configuration>
        </plugin>
        <plugin>
            <groupId>org.springframework.boot</groupId>
            <artifactId>spring-boot-maven-plugin</artifactId>
        </plugin>
    </plugins>
    </build>
然后编译时,加入-Ptest,则会替换test环境下的参数值。
完整参数:
mvn clean install -DskipTests -Ptest
application.properties
server.port=${pom.port}
利用maven实现多环境配置,比较麻烦的就是每次部署新环境时,都需要再次指定环境编译打包一次。一下进入主题,springboot的多环境,比较优雅了许多。
springboot多环境配置
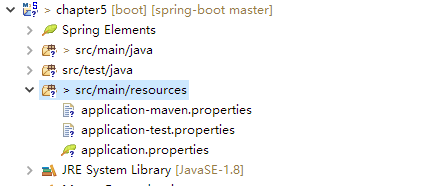
Profile是Spring针对不同环境不同配置的支持。需要满足application-{profile}.properties,{profile}对应你的环境标识。如:
application-dev.properties:开发环境application-test.properties:测试环境

而指定执行哪份配置文件,只需要在application.properties配置spring.profiles.active为对应${profile}的值。
# 指定环境为dev
spring.profiles.active=dev
则会加载:application-dev.properties的配置内容。
2018-07-15 14:52:41.304  INFO 15496 --- [           main] s.b.c.e.t.TomcatEmbeddedServletContainer : Tomcat started on port(s): 8080 (http)
2018-07-15 14:52:41.310  INFO 15496 --- [           main] c.l.l.s.chapter5.Chapter5Application     : Started Chapter5Application in 8.506 seconds (JVM running for 10.81)
2018-07-15 14:52:41.316  INFO 15496 --- [           main] c.l.l.s.chapter5.Chapter5Application     : 多环境应用启动.
还可以在**命令行方式**激活不同环境配置,如
java -jar xxx.jar --spring.profiles.active=test
此时就会加载application-test.properties的配置内容。
test:
dev:
这里顺便提一句,可能在不同环境下,可能加载不同的bean时,可利用@Profile注解来动态激活
@Profile("dev")//支持数组:@Profile({"dev","test"})
@Configuration
@Slf4j
public class ProfileBean {

    @PostConstruct
    public void init() {
        log.info("dev环境下激活");
    }
}
启动时。控制台输出:
2018-07-15 15:04:44.540 INFO 11876 --- [ main] c.l.l.springboot.chapter5.ProfileBean : dev环境下激活
总结
目前互联网上很多大佬都有
SpringBoot系列教程,如有雷同,请多多包涵了。本文是作者在电脑前一字一句敲的,每一步都是亲身实践过的。若文中有所错误之处,还望提出,谢谢。
完整实例地址:chapter-5

 随时随地看视频


