
在今天的数字环境中,将语音转换为文本是一种创建易于访问的内容、提高可搜索性以及分析音频数据的强大工具。Azure认知服务提供了一个强大的语音转文本API工具,可以轻松集成到Python程序中。本文将向您展示如何使用Azure的语音转文本服务和Python自动转录音频文件。
概要我们将使用 Azure 的语音识别 API 将存储在 Azure Blob 存储中的音频文件转换成文本。我们的 Python 脚本将执行如下操作:,
- 创建一个新的转录作业。
- 轮询转录作业的状态。
- 获取并显示转录结果的内容。
在动手写代码之前,先确保你准备好了。
- 具有启用 Speech-to-Text API 的 Azure 订阅。
- 安装了
requests库的 Python 环境已经准备好。 - 可以访问存储在 Azure Blob Storage 中的音频文件。
- 和 Postman
让我们使用Postman工具开始我们的语音服务的旅程,这将为我们提供一步步指导,帮助我们将音频流文件转换为文本。
如何使用压缩音频输入 - 语音服务 - Azure AI 服务 了解如何使用 Speech SDK 和 CLI 使用压缩音频输入。learn.microsoft.com(查看详细信息)- 首先让我们下载示例音频文件,我使用的是:点击这里访问此链接 https://filesampleshub.com/format/audio/wav
- 创建一个新的 Azure 语音服务实例,并选择标准级别。
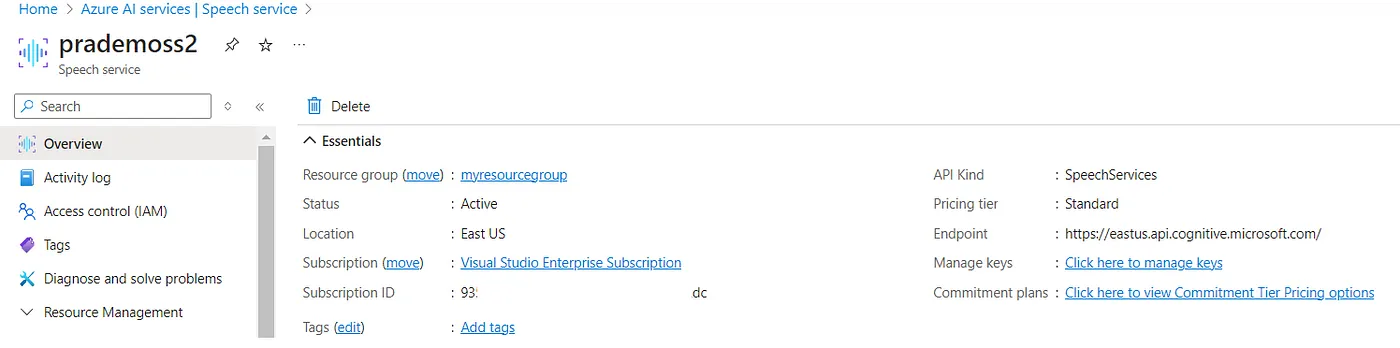
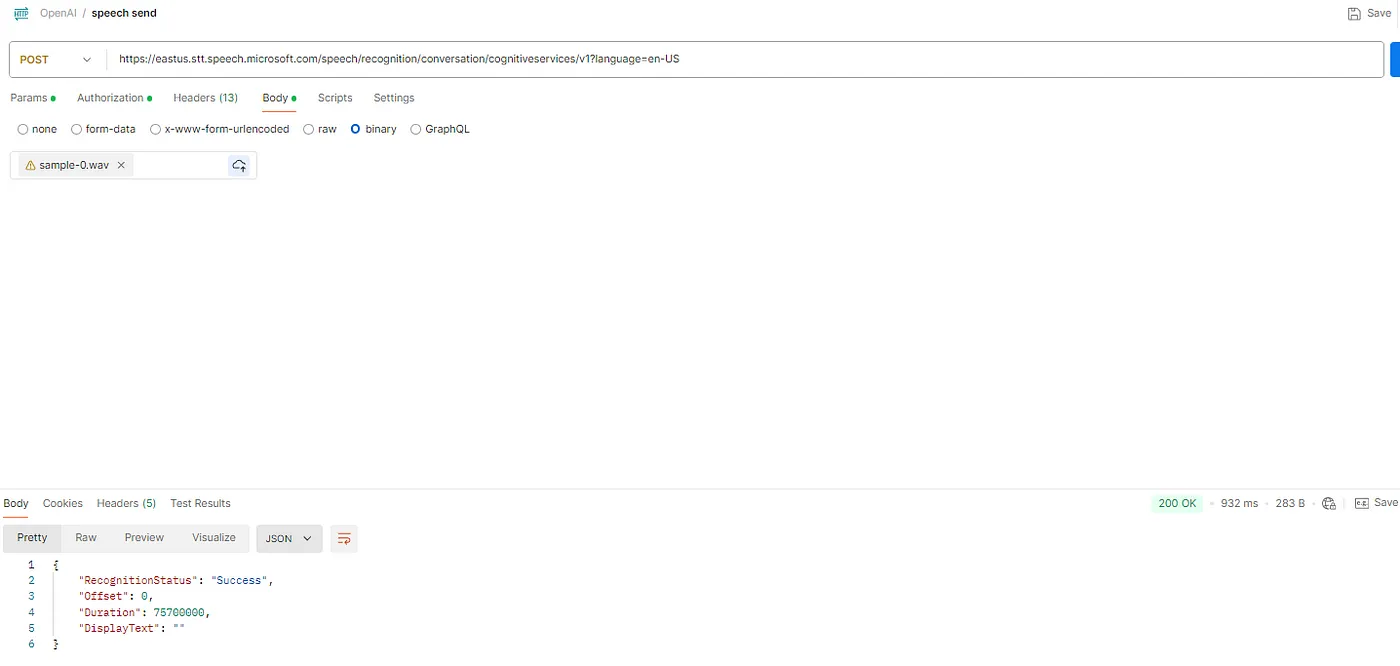
3. 接下来打开Postman,然后创建一个新的Post REST API请求 → 确保复制Azure语音服务中的端点地址 → 添加如下网址,例如 https://<区域>.stt.speech.microsoft.com/speech/recognition/conversation/cognitiveservices/v1?language=en-US
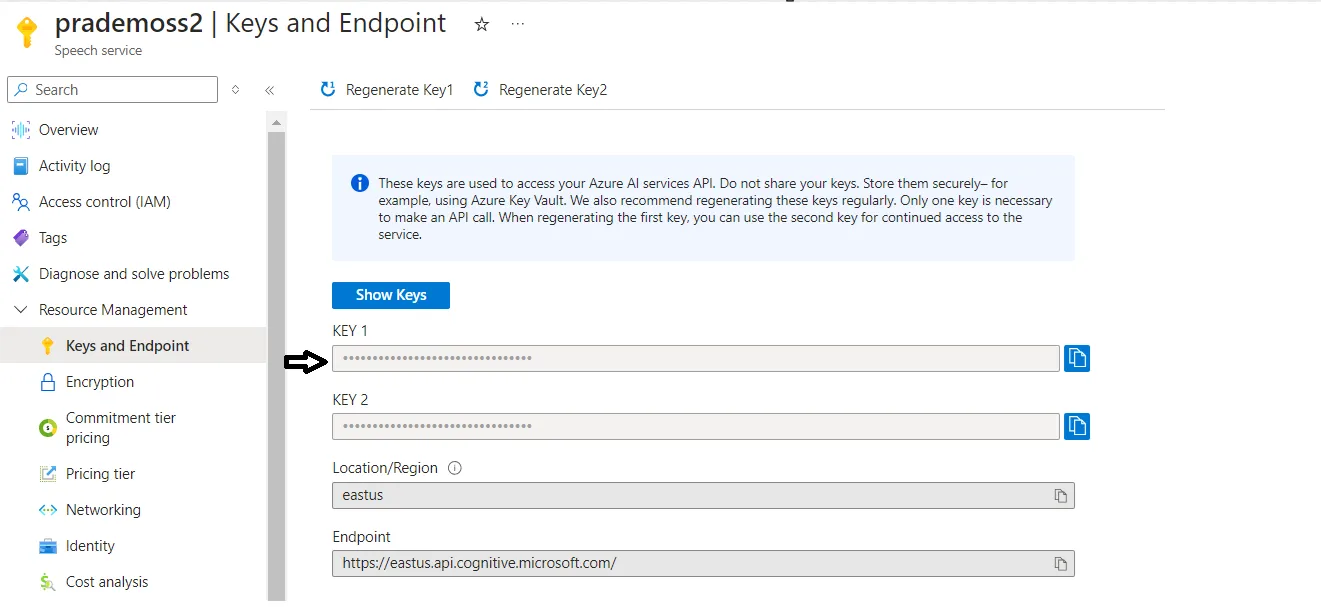
您可以在更多地方找到Azure语音服务端点:
创建批量转录 - 语音服务 - Azure AI 服务 了解如何使用 Azure AI 语音服务进行批量转录,提交音频文件,然后获取转录结果…learn.microsoft.com 从 v3.1 升级到 v3.2 REST API - 语音服务 - Azure AI 服务此文档帮助开发人员将代码从 v3.1 升级到 v3.2 版本的文本转语音 REST API。learn.microsoft.com4. 转到 Headers 选项卡下 → 添加“Ocp-Apim-Subscription-Key” (订阅密钥):复制你在 Azure 语音服务中的订阅密钥。
接下来接着添加 “Content-Type”: audio/wav。
前往“Body”部分,选择“Binary”,然后上传你本地的 .wav 文件来验证与 Azure 语音服务的连接。
- 现在我这次继续生成实际的输出结果,将我的.wav文件上传到Azure存储。
6. 创建一个新的 POST 请求,将端点设置为 /speechtotext/v3.2/transcriptions
→ 前往 Headers,添加一个 “Ocp-Apim-Subscription-Key” 并将其设为你的 Azure 语音服务密钥。
→ “Content-Type 头”: “application/json”。
7. 转到“正文”,添加你的存储帐户的wav文件位置,及SAS令牌。
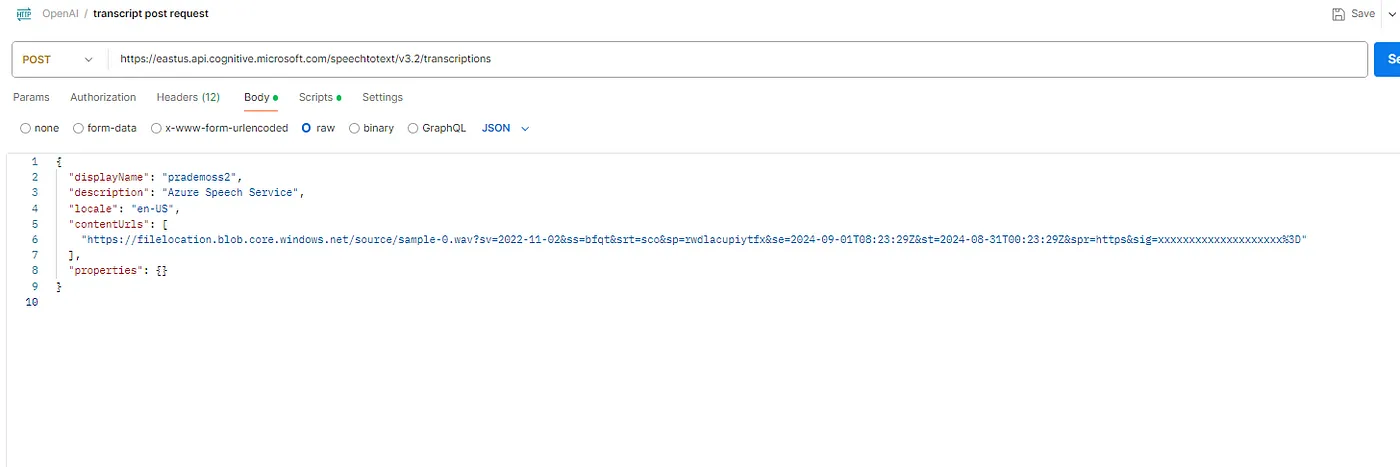
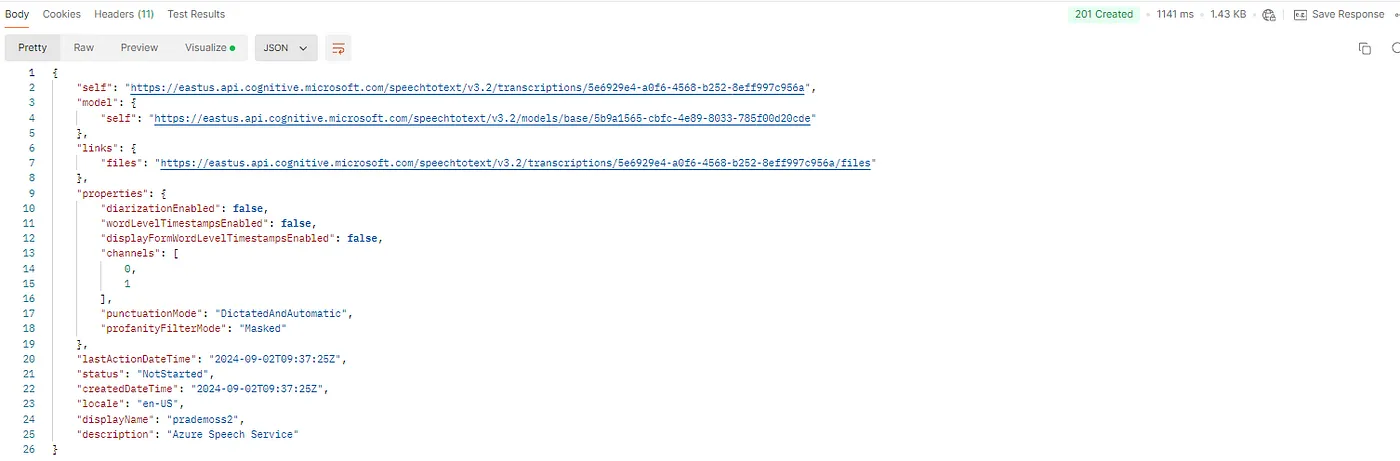
现在你可以看到你会得到201响应码,以及转录和文件结果。
8. 接下来我们需要检查生成的转写,打开一个新的 GET 请求。在 Headers 中添加 Azure 语音服务密钥(密钥)。
确保你从步骤 7(“自己”)复制 API URL。
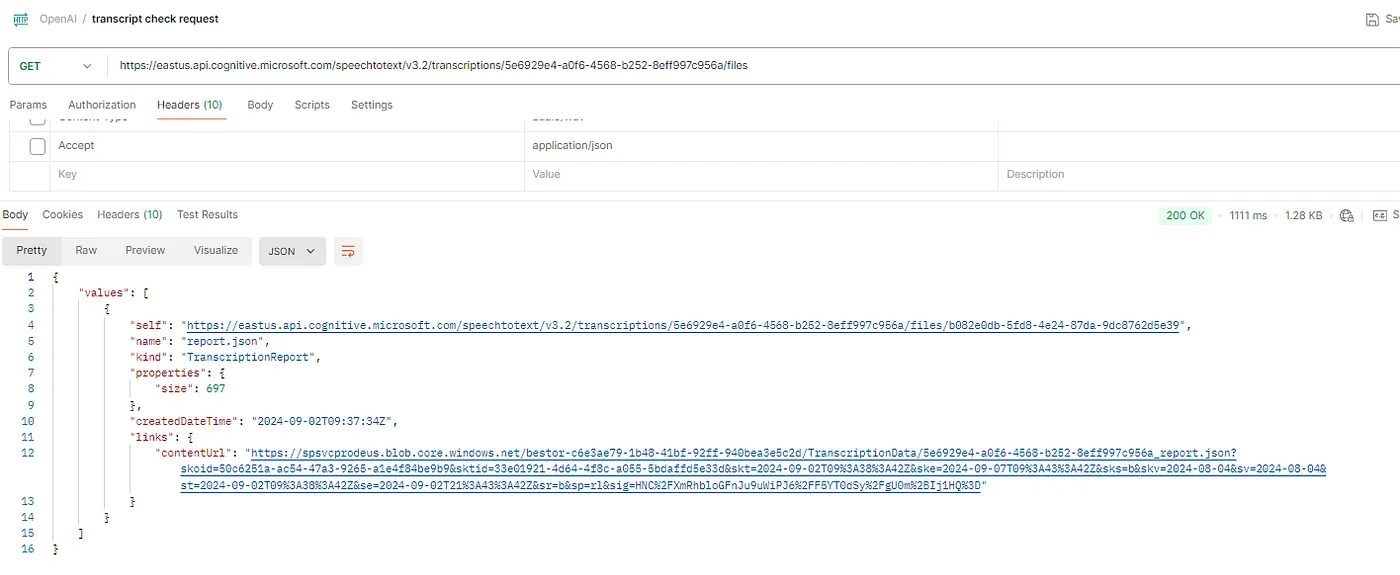
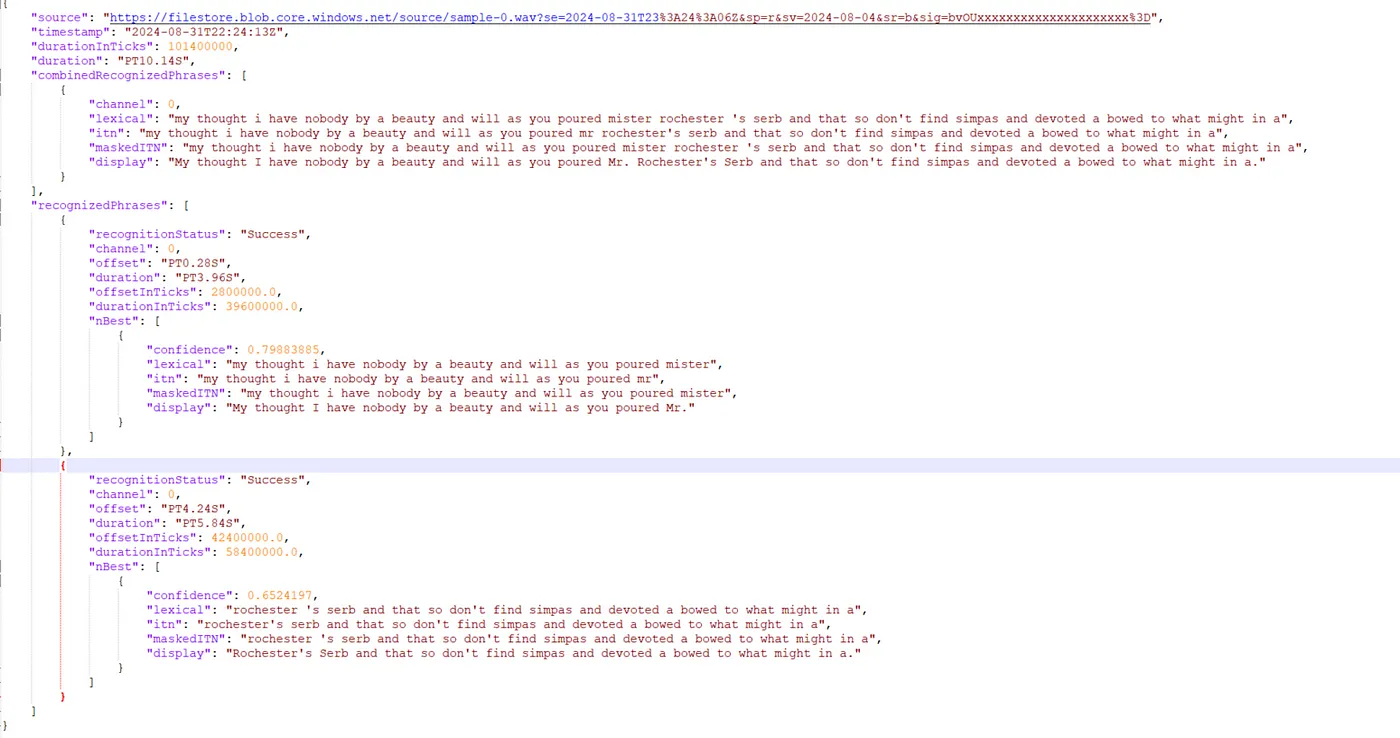
9. 现在,你可以查看实际的输出结果。你可以在浏览器中复制并粘贴“contentUrl”。
这就是输出的样子
以下请求仅当你刚开始试用Azure语音服务时,用于测试一个文件。
我们再用Python脚本把它增强一下,进行测试。 Python 代码如果想用它来做批量处理或连续处理,我们就开始编写Python脚本吧。
所以我已经把我的 Postman 逻辑转换成了真正的 Python 脚本。
我们从基础逻辑开始,仅从一个wav文件中获取转录进行测试。添加了所有参数,如“Subscription_key”,“service_region”,“
1. 设置
首先设置配置变量。
SUBSCRIPTION_KEY: 您用于 Speech-to-Text API 的 Azure 订阅密钥。SERVICE_REGION: 您的 Azure 语音服务所在的区域位置。TRANSCRIPTION_API_URL: Speech-to-Text API 的终结点 URL 地址。AUDIO_FILE_URI: 您想要转写的音频文件的 URI。DISPLAY_NAME,DESCRIPTION,LOCALE: 转写作业的显示名称、描述及语言设置。
    # 配置信息
    SUBSCRIPTION_KEY = "xxxxxx"
    SERVICE_REGION = "eastus"
    TRANSCRIPTION_API_URL = f"https://{SERVICE_REGION}.api.cognitive.microsoft.com/speechtotext/v3.2/transcriptions"
    AUDIO_FILE_URI = "https://xxxxx.blob.core.windows.net/source/sample-0.wav?sp=r&st=2024-08-31T00:09:47Z&se=2024-08-31T08:09:47Z&spr=https&sv=2022-11-02&sr=c&sig=xxcxxxxxx%3D"
    DISPLAY_NAME = "显示名称"
    DESCRIPTION = "Azure 语音服务"
    LOCALE = "区域设置"
2. 第二步:创建转写任务
The create_transcription 函数向 Speech-to-Text API 发送一个 POST 请求以开始一个新的转录任务。它包含了作业的元数据以及音频文件的 URI。
    def 创建转录任务():
        headers = {
            "Ocp-Apim-Subscription-Key": 订阅密钥值,
            "Content-Type": "application/json"
        }
        body = {
            "displayName": 显示名称,
            "description": 描述,
            "locale": 语言区域,
            "contentUrls": [音频文件的URL],
            "properties": {}
        }
        response = requests.post(转录API端点, headers=headers, json=body)
        response.raise_for_status()
        return response.json()["self"]
输出:创建新的转录…
3. 转录状态
get_transcription_status函数通过GET请求发送来检查语音转文字任务的状态。它将帮助你监控语音转文字过程的进度。
    def 获取转写状态函数(transcription_id):
        headers = {
            "Ocp-Apim-Subscription-Key": 订阅密钥值
        }
        response = requests.get(f"{转写API_URL}/{transcription_id}", headers=headers)
        response.raise_for_status()
        return response.json()
正在检查转录状态中…
4. 转写结果,
get_transcription_results函数在任务完成后会检索转写结果。它查找JSON格式的结果文件并从中提取转写数据。
    def 获取转录文件的结果(transcription_id):
        headers = {
            "Ocp-Apim-Subscription-Key": 订阅密钥值
        }
        response = requests.get(f"{转录API_URL}/{transcription_id}/files", headers=headers)
        response.raise_for_status()
        files = response.json()["values"]

        for 文件 in 文件列表:
            if 文件名.endswith(".json"):
                内容URL = 文件["links"]["contentUrl"]
                结果响应对象 = requests.get(内容URL)
                结果响应对象.raise_for_status()
                return 结果响应对象.json()
输出:运行中
状态:运行中
状态:成功
正在检索转写结果…
5. 主要功能如下:
main函数负责调度整个工作流程:
- 创建一个转写任务。
- 轮询任务状态,直到任务完成或失败。
- 获取并展示转写的结果。
def main():
# 步骤 1:创建新的转写...
print("创建新的转写...")
transcription_url = 创建新的转写()
transcription_id = transcription_url.split("/")[-1]
# 步骤 2:轮询转写状态...
print("轮询转写状态...")
状态 = "Running"
while 状态 not in ["Succeeded", "Failed"]:
time.sleep(5) # 等待 5 秒后再进行轮询
状态响应 = get_transcription_status(转写_id)
状态 = 状态响应["status"]
print(f"状态: {状态}")
if 状态 == "Failed":
print("转写失败了。")
return
# 步骤 3:检索并查看转写结果...
print("检索并查看转写结果...")
结果 = 获取转写结果(转写_id)
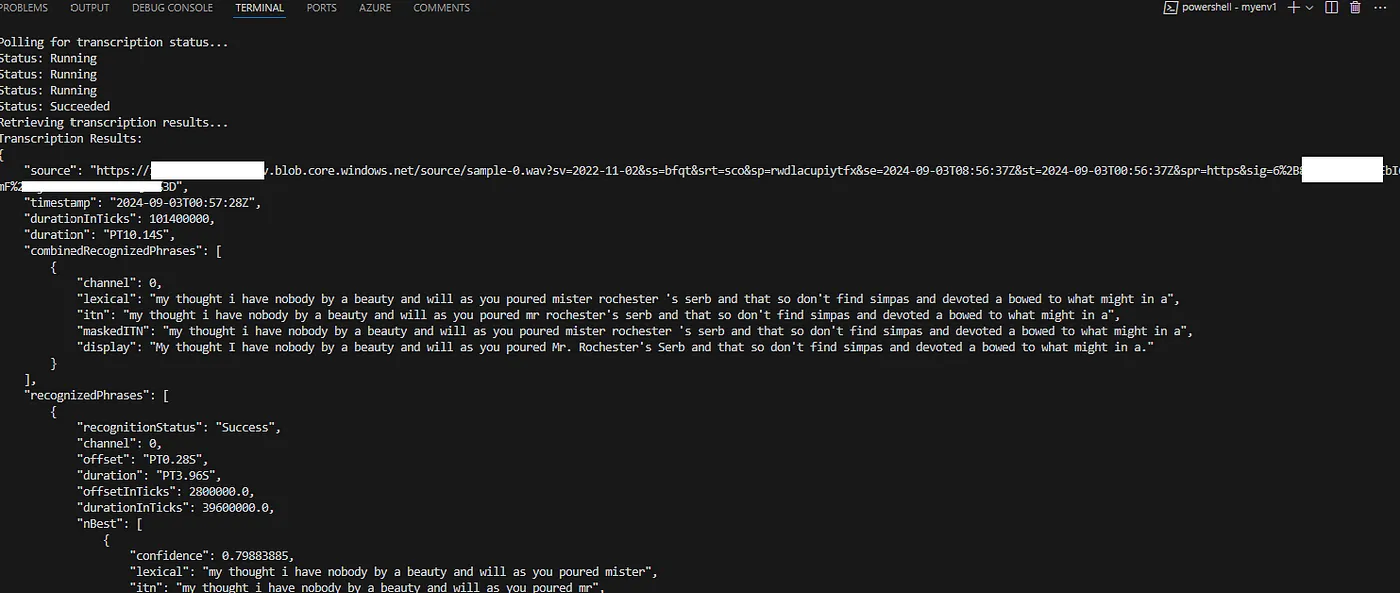
print("转写结果:")
print(json.dumps(结果, indent=4, ensure_ascii=False))
if __name__ == "__main__":
main()最终结果
这里举一个完整的例子,当你处理一个单独的 .wav 文件时。下面是完整的脚本。
    import requests
    import time
    import json

    # 配置
    SUBSCRIPTION_KEY = "xxxxxx"
    SERVICE_REGION = "eastus"
    TRANSCRIPTION_API_URL = f"https://{SERVICE_REGION}.api.cognitive.microsoft.com/speechtotext/v3.2/transcriptions"
    AUDIO_FILE_URI = "https://storageaccount.blob.core.windows.net/source/sample-0.wav?sv=2022-11-02&ss=bfqt&srt=sco&sp=rwdlacupiytfx&se=2024-09-03T08:56:37Z&st=2024-09-03T00:56:37Z&spr=https&sig=xxxxxxx"
    DISPLAY_NAME = "prademoss2"
    DESCRIPTION = "Azure 语音服务转写"
    LOCALE = "en-US"

    def create_transcription():
        headers = {
            "Ocp-Apim-Subscription-Key": SUBSCRIPTION_KEY,
            "Content-Type": "application/json"
        }
        body = {
            "displayName": DISPLAY_NAME,
            "description": DESCRIPTION,
            "locale": LOCALE,
            "contentUrls": [AUDIO_FILE_URI],
            "properties": {}
        }
        response = requests.post(TRANSCRIPTION_API_URL, headers=headers, json=body)
        response.raise_for_status()
        return response.json()["self"]

    def get_transcription_status(transcription_id):
        headers = {
            "Ocp-Apim-Subscription-Key": SUBSCRIPTION_KEY
        }
        response = requests.get(f"{TRANSCRIPTION_API_URL}/{transcription_id}", headers=headers)
        response.raise_for_status()
        return response.json()

    def get_transcription_results(transcription_id):
        headers = {
            "Ocp-Apim-Subscription-Key": SUBSCRIPTION_KEY
        }
        response = requests.get(f"{TRANSCRIPTION_API_URL}/{transcription_id}/files", headers=headers)
        response.raise_for_status()
        files = response.json()["values"]

        for file in files:
            if file["name"].endswith(".json"):
                content_url = file["links"]["contentUrl"]
                result_response = requests.get(content_url)
                result_response.raise_for_status()
                return result_response.json()

    def main():
        # 步骤 1:创建新的转写作业
        print("正在创建新的转写作业...")
        transcription_url = create_transcription()
        transcription_id = transcription_url.split("/")[-1]

        # 步骤 2:轮询转写作业状态
        print("正在轮询转写作业状态...")
        status = "Running"
        while status not in ["Succeeded", "Failed"]:
            time.sleep(5)  # 每 5 秒轮询一次
            status_response = get_transcription_status(transcription_id)
            status = status_response["status"]
            print(f"状态为: {status}")

        if status == "Failed":
            print("转写作业失败。")
            return

        # 步骤 3:获取转写作业结果
        print("正在获取转写作业结果...")
        results = get_transcription_results(transcription_id)
        print("转写作业结果:")
        print(json.dumps(results, indent=4))

    if __name__ == "__main__":
        main()
现在如果你正在处理存储帐户容器中的多个文件,你可以这样做处理。在你的配置里添加连接字符串。
STORAGE_CONNECTION_STRING = "XXXXXX" # 存储连接字符串然后你需要做的是初始化存储 blob。
    from azure.storage.blob import BlobServiceClient, generate_blob_sas, BlobSasPermissions

    POLLING_TIMEOUT = 600
    POLLING_INTERVAL = 5

    blob_service_client = BlobServiceClient.from_connection_string(STORAGE_CONNECTION_STRING)

    def generate_sas_token(blob_name):
        sas_token = generate_blob_sas(
            account_name=blob_service_client.account_name,
            container_name=CONTAINER_NAME,
            blob_name=blob_name,
            account_key=blob_service_client.credential.account_key,
            permission=BlobSasPermissions(read=True),
            expiry=datetime.utcnow() + timedelta(hours=1)
        )
        return sas_token

    def get_latest_blob():
        print("正在连接到Azure Blob Storage...")
        container_client = blob_service_client.get_container_client(CONTAINER_NAME)

        print(f"在容器 '{CONTAINER_NAME}' 中查找 .wav 文件...")
        blobs = list(container_client.list_blobs())

        wav_files = [blob for blob in blobs if blob.name.endswith(".wav")]

        if not wav_files:
            print("未找到 .wav 文件。")
            return None

        latest_blob = max(wav_files, key=lambda b: b.last_modified)
        print(f"找到最新 .wav 文件: {latest_blob.name}")
        return latest_blob

    ###然后在你的主类中添加额外的参数。

       latest_blob = get_latest_blob()
blob_url = f"https://{blob_service_client.account_name}.blob.core.windows.net/{CONTAINER_NAME}/{latest_blob.name}?{sas_token}"这个 Python 脚本演示了如何使用 Postman 和 Python 自动化音频文件的转录。通过将此脚本集成到您的应用中,您可以高效地将口语内容转换为文本,使其更易于访问和搜索,进一步提高效率。如有需要,您还可以自定义脚本,通过调整配置参数来应对更多场景。
这个脚本可以托管在 Azure Functions 或 Azure Automation 帐户中,甚至可以在 Azure Batch 服务中运行。
我用的相同脚本也用于远程物联网设备,以捕获终端设备的任何异常。
同时,我正在编写 Microsoft .net 控制台应用程序代码,将这段 Python 代码转换成可以在 Webjob(Webjob)上运行的代码。
修改增加了额外的逻辑和并行处理
    BATCH_SIZE = 1000    # 批处理大小
    MAX_DEGREE_OF_PARALLELISM = 5    # 最大并行度

    def process_batch(files_batch):
        def process_single_file(file_uri, original_file_name):
            print(f"正在处理文件: {original_file_name}")

            transcription_response = create_transcription_job(file_uri)
            transcription_id = transcription_response.json()["self"].split("/")[-1]
            if poll_transcription_status(transcription_id) == "Succeeded":
                transcription_text = download_transcription_result(transcription_id)

                upload_transcription_to_blob(transcription_text, original_file_name)
                send_message_to_service_bus_queue(f"成功转写了: {original_file_name}")
                print(f"转写完成了: {original_file_name}")
            else:
                send_message_to_service_bus_queue(f"转写失败: {original_file_name}")
                print(f"转写失败: {original_file_name}")

        with concurrent.futures.ThreadPoolExecutor(max_workers=MAX_DEGREE_OF_PARALLELISM) as executor:
            futures = []
            for file_uri, original_file_name in files_batch:
                futures.append(executor.submit(process_single_file, file_uri, original_file_name))

            for future in concurrent.futures.as_completed(futures):
                try:
                    future.result()
                except Exception as exc:
                    print(f"处理文件时发生了错误: {exc}")

    def process_files_in_batches():
        wav_files = get_wav_files_in_folder(FOLDER_PATH)

        if not wav_files:
            return
        batches = [wav_files[i:i + BATCH_SIZE] for i in range(0, len(wav_files), BATCH_SIZE)]  # 遍历批次文件:
        for batch in batches:
            process_batch(batch)
            time.sleep(5)  # 暂停5秒:

    process_files_in_batches()