学习如何让你的应用开始使用 Angular 的原生联邦功能,以便与 MFE(Micro Frontend)协同工作。

Angular 本机联邦模块
《Angular 本机联邦模块》
在第一篇文章中,我们学习了如何设置项目的初始配置并让它们运行。
在我们第二篇文章里,我们进一步探讨了路由以及如何解决Angular路由在MFE中的问题。接下来,学习如何高效地导出组件和服务。
注意: 为了确保一切正常工作,我使用的是版本 18.0.0。目前版本 18.0.2 存在一个影响动态加载的 bug。
导入动态组件首先,我已经在mfe2中准备了一个组件,我们将要导出它。这个组件包含了动画框,并且已经在mfe2里被使用。但现在我们需要把它导入到mfe1里使用。那我们该怎么操作呢?
federation.config 文件中导出组件配置
首先,我们将导出animated-box组件到federation.config中。
// federation.config.ts 文件中,定义了如下暴露的模块:
exposes: {
  './Component': './src/app/app.component.ts',
  './AnimatedBox': './src/app/components/animated-box/animated-box.component.ts',
}
其中 './Component' 指向 './src/app/app.component.ts'
而 './AnimatedBox' 则指向 './src/app/components/animated-box/animated-box.component.ts'mfe1 中为组件创建一个占位符
接下来,在我们的 mfe1 中,我们将创建一个 div 作为占位元素,组件将被插入到这个 div 中。具体来说,在 crud.component.html 文件中:
<div #placeAnimatedBox></div>接下来,让我们进入我们的 crud.component.ts 文件并进行实际的远程加载:
    import { 加载远程模块 } from '@angular-architects/native-federation';
    import { Component 装饰器, OnInit, ViewChild 装置, ViewContainerRef 视图容器引用 } from '@angular/core';
    import { RouterModule 路由模块 } from '@angular/router';
    import { CustomRouterLinkDirective 自定义路由链接指令 } from '../directives/custom-router-link.directive';

    @Component 装饰器({
      selector: 'app-crud',
      standalone: true,
      imports: [RouterModule 路由模块, 自定义路由链接指令 自定义路由链接指令],
      templateUrl: './crud.component.html',
      styleUrls: ['./crud.component.scss']
    })
    export class CrudComponent implements OnInit {

      @ViewChild 装置('placeAnimatedBox', { read: ViewContainerRef 视图容器引用 })
      viewContainer!: ViewContainerRef 视图容器引用;

      constructor() { }

      ngOnInit() {
        setTimeout(() => {
          this.异步加载AnimatedBox();
        }, 2000);
      }

      异步加载AnimatedBox(): Promise<void> {
        const m = await 加载远程模块({
          remoteEntry: 'http://localhost:4202/remoteEntry.json',
          exposedModule: './AnimatedBox'
        });

        const ref = this.viewContainer.createComponent(m.AnimatedBoxComponent);
        // const compInstance = ref.实例;
      }
    }
就像变魔术一样,我们可以从 mfe2 导入 mfe1 中创建和维护的组件。

MFE导出的组件
解决 Angular 微前端架构中的服务相关问题我们的组件能工作是因为它非常简单。然而,如果这个组件开始依赖于一个服务,它将无法正常工作。我们稍微调整一下方法,在mfe2里创建一个服务。
首先,我们在 mfe2 里定义一下服务:
    import { HttpClient } from '@angular/common/http';
    import { Injectable } from '@angular/core';

    @Injectable({ providedIn: 'root' })
    export class DataService {

      constructor(private httpClient: HttpClient) { }

      获取数据() {
        return this.httpClient.get('https://jsonplaceholder.typicode.com/posts/1');
      }
}接下来,我们需要在 app.component.ts 里实现这个功能。
    导入 { Component } from '@angular/core';
    导入 { RouterOutlet } from '@angular/router';
    导入 { ExposeAnimatedBoxComponent } from './exposes/expose-animated-box/expose-animated-box.component';
    导入 { FooComponent } from './pages/foo/foo.component';
    导入 { DataService } from './services/data.service';

    @Component({
      选择器: 'app-root',
      独立: true,
      导入: [RouterOutlet, FooComponent, ExposeAnimatedBoxComponent],
      提供者: [DataService],
      模板URL: './app.component.html',
      样式URL: ['./app.component.scss']
    })
    导出 class AppComponent {
      title = '微前端2';
    }
既然我们使用 HttpClient,我们需要在 app.config.ts 中定义提供程序。我们还应该在 mfe1 和 shell 中也这样做,以确保在导入组件时可以使用 HttpClient 实例。
    import { ApplicationConfig, provideZoneChangeDetection } from '@angular/core';
    import { provideRouter } from '@angular/router';
    import { provideHttpClient, withFetch } from '@angular/common/http';
    import { routes } from './app.routes';

    export const appConfig: ApplicationConfig = {
      providers: [
        provideZoneChangeDetection({ eventCoalescing: true }),
        provideRouter(routes),
        provideHttpClient(withFetch())
      ]
};现在,让我们在 animated-box.component.ts 文件里调用 fetchData 函数:
fetchData() import { CommonModule } from '@angular/common';
import { Component, OnInit } from '@angular/core';
import { DataService } from '../../services/data.service';
@Component({
selector: 'app-animated-box',
standalone: true,
imports: [CommonModule],
templateUrl: './animated-box.component.html',
styleUrls: ['./animated-box.component.scss']
})
export class AnimatedBoxComponent implements OnInit {
constructor(private dataService: DataService) { }
ngOnInit() {
this.dataService.fetchData().subscribe((data) => {
console.log("AnimatedBoxComponent: " + JSON.stringify(data));
});
}
}在这种设置下,集成与端点在mfe2中运行。
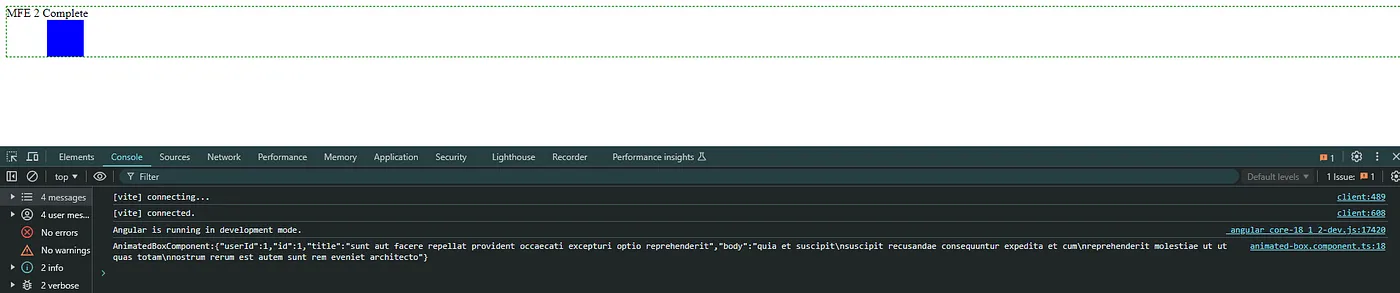
在mfe2中获取数据的操作
处理 mfe1 错误然而,在 mfe1 时,我们遇到了错误。
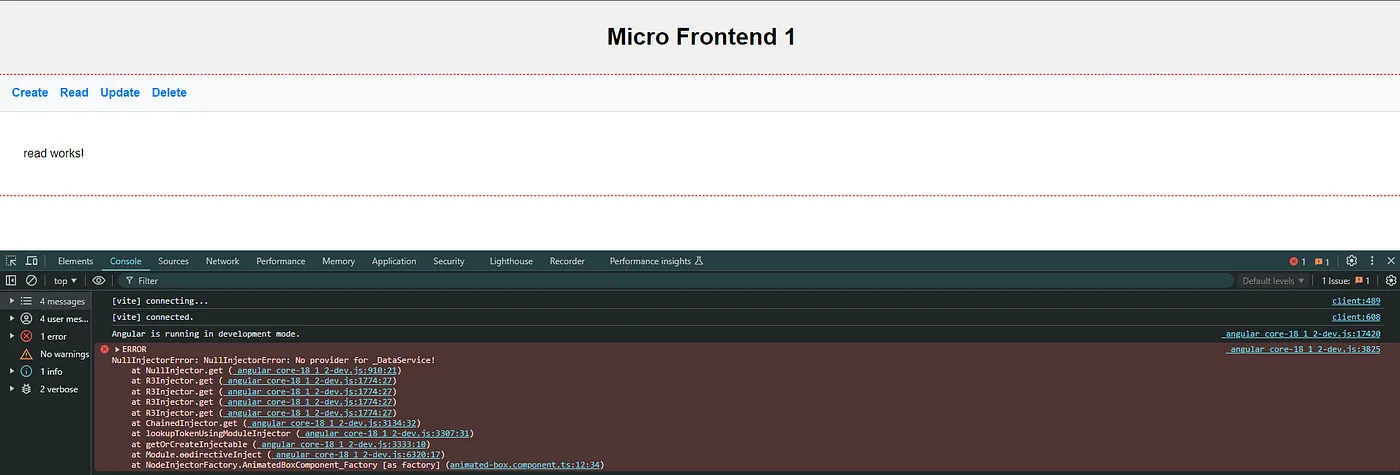
MFE1 with错误
为了处理这个问题,我们不再直接导出 AnimatedBoxComponent,而是创建一个独立的组件,这个新组件将提供 AnimatedBoxComponent 所需的所有模块、服务和提供者。建议创建一个单独的文件夹来存放这些中间组件,例如 /exposes 目录。
在 /exposes 文件夹里,咱们创建一个叫 ExposeAnimatedBoxComponent 的组件。
    <!-- 展示动画框组件 -->
    <app-animated-box></app-animated-box>
// 暴露动画盒子组件.html
import { Component } from '@angular/core';
import { AnimatedBoxComponent } from '../../components/animated-box/animated-box.component';
import { DataService } from '../../services/data.service';
@Component({
selector: 'app-暴露动画盒子',
standalone: true,
imports: [AnimatedBoxComponent],
providers: [DataService],
templateUrl: './暴露动画盒子组件.html',
styleUrl: './暴露动画盒子组件.scss'
})
export class ExposeAnimatedBoxComponent {
}我们将导出我们的组件,该组件封装了所需的依赖项,以支持 AnimatedBoxComponent:
    // 暴露组件映射,用于路由配置
    exposes: {
      './Component': './src/app/app.component.ts',  // 主组件文件路径
      './ExposeAnimatedBox': './src/app/exposes/expose-animated-box/expose-animated-box.component.ts',  // 动画盒子组件文件路径
},最后,在我们的 crud.component.ts 文件中,让我们更新导入语句来使用新组件。
    import { loadRemoteModule } from '@angular-architects/native-federation';
    import { Component, OnInit, ViewChild, ViewContainerRef } from '@angular/core';
    import { RouterModule } from '@angular/router';
    import { CustomRouterLinkDirective } from '../directives/custom-router-link.directive';

    /**

* 这个组件是一个独立的组件
     */
    @Component({
      selector: 'app-crud',
      standalone: true,
      imports: [RouterModule, CustomRouterLinkDirective],
      templateUrl: './crud.component.html',
      styleUrls: ['./crud.component.scss']
    })
    export class CrudComponent implements OnInit {

      @ViewChild('placeAnimatedBox', { read: ViewContainerRef })
      viewContainer!: ViewContainerRef;

      constructor() { }

      ngOnInit() {
        setTimeout(() => {
          this.loadAnimatedBox();
        }, 2000);
      }

      /**

* 加载动画盒子组件
       */
      async loadAnimatedBox(): Promise<void> {
        const m = await loadRemoteModule({
          remoteEntry: 'http://localhost:4202/remoteEntry.json',
          exposedModule: './ExposeAnimatedBox'
        });

        const ref = this.viewContainer.createComponent(m.ExposeAnimatedBoxComponent);
      }
    }
通过这种方法,我们成功地将 AnimatedBoxComponent 包裹在一个组件(ExposeAnimatedBoxComponent)中,该组件用于提供必需的服务模块,确保这些服务模块在 mfe2 应用树的根或顶层正确提供。
所有这些作品
拥有巨大的权力,就意味着承担巨大的责任微前端的最大优势在于能够将庞大的单体应用拆分成更小、更易管理的模块,独立的团队可以各自开发、部署和维护这些模块,互不干扰。这增加了系统的可扩展性,简化了维护工作,并促进了组件的重复利用。此外,它还允许根据需要采用不同的技术栈,提高了开发的灵活性和适应性。
通过在 Angular 中使用动态加载组件和微前端的方法,可以实现由其他团队维护的功能和组件。这种方法的优点在于可以自动反映团队对组件的更新。然而,如果不妥善维护导出的组件,这种优势也可能导致问题。确保导出的组件稳定且兼容,以避免应用程序中的故障和不一致性,这一点至关重要。
奖金当我们单独分析每个应用程序的大小以及它们在 shell 中加载时,我们注意到它们并没有完全重新加载。这要归功于 Native Federation 在重用依赖代码方面的出色表现。因此,远程加载仅限于实际为您的应用程序编写的新代码,从而优化了性能并缩短了加载时间。这种高效的依赖管理使应用程序更加轻便快捷,从而改善了用户体验。

尺寸例子(例如)
为了实际演示并了解实现细节,您可以访问 GitHub 查看完整的源代码。仓库里包含了所有必要的配置和代码示例,帮助您轻松地设置和运行项目。点击这里访问仓库,here。
结尾:将一个单体应用分解为微前端可以带来多种好处,例如可扩展性、更易于维护和管理以及技术灵活性。通过 Angular 的远程组件加载,我们可以自动反映其他团队的更新,只要导出的组件稳定且兼容。原生 Federation 通过重用依赖代码来优化性能,从而实现更轻量且快速的应用程序。