简介
在上一次,我介绍了在国产操作系统 Kylin V10 (Lance)-aarch64 上安装单机版 Easysearch/Console/Agent/Gateway/Loadgen,小伙伴们可查看原文。今天我重点介绍下在 Loongnix-Server Linux release 8.4.1 (3C5000L)上安装 Easysearch。
系统配置
在安装之前,需要先进行系统参数调整并创建操作用户,以下命令均需要使用 root 用户操作。
#配置nofile和memlock

tee  /etc/security/limits.d/21-infini.conf <<-'EOF'

* soft nofile 1048576

* hard nofile 1048576

* soft memlock unlimited

* hard memlock unlimited

root soft nofile 1048576

root hard nofile 1048576

root soft memlock unlimited

root hard memlock unlimited

EOF


#关闭THP

echo  never > /sys/kernel/mm/transparent_hugepage/enabled

echo  never > /sys/kernel/mm/transparent_hugepage/defrag

grep  -i  HugePages_Total  /proc/meminfo


grep  -wq  transparent_hugepage  /etc/rc.local || cat <<-'EOF' >> /etc/rc.local


if test -f /sys/kernel/mm/transparent_hugepage/enabled; then

echo never > /sys/kernel/mm/transparent_hugepage/enabled

fi

if test -f /sys/kernel/mm/transparent_hugepage/defrag; then

echo never > /sys/kernel/mm/transparent_hugepage/defrag

fi

EOF

chmod  755  /etc/rc.local


#内核调优

tee  /etc/sysctl.d/70-infini.conf <<-'EOF'

vm.max_map_count = 262145

net.core.somaxconn = 65535

net.core.netdev_max_backlog = 65535

net.ipv4.tcp_max_syn_backlog = 65535

net.ipv4.tcp_syncookies = 1

net.ipv4.tcp_tw_reuse = 1

net.ipv4.tcp_timestamps=1

net.ipv4.tcp_fin_timeout = 10

net.ipv4.tcp_keepalive_time = 900

net.ipv4.tcp_max_tw_buckets = 2000000

net.ipv4.ip_local_port_range = 1024 65535

EOF

sysctl  -p  /etc/sysctl.d/70-infini.conf
用户配置
#创建Easysearch操作用户

groupadd  -g  602  es

useradd  -u  602  -g  es  -m  -d  /home/es  -c  'easysearch'  -s  /bin/bash  es
配置 JDK
#在各个节点上分别操作

wget  -N  http://ftp.loongnix.cn/Java/openjdk17/loongson17.4.0-fx-jdk17.0.6_10-linux-loongarch64.tar.gz  -P  /usr/src


mkdir  -p  /usr/local/jdk

tar  -zxf  /usr/src/loongson*.tar.gz  -C  /usr/local/jdk  --strip-components  1


tee  /etc/profile.d/java.sh <<-'EOF'

# set java environment

JAVA_HOME=/usr/local/jdk

CLASSPATH=$CLASSPATH:$JAVA_HOME/lib

PATH=$JAVA_HOME/bin:$PATH

export PATH JAVA_HOME CLASSPATH

EOF

source  /etc/profile

java  -version
Easysearch 部署
部署及密码配置
#在线安装

curl  -sSL  http://get.infini.sh | bash  -s  --  -p  easysearch  -d  /data/easysearch

#初始化证书(若不采用默认证书,如需要调整证书可修改证书生成文件)

cd  /data/easysearch

#默认会生成随机密码

bin/initialize.sh

ll  /data/easysearch/config/{*.crt,*.key,*.pem}
配置文件及 JVM 调整
cat <<EOF > /data/easysearch/config/easysearch.yml

cluster.name: infinilabs

node.name: node-1

network.host: 0.0.0.0

http.port: 9200

transport.port: 9300

bootstrap.memory_lock: false

bootstrap.system_call_filter: false


cluster.initial_master_nodes: ["node-1"]


path.home: /data/easysearch

path.data: /data/easysearch/data

path.logs: /data/easysearch/logs


http.compression: true


security.enabled: true

security.audit.type: noop

security.ssl.transport.cert_file: instance.crt

security.ssl.transport.key_file: instance.key

security.ssl.transport.ca_file: ca.crt

security.ssl.transport.skip_domain_verify: true

security.ssl.http.enabled: true

security.ssl.http.cert_file: instance.crt

security.ssl.http.key_file: instance.key

security.ssl.http.ca_file: ca.crt


security.allow_default_init_securityindex: true


security.nodes_dn:

- 'CN=infini.cloud,OU=UNIT,O=ORG,L=NI,ST=FI,C=IN'


security.restapi.roles_enabled: [ "superuser", "security_rest_api_access" ]


security.system_indices.enabled: true

security.ssl.http.clientauth_mode: OPTIONAL

security.system_indices.indices: [".infini-*"]


#for admin dn

## specify admin certs to operate against system indices, basic_auth is not required

## curl -k --cert config/admin.crt --key config/admin.key -XDELETE 'https://localhost:9200/.infini-*/'

security.authcz.admin_dn:

- 'CN=admin.infini.cloud,OU=UNIT,O=ORG,L=NI,ST=FI,C=IN'

EOF


#根据实际机器内存的大小进行配置,推荐配置为机器内存一半,且不超过31G

sed  -i  "s/1g/4g/g"  $ES_HOME/config/jvm.options
备份目录及权限调整
#创建备份目录

mkdir  -p  /data/easysearch/backup

#更新目录权限

chown  -R  es.es  /data/easysearch
环境变量及启动服务
su  -  es

grep  -wq  easysearch  ~/.bashrc || cat<<EOF >> ~/.bashrc

export  ES_HOME=/data/easysearch

EOF

source  ~/.bashrc


#jna替换<龙芯平台有独立的jna实现>

rm  -rvf  $ES_HOME/lib/jna*.jar

wget  -N  https://release.infinilabs.com/easysearch/archive/jna/loongarch64/jna-5.12.1.jar  -P  $ES_HOME/lib


#以后台方式启动服务

$ES_HOME/bin/easysearch -d
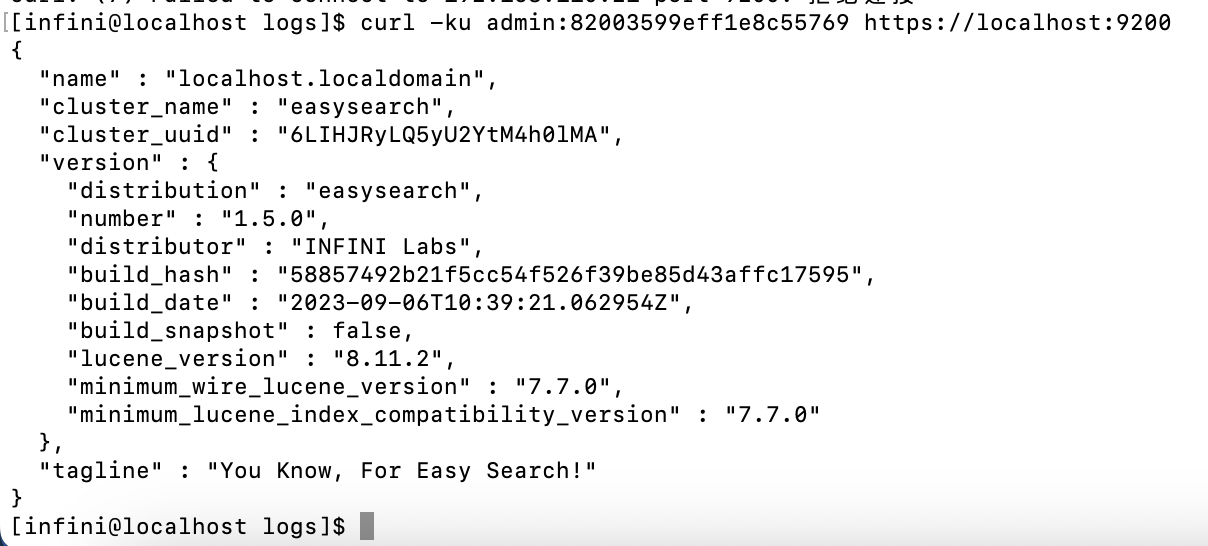
Easysearch 验证
curl  -ku  "admin:$pass"  https://127.0.0.1:9200

curl  -ku  "admin:$pass"  https://127.0.0.1:9200/_cluster/health?pretty

curl  -ku  "admin:$pass"  https://127.0.0.1:9200/_cat/nodes?v
部署 Console
curl  -sSL  http://get.infini.sh | bash  -s  --  -p  console


#安装服务并启动

cd  /opt/console

./console-linux-loong64  -service  install

./console-linux-loong64  -service  start


#验证

systemctl  status  console
部署 Agent
curl  -sSL  http://get.infini.sh | bash  -s  --  -p  agent


#修改Agent配置文件

cd  /opt/agent

sed  -i  "/ES_ENDPOINT:/ s|\(.*\: \).*|\1$https://localhost:9200|"  agent.yml

sed  -i  "/ES_USER:/ s|\(.*\: \).*|\1admin|"  agent.yml

sed  -i  "/ES_PASS:/ s|\(.*\: \).*|\1$pass|"  gateway.yml

sed  -i  "/API_BINDING:/ s|\(.*\: \).*|\1\"0.0.0.0:8080\"|"  agent.yml

head  -n  5  agent.yml


#安装服务并启动

./agent-linux-loong64  -service  install

./agent-linux-loong64  -service  start


#验证

systemctl  status  agent
部署 Gateway
curl  -sSL  http://get.infini.sh | bash  -s  --  -p  gateway

cd  /opt/gateway


#修改Gateway配置文件

sed  -i  "/ES_PASS:/ s|\(.*\: \).*|\1$pass|"  gateway.yml

head  -n  10  gateway.yml


#安装服务并启动

./gateway-linux-loong64  -service  install

./gateway-linux-loong64  -service  start


#检查服务

systemctl  status  gateway

curl  -u  "admin:$pass"  http://127.0.0.1:8000
部署 Loadgen
curl  -sSL  http://get.infini.sh | bash  -s  --  -p  loadgen


#写入数据测试

cd  /opt/loadgen

mkdir  -p  mock

cat <<EOF > mock/nginx.log

175.10.75.216 - - [28/Jul/2020:21:20:26 +0800] "GET / HTTP/1.1" 200 8676 "-" "Mozilla/5.0 (Macintosh; Intel Mac OS X 10_15_6) AppleWebKit/537.36 (KHTML, like Gecko) Chrome/84.0.4147.89 Safari/537.36"

175.10.75.216 - - [28/Jul/2020:21:20:26 +0800] "GET /vendor/bootstrap/css/bootstrap.css HTTP/1.1" 200 17235 "http://dl-console.elasticsearch.cn/" "Mozilla/5.0 (Macintosh; Intel Mac OS X 10_15_6) AppleWebKit/537.36 (KHTML, like Gecko) Chrome/84.0.4147.89 Safari/537.36"

175.10.75.216 - - [28/Jul/2020:21:20:26 +0800] "GET /vendor/daterangepicker/daterangepicker.css HTTP/1.1" 200 1700 "http://dl-console.elasticsearch.cn/" "Mozilla/5.0 (Macintosh; Intel Mac OS X 10_15_6) AppleWebKit/537.36 (KHTML, like Gecko) Chrome/84.0.4147.89 Safari/537.36"

175.10.75.216 - - [28/Jul/2020:21:20:26 +0800] "GET /vendor/fork-awesome/css/v5-compat.css HTTP/1.1" 200 2091 "http://dl-console.elasticsearch.cn/" "Mozilla/5.0 (Macintosh; Intel Mac OS X 10_15_6) AppleWebKit/537.36 (KHTML, like Gecko) Chrome/84.0.4147.89 Safari/537.36"

175.10.75.216 - - [28/Jul/2020:21:20:26 +0800] "GET /assets/font/raleway.css HTTP/1.1" 200 145 "http://dl-console.elasticsearch.cn/" "Mozilla/5.0 (Macintosh; Intel Mac OS X 10_15_6) AppleWebKit/537.36 (KHTML, like Gecko) Chrome/84.0.4147.89 Safari/537.36"

175.10.75.216 - - [28/Jul/2020:21:20:26 +0800] "GET /vendor/fork-awesome/css/fork-awesome.css HTTP/1.1" 200 8401 "http://dl-console.elasticsearch.cn/" "Mozilla/5.0 (Macintosh; Intel Mac OS X 10_15_6) AppleWebKit/537.36 (KHTML, like Gecko) Chrome/84.0.4147.89 Safari/537.36"

175.10.75.216 - - [28/Jul/2020:21:20:26 +0800] "GET /assets/css/overrides.css HTTP/1.1" 200 2524 "http://dl-console.elasticsearch.cn/" "Mozilla/5.0 (Macintosh; Intel Mac OS X 10_15_6) AppleWebKit/537.36 (KHTML, like Gecko) Chrome/84.0.4147.89 Safari/537.36"

175.10.75.216 - - [28/Jul/2020:21:20:26 +0800] "GET /assets/css/theme.css HTTP/1.1" 200 306 "http://dl-console.elasticsearch.cn/" "Mozilla/5.0 (Macintosh; Intel Mac OS X 10_15_6) AppleWebKit/537.36 (KHTML, like Gecko) Chrome/84.0.4147.89 Safari/537.36"

175.10.75.216 - - [28/Jul/2020:21:20:26 +0800] "GET /vendor/fancytree/css/ui.fancytree.css HTTP/1.1" 200 3456 "http://dl-console.elasticsearch.cn/" "Mozilla/5.0 (Macintosh; Intel Mac OS X 10_15_6) AppleWebKit/537.36 (KHTML, like Gecko) Chrome/84.0.4147.89 Safari/537.36"

175.10.75.216 - - [28/Jul/2020:21:20:26 +0800] "GET /syncthing/development/logbar.js HTTP/1.1" 200 486 "http://dl-console.elasticsearch.cn/" "Mozilla/5.0 (Macintosh; Intel Mac OS X 10_15_6) AppleWebKit/537.36 (KHTML, like Gecko) Chrome/84.0.4147.89 Safari/537.36"

EOF


cat <<EOF > loadgen.yml

env:

ES_USERNAME: admin

ES_PASSWORD: $pass

ES_ENDPOINT: http://localhost:8000

runner:

# total_rounds: 1

no_warm: false

# Whether to log all requests

log_requests: false

# Whether to log all requests with the specified response status

log_status_codes:

- 0

- 500

assert_invalid: false

assert_error: false

variables:

- name: ip

type: file

path: dict/ip.txt

- name: message

type: file

path: mock/nginx.log

replace: # replace special characters in the value

'"': '\"'

'\': '\\'

- name: user

type: file

path: dict/user.txt

- name: id

type: sequence

- name: uuid

type: uuid

- name: now_local

type: now_local

- name: now_utc

type: now_utc

- name: now_unix

type: now_unix

- name: suffix

type: range

from: 10

to: 13

requests:

- request:

method: POST

runtime_variables:

batch_no: uuid

runtime_body_line_variables:

routing_no: uuid

basic_auth:

username: $[[env.ES_USERNAME]]

password: $[[env.ES_PASSWORD]]

url: $[[env.ES_ENDPOINT]]/_bulk

body_repeat_times: 5000

body: |

{ "index" : { "_index" : "test-$[[suffix]]", "_id" : "$[[uuid]]" } }

{ "id" : "$[[uuid]]","routing_no" : "$[[routing_no]]","batch_number" : "$[[batch_no]]","message" : "$[[message]]","random_no" : "$[[suffix]]","ip" : "$[[ip]]","now_local" : "$[[now_local]]","now_unix" : "$[[now_unix]]" }

EOF


#执行测试

./loadgen-linux-loong64  -c  6  -d  6  --compress


#检查测试索引文档

curl  -u  "admin:$pass"  http://127.0.0.1:8000/_cat/indices/test*?v
至此,完成在 LoongArch(3C5000L)上安装单机版 Easysearch/Console/Agent/Gateway/Loadgen。通过浏览器 http://机器域名:9000/ 即可访问 Console,对 Easysearch 进行配置管理。
可能遇到的问题

检查下配置文件中监听的地址是否正确,防火墙是否有关闭。


 随时随地看视频


