本文主要向大家介绍springboot是怎么对缓存、SQL运行以及系统进行监控的。
显而可见,本文分为三个部分:缓存监控、SQL监控、系统监控。
文中代码只做简单介绍,详细代码文末已附地址。
缓存监控
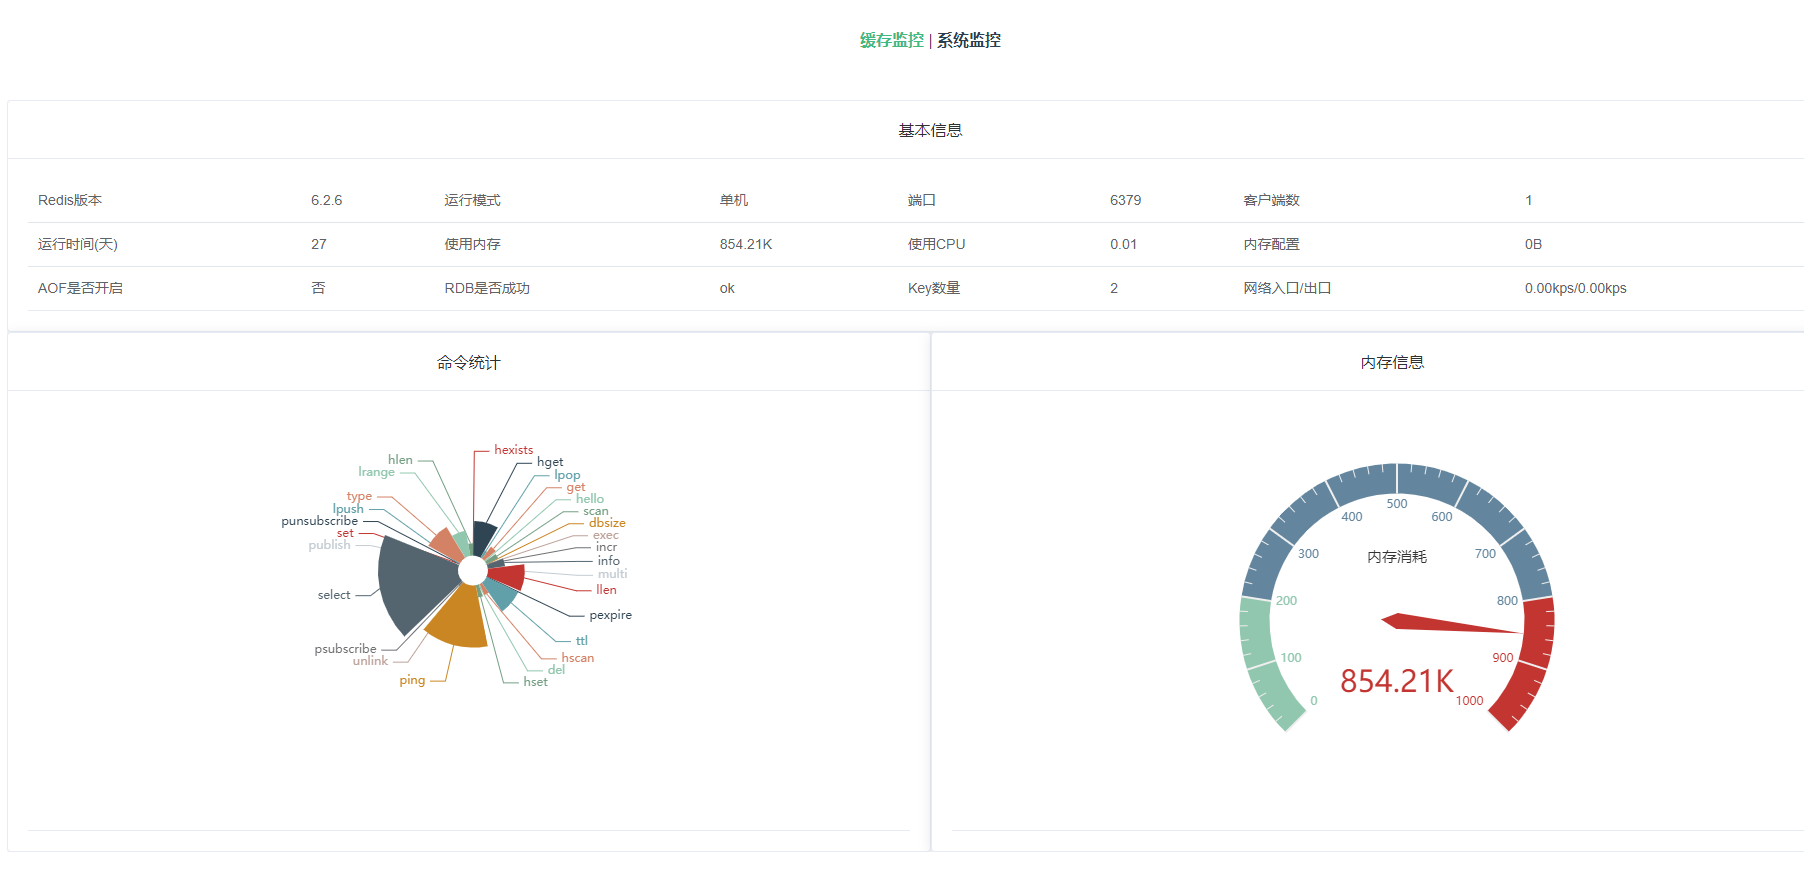
本文中所说缓存监控,是指对Redis各项数据进行监控统计。
- 首先要在项目导入Redis依赖
<dependency>
            <groupId>org.springframework.boot</groupId>
            <artifactId>spring-boot-starter-data-redis</artifactId>
            <version>2.3.12.RELEASE</version>
 </dependency>
- Redis信息配置
在application.yml或application.properties中添加redis配置信息。
本文中使用application.yml
spring:
  redis:
    host: 192.168.1.5
    client-name:
    password:
    port: 6379
- 创建config类
@Configuration
@EnableCaching
public class RedisConfig extends CachingConfigurerSupport {

    @Value("${spring.redis.host}")
    private String host;
    @Value("${spring.redis.client-name}")
    private String name;
    @Value("${spring.redis.password}")
    private String password;
    @Value("${spring.redis.port}")
    private int port;
    private static final Long DEFAULT_EXPIRE_TIME = 300L;

    /**
     * 配置lettuce连接池
     * @return
     */
    @Bean("redisPool")
    @ConfigurationProperties(prefix = "spring.redis.lettuce.pool")
    public GenericObjectPoolConfig redisPool() {
        return new GenericObjectPoolConfig();
    }

    /**
     * 配置第一个数据源的
     *
     * @return
     */
    @Bean("redisConfigFirst")
    @ConfigurationProperties(prefix = "spring.redis")
    public RedisStandaloneConfiguration redisConfig() {
        RedisStandaloneConfiguration redisStandaloneConfiguration = new RedisStandaloneConfiguration();
        redisStandaloneConfiguration.setHostName(host);
        redisStandaloneConfiguration.setPort(port);
        redisStandaloneConfiguration.setPassword(password);
        return redisStandaloneConfiguration;
    }

    /**
     * 配置第一个数据源的连接工厂
     * 这里注意:需要添加@Primary 指定bean的名称,目的是为了创建两个不同名称的LettuceConnectionFactory
     *
     * @param config
     * @param redisConfig
     * @return
     */
    @Bean("factory")
    @Primary
    public LettuceConnectionFactory factory(@Qualifier("redisPool") GenericObjectPoolConfig config, @Qualifier("redisConfigFirst") RedisStandaloneConfiguration redisConfig) {
        LettuceClientConfiguration clientConfiguration = LettucePoolingClientConfiguration.builder().poolConfig(config).build();
        return new LettuceConnectionFactory(redisConfig, clientConfiguration);
    }

    @Bean("redisTemplate")
    @Primary
    public RedisTemplate<String, Object> redisTemplate(@Qualifier("factory") RedisConnectionFactory factory) {
        return getStringStringRedisTemplate(factory);
    }
}
- 获取缓存信息
- 创建一个controller
- 在controller中添加一个方法返回缓存信息
@RestController
@RequestMapping("/monitor/cache")
public class CacheController {

    @Autowired
    private RedisTemplate redisTemplate;

    @GetMapping("/info")
    public AjaxResult getInfo() {
        Properties info = (Properties) redisTemplate.execute((RedisCallback<Object>) connection -> connection.info());
        Properties commandStats = (Properties) redisTemplate.execute((RedisCallback<Object>) connection -> connection.info("commandstats"));
        Object dbSize = redisTemplate.execute((RedisCallback<Object>) connection -> connection.dbSize());

        Map<String, Object> result = new HashMap<>(3);
        result.put("info", info);
        result.put("dbSize", dbSize);

        List<Map<String, String>> pieList = new ArrayList<>();
        commandStats.stringPropertyNames().forEach(key -> {
            Map<String, String> data = new HashMap<>(2);
            String property = commandStats.getProperty(key);
            data.put("name", StringUtils.removeStart(key, "cmdstat_"));
            data.put("value", StringUtils.substringBetween(property, "calls=", ",usec"));
            pieList.add(data);
        });
        result.put("commandStats", pieList);
        return AjaxResult.success(result);
    }
}
- 效果展示

系统监控
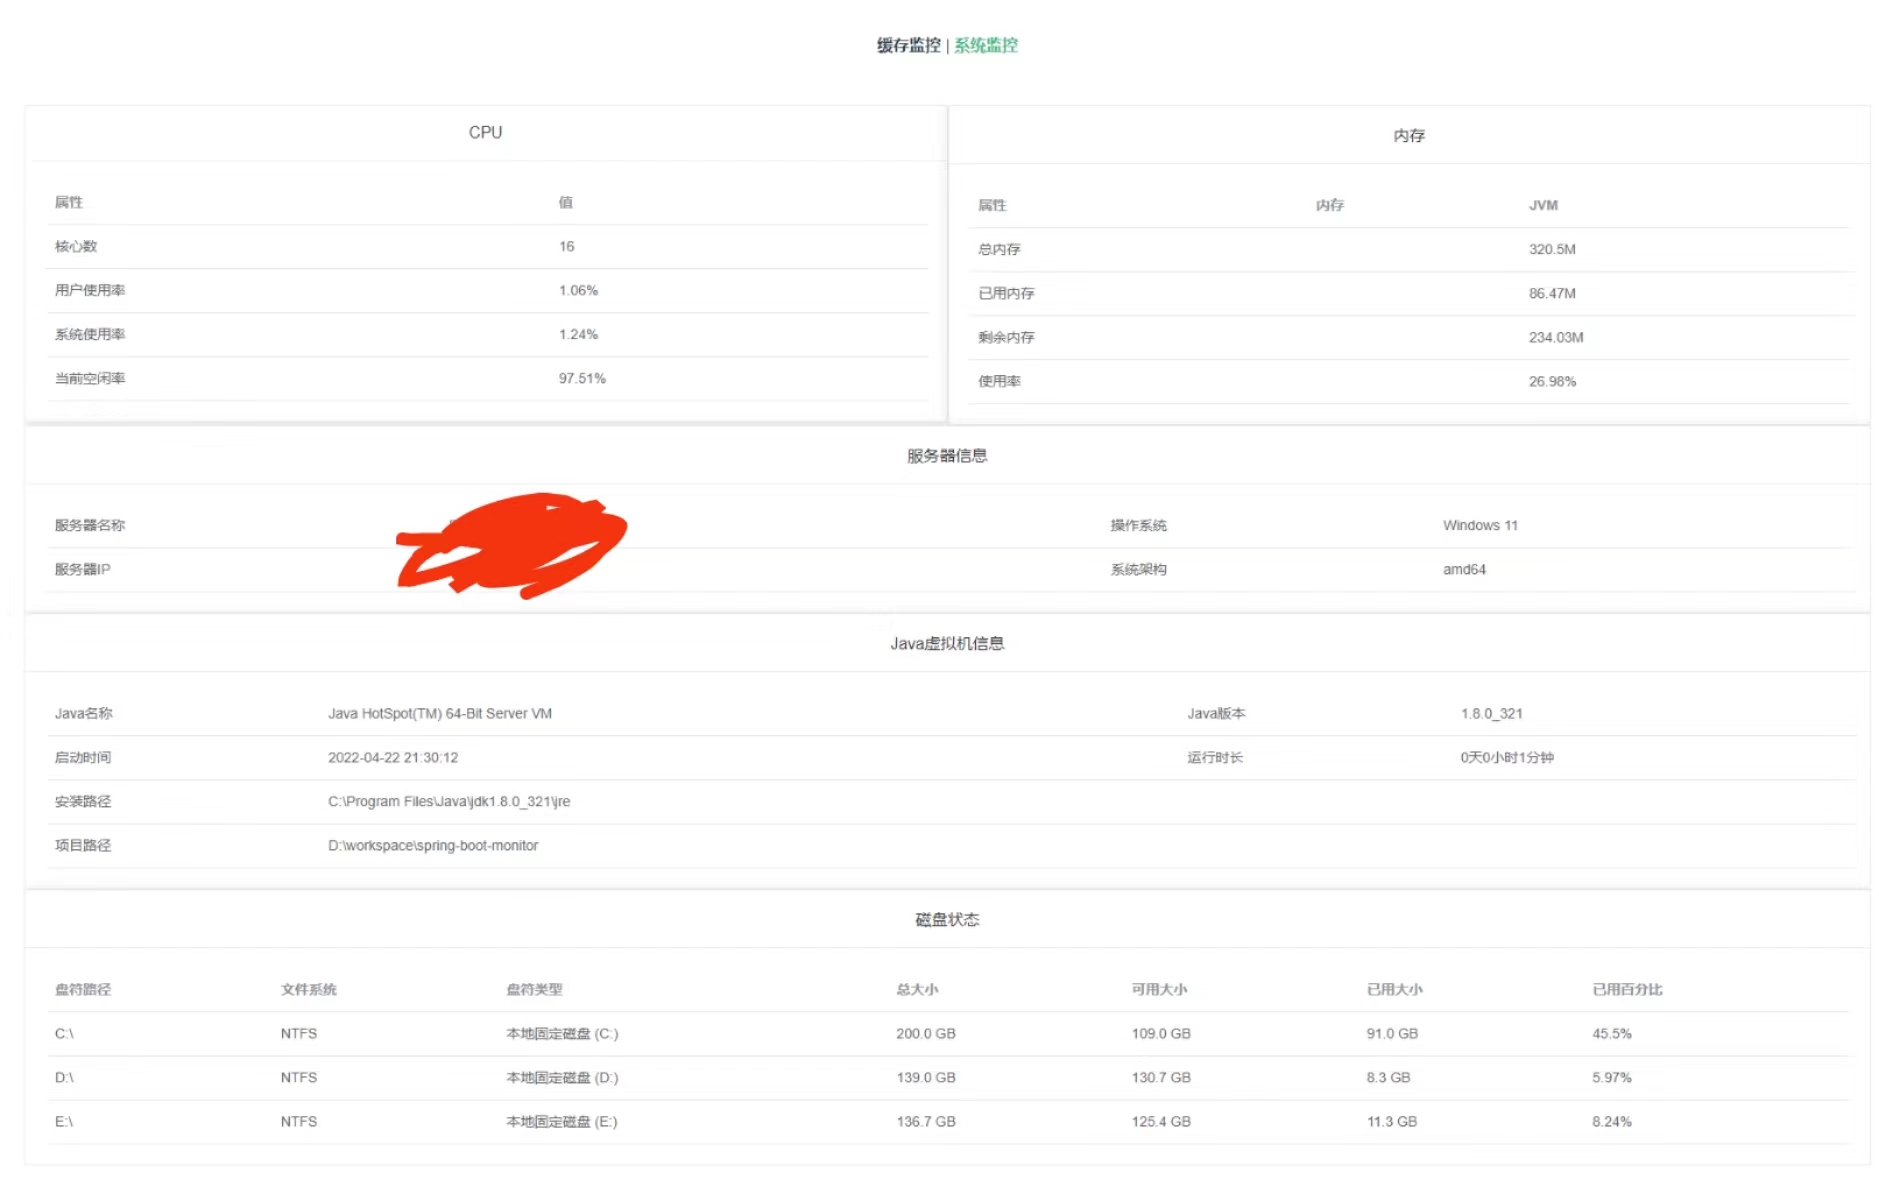
系统监控主要是指项目运行所在服务器信息、CPU、JVM信息等。
- 导入依赖
<dependency>
            <groupId>com.github.oshi</groupId>
            <artifactId>oshi-core</artifactId>
            <version>6.1.6</version>
</dependency>
- 创建一个server类
主要方法如下(详细代码文末附有地址)
/**
  * 设置CPU信息
  */
    private void setCpuInfo(CentralProcessor processor)
    {
        // CPU信息
        long[] prevTicks = processor.getSystemCpuLoadTicks();
        Util.sleep(OSHI_WAIT_SECOND);
        long[] ticks = processor.getSystemCpuLoadTicks();
        long nice = ticks[TickType.NICE.getIndex()] - prevTicks[TickType.NICE.getIndex()];
        long irq = ticks[TickType.IRQ.getIndex()] - prevTicks[TickType.IRQ.getIndex()];
        long softirq = ticks[TickType.SOFTIRQ.getIndex()] - prevTicks[TickType.SOFTIRQ.getIndex()];
        long steal = ticks[TickType.STEAL.getIndex()] - prevTicks[TickType.STEAL.getIndex()];
        long cSys = ticks[TickType.SYSTEM.getIndex()] - prevTicks[TickType.SYSTEM.getIndex()];
        long user = ticks[TickType.USER.getIndex()] - prevTicks[TickType.USER.getIndex()];
        long iowait = ticks[TickType.IOWAIT.getIndex()] - prevTicks[TickType.IOWAIT.getIndex()];
        long idle = ticks[TickType.IDLE.getIndex()] - prevTicks[TickType.IDLE.getIndex()];
        long totalCpu = user + nice + cSys + idle + iowait + irq + softirq + steal;
        cpu.setCpuNum(processor.getLogicalProcessorCount());
        cpu.setTotal(totalCpu);
        cpu.setSys(cSys);
        cpu.setUsed(user);
        cpu.setWait(iowait);
        cpu.setFree(idle);
    }
 /**
   * 设置内存信息
   */
    private void setMemoryInfo(GlobalMemory globalMemory)
    {
        Memory.setTotal(globalMemory.getTotal());
        Memory.setUsed(globalMemory.getTotal() - globalMemory.getAvailable());
        Memory.setFree(globalMemory.getAvailable());
    }
     /**
      * 设置Java虚拟机
     */
    private void setJvmInfo() throws UnknownHostException
    {
        Properties props = System.getProperties();
        jvm.setTotal(Runtime.getRuntime().totalMemory());
        jvm.setMax(Runtime.getRuntime().maxMemory());
        jvm.setFree(Runtime.getRuntime().freeMemory());
        jvm.setVersion(props.getProperty("java.version"));
        jvm.setHome(props.getProperty("java.home"));
    }
/**
     * 设置磁盘信息
     */
    private void setSysFiles(OperatingSystem os)
    {
        FileSystem fileSystem = os.getFileSystem();
        List<OSFileStore> fsArray = fileSystem.getFileStores();
        for (OSFileStore fs : fsArray)
        {
            long free = fs.getUsableSpace();
            long total = fs.getTotalSpace();
            long used = total - free;
            SysFile sysFile = new SysFile();
            sysFile.setDirName(fs.getMount());
            sysFile.setSysTypeName(fs.getType());
            sysFile.setTypeName(fs.getName());
            sysFile.setTotal(convertFileSize(total));
            sysFile.setFree(convertFileSize(free));
            sysFile.setUsed(convertFileSize(used));
            sysFile.setUsage(Arith.mul(Arith.div(used, total, 4), 100));
            sysFiles.add(sysFile);
        }
    }
- 创建controller
@RestController
@RequestMapping("/monitor/server")
public class ServerController {

    @GetMapping("/info")
    public AjaxResult info() throws Exception {
        Server server = new Server();
        server.copyTo();
        return AjaxResult.success(server);
    }
}
- 效果展示

SQL监控
本文中的SQL监控就是指Druid中的监控功能。
- 导入各项依赖
<dependency>
       <groupId>org.springframework.boot</groupId>
       <artifactId>spring-boot-starter-jdbc</artifactId>
       <version>2.3.12.RELEASE</version>
</dependency>
<dependency>
      <groupId>mysql</groupId>
      <artifactId>mysql-connector-java</artifactId>
      <version>8.0.28</version>
</dependency>
<dependency>
       <groupId>com.alibaba</groupId>
       <artifactId>druid</artifactId>
       <version>1.2.6</version>
</dependency>
<dependency>
	<groupId>com.alibaba</groupId>
        <artifactId>druid-spring-boot-starter</artifactId>
        <version>1.2.6</version>
</dependency>
<dependency>
       <groupId>org.mybatis.spring.boot</groupId>
       <artifactId>mybatis-spring-boot-starter</artifactId>
       <version>2.2.2</version>
</dependency>
- 配置连接数据库(application.yml中)
datasource:
    driver-class-name: com.mysql.cj.jdbc.Driver
    type: com.alibaba.druid.pool.DruidDataSource
    url: jdbc:mysql://127.0.0.1:3306/test?useUnicode=true&characterEncoding=utf-8&useSSL=false&allowMultiQueries=true&serverTimezone=UTC
    username: root
    password: 123456
- 创建一个实体类,做简单查询
public class OAEmail implements Serializable {
    private Long id;
    private String receiveEmail;
    private String subject;
    private String attachment;
    private Date sendTime;
    private String content;
    private static final long serialVersionUID = 1L;
    //此处省略 getter/setter
}

@Mapper
@Repository
public interface OAEmailMapper {
    OAEmail selectByPrimaryKey(Long id);
}

@Service
public class OAEmailServiceImpl implements OAEmailService {

    @Autowired
    private OAEmailMapper oaEmailMapper;

    @Override
    public OAEmail selectByPrimaryKey(Long id) {
        return oaEmailMapper.selectByPrimaryKey(id);
    }
}

@RestController
@RequestMapping("/monitor/sql")
public class IndexController {

    @Autowired
    private OAEmailService oaEmailService;

    @GetMapping("/info")
    public AjaxResult info() {
        OAEmail oaEmail = oaEmailService.selectByPrimaryKey(1L);
        return AjaxResult.success(oaEmail);
    }
}
- 配置 WebStatFilter/StatViewServlet(application.yml中)
druid:
     initialSize: 5
     minIdle: 10
     maxActive: 20
     maxWait: 60000
     timeBetweenEvictionRunsMillis: 60000
     minEvictableIdleTimeMillis: 300000
     maxEvictableIdleTimeMillis: 900000
     validationQuery: SELECT 1 FROM DUAL
     testWhileIdle: true
     testOnBorrow: false
     testOnReturn: false
     poolPreparedStatements: true
     filters: stat,wall
     maxPoolPreparedStatementPerConnectionSize: 20
     useGlobalDataSourceStat: true
     connectionProperties: druid.stat.mergeSql=true;druid.stat.slowSqlMillis=500
     stat-view-servlet:
       enabled: true
       url-pattern: /druid/*
- druid配置类
@Configuration
public class DruidConfig {
    @Bean
    @ConfigurationProperties(prefix = "spring.datasource")
    public DruidDataSource druidDataSource() throws SQLException {
        DruidDataSource druidDataSource = new DruidDataSource();
        druidDataSource.addFilters("stat");
        return druidDataSource;
    }

    @Bean
    public ServletRegistrationBean startViewServlet() {
        final ServletRegistrationBean<StatViewServlet> bean = new ServletRegistrationBean<>(new StatViewServlet(), "/druid/*");
        //配置用于登录DRUID后台的账号和密码
        final HashMap<String, String> hashMap = new HashMap<>();
        hashMap.put("loginUsername", "root");
        hashMap.put("loginPassword", "123456");
        //allow表示ip白名单,""表示ip可访问,如果写localhost表示本地可访问
        hashMap.put("allow", "");
        //deny表示ip黑名单,优先级高于allow
//        hashMap.put("deny", "");

        bean.setInitParameters(hashMap);
        return bean;
    }
    @Bean
    public FilterRegistrationBean webStatFilter(){
        FilterRegistrationBean bean = new FilterRegistrationBean();
        bean.setFilter(new WebStatFilter());
        //设置过滤的内容
        Map<String, String> initParameters =new HashMap<>();
        //排除统计以下内容
        initParameters.put("exclusions","*.js,*.css,/druid/*");
        bean.setInitParameters(initParameters);
        return bean;
    }
}
- 测试
- 启动项目,启动成功后,访问地址:http://localhost:8080/druid/login.html

- 输入设置的账号、密码:root和123456
登录成功后:

- 访问接口
访问接口地址: http://localhost:8080/monitor/sql/info,会执行SQL,
然后监控记录就会更新


- 去除底部广告
/**
     * 去除监控页面底部的广告
     */
    @SuppressWarnings({ "rawtypes", "unchecked" })
    @Bean
    @ConditionalOnProperty(name = "spring.datasource.druid.stat-view-servlet.enabled", havingValue = "true")
    public FilterRegistrationBean removeDruidFilterRegistrationBean(DruidStatProperties properties)
    {
        // 获取web监控页面的参数
        DruidStatProperties.StatViewServlet config = properties.getStatViewServlet();
        // 提取common.js的配置路径
        String pattern = config.getUrlPattern() != null ? config.getUrlPattern() : "/druid/*";
        String commonJsPattern = pattern.replaceAll("\\*", "js/common.js");
        final String filePath = "support/http/resources/js/common.js";
        // 创建filter进行过滤
        Filter filter = new Filter()
        {
            @Override
            public void init(javax.servlet.FilterConfig filterConfig) throws ServletException
            {
            }
            @Override
            public void doFilter(ServletRequest request, ServletResponse response, FilterChain chain)
                    throws IOException, ServletException
            {
                chain.doFilter(request, response);
                // 重置缓冲区,响应头不会被重置
                response.resetBuffer();
                // 获取common.js
                String text = Utils.readFromResource(filePath);
                // 正则替换banner, 除去底部的广告信息
                text = text.replaceAll("<a.*?banner\"></a><br/>", "");
                text = text.replaceAll("powered.*?shrek.wang</a>", "");
                response.getWriter().write(text);
            }
            @Override
            public void destroy()
            {
            }
        };
        FilterRegistrationBean registrationBean = new FilterRegistrationBean();
        registrationBean.setFilter(filter);
        registrationBean.addUrlPatterns(commonJsPattern);
        return registrationBean;
    }


 随时随地看视频


热门评论
-

慕娘54722892023-05-14 0
查看全部评论没有代码链接呀?