作者:汪曦
背景
上期分享了基于 Formily 的表单设计器实现原理,JSON Schema 是表单设计器和表单渲染组件之间沟通的语言。为了更深入理解表单设计器的核心,本期为大家详细解读表单 Schema 详细格式及快速入门实践。
Formily 提供了 JSON Schema、JSX Schema、纯 JSX 三种开发模式。由于 JSON 可以序列化保存到数据库中,所以 JSON Schema 的方式非常适合后端动态渲染表单,前端完全不需要维护 schema,只需利用 Formliy 提供的 SchemaForm 来渲染后端返回的 schema 即可。我们仅需通过 Form Builder 或者 Page Designer 之类的工具来输出 JSON Schema,然后交给 SchemaForm 或者 PageEngine 之类的组件来渲染。
说明:
Form Schema 遵循 json schema spec的描述规范动态生成表单。
JSON Schema 规范
JSON Schema 是一个社区推动的 JSON 文件协议,用于规范 JSON 文件内容。它与平台无关,可以描述任意复杂的数据结构,相比 XML,JSON 的描述格式更加紧凑,可读性更好。JSON Schema 在 JSON 的格式上,加入了一些列的标准化属性,用于描述结构化数据。Formily 遵循 JSON Schema 使用最广泛的draft-07 标准,并在其规范上扩充了自己的属性。
我们可以借助 ajv 这类 JSON Schema 验证工具,来认识不同 Schema 规范的区别,详情可参考 draft-07 (and draft-06)。也可以执行 npm i ajv ,在 nodejs 下查看 drat-07 的规范:
require("ajv/dist/refs/json-schema-draft-07.json")
Form Schema 结构
Formily 的 Form Schema 将标准的 JSON Schema 的 properties 属性进行了扩充,关键字段说明如下:
| 属性名 | 描述 | 类型 |
|---|---|---|
| title | 字段标题 | React.ReactNode |
| name | 字段所属的父节点属性名 | string |
| description | 字段描述 | React.ReactNode |
| default | 字段默认值 | any |
| type | 字段类型 | string, object, array, number |
| enum | 枚举字段 | string[], number[], Array<{ label: React.ReactNode, value: any }> |
| required | 字段是否必填 | string, bool |
| maximum | 校验最大值(大于) | number |
| minimum | 校验最小值(小于) | number |
| maxLength | 校验最大长度 | number |
| minLength | 校验最小长度 | number |
| pattern | 正则校验规则 | string, RegExp |
| properties | 对象属性 | {[key : string]:Schema} |
| items | 数组描述 | Schema, Schema[] |
| editable | 字段是否可编辑 | boolean |
| visible | 字段是否可见(数据+样式) | boolean |
| display | 字段样式是否可见 | boolean |
| x-props | 字段扩展属性 | { [name: string]: any } |
| x-index | 字段顺序 | number |
| x-component | 字段 UI 组件名称,大小写不敏感 | string |
| x-component-props | 字段 UI 组件属性 | {} |
通过对比 Form Schema 和标准的 json-schema-spec ,不难发现x-props、x-component、x-component-props 等 x- 开头的属性是新增的,这些属性被 Formily 用来控制组件的渲染、数据校验、联动以及定义副作用等等。
Form Schema 生成表单
理解了 Form Schema 的定义,我们就可以借助 Formily 的 SchemaForm 组件来动态生成表单。
-
举个例子,通过如下代码片段就可以渲染出一个带用户名、密码的基本登录界面了。
import React from 'react'
import ReactDOM from 'react-dom'
import { SchemaForm } from '@formily/next'
import { Input } from '@project/components'

const Title = () => (
  <h2 style={{display: 'flex', justifyContent: 'center'}}>
    登录
  </h2>
)

const schema = {
  type: 'object',
  properties: {
    title: {
      type: 'string',
      'x-component': 'Title'
    },
    username: {
      type: 'string',
      title: '用户名',
      'x-component': 'Input'
    },
    password: {
      type: 'string',
      title: '密码',
      'x-component': 'Input'
    }
  }
 }

const App = () => {
  return (
    <SchemaForm
      components={{
        Input,
        Title
      }}
      onSubmit={console.log}
      schema={schema}
    />
  )
}
ReactDOM.render(<App />, document.getElementById('root'))
说明:
SchemaForm 有两个属性很关键。
- schema 属性是外界传入的 json schema,这个 schema 通常作为字符串存在后端,前端通过接口去获取,JSON.parse 之后交给 SchemaForm 渲染。整个过程,前端完全不关心 schema 的来源以及如何构造。
- components 属性定义了 schema 渲染时的可用组件上下文。form schema 中每个
x-component属性都是一个 string,x-component 作为 key,要在 components map 中找到 value 并且 value 是一个合法的组件(可以是 react、vue、angular 的组件,formily 不和具体的 UI 库绑定),这样就可以渲染出具体的组件。
效果图如下:

以 react 为例,大致的渲染过程是:
const fieldSchema = get(formSchema, 'properties.field_x') const compName = fieldSchema['x-component'] const compProps = fieldSchema['x-component-props'] React.createElement(SchemaForm.components[compName], compProps) -
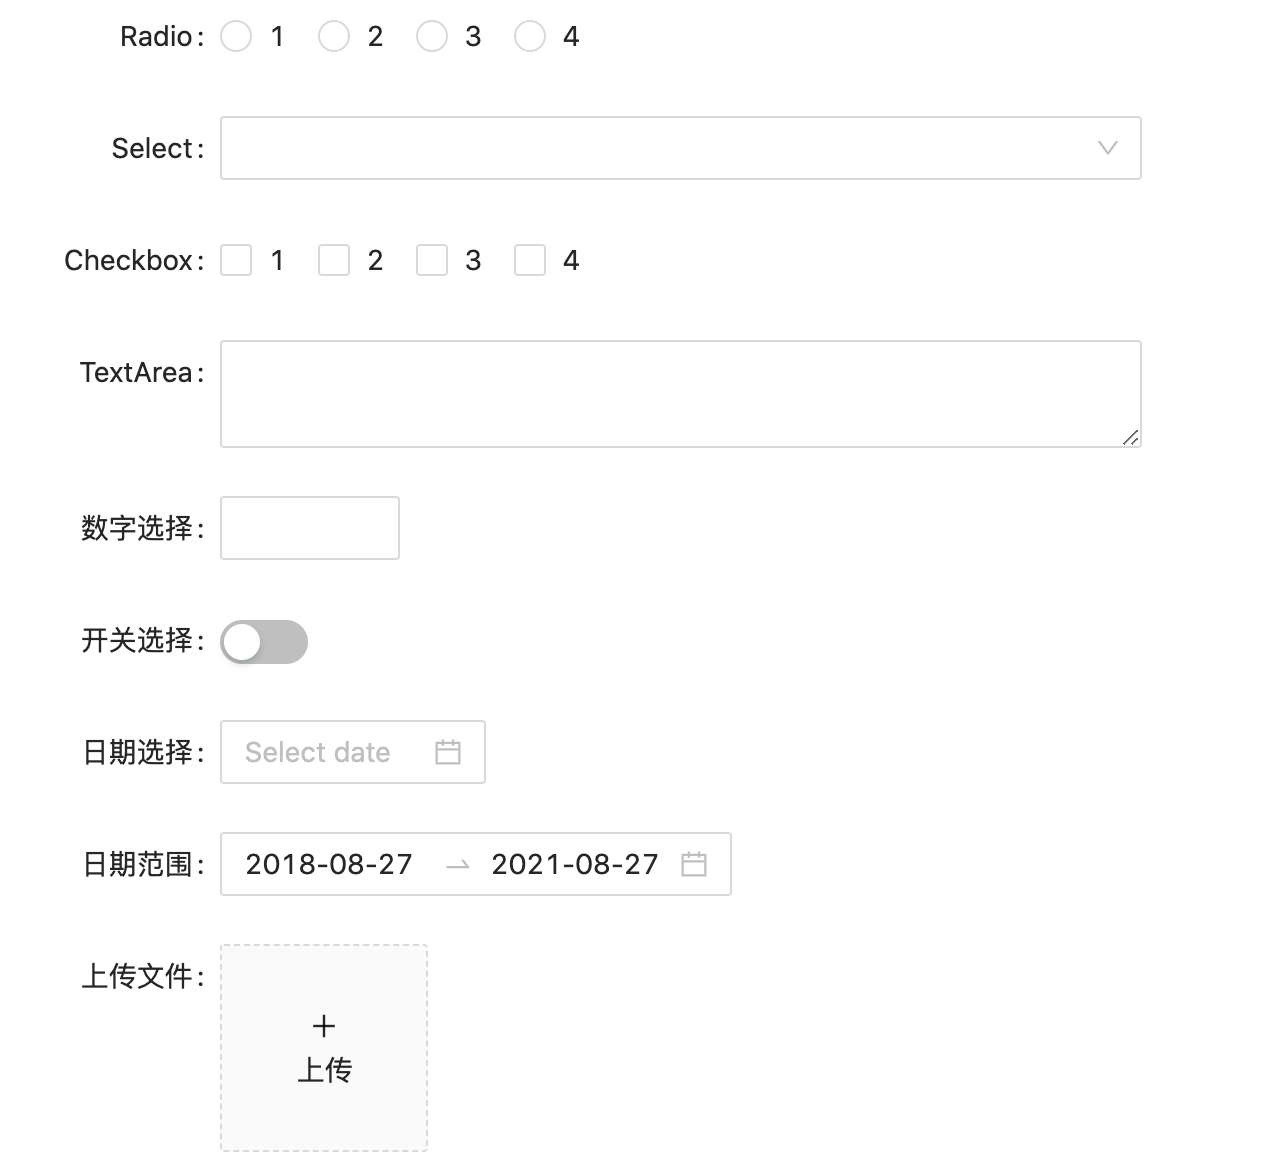
理解了基本登录页面的渲染,我们来看一个更加复杂的 schema 示例,效果图如下:
const schema = {
  "version": "1.0",
  "type": "object",
  "properties": {
    "radio": {
      "type": "string",
      "enum": [
        "1",
        "2",
        "3",
        "4"
      ],
      "title": "Radio",
      "name": "radio",
      "x-component": "radio"
    },
    "select": {
      "type": "string",
      "enum": [
        "1",
        "2",
        "3",
        "4"
      ],
      "title": "Select",
      "name": "select",
      "x-component": "select"
    },
    "checkbox": {
      "type": "string",
      "enum": [
        "1",
        "2",
        "3",
        "4"
      ],
      "title": "Checkbox",
      "name": "checkbox",
      "x-component": "checkbox"
    },
    "textarea": {
      "type": "string",
      "title": "TextArea",
      "name": "textarea",
      "x-component": "textarea"
    },
    "number": {
      "type": "number",
      "title": "数字选择",
      "name": "number",
      "minimum": 0,
      "maximum": 100,
      "x-component": "numberpicker"
    },
    "boolean": {
      "type": "boolean",
      "title": "开关选择",
      "name": "boolean",
      "x-component": "switch"
    },
    "date": {
      "version": "1.0",
      "key": "date",
      "type": "string",
      "title": "日期选择",
      "name": "date",
      "x-component": "datepicker"
    },
    "daterange": {
      "type": "date",
      "title": "日期范围",
      "default": [
        "2018-12-19",
        "2021-12-19"
      ],
      "name": "daterange",
      "x-component": "daterangepicker"
    },
    "upload": {
      "type": "array",
      "title": "卡片上传文件",
      "name": "upload",
      "x-component-props": {
        "listType": "card"
      },
      "x-component": "upload"
    },
    "range": {
      "type": "number",
      "title": "范围选择",
      "name": "range",
      "x-component-props": {
        "min": 0,
        "max": 1024,
        "marks": [
          0,
          1024
        ]
      },
      "x-component": "range"
    },
    "transfer": {
      "type": "number",
      "enum": [
        {
          "key": 1,
          "title": "选项1"
        },
        {
          "key": 2,
          "title": "选项2"
        }
      ],
      "x-component-props": {},
      "title": "穿梭框",
      "name": "transfer",
      "x-component": "transfer"
    },
    "rating": {
      "type": "number",
      "title": "等级",
      "name": "rating",
      "x-component": "rating"
    }
  }
}

const components = {
  // 可用的组件上下文
}

ReactDOM.render(<SchemaForm schema={schema} components={components} />, document.body)

总结
综上,用 JSON Schema 来描述表单适合于低代码或者数据中台的快速开发。前端不需要维护 schema,schema 可以存在后端,随意分发动态渲染。但是缺点是 JSON Schema 的表达能力没有 JSX 强,在处理复杂交互时,前端还是需要使用 JSX。
另外 JSON Schema 在交互过程中的反复解析也是性能的瓶颈,尤其是 schema 的内容很多且表单需要做复杂联动和批量更新时,性能问题更加明显。原因是 Formily 内部会对状态做深拷贝,同时也做了深度遍历脏检测,这种方式能够提升用户体验,但在大数据场景下,就会出现性能问题, 此时需要考虑屏蔽 Formily 的局部重复渲染,回到 react 的整树渲染。
当然任何方案都只是解决了部分的问题,一个方案能满足 80% 的场景,剩下的 20% 可以回退到其它的方案。Everything is tradeoff。
我们注意到 JSON Schema 是递归描述的,解析的函数也是递归的。更好的方案是将解析,转换这类 CPU 密集型任务转移到单独的线程,或者交给性能更高的工具来做(如:WebAssembly)。在后续的文章中,我们会分析大数据量下 JSON Schema 渲染的性能,以及探索用 Web Worker,Wasm 来处理 CPU 密集型任务相比于目前的纯 JS 方案能带来多大的提升,敬请期待。


 随时随地看视频


