前言
在朋友的项目有个自定义配置文件user.yml,其内容如下
user:
  userId: 1
  name: 张三
  email: zhangsan@qq.com
其映射实体内容为如下
@Data
@AllArgsConstructor
@NoArgsConstructor
@Builder
@PropertySource(value = "user.yml",encoding = "utf-8",factory = CustomYmlPropertySourceFactory.class)
@ConfigurationProperties(prefix = "user")
@Configuration
public class User {

    private String name;

    private Long userId;

    private String email;
}
项目启动后,输出的user内容为
User(name=Administrator, userId=1, email=zhangsan@qq.com)
很明显name的内容不是我们想要的
排查

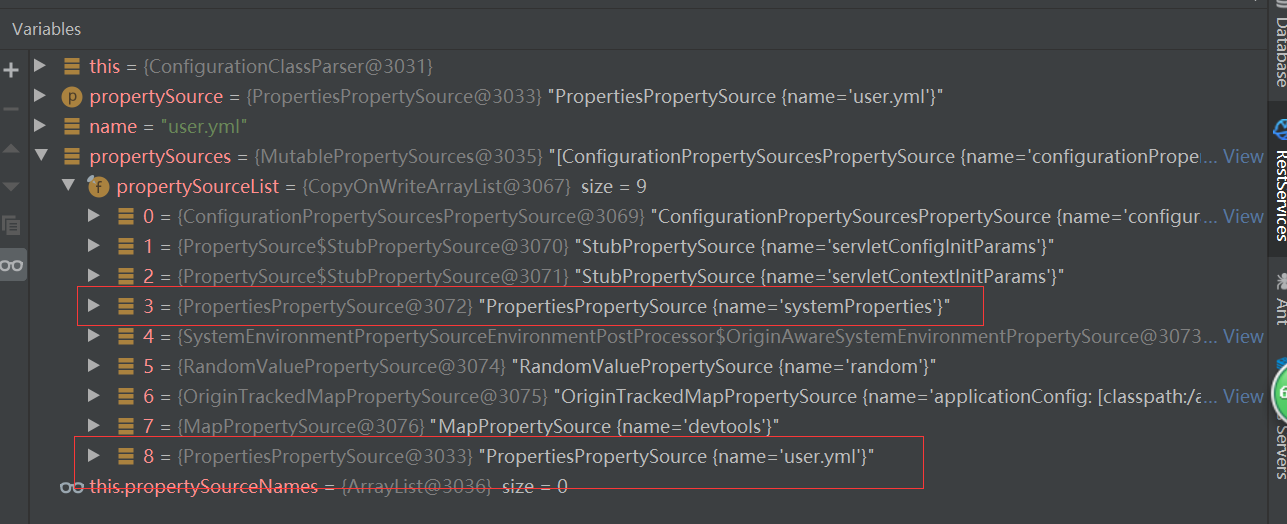
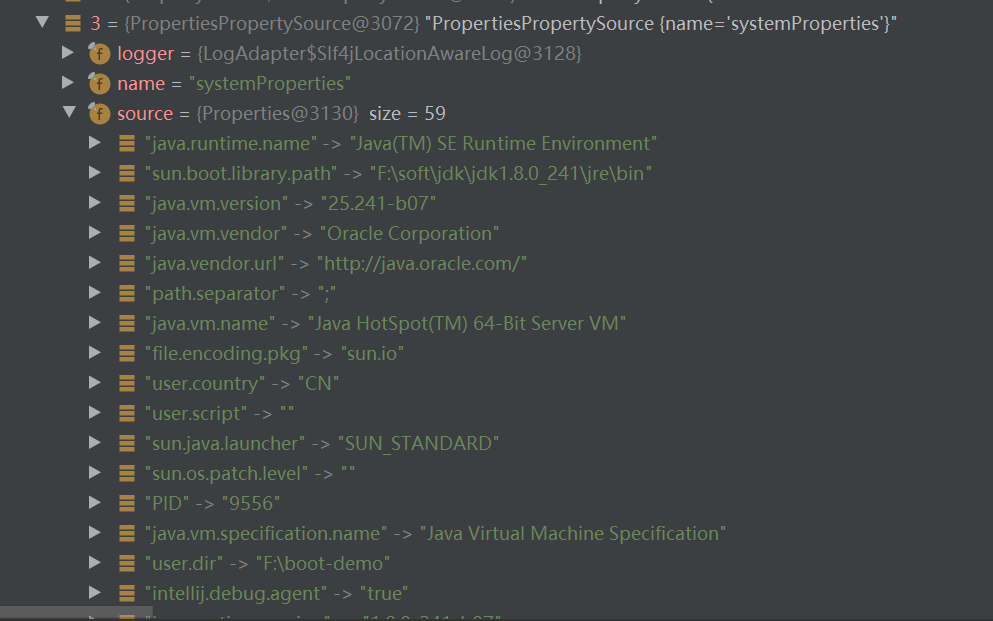
从跟踪的源码可以发现有个systemProperties配置排在user.yml前面。systemProperties这是个啥东西,见名之意,这明显就是系统属性配置。而systemProperties里面又有啥内容,我们继续跟踪下

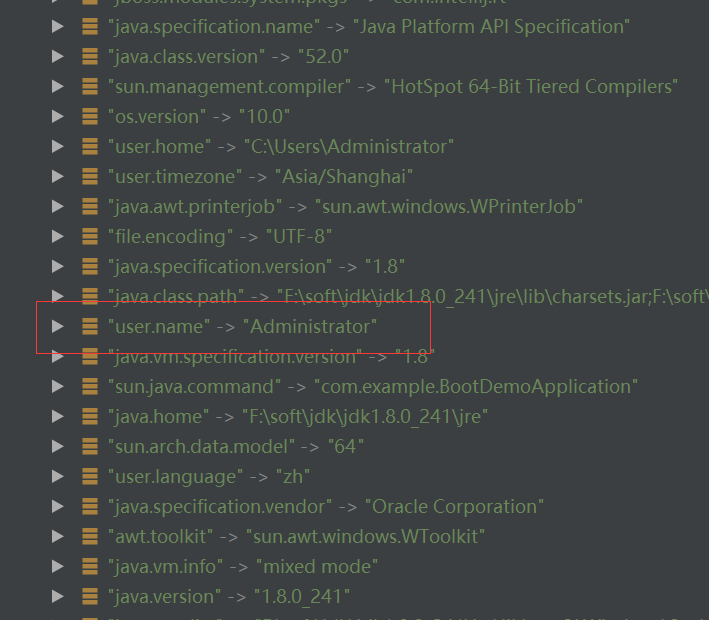
从源码可以看出systemProperties里面有个key为user.name,value为Administrator。
从这边我们可以看出我们控制台打印出来的内容其实是systemProperties的内容。由此我们可以推断出当系统变量和自定义配置变量都有一样的key时,将以系统变量的值为准。
看到这边也许有朋友说你这是在胡说八道,就凭这个现象就得出这个结论。那好为了证明这个结论,我们不得继续断点排查下去。不过在断点之前,我们去spring官网溜溜,看有没有啥收获。进官网我们可以看到有这么一段话
这段话的意思是默认情况下,系统属性优先于环境变量。 因此,如果在调用env.getProperty(“ my-property”)的过程中在两个地方都同时设置了my-property属性,则系统属性值“ wins”并返回。 请注意,属性值不会合并,而是会被前面的条目完全覆盖。
看吧,官网它自己也这么说
如果我们想要自定义的属性优于系统属性,要怎么做

这段也是从官网截图来的,其意思是整个机制是可配置的。 也许您具有要集成到此搜索中的自定义属性源。 为此,实现并实例化您自己的PropertySource并将其添加到当前环境的PropertySources集中
ConfigurableApplicationContext ctx = new GenericApplicationContext();
MutablePropertySources sources = ctx.getEnvironment().getPropertySources();
sources.addFirst(new MyPropertySource());
这个是官方解法。
我这边在提供2种解法。
- bean初始化之前,修改属性文件加载顺序
- 在bean初始化后,变更bean的属性值
其实现代码如下
ntBeanFactoryPostProcesser implements BeanFactoryPostProcessor, ApplicationContextAware, BeanPostProcessor {

    private ApplicationContext applicationContext;

    @Override
    public Object postProcessAfterInitialization(Object bean, String beanName) throws BeansException {
        //方法三:在bean初始化后,变更bean的属性值
//        if("user".equals(beanName)){
//            User user = (User)bean;
//            System.out.println("----------------before---------------------");
//            System.out.println("user-->"+user);
//            System.out.println("----------------after---------------------");
//            String propertySourceName = "user.yml";
//            PropertySource propertySource = getPropertySource(propertySourceName);
//            if(!ObjectUtils.isEmpty(propertySource)){
//               user.setName(String.valueOf(propertySource.getProperty("user.name")));
//            }
//            System.out.println("user-->"+user);
//
//        }
        return bean;
    }

    @Override
    public void postProcessBeanFactory(ConfigurableListableBeanFactory configurableListableBeanFactory) throws BeansException {
        printPropertySourceNames();
       String propertySourceName = "user.yml";
        PropertySource propertySource = getPropertySource(propertySourceName);
        if(!ObjectUtils.isEmpty(propertySource)){
            //方法一 bean初始化之前,修改属性文件加载顺序
            getEnvironment().getPropertySources().remove(propertySourceName);
            getEnvironment().getPropertySources().addFirst(propertySource);
        }

        // 方法二 新增一个PropertySource,并把他的加载顺序置为第一位
//        Map<String, Object> propertiesSource = new HashMap<>();
//        propertiesSource.put("user.name", "张三");
//        PropertySource newPropertySource = new MapPropertySource("newPropertySource", propertiesSource);
//        getEnvironment().getPropertySources().addFirst(newPropertySource);


    }

    private PropertySource getPropertySource(String propertySourceName){
        return getEnvironment().getPropertySources().get(propertySourceName);
    }

    private AbstractEnvironment getEnvironment(){
        return (AbstractEnvironment)applicationContext.getEnvironment();
    }

    @Override
    public void setApplicationContext(ApplicationContext applicationContext) throws BeansException {
        this.applicationContext = applicationContext;
    }


    private void printPropertySourceNames(){
        getEnvironment().getPropertySources().stream().forEach(p-> System.out.println(p.getName()));
    }


}
改完后,我们看下控制台此时输出的内容为
User(name=张三, userId=1, email=zhangsan@qq.com)
总结
其实要想自定义文件属性值不和系统变量的值产生冲突,最快捷的方法,就是让自定义文件属性的key和系统变量的key不一样就好。能少写代码就尽量少写

 随时随地看视频


