
背景
Kong是基于OpenResty的开源网关,其将API相关信息配置到postgresql或者是cassandra。通过lua扩展模块,扩展网关平台的功能。
本文记录着笔者在对Kong网关的具体使用过程。包括Kong部署,Kong组件使用,Kong插件使用。其他Kong相关的内容,可以到官网上查阅。
关注wx:战渣渣
回复关键字“kong”获取测试代码
Kong部署
Kong的部署方式有很多种,这里采取的是基于Docker的部署过程。
postgresql部署
Docker部署Postgresql9.6
- 创建网络
docker network create kong-net
- 启动数据库
docker run -d --name kong-database \
--network=kong-net \
-p 5432:5432 \
-e "POSTGRES_USER=mykong" \
-e "POSTGRES_DB=mykong" \
-e "POSTGRES_PASSWORD=mykong" \
postgres:9.6
数据库高可用性,可将数据库做双机热备。笔者没有实际需求,下面是收集的一些资料并未执行,待到以后有需求再做执行
流复制+双机热备方案
- 配置postgresql的主从流复制
https://www.cnblogs.com/cxy486/p/5164612.html - 利用pgpool-II中间件实现高可用性
https://www.iteye.com/blog/iwin-2108807
https://www.xiaomastack.com/2019/08/16/postgresql集群/ - 利用keepalived+pgpoll-II完成双机热备切换
https://www.cnblogs.com/songyuejie/p/4561089.html
部署kong
创建kong所需要数据库
创建数据库时指定的用户名,密码,数据库等,需要使用KONG_前缀的参数使用。
其他环境变量说明
docker run --rm \
--network=kong-net \
-e "KONG_DATABASE=postgres" \
-e "KONG_PG_HOST=kong-database" \
-e "KONG_PG_USER=mykong" \
-e "KONG_PG_PASSWORD=mykong" \
-e "KONG_PG_DATABASE=mykong" \
kong:2.0.1 kong migrations bootstrap
使用kong最新版本 2.0.1
节点1:172.17.23.14
docker run -d --name kong  \
--network=kong-net \
-e "KONG_DATABASE=postgres" \
-e "KONG_PG_HOST=kong-database" \
-e "KONG_PG_USER=mykong" \
-e "KONG_PG_PASSWORD=mykong" \
-e "KONG_PG_DATABASE=mykong" \
-e "KONG_ADMIN_LISTEN=0.0.0.0:8001" \
-e "KONG_ADMIN_LISTEN_SSL=0.0.0.0:8444" \
-e "KONG_PROXY_ACCESS_LOG=/usr/local/kong/logs/proxy_access.log"     \
-e "KONG_ADMIN_ACCESS_LOG=/usr/local/kong/logs/admin_access.log"     \
-e "KONG_PROXY_ERROR_LOG=/usr/local/kong/logs/proxy_error.log"     \
-e "KONG_ADMIN_ERROR_LOG=/usr/local/kong/logs/admin_error.log" \
-e "KONG_TRUSTED_IPS=0.0.0.0/0,::/0"     \ # 使用IP-restriction插件时,保证真实IP地址的传递
-e "KONG_REAL_IP_HEADER=X-Forwarded-For" \ # 使用IP-restriction插件时,保证真实IP地址的传递
-p 8000:8000 \
-p 8443:8443 \
-p 8001:8001 \
-p 8444:8444 \
kong:2.0.1
节点2:172.17.23.17
docker run -d --name kong  \
-e "KONG_DATABASE=postgres" \
-e "KONG_PG_HOST=172.17.23.14" \
-e "KONG_PG_USER=mykong" \
-e "KONG_PG_PASSWORD=mykong" \
-e "KONG_PG_DATABASE=mykong" \
-e "KONG_ADMIN_LISTEN=0.0.0.0:8001" \
-e "KONG_ADMIN_LISTEN_SSL=0.0.0.0:8444" \
-e "KONG_PROXY_ACCESS_LOG=/usr/local/kong/logs/proxy_access.log"     \
-e "KONG_ADMIN_ACCESS_LOG=/usr/local/kong/logs/admin_access.log"     \
-e "KONG_PROXY_ERROR_LOG=/usr/local/kong/logs/proxy_error.log"     \
-e "KONG_ADMIN_ERROR_LOG=/usr/local/kong/logs/admin_error.log" \
-e "KONG_TRUSTED_IPS=0.0.0.0/0,::/0"     \ # 使用IP-restriction插件时,保证真实IP地址的传递
-e "KONG_REAL_IP_HEADER=X-Forwarded-For" \ # 使用IP-restriction插件时,保证真实IP地址的传递
-p 8000:8000 \
-p 8443:8443 \
-p 8001:8001 \
-p 8444:8444 \
kong:2.0.1
配置NGINX
Kong部署了集群后,使用NGINX做负载均衡,为提高可用性,防止进群中某台服务宕机,NGINX对服务启用健康检查。
NGINX本身就具有被动检查,如下配置:
upstream kong_cluster{
    server 172.17.23.14:80  max_fails=1 fail_timeout=10s;
}

server {
    listen 80;
    server_name example.com;
    location / {
      proxy_pass         http://kong_cluster;
    }
}
但是我这里使用的主动健康检查。
主动健康检查需要安装三方插件,这里使用的是淘宝开发的第三方模块,upstream_check模块,需要重新编译NGINX。
我的操作系统中本身已经有了nginx1.10。所以我要重新编译一下,将三方模块编译进去
参考资料
- 下载主动检查模块
下载地址
# git clone http://github.com/yaoweibin/nginx_upstream_check_module
- 重新下载NGINX1.16.1
# 下载NGINX  1.16.1
wget http://nginx.org/download/nginx-1.16.1.tar.gz
## 因为我的操作系统中本身已经安装了nginx,所以我要重新安装,查看原来安装的命令,并把扩展的check模块编译到nginx中
# 查看原安装的命令
nginx -V
# ubuntu系统下,安装nginx依赖包
# zlib依赖包
sudo apt-get install zlib1g-dev
# openssl依赖包
sudo apt-get install openssl libssl-dev
# 安装pcre依赖包
sudo apt-get install libpcre3 libpcre3-dev
# 安装 libxml2/libxslt
sudo apt-get install libxslt1-dev
sudo apt-get install libxml2-dev
# 安装GD依赖包
sudo apt-get install libgd-dev
# 安装 GeoIP依赖包
sudo apt-get install libgeoip-dev
# 重新安装下载的nginx1.16.1
tar zxvf nginx-1.16.1.tar.gz
cd nginx-1.16.1
# 下载三方模块并打补丁  根据nginx版本选定补丁
patch -p1 < /root/install/nginx_upstream_check_module/check_1.16.1+.patch
# 补丁打完之后,安装nginx
./configure \
--with-cc-opt='-g -O2 -fPIE -fstack-protector-strong -Wformat -Werror=format-security -Wdate-time -D_FORTIFY_SOURCE=2' \
--with-ld-opt='-Wl,-Bsymbolic-functions -fPIE -pie -Wl,-z,relro -Wl,-z,now' \
--prefix=/usr/share/nginx \
--conf-path=/etc/nginx/nginx.conf \
--http-log-path=/var/log/nginx/access.log \
--error-log-path=/var/log/nginx/error.log \
--lock-path=/var/lock/nginx.lock \
--pid-path=/run/nginx.pid \
--http-client-body-temp-path=/var/lib/nginx/body \
--http-fastcgi-temp-path=/var/lib/nginx/fastcgi \
--http-proxy-temp-path=/var/lib/nginx/proxy \
--http-scgi-temp-path=/var/lib/nginx/scgi \
--http-uwsgi-temp-path=/var/lib/nginx/uwsgi \
--with-debug \
--with-pcre-jit \
--with-http_ssl_module \
--with-http_stub_status_module \
--with-http_realip_module \
--with-http_auth_request_module \
--with-http_addition_module \
--with-http_dav_module \
--with-http_geoip_module \
--with-http_gunzip_module \
--with-http_gzip_static_module \
--with-http_image_filter_module \
--with-http_v2_module \
--with-http_sub_module \
--with-http_xslt_module \
--with-stream \
--with-stream_ssl_module \
--with-mail \
--with-mail_ssl_module \
--with-threads \
--with-pcre \
--add-module=/root/install/nginx_upstream_check_module
# 编译安装
make
# 如果是已经安装过了,只需要make
# 然后将生成nginx拷贝到原来的目录
cp objs/nginx /usr/sbin/nginx
部署nginx
# 配置https
upstream kong_cluster{
    # 最简单的轮询方式
    server 172.17.23.17:8000;
    server 172.17.23.14:8000;

    # 配置三方模块主动检查健康状态,检查TCP,只要确保Kong服务没有断掉即可,实际的服务健康检查使用Kong插件检查
    # 其他配置参考 http://tengine.taobao.org/document_cn/http_upstream_check_cn.html
    check interval=3000 rise=2 fall=3 timeout=1000 type=tcp;
}

server {
    listen 443 ssl;
    server_name example.com; # 更换自己的域名信息

    ssl_certificate   cert/214533299050973.pem;  # 更换成自己的证书信息
    ssl_certificate_key  cert/214533299050973.key; # 更换成自己的证书信息
    ssl_session_timeout 5m;
    ssl_ciphers ECDHE-RSA-AES128-GCM-SHA256:ECDHE:ECDH:AES:HIGH:!NULL:!aNULL:!MD5:!ADH:!RC4;
    ssl_protocols TLSv1 TLSv1.1 TLSv1.2;
    ssl_prefer_server_ciphers on;

    # https 因为安全原因,需要禁用 gzip
    # 但是在一些场景下,不需要禁用
    # gzip off;
    gzip on;
    # 设置允许压缩的页面最小字节数
    gzip_min_length 1000;
    gzip_buffers 4 16k;
    gzip_http_version 1.1;
    # 1~9,默认为1,数值越大,压缩率越高,CPU占用越多,时间越久
    gzip_comp_level 3;
    gzip_vary on;
    # 禁用对 IE 6 使用 gzip 压缩
    gzip_disable "MSIE [1-6]\.";
    gzip_types text/plain text/css text/xml text/javascript application/x-javascript application/javascript "application/javascript; charset=utf-8" application/xml application/xml+rss application/json "application/json; charset=utf-8" font/ttf font/otf image/svg+xml;

    # 设置最大允许的POST数据量,如果提交的文件超过这个值,会出现413错误
    client_max_body_size 20m;
    keepalive_timeout 15;

    # 不显示 nginx 的版本号
    server_tokens off;

    # 设置请求头的长度大小
    client_header_buffer_size 32k;
    large_client_header_buffers 4 32k;


    ## Individual nginx logs
    access_log  /var/log/nginx/kong_access.log;
    error_log   /var/log/nginx/kong_error.log;

    location ^~ /robots.txt {
        expires 30d;
        # add_header Content-Type text/plain;
        return 200 "User-Agent:  *\nDisallow:  /";
    }

    location ~ /(\w+) {
        # websocket 支持
        proxy_http_version 1.1;
        proxy_set_header Upgrade $http_upgrade;
        proxy_set_header Connection "upgrade";

        proxy_set_header Host $http_host;
        proxy_redirect off;
        proxy_set_header X-Real-IP $remote_addr;
        proxy_set_header X-Scheme $scheme;
        proxy_set_header X-Forwarded-For $proxy_add_x_forwarded_for; # 真实地址传递,IP限制插件使用
        proxy_pass http://kong_cluster;
        expires -1;
    }

    # 主页返回 404
    location = / {
        return 404;
    }
}

server {
   listen 80;
   server_name  example.com; # 更换自己的域名信息
   #告诉浏览器有效期内只准用 https 访问
   add_header Strict-Transport-Security max-age=15768000;
   #永久重定向到 https 站点
   return 301 https://$server_name$request_uri;
}
重启NGINX
systemctl restart nginx
将API配置到Kong
Kong常用组件说明
- Service
    Service是定义的服务,通过Kong转发后根据请求的协议,host,method,path匹配到实际的服务地址。

    Service可以与Route进行关联,一个Service可以有很多Route, Route匹配后就会转发到Service,
    处理过程中也会通过Plugin的处理,增加或者减少一些相应的Header或者其他信息

    Service可以是一个实际的地址,也可以是Kong内部提供的Upstream组件关联,由Upstream将请求转发到实际的服务。
- Route:
    Route就是路由,实际就是我们通过定义一些规则来匹配客户端的请求,每个路由都会关联一个Service,
    并且Service可以关联多个Route,当匹配到客户端的请求时,每个请求都会被代理到其配置的Service中

    Route作为客户端的入口,通过将Route和Service的松耦合,可以通过hosts path等规则的配置,最终让请求转发到不同的Service。

    例如,我们规定api.example.com 和 api.service.com的登录请求都能够代理到123.11.11.11:8000端口上,那我们可以通过hosts和path来路由

    首先,创建一个Service s1,其相应的host和port以及协议为http://123.11.11.11:8000
    然后,创建一个Route,关联的Service为s1,其hosts为[api.service.com, api.example.com],path为login
    最后,将域名api.example.com和api.service.com的请求转到到我们的Kong集群上,也就是我们上面一节中通过Nginx配置的请求地址
    那么,当我们请求api.example.com/login和api.service.com/login时,其通过Route匹配,然后转发到Service,最终将会请求我们自己的服务。
- Upstream
    这是指您自己的API /服务位于Kong后面,客户端请求被转发到该服务器。

    相当于Kong提供了一个负载的功能,基于Nginx的虚拟主机的方式做的负载功能

    当我们部署集群时,一个单独的地址不足以满足我们的时候,我们可以使用Kong的upstream来进行设置

    首先在service中指定host的时候,可以指定为我们的upstream定义的hostname

    我们在创建upstream时指定名字,然后指定solts(暂时不确定具体作用),upstream可以进行健康检查等系列操作。这里先不开启(还没有研究)

    然后我们可以再创建target类型,将target绑定到upstream上,那么基本上我们部署集群时,也可以使用
- Target
    target 就是在upstream进行负载均衡的终端,当我们部署集群时,需要将每个节点作为一个target,并设置负载的权重,当然也可以通过upstream的设置对target进行健康检查。
    当我们使用upstream时,整个路线是 Route >> Service >> Upstream >> Target
- Consumer
    Consumer 可以代表一个服务,可以代表一个用户,也可以代表消费者,可以根据我们自己的需求来定义

    可以将一个Consumer对应到实际应用中的一个用户,也可以只是作为一个Service的请求消费者

    Consumer具体可以在Plugin使用时再做深入了解
- Plugin
    在请求被代理到上游API之前或之后执行Kong内的动作的插件。

    例如,请求之前的Authentication或者是请求限流插件的使用

    Plugin可以和Service绑定,也可以和Route以及Consumer进行关联,也可以是全局的插件。

    常用的限流插件,IP限制插件等。
Kong使用
主要使用4个组件Service,Route,Upstream和Target
Target配置的就是服务节点,不过要将其关联到到Upstream。
Upstream可以对Target做负载均衡和健康检查等,通过设置name于Service关联,Service匹配到请求时转发到相应的Upstream。
Service根据业务设置不同的服务,Service和Route绑定获取实际请求,通过protocol,host,port和path匹配请求,并将匹配到的请求转发到Upstream。
Route是Kong中实际的入口点。主要根据protocols,hosts,methods,paths设置,匹配请求,将请求转发到相应的服务上
我们按照这个顺序,依次创建Service,Route,Upstream和Target
配置Service
Service还有一些其他参数,可根据具体需求定制。官网资料
- 添加命令
curl -i -X POST \
--url http://localhost:8001/services/ \
--data 'name=example-service' \
--data 'protocol=http' \
--data 'host=api.example.service'

# host属性在创建Upstream时使用
- 添加结果
{
    "host": "api.example.service",
    "created_at": 1582626079,
    "connect_timeout": 60000,
    "id": "71b28160-15fc-4215-a68f-d0b607e9cb9f",
    "protocol": "http",
    "name": "example-service",
    "read_timeout": 60000,
    "port": 80,
    "path": null,
    "updated_at": 1582626079,
    "retries": 5,
    "write_timeout": 60000,
    "tags": null,
    "client_certificate": null
}
- 修改命令
curl -i -X PATCH \
--url http://localhost:8001/services/71b28160-15fc-4215-a68f-d0b607e9cb9f/ \
--data 'name=test-kong' \
--data 'protocol=http'  \
--data 'host=test.kong.service'
- 修改结果
{
    "host": "test.kong.service",
    "created_at": 1582626079,
    "connect_timeout": 60000,
    "id": "71b28160-15fc-4215-a68f-d0b607e9cb9f",
    "protocol": "http",
    "name": "test-kong",
    "read_timeout": 60000,
    "port": 80,
    "path": null,
    "updated_at": 1582626120,
    "retries": 5,
    "write_timeout": 60000,
    "tags": null,
    "client_certificate": null
}
配置Route
Route还有一些其他参数,可根据具体需求定制。官网资料
- 添加命令
实际使用时,将hosts变更为实际的域名
curl -i -X POST \
--url http://localhost:8001/routes/ \
--data 'protocols[]=http' \
--data 'protocols[]=https' \
--data 'methods[]=GET' \
--data 'methods[]=POST' \
--data 'methods[]=DELETE' \
--data 'methods[]=PUT' \
--data 'hosts[]=api.example.com' \
--data 'paths[]=/v1/test_kong' \
--data 'strip_path=false' \ # 此属性代表是否清除原有的path,默认是清除,如果不需要清除需要再添加的时候指定为false
--data 'service.id=71b28160-15fc-4215-a68f-d0b607e9cb9f'
- 添加结果
{
    "id": "c156de0e-4b08-43a3-bc2d-3f0cf5d5d00a",
    "path_handling": "v0",
    "paths": ["\/v1\/test_kong"],
    "destinations": null,
    "headers": null,
    "protocols": ["http", "https"],
    "methods": ["GET", "POST", "DELETE", "PUT"],
    "snis": null,
    "service": {
        "id": "71b28160-15fc-4215-a68f-d0b607e9cb9f"
    },
    "name": null,
    "strip_path": false,
    "preserve_host": false,
    "regex_priority": 0,
    "updated_at": 1582627872,
    "sources": null,
    "hosts": ["api.example.com"],
    "https_redirect_status_code": 426,
    "tags": null,
    "created_at": 1582627872
}
配置Upstream
- 添加命令
这里只配置主动检查
curl -i -X POST \
--url http://localhost:8001/upstreams/ \
--data 'name=test.kong.service'  \
--data 'algorithm=round-robin' \
--data 'healthchecks.active.type=http' \
--data 'healthchecks.active.http_path=/' \
--data 'healthchecks.active.timeout=2' \
--data 'healthchecks.active.healthy.successes=3' \
--data 'healthchecks.active.healthy.interval=10' \
--data 'healthchecks.active.unhealthy.interval=10' \
--data 'healthchecks.active.unhealthy.http_failures=3'
- 添加结果
{
    "created_at": 1582626649,
    "hash_on": "none",
    "id": "1d3638c6-d5a0-4bb5-907b-015c8daf7861",
    "algorithm": "round-robin",
    "name": "test.kong.service",
    "tags": null,
    "hash_fallback_header": null,
    "hash_fallback": "none",
    "hash_on_cookie": null,
    "host_header": null,
    "hash_on_cookie_path": "\/",
    "healthchecks": {
        "threshold": 0,
        "active": {
            "unhealthy": {
                "http_statuses": [429, 404, 500, 501, 502, 503, 504, 505],
                "tcp_failures": 0,
                "timeouts": 0,
                "http_failures": 3,
                "interval": 10
            },
            "type": "http",
            "http_path": "\/",
            "timeout": 2,
            "healthy": {
                "successes": 3,
                "interval": 10,
                "http_statuses": [200, 302]
            },
            "https_sni": null,
            "https_verify_certificate": true,
            "concurrency": 10
        },
        "passive": {
            "unhealthy": {
                "http_failures": 0,
                "http_statuses": [429, 500, 503],
                "tcp_failures": 0,
                "timeouts": 0
            },
            "healthy": {
                "http_statuses": [200, 201, 202, 203, 204, 205, 206, 207, 208, 226, 300, 301, 302, 303, 304, 305, 306, 307, 308],
                "successes": 0
            },
            "type": "http"
        }
    },
    "hash_on_header": null,
    "slots": 10000
}
配置target
- 添加命令
curl -i -X POST \
--url http://localhost:8001/upstreams/1d3638c6-d5a0-4bb5-907b-015c8daf7861/targets \
--data 'target=172.17.23.14:38001'

curl -i -X POST \
    --url http://localhost:8001/upstreams/1d3638c6-d5a0-4bb5-907b-015c8daf7861/targets \
    --data 'target=172.17.23.14:38002'
- 添加结果
{
    "created_at": 1582627463.954,
    "upstream": {
        "id": "1d3638c6-d5a0-4bb5-907b-015c8daf7861"
    },
    "id": "66c83e7d-f006-43da-990b-d493a966fc66",
    "target": "172.17.23.14:38001",
    "weight": 100
}

{
    "created_at": 1582627517.872,
    "upstream": {
        "id": "1d3638c6-d5a0-4bb5-907b-015c8daf7861"
    },
    "id": "d9940f44-30ad-437a-aaab-836dfaf27b93",
    "target": "172.17.23.14:38002",
    "weight": 100
}
检查配置kong是否可行
- 检查配置的请求
curl -X GET https://example.com/v1/test_kong

{"code": 200, "message": "test kong get success"}

curl -X POST https://example.com/v1/test_kong

{"code": 200, "message": "test post get success"}

curl -X DELETE https://example.com/v1/test_kong

{"code": 200, "message": "test kong delete success"}

curl -X PUT https://example.com/v1/test_kong

{"code": 200, "message": "test kong put success"}
- 检查配置的健康检查
看到服务配置的东西一直在被检查
[I 200225 19:03:10 web:2246] 200 GET / (172.17.23.14) 0.88ms
[I 200225 19:03:20 web:2246] 200 GET / (172.17.23.17) 1.34ms
[I 200225 19:03:20 web:2246] 200 GET / (172.17.23.14) 0.67ms
[I 200225 19:03:30 web:2246] 200 GET / (172.17.23.14) 0.88ms
[I 200225 19:03:30 web:2246] 200 GET / (172.17.23.17) 1.02ms
[I 200225 19:03:40 web:2246] 200 GET / (172.17.23.14) 0.88ms
[I 200225 19:03:40 web:2246] 200 GET / (172.17.23.17) 1.15ms
Kong插件使用
插件的作用范围,从小到大可以是 Route,Service,Consumer,Global。
可以根据需求使用一些插件,比如做一些限流操作,IP白名单和IP黑名单等
下面是Kong官方就提供的开源版可用的插件
Rate Limiting 限流插件
限流插件,限制在指定时间内可以访问的次数,可以是几秒内,几分钟内,几小时,几天等。
插件可以设置在Service,Route或者全局,如果启用Consumer,则根据Consumer来计算限制时间,否则根据客户端IP地址
给定service添加插件
curl -X POST http://localhost:8001/services/71b28160-15fc-4215-a68f-d0b607e9cb9f/plugins \
    --data "name=rate-limiting"  \
    --data "config.second=2" \
    --data "config.hour=10000" \
    --data "config.policy=local" \
    --data "config.limit_by=ip"
添加结果
{
    "created_at": 1582637075,
    "config": {
        "minute": null,
        "policy": "local",
        "month": null,
        "redis_timeout": 2000,
        "limit_by": "consumer",
        "hide_client_headers": false,
        "second": 5,
        "day": null,
        "redis_password": null,
        "year": null,
        "redis_database": 0,
        "hour": 10000,
        "redis_port": 6379,
        "redis_host": null,
        "fault_tolerant": true
    },
    "id": "9f8d08c9-4bdf-4912-b4dd-f96b32e38019",
    "service": {
        "id": "71b28160-15fc-4215-a68f-d0b607e9cb9f"
    },
    "enabled": true,
    "protocols": ["grpc", "grpcs", "http", "https"],
    "name": "rate-limiting",
    "consumer": null,
    "route": null,
    "tags": null
}
测试效果
def test_rate_limiting():
    url = "https://example.com/v1/test_kong"
    def _request(idx):
        print("request {} start by : {}".format(idx, datetime.datetime.now()))
        print("request {} result >>>".format(idx))
        resp = requests.get(url)
        print("request {} status_code {} ".format(idx, resp.status_code))
        print("request {} json {} ".format(idx, resp.json()))
        print("request {} result <<<".format(idx))
        print("request {} end by : {}".format(idx, datetime.datetime.now()))

    for i in range(0, 8):
        t = threading.Thread(target=_request, args=(i, ))
        t.start()
执行结果
request 3 status_code 200
request 3 json {'message': 'test kong get success', 'code': 200}
request 3 result <<<
request 3 end by : 2020-02-25 21:45:18.566325
request 6 status_code 429
request 6 json {'message': 'API rate limit exceeded'}
request 5 status_code 429
IP Restriction
IP Restriction就是通过设置IP白名单和黑名单,根据客户端IP来对一些请求进行拦截和防护,通过插件的源码可以看到其工作原理是,通过NGINX的变量binary_remote_addr以及设置的黑名单和白名单来进行限制,先看黑名单再看白名单,就是说白名单优先级更高一些,如果同时设置一个IP即在黑名单又在白名单列表,那么这个IP是可以进行访问。
IP Restriction插件可以作用于Service, Route, Consumer, 也可以作用于全局。
我们现在将其作用于Service上
curl -X POST http://localhost:8001/services/71b28160-15fc-4215-a68f-d0b607e9cb9f/plugins \
--data "name=ip-restriction" \
--data "config.whitelist=172.17.23.14" \
--data "config.whitelist=172.17.23.17"
添加结果
{
    "created_at": 1582980903,
    "config": {
        "whitelist": ["172.17.23.14", "172.17.23.17"],
        "blacklist": null
    },
    "id": "c0364fe4-2d43-451e-9330-b45964cf1483",
    "service": {
        "id": "71b28160-15fc-4215-a68f-d0b607e9cb9f"
    },
    "enabled": true,
    "protocols": ["grpc", "grpcs", "http", "https"],
    "name": "ip-restriction",
    "consumer": null,
    "route": null,
    "tags": null
}
测试结果
{"message":"Your IP address is not allowed"}
Zipkin
Zipkin是分布式跟踪系统,我们使用者插件的目的是来监控我们的API耗时情况,尤其是可以根据这些结果来跟踪相应的性能消耗。
所以我们先部署Zipkin服务,直接使用Docker安装。
zipkin具体信息,查看官网
部署Zipkin
docker run -d -p 9411:9411 openzipkin/zipkin
添加插件
zipkin插件可以作用于Service, Route, Consumer, 也可以作用于全局。
我们现在将其作用于Service上
curl -X POST http://localhost:8001/services/71b28160-15fc-4215-a68f-d0b607e9cb9f/plugins \
    --data "name=zipkin"  \
    --data "config.http_endpoint=http://172.17.23.14:9411/api/v2/spans" \
    --data "config.sample_ratio=1" \   # 全部采样
    --data "config.include_credential=true"
添加结果
{
    "created_at": 1582812902,
    "config": {
        "sample_ratio": 1,
        "http_endpoint": "http:\/\/172.17.23.14:9411\/api\/v2\/spans",
        "include_credential": true,
        "default_service_name": null
    },
    "id": "c58654d8-2fd5-43b6-854f-0fd65a353f7e",
    "service": {
        "id": "71b28160-15fc-4215-a68f-d0b607e9cb9f"
    },
    "enabled": true,
    "protocols": ["grpc", "grpcs", "http", "https"],
    "name": "zipkin",
    "consumer": null,
    "route": null,
    "tags": null
}
http_endpoint:zipkin的服务地址
sample_ratio:采集的频率 设置为1时全部采集,设置为0时,全部不采集, 设置为0-1之间的小数,则会采
用算法按照设定的参数随机采集
测试插件使用效果:
访问配置的地址之后,前面设置的采集频率是1,表示全部采集,访问之后登陆zipkin的地址http://172.17.23.14:9411/zipkin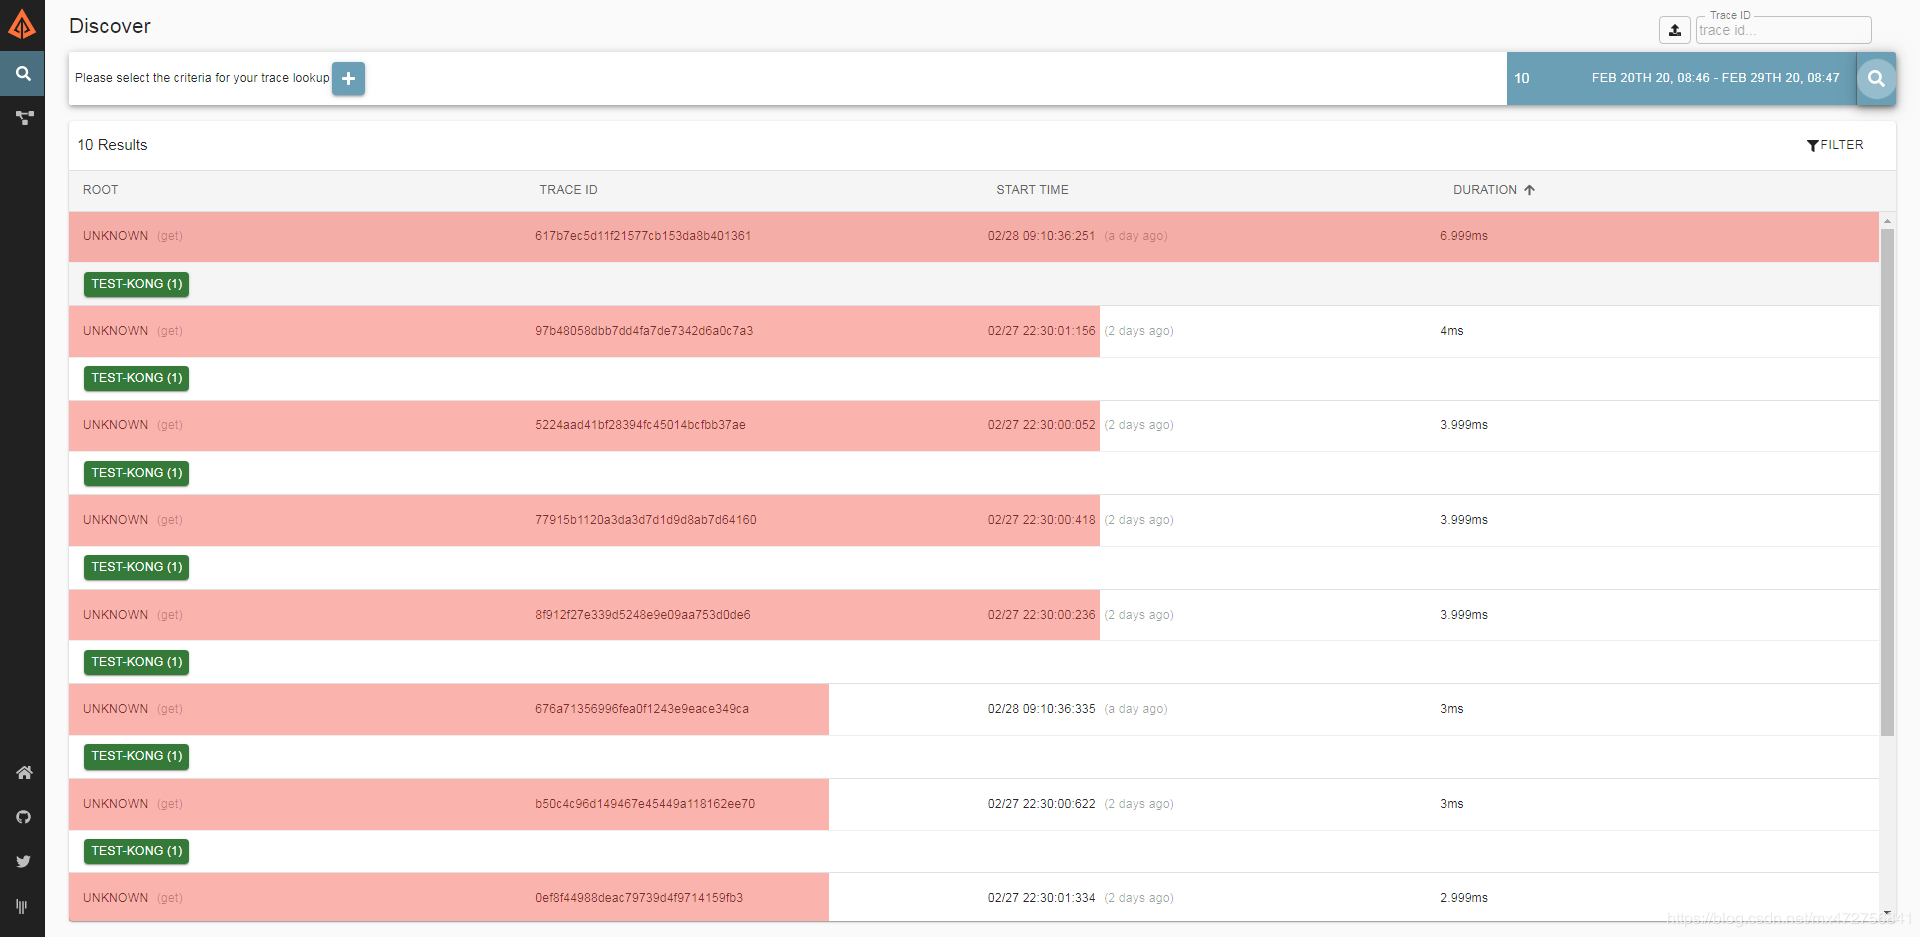
HMAC Authentication
HMAC签名身份验证,Kong网关签名验证通过后,才可以向后请求,实际应用场景听多,具体流程如下:
- 创建消费者Consumer
- 给消费Consumer创建插件HMAC对应的username和secret,客户端使用其签名
- 在Service或者Route中启用HMAC插件
- 客户端在请求时,根据前面返回的username和secret签名,Kong网关匹配后进行签名验证
- 创建消费者
创建命令
curl -i http://localhost:8001/consumers/ -d "username=test_hmac&custom_id=test_hmac_id"
创建结果
{
    "custom_id": "test_hmac_id",
    "created_at": 1583071044,
    "id": "c9a4ad0e-174f-4a7f-81b0-ce9e3261c177",
    "tags": null,
    "username": "test_hmac"
}
- 创建消费者相应HMAC插件信息
curl -X POST http://localhost:8001/consumers/test_hmac/hmac-auth \
--data "username=test_hmac" \
--data "secret=test_hmac_secret123"
username:在HMAC签名验证中使用的用户名。
secret: 在HMAC签名验证中使用的秘钥。
创建结果
{
    "created_at": 1583071212,
    "consumer": {
        "id": "c9a4ad0e-174f-4a7f-81b0-ce9e3261c177"
    },
    "id": "834a8f69-c63d-4183-8a50-b52ab6a6187e",
    "tags": null,
    "secret": "test_hmac_secret123",
    "username": "test_hmac"
}
- 启用HMAC插件
先把之前的Service上的IP Restriction插件去掉。否则我本地和服务器上的测试会提示无法处理
根据之前创建插件产生的ID,直接删除即可。
curl -i -X DELETE http://localhost:8001/plugins/c0364fe4-2d43-451e-9330-b45964cf1483
把插件添加到指定的Route或者Service都可以,这次把这个插件加到Route上,也来测试一遍
添加命令
curl -i -X POST http://localhost:8001/routes/c156de0e-4b08-43a3-bc2d-3f0cf5d5d00a/plugins \
      -d "name=hmac-auth" \
      -d "config.enforce_headers=date" \
      -d "config.algorithms=hmac-sha1" \
      -d "config.algorithms=hmac-sha256" \
      -d "config.validate_request_body=true"
enforce_headers: Header中必须要有的参数,后续用于签名验证

algorithms:用户想要支持的HMAC摘要算法列表。允许的值是hmac-sha1,hmac-sha256,
hmac-sha384,和hmac-sha512客户端请求时,从中选择一个即可

validate_request_body:启用验证请求体,设置为true之后,客户端请求头中若是有Digest,
Kong则会使用HMAC算法验证请求体body。
添加结果
{
    "created_at": 1583072768,
    "config": {
        "clock_skew": 300,
        "validate_request_body": true,
        "enforce_headers": ["date"],
        "algorithms": ["hmac-sha1", "hmac-sha256"],
        "anonymous": null,
        "hide_credentials": false
    },
    "id": "39188d02-5425-4f76-8795-5e028f793476",
    "service": null,
    "enabled": true,
    "protocols": ["grpc", "grpcs", "http", "https"],
    "name": "hmac-auth",
    "consumer": null,
    "route": {
        "id": "c156de0e-4b08-43a3-bc2d-3f0cf5d5d00a"
    },
    "tags": null
}
- 客户端请求测试
重要请求头信息
1. Authorization 或者 Proxy-Authorization
    这个头的组成是
    credentials 签名算法  使用HMAC插件,固定值就是hmac
    params 具体的参数,参数用","分割。
        algorithm: 签名算法
        headers: 签名计算包括的key
        signature: 生成的签名,生成规则
2. Digest:启用validate_request_body,需要生成
3. Date:必须是GMT时间格式
Python测试函数
def test_hmac_authentication():
    # 创建消费者对应HMAC插件时的用户名和秘钥
    hmac_username = "test_hmac"
    hmac_secret = "test_hmac_secret123"

    url = "https://example.com/v1/test_kong"

    # 请求头
    # 注意,请求头的时间格式必须是GMT时间格式
    request_headers = {
        "Authorization": "",
        "Digest": "",
        "Date": datetime.datetime.utcnow().strftime("%a, %d %b %Y %H:%M:%S GMT")
    }

    # 请求体
    request_body = {
        "data": {"test": "hmac"}
    }

    # 生成Digest
    #  body="A small body"
    #  digest=SHA-256(body)
    #  base64_digest=base64(digest)
    #  Digest: SHA-256=<base64_digest>
    base64_digest = base64.b64encode(hashlib.sha256(json.dumps(request_body).encode('utf-8')).digest()).decode('utf-8')
    request_headers['Digest'] = "SHA-256={}".format(base64_digest)

    # 生成签名
    # signing_string = "date: Thu, 22 Jun 2017 17:15:21 GMT\nGET /requests HTTP/1.1"
    # digest = HMAC - SHA256( < signing_string >, "secret")
    # base64_digest = base64( < digest >)
    # 签名字符串构造
    # 如果参数不是request-line,则名字用小写,然后跟":"和一个空格" ",
    # 如果参数是request-line,则追加http请求行【GET /requests HTTP/1.1】
    # 中间用换行符"\n"将所有的参数连接起来。

    # 按照上述规则拼接字符串
    sign_string = "date: {}\ndigest: {}".format(request_headers['Date'], request_headers['Digest'])

    # 开始签名
    sign_digest = hmac.new(hmac_secret.encode("utf-8"), sign_string.encode('utf-8'), digestmod='sha256').digest()
    sign_base64_digest = base64.b64encode(sign_digest).decode('utf-8')

    # 构建Authorization参数 具体信息 https://docs.konghq.com/hub/kong-inc/hmac-auth/#signature-authentication-scheme
    authorization = 'hmac username="{}", algorithm="hmac-sha256", headers="date digest", signature="{}"'.format(
        hmac_username, sign_base64_digest)

    request_headers['Authorization'] = authorization
    resp = requests.post(url, headers=request_headers, json=request_body)
    print(request_headers)
    print(resp.status_code)
    print(resp.json())
测试结果
# 失败
401
{'message': 'HMAC signature cannot be verified'}

# 成功
200
{'code': 200, 'message': 'test kong post success'}


