AnimatedContainer
了解过Android 开发的应该知道,在Android 中给控件设置属性动画还是比较麻烦的,而且多个属性动画一起设置的话更是麻烦,要写很多行代码。
那么在Flutter 中,给Widget 设置动画就完全不需要那么复杂。只需要使用 AnimatedContainer就够了。
AnimatedContainer看名字就应该知道,他是Container + Animation ,也就是带动画的容器。 AnimatedContainer继承于 ImplicitlyAnimatedWidget,我们点开父类的源码,可以看到类名上面的注释:
/// An abstract widget for building widgets that gradually change their /// values over a period of time. /// /// Subclasses’ States must provide a way to visit the subclass’s relevant /// fields to animate. [ImplicitlyAnimatedWidget] will then automatically /// interpolate and animate those fields using the provided duration and /// curve when those fields change.
简单翻译一下就是:
这个类是用来构建带动画的widget,可以在一段时间内改变其值。
子类必须提供一种方法来访问子类的相关字段以进行动画的处理,当这些字段发生变化的时候,ImplicitlyAnimatedWidget 将使用提供的 duration 和 curve 来自动设置动画。
说的很厉害,来个例子:
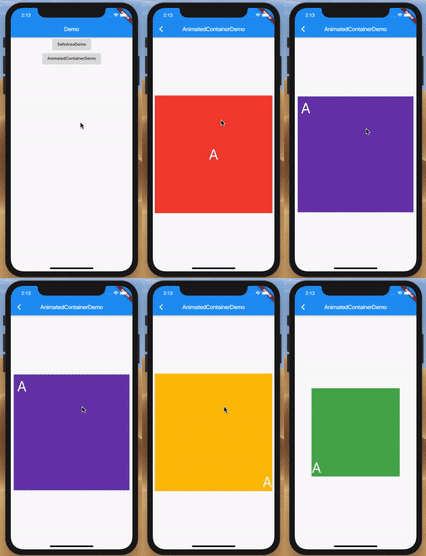
实现上图效果非常简单,逻辑代码根本没有,只需要定义好几个数值,随机就ok。
首先定义几个变量:颜色,位置,宽高和下标:
1.   `var _colors =  [`

2.   `Colors.red,`

3.   `Colors.green,`

4.   `Colors.amber,`

5.   `Colors.blue,`

6.   `Colors.deepPurple`

7.   `];`

8.

9.   `var _alignments =  [`

10.   `Alignment.center,`

11.   `Alignment.bottomLeft,`

12.   `Alignment.bottomRight,`

13.   `Alignment.topRight,`

14.   `Alignment.topLeft,`

15.   `];`

16.

17.   `double _weight =  400;`

18.   `double _height =  400;`

19.

20.   `int index =  0;`
然后我们定义一个方法,用来点击的时候调用,随机变换数值:
1.  `next()  {`

2.   `setState(()  {`

3.   `if(_weight ==  400){`

4.   `_weight -=  100;`

5.   `_height -=  100;`

6.   `}else  {`

7.   `_weight +=  100;`

8.   `_height +=  100;`

9.   `}`

10.   `index =  Random().nextInt(5);`

11.   `});`

12.  `}`
最后我们写 build方法来实现页面:
1.   `@override`

2.   `Widget build(BuildContext context)  {`

3.   `return  Scaffold(`

4.   `appBar:  AppBar(`

5.   `title:  Text('AnimatedContainerDemo'),`

6.   `),`

7.   `body:  Center(  // 让View在中间`

8.   `child:  GestureDetector(  // 手势识别控件,用来写点击事件`

9.   `onTap:  (){`

10.   `setState(()  {`

11.   `next();`

12.   `});`

13.   `},`

14.   `child:  AnimatedContainer(  // AnimatedContainer控件`

15.   `width: _weight,  //设置上变量里的宽高`

16.   `height: _height,`

17.   `curve:  Curves.fastOutSlowIn,  // 设置插值属性`

18.   `duration:  Duration(milliseconds:  500),  // 设置时间`

19.   `color: _colors[index],  //设置颜色`

20.   `alignment: _alignments[index],  // 设置位置`

21.   `child:  Text(`

22.   `'A',`

23.   `style:  TextStyle(color:  Colors.white, fontSize:  50),`

24.   `),`

25.   `),`

26.   `),`

27.   `),`

28.   `);`

29.   `}`
可以看到代码里非常简单,只是设置了一个AnimatedContainer Widget,把属性填上去。
这个时候和我们在 ImplicitlyAnimatedWidget源码中看到的注释一样,只要有值发生了变化,那么 AnimatedContainer就会自动设置插值属性来改变值,这样动画效果就出来了。
小结
使用Flutter 提供的 AnimatedContainer 可以很方便的实现 Widget的动画效果,在做一些简单的动画时可以说是非常方便了。其实还有很多类似于 AnimatedContainer的 Widget,使用方法都类似,就不一一讲解了。

 随时随地看视频