
使用过SpringBoot的都应该知道,一个SpringBoot 项目就是由一个一个 Starter 组成的,一个 Starter 代表该项目的 SpringBoot 启动依赖,除了官方已有的 Starter,我们可以根据自己的需要自定义新的Starter。
一、自定义SpringBoot Starter
自定义Starter,首选需要实现自动化配置,而要实现自动化配置需要满足以下两个条件:
(1)能够自动配置项目所需要的配置信息,也就是自动加载依赖环境;
(2)能够根据项目提供的信息自动生成Bean,并且注册到Bean管理容器中;
要实现自动化配置需要在项目的pom.xml文件中引入如下依赖:
<dependency>
    <groupId>org.springframework.boot</groupId>
    <artifactId>spring-boot-autoconfigure</artifactId>
    <version>2.1.4.RELEASE</version>
</dependency>
根据需要自定义Starter的实现过程大致如下(以我定义的Starter为例):
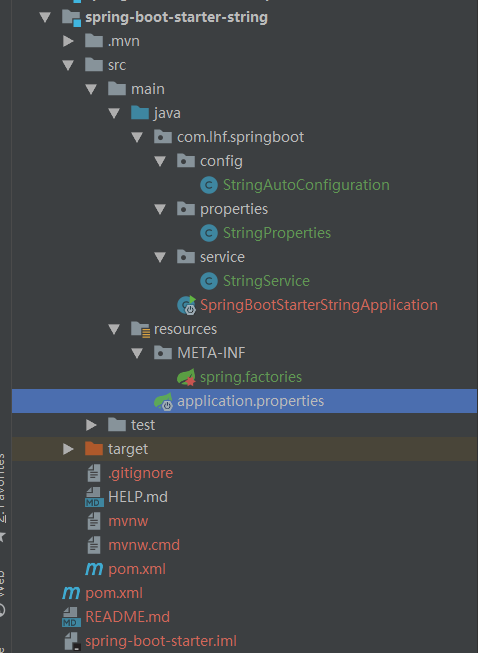
工程目录结构:
1. 引入项目的配置依赖
<dependency>
    <groupId>org.springframework.boot</groupId>
    <artifactId>spring-boot-autoconfigure</artifactId>
    <version>2.1.4.RELEASE</version>
</dependency>
2. 创建xxxService类,完成相关的操作逻辑
代码:StringService.java
public class StringService {

    private String str1;

    private String str2;

    private String default_str;

    public String getStr1() {
        return str1;
    }

    public void setStr1(String str1) {
        this.str1 = str1;
    }

    public String getStr2() {
        return str2;
    }

    public void setStr2(String str2) {
        this.str2 = str2;
    }

    public String getDefault_str() {
        return default_str;
    }

    public void setDefault_str(String default_str) {
        this.default_str = default_str;
    }

    public String addStr(){
        if(str1 != null){
            if(str2 != null){
                return str1 + "," + str2;
         }
            return str1;
        }
        return default_str;
    }

}
3. 定义xxxProperties类,属性配置类,完成属性配置相关的操作,比如设置属性前缀,用于在application.properties中配置
代码:StringProperties.java
//指定项目在属性文件中配置的前缀为str,即可以在属性文件中通过 str.str1=springboot,就可以改变属性类字段 str1 的值了
@SuppressWarnings("ConfigurationProperties")
@ConfigurationProperties(prefix = "str")
public class StringProperties {

    public static final String DEFAULT_STR1 = "I know, you need me";

    public static final String DEFAULT_STR2 = "but I also need you";

    private String str1 = DEFAULT_STR1;

    private String str2 = DEFAULT_STR2;

    public String getStr1() {
        return str1;
    }

    public void setStr1(String str1) {
        this.str1 = str1;
    }

    public String getStr2() {
        return str2;
    }

    public void setStr2(String str2) {
        this.str2 = str2;
    }
}
4. 定义xxxConfigurationProperties类,自动配置类,用于完成Bean创建等工作
代码:StringAutoConfiguration.java
// 定义 java 配置类
@Configuration
//引入StringService
@ConditionalOnClass({StringService.class})
// 将 application.properties 的相关的属性字段与该类一一对应,并生成 Bean
@EnableConfigurationProperties(StringProperties.class)
public class StringAutoConfiguration {

    // 注入属性类
    @Autowired
    private StringProperties stringProperties;

    @Bean
    // 当容器没有这个 Bean 的时候才创建这个 Bean
    @ConditionalOnMissingBean(StringService.class)
    public StringService helloworldService() {
        StringService stringService = new StringService();
        stringService.setStr1(stringProperties.getStr1());
        stringService.setStr2(stringProperties.getStr2());
        return stringService;
    }

}
5. 在resources下创建目录META-INF,在 META-INF 目录下创建 spring.factories,在SpringBoot启动时会根据此文件来加载项目的自动化配置类
代码:spring.factories
# Auto Configure
org.springframework.boot.autoconfigure.EnableAutoConfiguration=com.lhf.springboot.config.StringAutoConfiguration
6.到这里自定义Starter就定义完成了,只需在其他项目中引入即可使用。
二、其他项目中使用自定义的Starter
1. 在新项目中引入自定义Starter依赖配置
创建一个新的SpringBoot项目,在项目的pom.xml文件中引入自定义SpringBoot Starter的依赖配置如下:
<!--引入自定义Starter-->
<dependency>
    <groupId>com.lhf.springboot</groupId>
    <artifactId>spring-boot-starter-string</artifactId>
    <version>0.0.1-SNAPSHOT</version>
</dependency>
2. 编写一个简单的Controller
@RestController
public class StringController {
@Autowired
private StringService stringService; //引入自定义Starter中的StringService
@RequestMapping("/")
public String addString(){
return stringService.addStr();
}
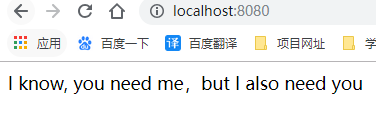
}3. 编写属性配置文件,内容如下:
#配置自定义的属性信息
str.str1=为什么我的眼里常含泪水
str.str2=那是因为我对你爱的深沉
4. 启动项目进行访问,效果如图:

代码见:https://github.com/JavaCodeMood/spring-boot-starter1.git
到此SpringBoot自定义Starter的过程以及用法就完了,分享就到这里了!感谢诸君的支持!


热门评论
-

_斌_2020-04-24 0
查看全部评论每一个都是hello world级别的 ?????