这段时间在做paypal的支付功能,把集成的流程稍微回顾一下。
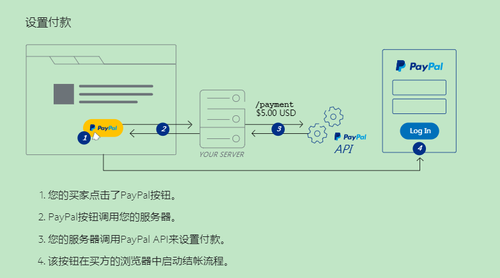
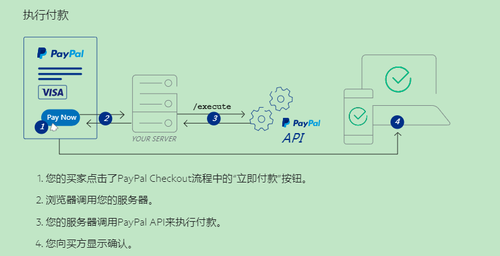
1、首先要理解paypal的checkout支付的流程,流程图如下,一共分为两个步骤,分别是设置付款和执行付款。其中每次的作用如下图所示。


2、了解了流程以后,直接上代码。当我们需要在自己的网站上集成paypal支付时,必然是需要在页面上提供一个支付按钮的,我这里根据官网文档给出自己测试的demo。当然,你也可以参考paypal的官网文档:https://developer.paypal.com/docs/checkout/how-to/server-integration/
<html><head><meta http-equiv="Content-Type" content="text/html; charset=UTF-8"/></head><script src="https://www.paypalobjects.com/api/checkout.js"></script><div id="paypal-button"></div><script> paypal.Button.render({ env: 'sandbox', // Or 'production' // Set up the payment: // 1. Add a payment callback payment: function(data, actions) { // 2. Make a request to your server return actions.request.post('http://127.0.0.1:8080/api/pay/createPayment/', { "productCode":"dc06ad4a-f7b0-3db6-af28-df1f353dd7bf", "sn":"a3.05-17.10-20072194", "pkg":"com.test.apk", "appVersion":"5.4.4", "lang":"en" }) .then(function(res) { // 3. Return res.id from the response console.log(res); console.log("hello world"); return res.id; }); }, // Execute the payment: // 1. Add an onAuthorize callback onAuthorize: function(data, actions) { // 2. Make a request to your server return actions.request.post('http://127.0.0.1:8080/api/pay/executePayment/', { paymentID: data.paymentID, payerID: data.payerID }) .then(function(res) { // 3. Show the buyer a confirmation message. alert("success"); console.log(res); }); } }, '#paypal-button');</script></html>3、你可以直接将第二步的代码拷贝下来作为一个html文件即可。需要改动的地方只有actions.request.post中的请求地址而已,这里你可以根据自己的环境来填写。那么这两个post请求的作用是什么呢?
4、第一个接口请求的地址为:http://127.0.0.1:8080/api/pay/createPayment/,先看这个接口里面做了什么操作,如下就是核心代码。主要作用就是连接到我们自己的收款用户,并创建了一个订单,如果创建成功,paypal会返回一个订单唯一id。该接口会将这个订单id返回给前端。
Payment createdPayment = null; APIContext apiContext = new APIContext(sellerMes.getClientId(), sellerMes.getClientSecret(), sellerMes.getMode()); String paymentTemp = productMes.getTemplateJson(); Payment payment = (Payment) JsonUtil.writeJSON2Object(paymentTemp, Payment.class); createdPayment = payment.create(apiContext);
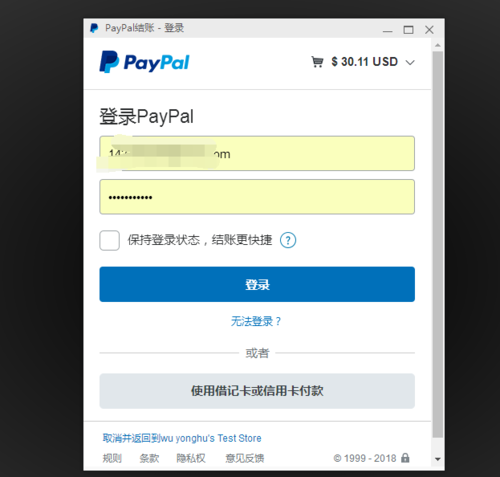
5、前端在调用第一个接口后,会接受到返回的订单id,此时,因为前端是paypal自己集成的代码,此时会自动弹出登录paypal的界面,如下:

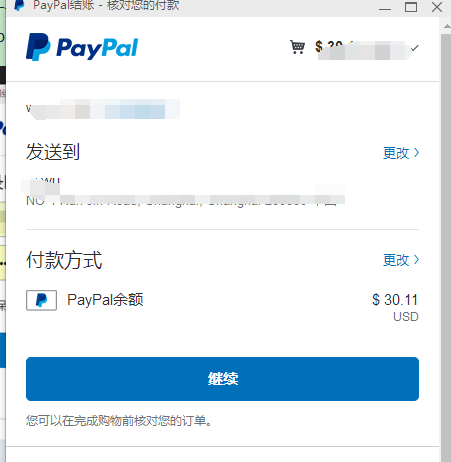
6、此时,作为用户的你,就可以直接登录paypal了,登录进去后,就会出现支付按钮。当你点击这个支付按钮时,就会触发第二个接口了。

7、第二个接口的主要作用就是完成转账的操作。伪代码如下:
Payment createdPayment = null; APIContext apiContext = new APIContext(sellerMes.getClientId(), sellerMes.getClientSecret(), sellerMes.getMode()); Payment payment = new Payment(); payment.setId(paymentID); PaymentExecution paymentExecution = new PaymentExecution(); paymentExecution.setPayerId(payerID); createdPayment = payment.execute(apiContext, paymentExecution);
8、支持支付完成,简单不。


 随时随地看视频


