主要内容:
- Bean 配置项
- Bean 的作用域
- Bean 的生命周期
- Bean 的自动装配
- Resources & ResourceLoader
- Id (获取 bean)
- Class (获取 bean)【必须】
- Scope 范围
- Constructor arguments 构造器参数 (构造注入)
- Properties 属性(设置注入)
- Autowiring mode 自动装配模式
- lazy-initialization mode 懒加载模式
- Initialization/destruction method 初始化和销毁方法
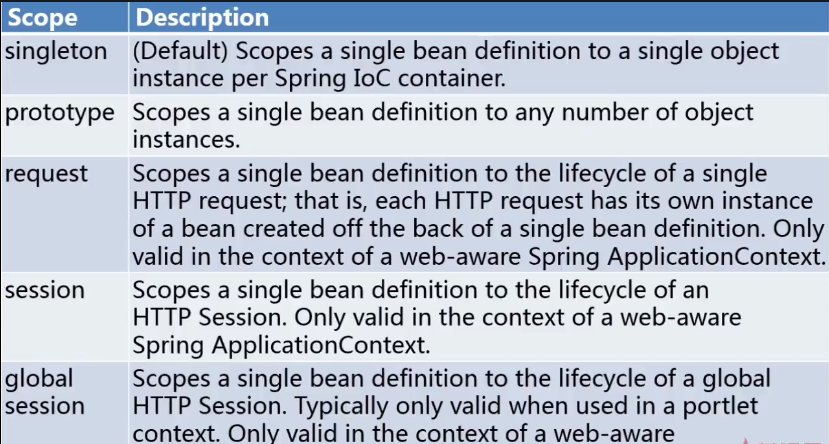
- singleton : 单例,指一个 Bean 容器中只存在一份,context 只存在一份
- prototype : 每次请求(每次使用)创建新的实例,destroy 方式不生效
- request : 每次 http 请求创建一个实例且仅在当前 request 内有效
- session:同上
- global session:基于 portlet 的 web 中有效(portlet 定义了 global session),如果是 web 中,同 session

Bean 的作用域案例
Bean 类
package com.imooc.bean;

public class BeanScope {

  public void say() {
  System.out.println("BeanScope say : " + this.hashCode());
  }
}
spring 配置 Bean
spring-beanscope.xml
<?xml version="1.0" encoding="UTF-8"?>
<beans xmlns="http://www.springframework.org/schema/beans"
  xmlns:xsi="http://www.w3.org/2001/XMLSchema-instance"
  xsi:schemaLocation="http://www.springframework.org/schema/beans
  http://www.springframework.org/schema/beans/spring-beans.xsd" >

  <bean id="beanScope" class="com.imooc.bean.BeanScope" scope="singleton"></bean>

 </beans>
单元测试方法
@RunWith(BlockJUnit4ClassRunner.class)
public class TestBeanScope extends UnitTestBase {

  public TestBeanScope() {
  super("classpath*:spring-beanscope.xml");
  }

  @Test
  public void testSay() {
  //BeanScope scope=singleton 单例
  //beanScope 和 beanScope2 的 hashCode 相同

  BeanScope beanScope = super.getBean("beanScope");
  beanScope.say();

  BeanScope beanScope2 = super.getBean("beanScope");
  beanScope2.say();
  }
}
执行单元测试 testSay 方法,发现 beanScope 和 beanScope2 的 hashCode 相同,因为 scope = singleton 同一份容器中只会出现一个 bean。
执行结果

将 xml 文件中 singleton 改为 prototype,重新执行,执行结果

- 生命周期
- 定义 springxml 配置 bean
- 初始化 context 加载 springxml,context.start() 初始化
- 使用 从 Bean 容器中获取使用
- 销毁 Bean 容器销毁所有 Bean 实例
Bean 初始化方法
- 实现 org.springframework.beans.factory.InitializingBean 接口,覆盖
afterPropertiesSet 方法。

- 配置 init-method

Bean 销毁
- 实现 org.springframework.beans.factory.DisposableBean 接口,覆盖 destory 方法

- 配置 destroy-method

- 配置全局默认初始化、销毁方法

注:当三种方法同时使用时,先执行接口方法,然后执行 bean 配置方法,不执行默认方法。
Aware 获取资源- 实现 Aware 接口的 bean 在被初始化之后,可以获取相应资源
- 通过 Aware 接口,可以操作 Spring 的相应资源(慎重)。
- 对 Spring 的简单扩展提供入口
常用 Aware 接口
- ApplicationContextAware 提供 context 上下文信息
- BeanNameAware 提供 BeanName(BeanId)
- ApplicationEventPublisherAware
- BeanFactoryAware
- BootstrapContextAware
- ServletConfigAware
注:一般是同时实现 ApplicationContextAware 和 BeanNameAware 接口,获取到 Bean 的 Id,利用 context.getBean(id) 获取其他 Bean 资源。
- NO:不做任何操作
- byname:根据属性名自动装配
- byType:装配(一个)类型相同的 Bean ,(多个)报错
-
Constructor:装配配合(参数类型一致)的构造器
例子<?xml version="1.0" encoding="UTF-8"?> <beans xmlns="http://www.springframework.org/schema/beans" xmlns:xsi="http://www.w3.org/2001/XMLSchema-instance" xsi:schemaLocation="http://www.springframework.org/schema/beans http://www.springframework.org/schema/beans/spring-beans.xsd" default-autowire="constructor"><!-- 自动装配属性 default-autowire=“NO/byname” --> <bean id="autoWiringService" class="com.imooc.autowiring.AutoWiringService" ></bean> <bean class="com.imooc.autowiring.AutoWiringDAO" ></bean> </beans>
- 针对资源文件的统一接口
- Resource
- UrlResource:Url对应的资源
- ClassPathResource:获取类路径下的资源文件
- FIleSystemResource:文件系统下资源
- ServletContextResource:web 环境下可以访问的资源
- InputStreamResource:输入流封装的资源
- ByteArrayResource:字节数组封装的资源
- ResourceLoader
- 所有 application context 都实现 ResourceLoader 接口
- 加载 Resource 资源类
- 前缀:classpath/file/http/none(application context)


 随时随地看视频


热门评论
-

qq_寒搏_02017-10-12 0
查看全部评论请问:在bean作用域案例中,没有main方法是如何运行程序的???