
【1】、安装webpack(先全后局)
安装整个流程下:
1、全局安装
-npm i webpack -g
-cnpm i webpack -g(必须安装淘宝镜像)
-webpack -v(检查安装是否成功,成功是webpack命令可执行,我的版本是4.41.6)
2、新建一个文件webpack_demo,初始化这个文件
-mkdir webpack
-npm init -y
3、局部安装
-npm i webpack --save-dev
-cnpm i webpack --save-dev(这个必须安装淘宝镜像)
4、将webpack_demo文件下的index.js打包
-cd webpack_demo
-touch index.js 或者type nul>index.js(第一个是git命令,第二是cmd命令)
-write index.js
function fs(msg){
console.log(msg)
};
fs('welcome to webpack world');
-webpack index.js index.bundle.js
-如果出现版本过高这种现象,就执行 webpack index.js -o index.bundle.js(我的就是版本过高,所执行这个命令)
##基于window10 的操作系统,webpack版本4.41.6(2020年,版本最新的)
5、新建了world.js 、style.css,解析css文件
-npm i style-loader css-loader --save-dev
-index.js文件写入
let world= require('./world.js');
require('style-loader!css-loader!./style.css');
function fs(msg){
console.log(msg)
};
fs('welcome to webpack world!');
world();
-world.js文件写入
function world(str){
console.log('已经写入JavaScript')
}
-style.css
html,body,div,p{ color:green; font-size:12px;}
-执行 webpack index.js index.bundle.js 进行对index.js的打包
>
$ webpack index.js index.bundle.js
Hash: c9f24286344c03ff8fc0
Version: webpack 4.41.6
Time: 212ms
Built at: 2020-02-13 18:43:43
Asset Size Chunks Chunk Names
main.js 5.68 KiB 0 [emitted] main
Entrypoint main = main.js
[0] multi ./index.js ./index.bundle.js 40 bytes {0} [built]
[1] ./index.js 166 bytes {0} [built]
[2] ./world.js 63 bytes {0} [built]
[3] ./node_modules/style-loader/dist/cjs.js!./node_modules/css-loader/dist/cjs.js!./style.css 559 bytes {0} [built]
[5] ./node_modules/css-loader/dist/cjs.js!./style.css 277 bytes {0} [built]
[7] ./index.bundle.js 980 bytes {0} [built]
+ 2 hidden modules
WARNING in configuration
The 'mode' option has not been set, webpack will fallback to 'production' for this value. Set 'mode' option to 'development' or 'production' to enable defaults for each environment.
You can also set it to 'none' to disable any default behavior. Learn more: https://webpack.js.org/configuration/mode/
【2】、webpack的 配置
1、在项目的根目录下,也就是webpack_demo文件下建立相应的文件
-src
-script
·main.js
-style
-dist
-webpack.config.js
-index.html
2、写配置文件webpack.config.js
(1)、
module.exports = {
entry:'./src/script/main.js',
path:'./dist',
filename:'bundle.js',
}
>$ webpack
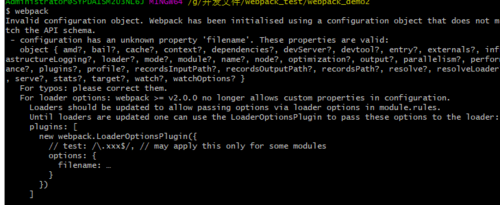
出现这个问题,主要的原因是webpack.config.js文件的配置不匹配当前的webpack版本4.41.6的
有两个解决方案:第一个就是安装指定版本,第二就是去看最新版本的文档
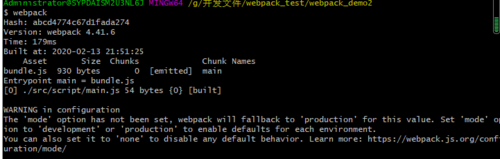
(2)、4.41.6版本的配置
const path = require('path');
module.exports = {
entry: './src/script/main.js',
output: {
path: path.resolve(__dirname, './dist'),
filename: 'bundle.js'
}
};
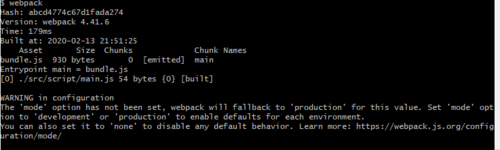
>$webpack
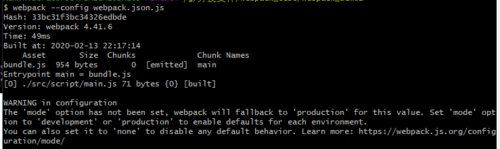
3、配置的命名一定是webpack.config.js? 不是
-将配置命名为webpack.json.js
-执行webpack --config webpack.json.js
>webpack --config webpack.json.js
4、npm的package.json配置文件,
【2.2】、entry 和 output
1、string形式
const path = require('path');
module.exports = {
entry: './src/script/main.js',
output: {
path: path.resolve(__dirname, './dist'),
filename: 'bundle.js'
}
};
>$webpack
2、array形式(原则:平行的互相依赖的)
const path = require('path');
module.exports = {
entry: ['./src/script/typearr.js','./src/script/typearr2.js'],
output: {
path: path.resolve(__dirname, './dist'),
filename: 'arrbundle.js'
}
};
>$webpack

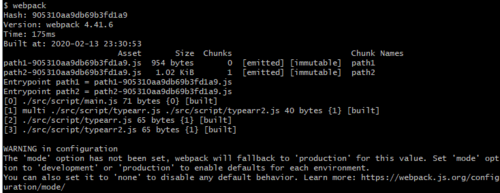
3、Object形式
const path = require('path');
module.exports = {
entry: {
path1:'./src/script/main.js',
path2: ['./src/script/typearr.js','./src/script/typearr2.js']
},
output: {
path: path.resolve(__dirname, './dist'),
filename: '[name]-[Hash].js'
}
};
>$webpack
【3、生成项目中的html页面文件】
3-1、安装html-webpack-plugin插件、解析html
·npm i html-webpack-plugin --save-dev
·在webpack.config.js配置文件写入
-引入const htmlwebpackPlugin = require('html-webpack-plugin')
-plugins:[ new htmlwebpackPlugin()//初始化插件]
-执行webpack
3-2、打包到指定的文件目录下,将output输出的文件进行规划
·在webpack.config.js配置
-1、将输出的js压缩文件指定在'./dist/js/'文件,html文件指定在'./dist/view/'下
>output{filename : 'js/basefun.js'}
>plugins: [new HtmlWebpackPlugin({filename: './view/index2.html'})
-2、new HtmlWebpackPlugin({})的相应配置
>new HtmlWebpackPlugin({
filename: 'index3.html',
template: './index.html',//打包的html文件
showErrors: true,
title:'welcome to webpack',
inject: 'head',
chunks: ["index"],
hash:true,
minify:{//minify 对html压缩
caseSensitive: false, //是否大小写敏感
removeComments:true, // 去除注释
removeEmptyAttributes:true, // 去除空属性
collapseWhitespace: true //是否去除空格
}
})
·生成多个html文件,就是写多个new HtmlWebpackPlugin({}),plugins是一个数组;
-plugins[
new HtmlWebpackPlugin({}),
new HtmlWebpackPlugin({})
]
·相应的html引入需要的js文件
-通过new HtmlWebpackPlugin({}) 的 chunks: ["main",'typearr']


